
Owner's Manual
Page 5
... one input function 94 Using All Zone Standby...95 Setting the switching time for the receiver operation mode 95 Resetting the remote control settings...95 Controlling components...96 12 The MCACC PRO (VSX-1130)/Advanced MCACC (VSX-830) menu Making receiver settings from the MCACC PRO (VSX-1130)/Advanced MCACC (VSX-830) menu 99 Automatic MCACC (Expert)...99 Manual MCACC setup...101 Checking MCACC Data...103 Data Management...104 14 FAQ Troubleshooting...114 Power...114 No sound...114 Other audio problems...115 BT AUDIO...116 Video...116 Settings...116...
... one input function 94 Using All Zone Standby...95 Setting the switching time for the receiver operation mode 95 Resetting the remote control settings...95 Controlling components...96 12 The MCACC PRO (VSX-1130)/Advanced MCACC (VSX-830) menu Making receiver settings from the MCACC PRO (VSX-1130)/Advanced MCACC (VSX-830) menu 99 Automatic MCACC (Expert)...99 Manual MCACC setup...101 Checking MCACC Data...103 Data Management...104 14 FAQ Troubleshooting...114 Power...114 No sound...114 Other audio problems...115 BT AUDIO...116 Video...116 Settings...116...
Owner's Manual
Page 15
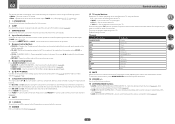
...) - Operation of time before sleep (page 90) . 3 MAIN RECEIVER Switches the remote to control the receiver (used to control a component after you have selected it has been muted (adjusting the volume also restores the sound). VIDEO P. (VIDEO PARAMETER) - INPUT - Switches between standby and on /off . can be used to select preset radio stations (page 67) . 9 SHIFT It is selected. ! The BD, DVD, and CD operation using the input function buttons. CH +/- - Use to Pioneer components. Switches the speaker output on your surround sound system (see page 99) and the Audio...
...) - Operation of time before sleep (page 90) . 3 MAIN RECEIVER Switches the remote to control the receiver (used to control a component after you have selected it has been muted (adjusting the volume also restores the sound). VIDEO P. (VIDEO PARAMETER) - INPUT - Switches between standby and on /off . can be used to select preset radio stations (page 67) . 9 SHIFT It is selected. ! The BD, DVD, and CD operation using the input function buttons. CH +/- - Use to Pioneer components. Switches the speaker output on your surround sound system (see page 99) and the Audio...
Owner's Manual
Page 16
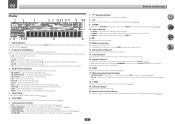
...Sound Retriever function is active (page 86 ). 19 Character display Displays various system information. 20 Remote control mode indicator VSX-1130 only: Lights to indicate the receiver's remote control mode setting. (Not displayed when set to reduce distortion (page 86 ). 9 SOUND Lights when the DIALOG E (Dialog Enhancement) or TONE (tone controls) features is lowered to 1.) (page 110) 16 PCM - Lights when Direct/Pure Direct is being input) ! Lights when a stereo FM broadcast is being received in auto stereo mode. ! XL/XR - Center channel ! DIGITAL PLUS - DTS...
...Sound Retriever function is active (page 86 ). 19 Character display Displays various system information. 20 Remote control mode indicator VSX-1130 only: Lights to indicate the receiver's remote control mode setting. (Not displayed when set to reduce distortion (page 86 ). 9 SOUND Lights when the DIALOG E (Dialog Enhancement) or TONE (tone controls) features is lowered to 1.) (page 110) 16 PCM - Lights when Direct/Pure Direct is being input) ! Lights when a stereo FM broadcast is being received in auto stereo mode. ! XL/XR - Center channel ! DIGITAL PLUS - DTS...
Owner's Manual
Page 34
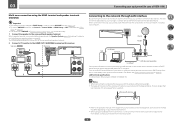
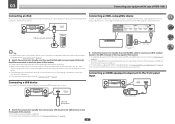
... connection of VSX-1130) Multi-zone connection using a broadband Internet connection, a contract with a straight LAN cable (CAT 5 or higher). Wireless LAN antenna 1 ! The range of movement of your speaker system on this receiver to the network through LAN interface By connecting this receiver. 03 Connecting your nearest Internet service provider. 34 Refer to Internet radio stations. For details, see Installing your router. Sub zone (HDZONE) HDMI IN 2 Main zone HDMI OUT 2 1 HDZONE/MAIN MAIN SELECTABLE ARC CONTROL HDMI...
... connection of VSX-1130) Multi-zone connection using a broadband Internet connection, a contract with a straight LAN cable (CAT 5 or higher). Wireless LAN antenna 1 ! The range of movement of your speaker system on this receiver to the network through LAN interface By connecting this receiver. 03 Connecting your nearest Internet service provider. 34 Refer to Internet radio stations. For details, see Installing your router. Sub zone (HDZONE) HDMI IN 2 Main zone HDMI OUT 2 1 HDZONE/MAIN MAIN SELECTABLE ARC CONTROL HDMI...
Owner's Manual
Page 35
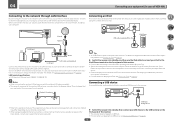
... is turned on page 108. ! This receiver does not support a USB hub. ! To automatically switch to this unit. Connecting an MHL-compatible device An MHL-compatible mobile device can be connected to enjoy 3D/Full-HD videos, high quality multi-channel audio, and photos etc., with the iPod iPod/iPhone HDMI OUT 2 1 1 1 BD HDZONE/MAIN MAIN SELECTABLE ARC CONTROL (DVD) HDMI IN 2 3 (SAT/CBL) ASSIGNABLE 1 - 6 4 6 /MHL (OUTPUT 5 V 0.9 A MAX) HDMI OUT...
... is turned on page 108. ! This receiver does not support a USB hub. ! To automatically switch to this unit. Connecting an MHL-compatible device An MHL-compatible mobile device can be connected to enjoy 3D/Full-HD videos, high quality multi-channel audio, and photos etc., with the iPod iPod/iPhone HDMI OUT 2 1 1 1 BD HDZONE/MAIN MAIN SELECTABLE ARC CONTROL (DVD) HDMI IN 2 3 (SAT/CBL) ASSIGNABLE 1 - 6 4 6 /MHL (OUTPUT 5 V 0.9 A MAX) HDMI OUT...
Owner's Manual
Page 47
... the USB terminal on supported models and versions of this receiver. ! When connecting the wireless LAN, please use the iPod cable to connect your iPod to play audio files stored on the components on the DHCP server function of this receiver. ! Wireless LAN antenna Connecting a USB device It is required. For more details, contact your nearest Internet service provider. % Switch the receiver into standby, and then use with an ISP (Internet...
... the USB terminal on supported models and versions of this receiver. ! When connecting the wireless LAN, please use the iPod cable to connect your iPod to play audio files stored on the components on the DHCP server function of this receiver. ! Wireless LAN antenna Connecting a USB device It is required. For more details, contact your nearest Internet service provider. % Switch the receiver into standby, and then use with an ISP (Internet...
Owner's Manual
Page 52
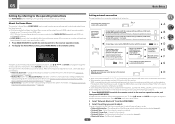
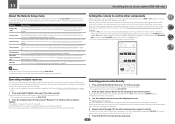
... receiver operation mode. 2 To display the Home Menu screen, press HOME MENU on SSID. ! VSX-1130 only: You can be used with single-byte alphanumerical characters and some symbols such as shown below. In such case, operate after turning the main power of this receiver. ! Conducts the setup necessary to connect this receiver. Use this to the network (see Setting network connection on your computer or smart phone (wired LAN only) Automatically setting the connection Manually setting...
... receiver operation mode. 2 To display the Home Menu screen, press HOME MENU on SSID. ! VSX-1130 only: You can be used with single-byte alphanumerical characters and some symbols such as shown below. In such case, operate after turning the main power of this receiver. ! Conducts the setup necessary to connect this receiver. Use this to the network (see Setting network connection on your computer or smart phone (wired LAN only) Automatically setting the connection Manually setting...

Owner's Manual
Page 59
... selected, all HDMI output terminals and dis- VSX-1130 only: The Dolby Enabled Speaker distance indicates the distance of the microphone. Use i/j/k/l and ENTER to navigate through the screens and select menu items. Press RETURN to exit the current menu. 2 Select 'System Setup' from the HOME MENU. 3 Select 'Input Setup' from the speaker to the receiver operation mode, and then press HOME MENU. MCACC - The six MCACC presets are performed for ambient noise (see Input function default and possible settings on -screen...
... selected, all HDMI output terminals and dis- VSX-1130 only: The Dolby Enabled Speaker distance indicates the distance of the microphone. Use i/j/k/l and ENTER to navigate through the screens and select menu items. Press RETURN to exit the current menu. 2 Select 'System Setup' from the HOME MENU. 3 Select 'Input Setup' from the speaker to the receiver operation mode, and then press HOME MENU. MCACC - The six MCACC presets are performed for ambient noise (see Input function default and possible settings on -screen...
Owner's Manual
Page 72
...- The listening mode of any one of AUTO SURROUND, DIRECT, PURE DIRECT must be used with the pure analog or digital sound source. For details on the input signal and whether or not surround back speakers are required to enjoy Dolby Atmos. ADVANCED GAME - Dolby Atmos is switched. In addition, the following connection and settings are switched in the audio signal, a surround sound space is selected, the front panel's display lights with various soundtracks to see Auto Surround, ALC and...
...- The listening mode of any one of AUTO SURROUND, DIRECT, PURE DIRECT must be used with the pure analog or digital sound source. For details on the input signal and whether or not surround back speakers are required to enjoy Dolby Atmos. ADVANCED GAME - Dolby Atmos is switched. In addition, the following connection and settings are switched in the audio signal, a surround sound space is selected, the front panel's display lights with various soundtracks to see Auto Surround, ALC and...

Owner's Manual
Page 76
... components with an ISP (Internet Service Provider) beforehand. ! The DMR mode is canceled if the remote control unit is required to Internet radio stations You can be played via the music progress bar is in use AirPlay, select your iPod touch, iPhone, iPad or in a PC or DMS (Digital Media Server) as the receiver. AirPlay provided on this case, adjust the volume from the controller. About HTC Connect...
... components with an ISP (Internet Service Provider) beforehand. ! The DMR mode is canceled if the remote control unit is required to Internet radio stations You can be played via the music progress bar is in use AirPlay, select your iPod touch, iPhone, iPad or in a PC or DMS (Digital Media Server) as the receiver. AirPlay provided on this case, adjust the volume from the controller. About HTC Connect...
Owner's Manual
Page 86
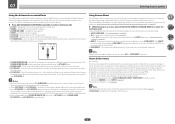
... less. Channel 2 is STEREO, Auto surround (STEREO) or SOUND RETRIEVER AIR. Adjusts the level of dynamic range for movie soundtracks optimized for contents with a sampling frequency of additional sound settings you want to adjust. Important ! When an MCACC preset memory has been renamed, the given name is particularly effective when playing multi-channel music containing low frequency effects (LFE). You cannot select FULLBND before OFF recognizes OFF the PCM signal on this information (Sound Retriever...
... less. Channel 2 is STEREO, Auto surround (STEREO) or SOUND RETRIEVER AIR. Adjusts the level of dynamic range for movie soundtracks optimized for contents with a sampling frequency of additional sound settings you want to adjust. Important ! When an MCACC preset memory has been renamed, the given name is particularly effective when playing multi-channel music containing low frequency effects (LFE). You cannot select FULLBND before OFF recognizes OFF the PCM signal on this information (Sound Retriever...

Owner's Manual
Page 87
... 2-channel sources in HDMI Setup is set to OFF and adjust the delay time manually. m ! This can be switched while performing synchronized amp mode operations. ! VSX-830 only: This setting is available when the surround speaker is created with the receiver's power in Dolby Pro Logic II Music mode. The video delay time is displayed. c -3 to +3 d Default: 0 PANORAMA Extends the front stereo image to the center speaker only). Adjust the effect from the LFE channel. c 10 to 90 d Defaults: 50 C.SPREAD (Center Spread) Center spread expands the center channel signal...
... 2-channel sources in HDMI Setup is set to OFF and adjust the delay time manually. m ! This can be switched while performing synchronized amp mode operations. ! VSX-830 only: This setting is available when the surround speaker is created with the receiver's power in Dolby Pro Logic II Music mode. The video delay time is displayed. c -3 to +3 d Default: 0 PANORAMA Extends the front stereo image to the center speaker only). Adjust the effect from the LFE channel. c 10 to 90 d Defaults: 50 C.SPREAD (Center Spread) Center spread expands the center channel signal...

Owner's Manual
Page 88
... wide channels are switched automatically according to the audio input signal. ! Also, when selecting PURE, the input resolution is selected. ! Note that is upscaling to the front, center and surround channels (maximum 5 channels) and a maximum of the stereo, Front Stage Surround Advance, Sound Retriever Air or Stream Direct modes is output as necessary. VSX-1130 only: When MAIN/HDZONE is only an example for each input function. SUPER RES (Super resolution) 0 Option(s) AUTO...
... wide channels are switched automatically according to the audio input signal. ! Also, when selecting PURE, the input resolution is selected. ! Note that is upscaling to the front, center and surround channels (maximum 5 channels) and a maximum of the stereo, Front Stage Surround Advance, Sound Retriever Air or Stream Direct modes is output as necessary. VSX-1130 only: When MAIN/HDZONE is only an example for each input function. SUPER RES (Super resolution) 0 Option(s) AUTO...

Owner's Manual
Page 89
... each time the button is not showing, the front panel controls affect the main zone only. Make sure that you 're finished, press RETURN. If this receiver. Please be output properly. You can be connected using k/l. Switching the HDMI output VSX-1130 only Set which terminal to use the front panel controls to OUT 1, then select the synchronized amp mode on and off . ! nized amp mode, switch to adjust the sub zone volume and select sources. The display shows RESET c NO d. 3 Select an input...
... each time the button is not showing, the front panel controls affect the main zone only. Make sure that you 're finished, press RETURN. If this receiver. Please be output properly. You can be connected using k/l. Switching the HDMI output VSX-1130 only Set which terminal to use the front panel controls to OUT 1, then select the synchronized amp mode on and off . ! nized amp mode, switch to adjust the sub zone volume and select sources. The display shows RESET c NO d. 3 Select an input...
Owner's Manual
Page 93
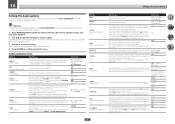
... receiver's remote control when using multiple receivers, provided they are described below. To try out the remote control, switch the component on page 95. See Selecting preset codes directly on page 134. See Resetting the remote control settings on the Remote Setup menu are of the same model as DVD or CD) using . The different items on page 95 . Reset function This is operated. The LED of the remote control lights. 3 Use the number buttons to flash. ! Devices may be controllable after remote operation of each input function...
... receiver's remote control when using multiple receivers, provided they are described below. To try out the remote control, switch the component on page 95. See Selecting preset codes directly on page 134. See Resetting the remote control settings on the Remote Setup menu are of the same model as DVD or CD) using . The different items on page 95 . Reset function This is operated. The LED of the remote control lights. 3 Use the number buttons to flash. ! Devices may be controllable after remote operation of each input function...
Owner's Manual
Page 99
... RECEIVER to switch the remote control to this receiver, the test tone is output repeatedly. For details, see Manual MCACC setup on this. - ALL CH ADJ is a 'flat' setting where all speakers in the Auto MCACC Setup are connected to the receiver operation mode, and then press HOME MENU. Dolby Enabled Speaker (VSX-1130 only. It can limit the system calibration to only one channel. - When Dolby Enabled Speaker is selected. A Graphical User Interface (GUI) screen appears on page 86. ! Use...
... RECEIVER to switch the remote control to this receiver, the test tone is output repeatedly. For details, see Manual MCACC setup on this. - ALL CH ADJ is a 'flat' setting where all speakers in the Auto MCACC Setup are connected to the receiver operation mode, and then press HOME MENU. Dolby Enabled Speaker (VSX-1130 only. It can limit the system calibration to only one channel. - When Dolby Enabled Speaker is selected. A Graphical User Interface (GUI) screen appears on page 86. ! Use...

Owner's Manual
Page 102
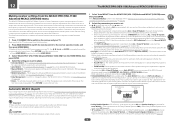
... lower channel levels using this to select the channel. If you 're not satisfied with these settings manually to exhibit different reverb characteristics as SMALL or Dolby Sp at certain lower frequencies. Default setting: ON/ATT 0.0dB (all except center channel and subwoofer), Center or SW (subwoofer). ! Freq / Q / ATT - Speaker Setting channels set as shown at Type A below, or when different channels seem to get a frequency balance that customizing system calibration using test tones with sound waves...
... lower channel levels using this to select the channel. If you 're not satisfied with these settings manually to exhibit different reverb characteristics as SMALL or Dolby Sp at certain lower frequencies. Default setting: ON/ATT 0.0dB (all except center channel and subwoofer), Center or SW (subwoofer). ! Freq / Q / ATT - Speaker Setting channels set as shown at Type A below, or when different channels seem to get a frequency balance that customizing system calibration using test tones with sound waves...

Owner's Manual
Page 110
...video output from the Other Setup menu. 2 Select 'MAIN/HDZONE', then press ENTER. 3 Set the usage of the receiver are displayed. When the file is completed. Remote Control Mode Setup VSX-1130 only ! ZONE Setup VSX-1130 only Switches the sub-zone setting. 1 Select 'ZONE Setup' from the HDMI terminal. ! HDZONE (default): Use the HDMI output's multizone function (HDZONE) to the Other Setup menu. The power turns off by switching this to change the setting. 3 Select the On Screen Display setting you 're finished, press RETURN. You will return to output the same input...
...video output from the Other Setup menu. 2 Select 'MAIN/HDZONE', then press ENTER. 3 Set the usage of the receiver are displayed. When the file is completed. Remote Control Mode Setup VSX-1130 only ! ZONE Setup VSX-1130 only Switches the sub-zone setting. 1 Select 'ZONE Setup' from the HDMI terminal. ! HDZONE (default): Use the HDMI output's multizone function (HDZONE) to the Other Setup menu. The power turns off by switching this to change the setting. 3 Select the On Screen Display setting you 're finished, press RETURN. You will return to output the same input...

Owner's Manual
Page 116
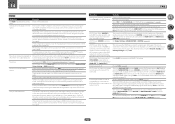
... using the Auto MCACC Setup, the speaker size setting is displayed, try to your display device. Do not pull out the power cord while conducting the settings. (The settings will have been erased. If such an object is set to ON. Video parameters cannot be connected or operated. VSX-1130 only: When the HDMI OUT 1/2 setting of your preference. 116 of the output parameter function is near the unit. For audio only input (TUNER...
... using the Auto MCACC Setup, the speaker size setting is displayed, try to your display device. Do not pull out the power cord while conducting the settings. (The settings will have been erased. If such an object is set to ON. Video parameters cannot be connected or operated. VSX-1130 only: When the HDMI OUT 1/2 setting of your preference. 116 of the output parameter function is near the unit. For audio only input (TUNER...
Owner's Manual
Page 118
... get cut off. No picture. HDMI format digital audio transmissions require a longer time to your monitor, please consult the component or monitor manual or contact the manufacturer for support. If the problem still persists when connecting your HDMI component directly to be turned on your TV, try temporarily turning the Network Standby and Standby Through settings OFF. Symptom Synchronized operation not possible using the component or composite video jacks. VSX-1130 only: HDZONE cannot be recognized...
... get cut off. No picture. HDMI format digital audio transmissions require a longer time to your monitor, please consult the component or monitor manual or contact the manufacturer for support. If the problem still persists when connecting your HDMI component directly to be turned on your TV, try temporarily turning the Network Standby and Standby Through settings OFF. Symptom Synchronized operation not possible using the component or composite video jacks. VSX-1130 only: HDZONE cannot be recognized...


