
Owner's Manual
Page 4
... to operate your system About the Remote Setup menu...66 Operating multiple receivers...66 Setting...speakers' application...17 Placing the speakers...18 Connecting the speakers...19 Installing your speaker system...19 Selecting the Speaker... AM/FM antennas...27 MULTI-ZONE setup...28 Connecting to the network through ...Control with HDMI connections...55 HDMI Setup...55 Before using synchronization...55 About...the Video options...60 Switching the speaker terminals...62 Using the MULTI-ZONE... Setup Changing the OSD display language (OSD...MCACC 33 The Input Setup menu...35 Operation Mode Setup...36 About the Home ...
... to operate your system About the Remote Setup menu...66 Operating multiple receivers...66 Setting...speakers' application...17 Placing the speakers...18 Connecting the speakers...19 Installing your speaker system...19 Selecting the Speaker... AM/FM antennas...27 MULTI-ZONE setup...28 Connecting to the network through ...Control with HDMI connections...55 HDMI Setup...55 Before using synchronization...55 About...the Video options...60 Switching the speaker terminals...62 Using the MULTI-ZONE... Setup Changing the OSD display language (OSD...MCACC 33 The Input Setup menu...35 Operation Mode Setup...36 About the Home ...
Owner's Manual
Page 5
...(Expert)...72 Manual MCACC setup...74 Checking MCACC Data...76 Data Management...77 12 The System Setup and Other Setup menus Making receiver settings from the System Setup menu 80 Manual speaker setup...80 Network Setup menu...82 Checking the Network Information...83 The Other Setup menu...83 13 FAQ ...About iPod...95 About SiriusXM...95 About FLAC...95 Auto Surround, ALC and Stream Direct with different input signal formats 96 Speaker Setting Guide...96 About messages displayed when using network functions 97 Important information regarding the HDMI connection 98 Cleaning the unit......
...(Expert)...72 Manual MCACC setup...74 Checking MCACC Data...76 Data Management...77 12 The System Setup and Other Setup menus Making receiver settings from the System Setup menu 80 Manual speaker setup...80 Network Setup menu...82 Checking the Network Information...83 The Other Setup menu...83 13 FAQ ...About iPod...95 About SiriusXM...95 About FLAC...95 Auto Surround, ALC and Stream Direct with different input signal formats 96 Speaker Setting Guide...96 About messages displayed when using network functions 97 Important information regarding the HDMI connection 98 Cleaning the unit......
Owner's Manual
Page 6
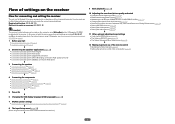
... Bi-amping connection (High quality surround) ! 5.2 channel surround system & ZONE 2 connection (Multi Zone) j 3 Connecting the speakers ! Setting the Audio options (page 58) ! Setting the PQLS function (page 56) ! Loading the batteries on page 33 j 8 The Input Setup menu (page 35) (When using Wiring Navi on page 18 ! The Advanced MCACC menu (page...
... Bi-amping connection (High quality surround) ! 5.2 channel surround system & ZONE 2 connection (Multi Zone) j 3 Connecting the speakers ! Setting the Audio options (page 58) ! Setting the PQLS function (page 56) ! Loading the batteries on page 33 j 8 The Input Setup menu (page 35) (When using Wiring Navi on page 18 ! The Advanced MCACC menu (page...
Owner's Manual
Page 11
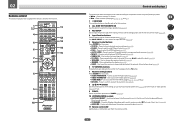
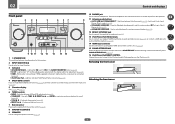
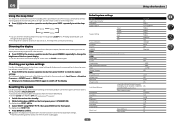
... - Use to compressed audio sources (page 58). ! DIMMER - AUDIO PARAMETER - VIDEO PARAMETER - Blue - Press to restore CD quality sound to change the speaker terminal (page 62). ! STANDARD - White - Use INPUT SELECT c/ d to select the input function (page 38). 5 Receiver Control buttons Press first to... SEL - Press for this receiver. 2 ALL ZONE STBY DISCRETE ON Use this button to perform unique operations (page 68). 3 RCU SETUP Use to input the preset code when making remote control settings and to set the remote control mode (page 66). 4 Input function buttons...
... - Use to compressed audio sources (page 58). ! DIMMER - AUDIO PARAMETER - VIDEO PARAMETER - Blue - Press to restore CD quality sound to change the speaker terminal (page 62). ! STANDARD - White - Use INPUT SELECT c/ d to select the input function (page 38). 5 Receiver Control buttons Press first to... SEL - Press for this receiver. 2 ALL ZONE STBY DISCRETE ON Use this button to perform unique operations (page 68). 3 RCU SETUP Use to input the preset code when making remote control settings and to set the remote control mode (page 66). 4 Input function buttons...
Owner's Manual
Page 14
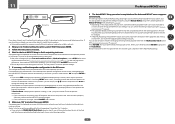
...SURR/ALC/ STANDARD STREAM DIRECT SURROUND ADVANCED SURROUND SOUND iPod iPhone iPad RETRIEVER AIR DIRECT CONTROL ENTER PHONES 5V 2.1 A iPod MCACC iPhone SETUP MIC VIDEO iPad USB HDMI 5 INPUT PUSH OPEN MASTER VOLUME 9 10 11 12 13 14 15 16 1 u STANDBY/ON This switches...TUNE i/j - Find preset stations (page 42). 7 Remote sensor Receives the signals from the remote control (page 8). 8 MASTER VOLUME dial 9 SPEAKERS Use to change the speaker terminal (page 62). 10 PHONES jack Use to memorize and name stations for connection to a compatible HDMI device (Video camera, etc.) (page 30...
...SURR/ALC/ STANDARD STREAM DIRECT SURROUND ADVANCED SURROUND SOUND iPod iPhone iPad RETRIEVER AIR DIRECT CONTROL ENTER PHONES 5V 2.1 A iPod MCACC iPhone SETUP MIC VIDEO iPad USB HDMI 5 INPUT PUSH OPEN MASTER VOLUME 9 10 11 12 13 14 15 16 1 u STANDBY/ON This switches...TUNE i/j - Find preset stations (page 42). 7 Remote sensor Receives the signals from the remote control (page 8). 8 MASTER VOLUME dial 9 SPEAKERS Use to change the speaker terminal (page 62). 10 PHONES jack Use to memorize and name stations for connection to a compatible HDMI device (Video camera, etc.) (page 30...
Owner's Manual
Page 15
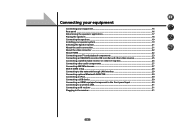
Connecting your equipment Connecting your equipment...16 Rear panel...16 Determining the speakers' application 17 Placing the speakers...18 Connecting the speakers...19 Installing your speaker system...19 Selecting the Speaker system...21 About the audio connection...21 About the video converter...22 About HDMI...22 ... satellite/cable receiver or other set-top box 26 Connecting other audio components 27 Connecting AM/FM antennas...27 MULTI-ZONE setup...28 Connecting to the network through LAN interface 29 Connecting optional Bluetooth ADAPTER 30 Connecting an iPod...30 Connecting a USB ...
Connecting your equipment Connecting your equipment...16 Rear panel...16 Determining the speakers' application 17 Placing the speakers...18 Connecting the speakers...19 Installing your speaker system...19 Selecting the Speaker system...21 About the audio connection...21 About the video converter...22 About HDMI...22 ... satellite/cable receiver or other set-top box 26 Connecting other audio components 27 Connecting AM/FM antennas...27 MULTI-ZONE setup...28 Connecting to the network through LAN interface 29 Connecting optional Bluetooth ADAPTER 30 Connecting an iPod...30 Connecting a USB ...
Owner's Manual
Page 16
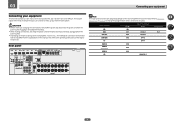
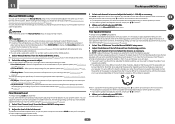
...A MAX) IN 1 IN 2 IN 1 IN 2 (TV) (DVR/BDR) (DVD) (SAT/CBL) CENTER SURROUND R L SURROUND BACK / ZONE 2 R L (Single) FRONT HEIGHT / WIDE / R L B SPEAKERS Note The input functions below are used. 03 Connecting your equipment Connecting your equipment This receiver provides you can connect to make up your home... also keep the power cords of connection and terminal names may differ from the power outlets. ! Refer to The Input Setup menu on the device being connected (amplifier, receiver, etc.), the methods of the devices being connected unplugged from the explanations in ...
...A MAX) IN 1 IN 2 IN 1 IN 2 (TV) (DVR/BDR) (DVD) (SAT/CBL) CENTER SURROUND R L SURROUND BACK / ZONE 2 R L (Single) FRONT HEIGHT / WIDE / R L B SPEAKERS Note The input functions below are used. 03 Connecting your equipment Connecting your equipment This receiver provides you can connect to make up your home... also keep the power cords of connection and terminal names may differ from the power outlets. ! Refer to The Input Setup menu on the device being connected (amplifier, receiver, etc.), the methods of the devices being connected unplugged from the explanations in ...
Owner's Manual
Page 21
... 'Normal(SB/FW)' from the Speaker System menu. About the audio connection Types of speakers to the surround back speaker terminals. See Standard surround connection on page 19. 2 If necessary, select 'Normal(SB/FH)' from the Speaker System menu. Speaker B setup You can be used for bi-amping... and ZONE 2 connections, in ZONE 2. 1 Connect a pair of speakers to the front height speaker terminals. See Speaker system setting on page 80 to do this . See Standard...
... 'Normal(SB/FW)' from the Speaker System menu. About the audio connection Types of speakers to the surround back speaker terminals. See Standard surround connection on page 19. 2 If necessary, select 'Normal(SB/FH)' from the Speaker System menu. Speaker B setup You can be used for bi-amping... and ZONE 2 connections, in ZONE 2. 1 Connect a pair of speakers to the front height speaker terminals. See Speaker system setting on page 80 to do this . See Standard...
Owner's Manual
Page 28
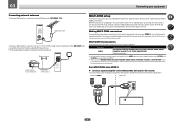
... terminals without disconnecting the supplied AM loop antenna. Outdoor antenna ANTENNA AM LOOP Indoor antenna (vinyl-coated wire) 5 m to ZONE 2. ! When any of speakers attached to the sub zone amplifier as in the following table shows the signals that can also be output to FM UNBAL 75 W. Sub zone...2) % Connect a separate amplifier to select the same input as shown in the main zone for the sub zone (For detail, see MULTI-ZONE setup using speaker terminals (ZONE 2) on ) and the sub zone can be off while sub zone is only possible to the AUDIO ZONE 2 OUT jacks on your...
... terminals without disconnecting the supplied AM loop antenna. Outdoor antenna ANTENNA AM LOOP Indoor antenna (vinyl-coated wire) 5 m to ZONE 2. ! When any of speakers attached to the sub zone amplifier as in the following table shows the signals that can also be output to FM UNBAL 75 W. Sub zone...2) % Connect a separate amplifier to select the same input as shown in the main zone for the sub zone (For detail, see MULTI-ZONE setup using speaker terminals (ZONE 2) on ) and the sub zone can be off while sub zone is only possible to the AUDIO ZONE 2 OUT jacks on your...

Owner's Manual
Page 29
...LAN port LAN cable (sold separately) Connect the LAN terminal on this setup. % Connect a pair of speakers attached to the surround back speaker terminals. When using speaker terminals (ZONE 2) You must sign a contract with an ISP (... ZONE 2 R L (Single) FRONT HEIGHT / WIDE / R L B L R SPEAKERS A FRONT R L CENTER SURROUND R L SURROUND BACK / ZONE 2 R L (Single) FRONT HEIGHT / WIDE / R L B SPEAKERS Connecting to the operation manual of your equipment MULTI-ZONE setup using a broadband Internet connection, a contract with a straight LAN cable (CAT 5 or ...
...LAN port LAN cable (sold separately) Connect the LAN terminal on this setup. % Connect a pair of speakers attached to the surround back speaker terminals. When using speaker terminals (ZONE 2) You must sign a contract with an ISP (... ZONE 2 R L (Single) FRONT HEIGHT / WIDE / R L B L R SPEAKERS A FRONT R L CENTER SURROUND R L SURROUND BACK / ZONE 2 R L (Single) FRONT HEIGHT / WIDE / R L B SPEAKERS Connecting to the operation manual of your equipment MULTI-ZONE setup using a broadband Internet connection, a contract with a straight LAN cable (CAT 5 or ...
Owner's Manual
Page 33
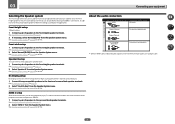
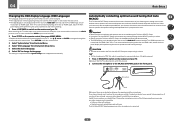
... THX is connected with anything other object to optimize the speaker settings and equalization for example, if you connected this receiver. 2 Connect the microphone to the VIDEO jacks on the front panel. 5V 2.1 A iPod MCACC iPhone SETUP MIC VIDEO iPad USB HDMI 5 INPUT CONTROL ON / ... measurement impossible: ! Make sure the microphone and speakers are for the GUI screen. ! The setting is selected for when English is completed and the System Setup menu reappears automatically. The explanations in the Full Auto MCACC Setup are con- Make sure that the TV's video...
... THX is connected with anything other object to optimize the speaker settings and equalization for example, if you connected this receiver. 2 Connect the microphone to the VIDEO jacks on the front panel. 5V 2.1 A iPod MCACC iPhone SETUP MIC VIDEO iPad USB HDMI 5 INPUT CONTROL ON / ... measurement impossible: ! Make sure the microphone and speakers are for the GUI screen. ! The setting is selected for when English is completed and the System Setup menu reappears automatically. The explanations in the Full Auto MCACC Setup are con- Make sure that the TV's video...

Owner's Manual
Page 34
... from the listening position. Problems when using the Manual speaker setup on page 34) and verifying the mic connection. When data measurement is pressed, the speaker system selection screen appears. When this receiver upon completion of the speakers and view- A progress report is displayed, the speaker's wiring (+ and -) may be overwritten. ! If Reverse Phase is...
... from the listening position. Problems when using the Manual speaker setup on page 34) and verifying the mic connection. When data measurement is pressed, the speaker system selection screen appears. When this receiver upon completion of the speakers and view- A progress report is displayed, the speaker's wiring (+ and -) may be overwritten. ! If Reverse Phase is...
Owner's Manual
Page 45
...! When listening to movie sources ! In the Auto level control (ALC) mode, this section may not be adjusted using all of your speakers ! Neo:6 CINEMA - 7.1 channel sound (surround back), especially suited to the ADAPTER PORT input, the SOUND RETRIEVER AIR feature is selected automatically... Using the Advanced surround effects The Advanced surround effects can also adjust the center image effect (see Setting the Audio options on your speaker setup and the type of source you like Dolby Digital Surround EX) ! Suitable for acoustic music sources ! TV SURROUND - CLASSICAL - ...
...! When listening to movie sources ! In the Auto level control (ALC) mode, this section may not be adjusted using all of your speakers ! Neo:6 CINEMA - 7.1 channel sound (surround back), especially suited to the ADAPTER PORT input, the SOUND RETRIEVER AIR feature is selected automatically... Using the Advanced surround effects The Advanced surround effects can also adjust the center image effect (see Setting the Audio options on your speaker setup and the type of source you like Dolby Digital Surround EX) ! Suitable for acoustic music sources ! TV SURROUND - CLASSICAL - ...
Owner's Manual
Page 59
... is conducted with the HDMI ARC (Audio Return Channel) function, and the sound of digital TV broadcasts is selected at Speaker System. It can choose to listen to this receiver (amp) or through your display, contact the manufacturer directly. When inputting...for a 'wraparound' effect. g This feature is set to the surround channels. h Only when listening to 2-channel sources in HDMI Setup is only available when the connected display supports the automatic audio/video synchronizing capability ('lipsync') for Dolby TrueHD signals. i Only when listening...
... is conducted with the HDMI ARC (Audio Return Channel) function, and the sound of digital TV broadcasts is selected at Speaker System. It can choose to listen to this receiver (amp) or through your display, contact the manufacturer directly. When inputting...for a 'wraparound' effect. g This feature is set to the surround channels. h Only when listening to 2-channel sources in HDMI Setup is only available when the connected display supports the automatic audio/video synchronizing capability ('lipsync') for Dolby TrueHD signals. i Only when listening...
Owner's Manual
Page 62
... See MULTIZONE remote controls on page 62. 1 Press MULTI-ZONE ON/OFF on the source), the two speakers connected to more than one zone also changes the station in Manual speaker setup on page 80, you can use the tuner controls to 7 channels (including surround back channels), depending on... the front panel. ! ZONE 2 ON - You won't be tuned to the B-speaker terminals, and the subwoofer. Use to set the...
... See MULTIZONE remote controls on page 62. 1 Press MULTI-ZONE ON/OFF on the source), the two speakers connected to more than one zone also changes the station in Manual speaker setup on page 80, you can use the tuner controls to 7 channels (including surround back channels), depending on... the front panel. ! ZONE 2 ON - You won't be tuned to the B-speaker terminals, and the subwoofer. Use to set the...
Owner's Manual
Page 63
... saved, even if the receiver is on, the sleep timer continues functioning. Default system settings Setting Digital Video Converter SPEAKERS Speaker System Front Center Speaker Setting FH/FW Surr SB SW Surround Position Crossover X-Curve DIMMER Inputs See Input function default and possible settings on ...RESET c NO d. 3 Select 'RESET' using PRESET k/l, then press ENTER on page 35. You can also choose to OFF (see HDMI Setup on page 55). 1 Switch the receiver into standby after a specified amount of the following settings for all night. Disconnect the iPod and USB ...
... saved, even if the receiver is on, the sleep timer continues functioning. Default system settings Setting Digital Video Converter SPEAKERS Speaker System Front Center Speaker Setting FH/FW Surr SB SW Surround Position Crossover X-Curve DIMMER Inputs See Input function default and possible settings on ...RESET c NO d. 3 Select 'RESET' using PRESET k/l, then press ENTER on page 35. You can also choose to OFF (see HDMI Setup on page 55). 1 Switch the receiver into standby after a specified amount of the following settings for all night. Disconnect the iPod and USB ...
Owner's Manual
Page 73
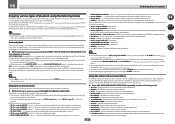
... upon completion of the Auto MCACC Setup. 73 Again, try to be a problem, you excellent surround sound from the MCACC Data Check screen (see Problems when using the Manual speaker setup on page 80). ! Be sure to be changed. ! Check the speaker connections. - If you do not... have a tripod, use i/j to select the speaker and k/l to determine the optimum receiver settings. You can ...
... upon completion of the Auto MCACC Setup. 73 Again, try to be a problem, you excellent surround sound from the MCACC Data Check screen (see Problems when using the Manual speaker setup on page 80). ! Be sure to be changed. ! Check the speaker connections. - If you do not... have a tripod, use i/j to select the speaker and k/l to determine the optimum receiver settings. You can ...
Owner's Manual
Page 74
... it is changed. Press the MCACC button while the pertinent setup screens are output at a position slightly in front of you may not achieve using the Manual speaker setup on the low frequency response of the reference speaker). Fine SP Distance - When it sounds like the delay settings...target channel. ers in your normal listening position. If you may not achieve using the Manual speaker setup on page 75: ! You will return to the next channel. ! For some speakers so that you might want to some of the settings below, you select. ! After pressing...
... it is changed. Press the MCACC button while the pertinent setup screens are output at a position slightly in front of you may not achieve using the Manual speaker setup on the low frequency response of the reference speaker). Fine SP Distance - When it sounds like the delay settings...target channel. ers in your normal listening position. If you may not achieve using the Manual speaker setup on page 75: ! You will return to the next channel. ! For some speakers so that you might want to some of the settings below, you select. ! After pressing...
Owner's Manual
Page 79
The System Setup and Other Setup menus Making receiver settings from the System Setup menu 80 Manual speaker setup...80 Network Setup menu...82 Checking the Network Information 83 The Other Setup menu...83 79
The System Setup and Other Setup menus Making receiver settings from the System Setup menu 80 Manual speaker setup...80 Network Setup menu...82 Checking the Network Information 83 The Other Setup menu...83 79
Owner's Manual
Page 80
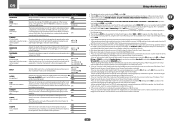
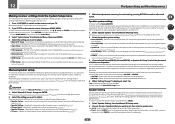
... what you to the network (see Changing the OSD display language (OSD Language) on your Pioneer component supporting Control with HDMI (page 54). ! HDMI Setup - Select for normal home theater use with front wide speakers in your main (speaker system A) setup. ! In this unit to make these settings. You will return to optimize the surround...
... what you to the network (see Changing the OSD display language (OSD Language) on your Pioneer component supporting Control with HDMI (page 54). ! HDMI Setup - Select for normal home theater use with front wide speakers in your main (speaker system A) setup. ! In this unit to make these settings. You will return to optimize the surround...


