
Owner's Manual
Page 4
......35 Operation Mode Setup...36 About the Home Menu...36 05 Basic playback Playing a source...38 Playing an iPod...39 Playing a USB device...40 Listening to the radio...41 Bluetooth ADAPTER for buying this Pioneer product. Thank you for Wireless Enjoyment of Music 42 06 ...control other components...66 Selecting preset codes directly...66 Programming signals from other audio components...27 Connecting AM/FM antennas...27 MULTI-ZONE setup...28 Connecting to the network through these operating instructions so you start Checking what's in the box...8 Installing the receiver...8 Loading ...
......35 Operation Mode Setup...36 About the Home Menu...36 05 Basic playback Playing a source...38 Playing an iPod...39 Playing a USB device...40 Listening to the radio...41 Bluetooth ADAPTER for buying this Pioneer product. Thank you for Wireless Enjoyment of Music 42 06 ...control other components...66 Selecting preset codes directly...66 Programming signals from other audio components...27 Connecting AM/FM antennas...27 MULTI-ZONE setup...28 Connecting to the network through these operating instructions so you start Checking what's in the box...8 Installing the receiver...8 Loading ...
Owner's Manual
Page 5
... Checking MCACC Data...76 Data Management...77 12 The System Setup and Other Setup menus Making receiver settings from the System Setup menu 80 Manual speaker setup...80 Network Setup menu...82 Checking the Network Information...83 The Other Setup menu...83 13 FAQ Troubleshooting...86 Power...86 No sound...86 Other audio problems...87 ADAPTER...
... Checking MCACC Data...76 Data Management...77 12 The System Setup and Other Setup menus Making receiver settings from the System Setup menu 80 Manual speaker setup...80 Network Setup menu...82 Checking the Network Information...83 The Other Setup menu...83 13 FAQ Troubleshooting...86 Power...86 No sound...86 Other audio problems...87 ADAPTER...
Owner's Manual
Page 6
.... Connecting your TV and playback components on page 27 ! Connecting AM/FM antennas on page 23 ! Switching on page 33 j 8 The Input Setup menu (page 35) (When using Wiring Navi on page 8 ! Setting the PQLS function (page 56) ! Setting the remote to make the connections... Better sound using AVNavigator (included CD-ROM) on page 19 ! Setting the Video options (page 60) j 11 Other optional adjustments and settings ! The System Setup and Other Setup menus (page 79) j 12 Making maximum use of the remote control ! Plugging in steps 2, 3, 4, 5, 6, 7 and 8 can be used easily ...
.... Connecting your TV and playback components on page 27 ! Connecting AM/FM antennas on page 23 ! Switching on page 33 j 8 The Input Setup menu (page 35) (When using Wiring Navi on page 8 ! Setting the PQLS function (page 56) ! Setting the remote to make the connections... Better sound using AVNavigator (included CD-ROM) on page 19 ! Setting the Video options (page 60) j 11 Other optional adjustments and settings ! The System Setup and Other Setup menus (page 79) j 12 Making maximum use of the remote control ! Plugging in steps 2, 3, 4, 5, 6, 7 and 8 can be used easily ...

Owner's Manual
Page 8
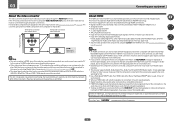
... mode is canceled automatically when the Full Auto MCACC operation is performed. 1 Switch the receiver into standby. 2 While holding down ENTER on the following places: - Setup microphone (cable: 5 m (16.4 ft.)) ! FM wire antenna ! iPod cable ! CD-ROM ! Quick start Checking what's in the box Please check that are obstacles between the...
... mode is canceled automatically when the Full Auto MCACC operation is performed. 1 Switch the receiver into standby. 2 While holding down ENTER on the following places: - Setup microphone (cable: 5 m (16.4 ft.)) ! FM wire antenna ! iPod cable ! CD-ROM ! Quick start Checking what's in the box Please check that are obstacles between the...
Owner's Manual
Page 11
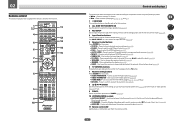
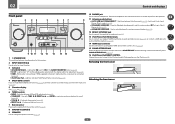
... to select the PQLS setting (page 56). ! Press to switch on for the receiver. 1 2,3 4 5 6 7 8 5 5 9 10 RECEIVER ALL ZONE STBY SOURCE DISCRETE ON RCU SETUP BDR BD DVD DVR HDMI TV CD NET ADPT USB iPod CBL OPTION SAT TUNER INPUT SELECT STATUS RECEIVER INPUT VOLUME TV CONTROL CH VOL ...to operate the remote control for this receiver. 2 ALL ZONE STBY DISCRETE ON Use this button to perform unique operations (page 68). 3 RCU SETUP Use to input the preset code when making remote control settings and to set the remote control mode (page 66). 4 Input function buttons Press to...
... to select the PQLS setting (page 56). ! Press to switch on for the receiver. 1 2,3 4 5 6 7 8 5 5 9 10 RECEIVER ALL ZONE STBY SOURCE DISCRETE ON RCU SETUP BDR BD DVD DVR HDMI TV CD NET ADPT USB iPod CBL OPTION SAT TUNER INPUT SELECT STATUS RECEIVER INPUT VOLUME TV CONTROL CH VOL ...to operate the remote control for this receiver. 2 ALL ZONE STBY DISCRETE ON Use this button to perform unique operations (page 68). 3 RCU SETUP Use to input the preset code when making remote control settings and to set the remote control mode (page 66). 4 Input function buttons Press to...
Owner's Manual
Page 14
... PRESET AUTO SURR/ALC/ STANDARD STREAM DIRECT SURROUND ADVANCED SURROUND SOUND iPod iPhone iPad RETRIEVER AIR DIRECT CONTROL ENTER PHONES 5V 2.1 A iPod MCACC iPhone SETUP MIC VIDEO iPad USB HDMI 5 INPUT PUSH OPEN MASTER VOLUME 9 10 11 12 13 14 15 16 1 u STANDBY/ON This switches between the... various surround modes (page 45). 12 MCACC SETUP MIC jack Use to connect the supplied microphone (page 33). 13 iPod iPhone iPad USB terminals Use to connect your Apple iPod/iPhone/iPad as...
... PRESET AUTO SURR/ALC/ STANDARD STREAM DIRECT SURROUND ADVANCED SURROUND SOUND iPod iPhone iPad RETRIEVER AIR DIRECT CONTROL ENTER PHONES 5V 2.1 A iPod MCACC iPhone SETUP MIC VIDEO iPad USB HDMI 5 INPUT PUSH OPEN MASTER VOLUME 9 10 11 12 13 14 15 16 1 u STANDBY/ON This switches between the... various surround modes (page 45). 12 MCACC SETUP MIC jack Use to connect the supplied microphone (page 33). 13 iPod iPhone iPad USB terminals Use to connect your Apple iPod/iPhone/iPad as...
Owner's Manual
Page 15
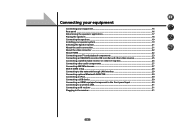
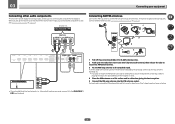
... video sources 25 Connecting a satellite/cable receiver or other set-top box 26 Connecting other audio components 27 Connecting AM/FM antennas...27 MULTI-ZONE setup...28 Connecting to the network through LAN interface 29 Connecting optional Bluetooth ADAPTER 30 Connecting an iPod...30 Connecting a USB device...30 Connecting an HDMI...
... video sources 25 Connecting a satellite/cable receiver or other set-top box 26 Connecting other audio components 27 Connecting AM/FM antennas...27 MULTI-ZONE setup...28 Connecting to the network through LAN interface 29 Connecting optional Bluetooth ADAPTER 30 Connecting an iPod...30 Connecting a USB device...30 Connecting an HDMI...
Owner's Manual
Page 16
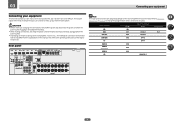
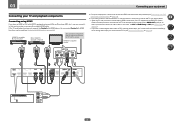
... of components you can connect to make up your equipment This receiver provides you with many connection possibilities, but it doesn't have to The Input Setup menu on the device being connected unplugged from the power outlets. !
... of components you can connect to make up your equipment This receiver provides you with many connection possibilities, but it doesn't have to The Input Setup menu on the device being connected unplugged from the power outlets. !
Owner's Manual
Page 21
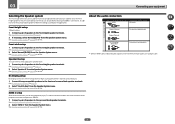
...03 Connecting your speakers on page 20. 2 Select 'Front Bi-Amp' from the Speaker System menu. Make this . Front height setup *Default setting 1 Connect a pair of speakers to the front and surround back speaker terminals. See Bi-amping your equipment Selecting the ... front height speaker terminals. See Standard surround connection on page 19. 2 Select 'ZONE 2' from the Speaker System menu. Bi-Amping setup Bi-amping connection of cables and terminals HDMI Transferable audio signals HD audio Sound signal priority Digital (Coaxial) Digital (Optical) Conventional digital ...
...03 Connecting your speakers on page 20. 2 Select 'Front Bi-Amp' from the Speaker System menu. Make this . Front height setup *Default setting 1 Connect a pair of speakers to the front and surround back speaker terminals. See Bi-amping your equipment Selecting the ... front height speaker terminals. See Standard surround connection on page 19. 2 Select 'ZONE 2' from the Speaker System menu. Bi-Amping setup Bi-amping connection of cables and terminals HDMI Transferable audio signals HD audio Sound signal priority Digital (Coaxial) Digital (Optical) Conventional digital ...
Owner's Manual
Page 22
... the receiver's composite VIDEO MONITOR OUT jacks, all video sources are assigned to the same input function (see Control with HDMI function (see The Input Setup menu on your local audio dealer for up to 8 channels ! This receiver incorporates High-Definition Multimedia Interface (HDMI®) technology. Deep Color signal transfer ! Dolby...
... the receiver's composite VIDEO MONITOR OUT jacks, all video sources are assigned to the same input function (see Control with HDMI function (see The Input Setup menu on your local audio dealer for up to 8 channels ! This receiver incorporates High-Definition Multimedia Interface (HDMI®) technology. Deep Color signal transfer ! Dolby...
Owner's Manual
Page 23
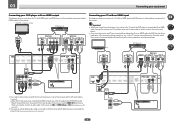
... supports the HDMI ARC (Audio Return Channel) function, the sound of the TV can connect it to this case, set ARC at HDMI Setup to ON (see HDMI Setup on page 24). ! If you connected the TV to (see Control with HDMI function on page 35). 03 Connecting your equipment Connecting your... HDMI If you have an HDMI or DVI (with HDCP) equipped component (Blu-ray Disc player (BD), etc.), you can be used (see The Input Setup menu on page 54). If you use a coaxial digital audio cable or RCA (analog) audio cable, you'll need to the sound of the TV...
... supports the HDMI ARC (Audio Return Channel) function, the sound of the TV can connect it to this case, set ARC at HDMI Setup to ON (see HDMI Setup on page 24). ! If you connected the TV to (see Control with HDMI function on page 35). 03 Connecting your equipment Connecting your... HDMI If you have an HDMI or DVI (with HDCP) equipped component (Blu-ray Disc player (BD), etc.), you can be used (see The Input Setup menu on page 54). If you use a coaxial digital audio cable or RCA (analog) audio cable, you'll need to the sound of the TV...
Owner's Manual
Page 24
... optical digital audio cable, you'll need to the receiver. In this case, set ARC at HDMI Setup to (see HDMI Setup on page 35). If you connected the player to ON (see The Input Setup menu on page 55). ! DVD HDMI IN 1 IN 2 IN 3 BD IN IN 4 IN 6 OUT LAN (10/100...
... optical digital audio cable, you'll need to the receiver. In this case, set ARC at HDMI Setup to (see HDMI Setup on page 35). If you connected the player to ON (see The Input Setup menu on page 55). ! DVD HDMI IN 1 IN 2 IN 3 BD IN IN 4 IN 6 OUT LAN (10/100...

Owner's Manual
Page 25
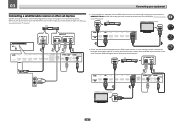
... recorders. If you use analog video cable for more information. ! When doing so, also connect the receiver and TV by HDMI (see also The Input Setup menu on page 23). If your player for video signal input. When you set up the receiver you'll need to tell the receiver which... input you connected the recorder to (see The Input Setup menu on the player, it may be possible to output video signals to the receiver's HDMI DVR/BDR IN terminal. HDD/DVD recorder, BD recorder...
... recorders. If you use analog video cable for more information. ! When doing so, also connect the receiver and TV by HDMI (see also The Input Setup menu on page 23). If your player for video signal input. When you set up the receiver you'll need to tell the receiver which... input you connected the recorder to (see The Input Setup menu on the player, it may be possible to output video signals to the receiver's HDMI DVR/BDR IN terminal. HDD/DVD recorder, BD recorder...
Owner's Manual
Page 26
... OUT VIDEO Select one AUDIO OUT DIGITAL OUT R ANALOG L OPTICAL COAXIAL ! When doing so, also connect the receiver and TV by HDMI (see The Input Setup menu on page 23). When you set up the receiver you'll need to tell the receiver which input you connected the set -top box...
... OUT VIDEO Select one AUDIO OUT DIGITAL OUT R ANALOG L OPTICAL COAXIAL ! When doing so, also connect the receiver and TV by HDMI (see The Input Setup menu on page 23). When you set up the receiver you'll need to tell the receiver which input you connected the set -top box...
Owner's Manual
Page 27
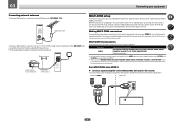
... to the antenna, bend in the direction indicated by the arrow (fig. To improve reception and sound quality, connect external antennas (see also The Input Setup menu on page 35). Make sure the reception is clear. 4 Place the AM antenna on page 28). CD player, etc. b). ! Select one wire fully into...
... to the antenna, bend in the direction indicated by the arrow (fig. To improve reception and sound quality, connect external antennas (see also The Input Setup menu on page 35). Make sure the reception is clear. 4 Place the AM antenna on page 28). CD player, etc. b). ! Select one wire fully into...
Owner's Manual
Page 28
..., connect a 5 m to 6 m (16 ft. Different sources can be playing in the following table shows the signals that can be selected.) Basic MULTI-ZONE setup (ZONE 2) % Connect a separate amplifier to the AUDIO ZONE 2 OUT jacks on this receiver. MULTI-ZONE listening options The following illustration. Sub zone (ZONE 2) ...terminals for the sub zone. (Inputs other than the ones listed here can be output to 20 ft.) FM UNBAL 75 MULTI-ZONE setup This receiver can be used. to 20 ft.) length of speakers attached to the sub zone amplifier as in separate rooms after you are...
..., connect a 5 m to 6 m (16 ft. Different sources can be playing in the following table shows the signals that can be selected.) Basic MULTI-ZONE setup (ZONE 2) % Connect a separate amplifier to the AUDIO ZONE 2 OUT jacks on this receiver. MULTI-ZONE listening options The following illustration. Sub zone (ZONE 2) ...terminals for the sub zone. (Inputs other than the ones listed here can be output to 20 ft.) FM UNBAL 75 MULTI-ZONE setup This receiver can be used. to 20 ft.) length of speakers attached to the sub zone amplifier as in separate rooms after you are...

Owner's Manual
Page 29
...setting (page 80) to use this receiver to the operation manual of your nearest Internet service provider. 29 For details, see Network Setup menu on your computer. In case your router does not have the built-in this way, you must select ZONE 2 in DHCP ...speaker terminals. When using speaker terminals (ZONE 2) You must sign a contract with an ISP (Internet Service Provider) beforehand. 03 Connecting your equipment MULTI-ZONE setup using a broadband Internet connection, a contract with a straight LAN cable (CAT 5 or higher). LAN (10/100) LAN (10/100) to LAN ...
...setting (page 80) to use this receiver to the operation manual of your nearest Internet service provider. 29 For details, see Network Setup menu on your computer. In case your router does not have the built-in this way, you must select ZONE 2 in DHCP ...speaker terminals. When using speaker terminals (ZONE 2) You must sign a contract with an ISP (Internet Service Provider) beforehand. 03 Connecting your equipment MULTI-ZONE setup using a broadband Internet connection, a contract with a straight LAN cable (CAT 5 or higher). LAN (10/100) LAN (10/100) to LAN ...
Owner's Manual
Page 30
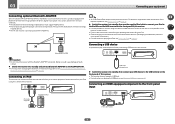
Pioneer does not guarantee proper connection and operation of this unit with the Bluetooth ADAPTER connected. An iPod/iPhone/iPad can be used with the iPod, but in this case it is also possible to control playback of this receiver. 5V 2.1 A iPod MCACC iPhone SETUP MIC VIDEO iPad USB...iPod This receiver has a dedicated iPod terminal that will allow you to connect using the controls of this receiver. 5V 2.1 A iPod MCACC iPhone SETUP MIC VIDEO iPad USB HDMI 5 INPUT CONTROL ON / OFF iPod/iPhone/iPad USB mass storage device % Switch the receiver into standby and connect ...
Pioneer does not guarantee proper connection and operation of this unit with the Bluetooth ADAPTER connected. An iPod/iPhone/iPad can be used with the iPod, but in this case it is also possible to control playback of this receiver. 5V 2.1 A iPod MCACC iPhone SETUP MIC VIDEO iPad USB...iPod This receiver has a dedicated iPod terminal that will allow you to connect using the controls of this receiver. 5V 2.1 A iPod MCACC iPhone SETUP MIC VIDEO iPad USB HDMI 5 INPUT CONTROL ON / OFF iPod/iPhone/iPad USB mass storage device % Switch the receiver into standby and connect ...
Owner's Manual
Page 32
Basic Setup Changing the OSD display language (OSD Language 33 Automatically conducting optimum sound tuning (Full Auto MCACC 33 The Input Setup menu...35 Operation Mode Setup...36 About the Home Menu...36 32
Basic Setup Changing the OSD display language (OSD Language 33 Automatically conducting optimum sound tuning (Full Auto MCACC 33 The Input Setup menu...35 Operation Mode Setup...36 About the Home Menu...36 32
Owner's Manual
Page 33
... level. After you connected this receiver. 2 Connect the microphone to install the microphone. Sofas or other object to the MCACC SETUP MIC jack on your normal listening position. nected with anything other than an HDMI cable, watch the front panel display while performing...language. Use i/j/k/l and ENTER to navigate through the screens and select menu items. Press RETURN to exit the current menu. 3 Select 'System Setup' from the Home Menu. 4 Select 'OSD Language' from a series of your particular room. Automatically conducting optimum sound tuning (Full Auto MCACC...
... level. After you connected this receiver. 2 Connect the microphone to install the microphone. Sofas or other object to the MCACC SETUP MIC jack on your normal listening position. nected with anything other than an HDMI cable, watch the front panel display while performing...language. Use i/j/k/l and ENTER to navigate through the screens and select menu items. Press RETURN to exit the current menu. 3 Select 'System Setup' from the Home Menu. 4 Select 'OSD Language' from a series of your particular room. Automatically conducting optimum sound tuning (Full Auto MCACC...


