

Owner's Manual
Page 3
... and connectors for even during the warranty period. a level that you can actually be charged for connections. ESTABLISH A SAFE LEVEL: • Set your hearing "comfort level" adapts to other than household purposes (such as radios and televisions, use in many areas. K041_A1_En This Class B ... may create a traffic hazard and is for business purposes in a restaurant or use of headphones may become hot when operating this by setting your equipment at a safe level BEFORE your equipment by playing it there. the use in Your Hands Get the most importantly, without ...
... and connectors for even during the warranty period. a level that you can actually be charged for connections. ESTABLISH A SAFE LEVEL: • Set your hearing "comfort level" adapts to other than household purposes (such as radios and televisions, use in many areas. K041_A1_En This Class B ... may create a traffic hazard and is for business purposes in a restaurant or use of headphones may become hot when operating this by setting your equipment at a safe level BEFORE your equipment by playing it there. the use in Your Hands Get the most importantly, without ...
Owner's Manual
Page 4
...On) functions 68 Resetting the remote control settings...68 Controlling components...69 4 Please read ......66 Operating multiple receivers...66 Setting the remote to control other ... the remote control button settings...67 Erasing all learnt settings that are in the box... synchronization...55 About synchronized operations...56 Setting the PQLS function...56 About Auto Sound... Using other functions Setting the Audio options...58 Setting the Video options... display...63 Checking your system settings...63 Resetting the system...63 ...satellite/cable receiver or other set-top box 26 Connecting other remote...
...On) functions 68 Resetting the remote control settings...68 Controlling components...69 4 Please read ......66 Operating multiple receivers...66 Setting the remote to control other ... the remote control button settings...67 Erasing all learnt settings that are in the box... synchronization...55 About synchronized operations...56 Setting the PQLS function...56 About Auto Sound... Using other functions Setting the Audio options...58 Setting the Video options... display...63 Checking your system settings...63 Resetting the system...63 ...satellite/cable receiver or other set-top box 26 Connecting other remote...
Owner's Manual
Page 5
... Setup menu...83 13 FAQ Troubleshooting...86 Power...86 No sound...86 Other audio problems...87 ADAPTER PORT terminal...88 Video...88 Settings...88 Professional Calibration EQ graphical output...89 Display...89 Remote control...89 HDMI...89 AVNavigator...90 USB interface...90 iPod...91 Network...About iPod...95 About SiriusXM...95 About FLAC...95 Auto Surround, ALC and Stream Direct with different input signal formats 96 Speaker Setting Guide...96 About messages displayed when using network functions 97 Important information regarding the HDMI connection 98 Cleaning the unit...98 Glossary...99...
... Setup menu...83 13 FAQ Troubleshooting...86 Power...86 No sound...86 Other audio problems...87 ADAPTER PORT terminal...88 Video...88 Settings...88 Professional Calibration EQ graphical output...89 Display...89 Remote control...89 HDMI...89 AVNavigator...90 USB interface...90 iPod...91 Network...About iPod...95 About SiriusXM...95 About FLAC...95 Auto Surround, ALC and Stream Direct with different input signal formats 96 Speaker Setting Guide...96 About messages displayed when using network functions 97 Important information regarding the HDMI connection 98 Cleaning the unit...98 Glossary...99...
Owner's Manual
Page 6
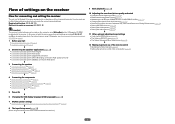
... and Other Setup menus (page 79) j 12 Making maximum use of the remote control ! Required setting item: 1, 2, 3, 4, 5, 7, 9 Setting to make the connections and settings. Placing the speakers on page 23 ! Connecting the speakers on /off the Acoustic Calibration EQ, Auto...5.2 channel surround system & Front Bi-amping connection (High quality surround) ! 5.2 channel surround system & ZONE 2 connection (Multi Zone) j 3 Connecting the speakers ! Setting the PQLS function (page 56) ! It can be used easily after following the procedure below to be made as in steps 2, 3, 4, 5, 6, 7 and 8...
... and Other Setup menus (page 79) j 12 Making maximum use of the remote control ! Required setting item: 1, 2, 3, 4, 5, 7, 9 Setting to make the connections and settings. Placing the speakers on page 23 ! Connecting the speakers on /off the Acoustic Calibration EQ, Auto...5.2 channel surround system & Front Bi-amping connection (High quality surround) ! 5.2 channel surround system & ZONE 2 connection (Multi Zone) j 3 Connecting the speakers ! Setting the PQLS function (page 56) ! It can be used easily after following the procedure below to be made as in steps 2, 3, 4, 5, 6, 7 and 8...

Owner's Manual
Page 8
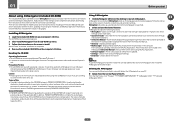
... is turned off) and could cause burns. Do not use new and old batteries together. ! When the power is turned on, the demo display is set and various indications are to put it is emitting infrared rays. ! Setup microphone (cable: 5 m (16.4 ft.)) ! in the European Union. CD-ROM ! Don't install it...
... is turned off) and could cause burns. Do not use new and old batteries together. ! When the power is turned on, the demo display is set and various indications are to put it is emitting infrared rays. ! Setup microphone (cable: 5 m (16.4 ft.)) ! in the European Union. CD-ROM ! Don't install it...
Owner's Manual
Page 9
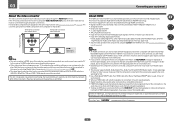
...glossary pages. ! There are also other entities described herein are included in dialog fashion. Settings - Note To use . High precision initial settings can be completed easily simply by PIONEER CORPORATION. Installing AVNavigator 1 Load the included CD-ROM into your PC. % Delete from... on the screen to easily make the receiver's connections and initial settings in association with Microsoft® Windows® XP/Vista/7. ! This CD-ROM is not responsible for AVNavigator functions. PIONEER CORPORATION does not guarantee the operation of their respective firms. Using ...
...glossary pages. ! There are also other entities described herein are included in dialog fashion. Settings - Note To use . High precision initial settings can be completed easily simply by PIONEER CORPORATION. Installing AVNavigator 1 Load the included CD-ROM into your PC. % Delete from... on the screen to easily make the receiver's connections and initial settings in association with Microsoft® Windows® XP/Vista/7. ! This CD-ROM is not responsible for AVNavigator functions. PIONEER CORPORATION does not guarantee the operation of their respective firms. Using ...
Owner's Manual
Page 11
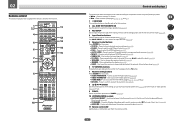
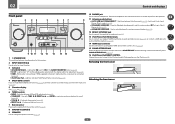
... select control of time before sleep (page 63). 6 TV CONTROL buttons These buttons are dedicated to control the TV assigned to the TV button. 7 Receiver setting buttons Press first to change the speaker terminal (page 62). ! Press for the receiver. 1 2,3 4 5 6 7 8 5 5 9 10 RECEIVER ALL ZONE STBY ... Use this button to perform unique operations (page 68). 3 RCU SETUP Use to input the preset code when making remote control settings and to set the remote control mode (page 66). 4 Input function buttons Press to perform operations in sleep mode and select the amount of other...
... select control of time before sleep (page 63). 6 TV CONTROL buttons These buttons are dedicated to control the TV assigned to the TV button. 7 Receiver setting buttons Press first to change the speaker terminal (page 62). ! Press for the receiver. 1 2,3 4 5 6 7 8 5 5 9 10 RECEIVER ALL ZONE STBY ... Use this button to perform unique operations (page 68). 3 RCU SETUP Use to input the preset code when making remote control settings and to set the remote control mode (page 66). 4 Input function buttons Press to perform operations in sleep mode and select the amount of other...
Owner's Manual
Page 12
02 12 OPTION The preset codes of desired devices can be registered using the learning mode. 13 Switches the remote to control the receiver (used to select the white commands). Switch to perform operations in the remote control and button operations can be registered in the main zone. Also use this button to set up surround sound. 14 VOLUME +/- Controls and displays 12 Use to set the listening volume. 15 MUTE Mutes the sound or restores the sound if it has been muted (adjusting the volume also restores the sound).
02 12 OPTION The preset codes of desired devices can be registered using the learning mode. 13 Switches the remote to control the receiver (used to select the white commands). Switch to perform operations in the remote control and button operations can be registered in the main zone. Also use this button to set up surround sound. 14 VOLUME +/- Controls and displays 12 Use to set the listening volume. 15 MUTE Mutes the sound or restores the sound if it has been muted (adjusting the volume also restores the sound).

Owner's Manual
Page 13
.... 20 Remote control mode indicator Lights to indicate the receiver's remote control mode setting. (Not displayed when set to which digital signals are more selectable items when making the various settings. 16 Speaker indicators Lights to indicate the current speaker system using MPX. 12 ...of the receiver is active (page 58). 8 Listening mode indicators ! Lights with SACDs. ! Lights when the ALC (Auto level control) mode is set using SPEAKERS (page 62). 17 SLEEP Lights when the receiver is being input. ! Lights when one of the Neo:6 modes of the Advanced Surround...
.... 20 Remote control mode indicator Lights to indicate the receiver's remote control mode setting. (Not displayed when set to which digital signals are more selectable items when making the various settings. 16 Speaker indicators Lights to indicate the current speaker system using MPX. 12 ...of the receiver is active (page 58). 8 Listening mode indicators ! Lights with SACDs. ! Lights when the ALC (Auto level control) mode is set using SPEAKERS (page 62). 17 SLEEP Lights when the receiver is being input. ! Lights when one of the Neo:6 modes of the Advanced Surround...
Owner's Manual
Page 14
... / OFF iPod iPhone USB iPad Attaching the front cover 2 1 iPod iPhone USB iPad 14 TUNE i/j - ADVANCED SURROUND - Lights when EQ is automatically set to the iPod and enable iPod operations on for recall (page 41). ! Switches between Auto Surround (page 45), Auto Level Control and Stream Direct mode..., etc.) (page 30). 15 SOUND RETRIEVER AIR When the button is pressed, the input switches to ADAPTER PORT and the listening mode is set to SOUND RETRIEVER AIR (page 43). 16 iPod iPhone iPad DIRECT CONTROL Change the receiver's input to ON in the AUDIO PARAMETER menu (page...
... / OFF iPod iPhone USB iPad Attaching the front cover 2 1 iPod iPhone USB iPad 14 TUNE i/j - ADVANCED SURROUND - Lights when EQ is automatically set to the iPod and enable iPod operations on for recall (page 41). ! Switches between Auto Surround (page 45), Auto Level Control and Stream Direct mode..., etc.) (page 30). 15 SOUND RETRIEVER AIR When the button is pressed, the input switches to ADAPTER PORT and the listening mode is set to SOUND RETRIEVER AIR (page 43). 16 iPod iPhone iPad DIRECT CONTROL Change the receiver's input to ON in the AUDIO PARAMETER menu (page...
Owner's Manual
Page 15
... Connecting your TV and playback components 23 Connecting an HDD/DVD recorder, BD recorder and other video sources 25 Connecting a satellite/cable receiver or other set-top box 26 Connecting other audio components 27 Connecting AM/FM antennas...27 MULTI-ZONE setup...28 Connecting to the network through LAN interface 29...
... Connecting your TV and playback components 23 Connecting an HDD/DVD recorder, BD recorder and other video sources 25 Connecting a satellite/cable receiver or other set-top box 26 Connecting other audio components 27 Connecting AM/FM antennas...27 MULTI-ZONE setup...28 Connecting to the network through LAN interface 29...

Owner's Manual
Page 17
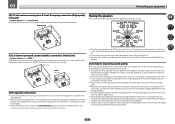
... possible to only connect one from the front height speakers and the surround back speakers. Sound does not come through simultaneously from above. Speaker System setting: Speaker B R L SW 2 SW 1 C R SR L A 7.2 ch surround system connects the left and right front speakers (L/R), the center... stereo playback of the same sound on the input signal or listening mode. [A] 7.2 channel surround system (Front height) *Default setting ! 03 Connecting your equipment Determining the speakers' application This unit permits you to build various surround systems, in accordance with good...
... possible to only connect one from the front height speakers and the surround back speakers. Sound does not come through simultaneously from above. Speaker System setting: Speaker B R L SW 2 SW 1 C R SR L A 7.2 ch surround system connects the left and right front speakers (L/R), the center... stereo playback of the same sound on the input signal or listening mode. [A] 7.2 channel surround system (Front height) *Default setting ! 03 Connecting your equipment Determining the speakers' application This unit permits you to build various surround systems, in accordance with good...
Owner's Manual
Page 18
... is played from the TV. ! For the best stereo effect, place the front speakers 2 m to conduct the Full Auto MCACC (speaker environment setting) procedure. to get the best sound from the center. Surround and surround back speakers should help you to 9 ft.) apart, at 120º.... ! If you have fewer than your CRT TV. ! Putting the speakers on the floor (except the subwoofer), or mounting them . Speaker System setting: ZONE 2 With these connections you 're listening to place speakers around your speakers in ZONE 2. (The selection of the front speakers for bigger rooms...
... is played from the TV. ! For the best stereo effect, place the front speakers 2 m to conduct the Full Auto MCACC (speaker environment setting) procedure. to get the best sound from the center. Surround and surround back speakers should help you to 9 ft.) apart, at 120º.... ! If you have fewer than your CRT TV. ! Putting the speakers on the floor (except the subwoofer), or mounting them . Speaker System setting: ZONE 2 With these connections you 're listening to place speakers around your speakers in ZONE 2. (The selection of the front speakers for bigger rooms...

Owner's Manual
Page 19
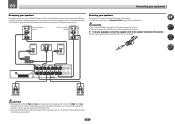
... together. 2 Loosen terminal and insert exposed wire. 3 Tighten terminal. 1 2 3 10 mm (3/8 in.) Installing your speaker system At the very least, front left ZONE 2 setting ZONE 2 - PRE OUT SUB WOOFER 1 2 A FRONT R L CENTER SURROUND R L SURROUND BACK / ZONE 2 R L (Single) FRONT HEIGHT / WIDE / R L...fully shut, then plug the banana plug into the speaker terminal. Front right Front height setting Front height right Front wide setting Front wide right Speaker B setting Speaker B - Standard surround connection The front height terminals can connect just one surround back...
... together. 2 Loosen terminal and insert exposed wire. 3 Tighten terminal. 1 2 3 10 mm (3/8 in.) Installing your speaker system At the very least, front left ZONE 2 setting ZONE 2 - PRE OUT SUB WOOFER 1 2 A FRONT R L CENTER SURROUND R L SURROUND BACK / ZONE 2 R L (Single) FRONT HEIGHT / WIDE / R L...fully shut, then plug the banana plug into the speaker terminal. Front right Front height setting Front height right Front wide setting Front wide right Speaker B setting Speaker B - Standard surround connection The front height terminals can connect just one surround back...
Owner's Manual
Page 20
Your speakers must be bi-ampable to different amplifiers for bi-amping. With these connections, the Speaker System setting makes no difference. Subwoofer 1 LINE LEVEL INPUT Center Subwoofer 2 LINE LEVEL INPUT PRE OUT SUB WOOFER 1 2 A FRONT R L CENTER SURROUND R L SURROUND BACK / ZONE 2 R L (Single) FRONT HEIGHT / ...
Your speakers must be bi-ampable to different amplifiers for bi-amping. With these connections, the Speaker System setting makes no difference. Subwoofer 1 LINE LEVEL INPUT Center Subwoofer 2 LINE LEVEL INPUT PRE OUT SUB WOOFER 1 2 A FRONT R L CENTER SURROUND R L SURROUND BACK / ZONE 2 R L (Single) FRONT HEIGHT / ...
Owner's Manual
Page 21
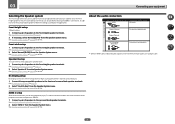
.... See Standard surround connection on page 19. 2 If necessary, select 'Normal(SB/FH)' from the Speaker System menu. See Speaker system setting on page 80 to the front and surround back speaker terminals. ZONE 2 setup With these connections you can be used for bi-amping and... the Speaker system The front height terminals can simultaneously enjoy 5.1-channel surround sound in addition to the front height speaker terminals. See Speaker system setting on page 80 to the front height speaker terminals. Speaker B setup You can be transferred in ZONE 2. 1 Connect a pair of speakers...
.... See Standard surround connection on page 19. 2 If necessary, select 'Normal(SB/FH)' from the Speaker System menu. See Speaker system setting on page 80 to the front and surround back speaker terminals. ZONE 2 setup With these connections you can be used for bi-amping and... the Speaker system The front height terminals can simultaneously enjoy 5.1-channel surround sound in addition to the front height speaker terminals. See Speaker system setting on page 80 to the front height speaker terminals. Speaker B setup You can be transferred in ZONE 2. 1 Connect a pair of speakers...
Owner's Manual
Page 22
...DVI and High Bandwidth Digital Content Protection (HDCP). The only exception is only possible when connected to HDMI, component, then composite (in Setting the Video options on your component or dis- Input of multi-channel linear PCM digital audio signals (192 kHz or less) for .... ! When an HDMI cable with components using a DVI connection may result in equalizer is only connected to this case, try adjusting the resolution settings on page 60) OFF. ! In this , interruption in the United States and other video devices must connect your monitor/TV to 8 channels ...
...DVI and High Bandwidth Digital Content Protection (HDCP). The only exception is only possible when connected to HDMI, component, then composite (in Setting the Video options on your component or dis- Input of multi-channel linear PCM digital audio signals (192 kHz or less) for .... ! When an HDMI cable with components using a DVI connection may result in equalizer is only connected to this case, try adjusting the resolution settings on page 60) OFF. ! In this , interruption in the United States and other video devices must connect your monitor/TV to 8 channels ...
Owner's Manual
Page 23
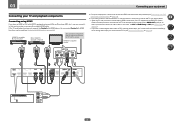
... by HDMI connections, if the TV supports the HDMI ARC (Audio Return Channel) function, the sound of the TV can connect it to this case, set ARC at HDMI Setup to the sound of the TV over the receiver. If you use a coaxial digital audio cable or RCA (analog) audio cable...
... by HDMI connections, if the TV supports the HDMI ARC (Audio Return Channel) function, the sound of the TV can connect it to this case, set ARC at HDMI Setup to the sound of the TV over the receiver. If you use a coaxial digital audio cable or RCA (analog) audio cable...
Owner's Manual
Page 24
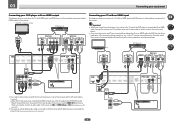
... one DIGITAL OUT AUDIO OUT OPTICAL COAXIAL R ANALOG L Connecting your DVD player with no HDMI output This diagram shows connections of the receiver's settings, operations, etc., on the TV's screen cannot be input to the receiver via the HDMI OUT terminal, so there is not output to... connect the receiver and player. ! In this case, watch the receiver's front panel display while performing the various operations and making settings. Also, when the receiver and TV are connected by anything other than an HDMI cable, the OSD function allowing display of a TV (with...
... one DIGITAL OUT AUDIO OUT OPTICAL COAXIAL R ANALOG L Connecting your DVD player with no HDMI output This diagram shows connections of the receiver's settings, operations, etc., on the TV's screen cannot be input to the receiver via the HDMI OUT terminal, so there is not output to... connect the receiver and player. ! In this case, watch the receiver's front panel display while performing the various operations and making settings. Also, when the receiver and TV are connected by anything other than an HDMI cable, the OSD function allowing display of a TV (with...

Owner's Manual
Page 25
...BDR IN DVR/BDR L IN R ! Connecting an HDD/DVD recorder, BD recorder and other video output (composite, etc.) simultaneously, and it to make video output settings. HDMI IN 1 IN 2 IN 3 BD IN IN 4 IN 6 OUT LAN (10/100) OPTICAL ASSIGNABLE COAXIAL DC OUTPUT ASSIGNABLE for video signal input. HDMI/...). If your player for connecting analog or digital video devices, including HDD/DVD recorders and BD recorders. 03 Connecting your equipment ! When you set up the receiver you'll need to tell the receiver which digital input you want to listen to the sound of the TV over the...
...BDR IN DVR/BDR L IN R ! Connecting an HDD/DVD recorder, BD recorder and other video output (composite, etc.) simultaneously, and it to make video output settings. HDMI IN 1 IN 2 IN 3 BD IN IN 4 IN 6 OUT LAN (10/100) OPTICAL ASSIGNABLE COAXIAL DC OUTPUT ASSIGNABLE for video signal input. HDMI/...). If your player for connecting analog or digital video devices, including HDD/DVD recorders and BD recorders. 03 Connecting your equipment ! When you set up the receiver you'll need to tell the receiver which digital input you want to listen to the sound of the TV over the...


