
Owner's Manual
Page 6
...codes 66 Controlling components 66 10 The Advanced MCACC menu Making receiver settings from the Advanced MCACC menu 69 Automatic MCACC (Expert 69 Manual MCACC setup 71 Fine Channel Level 72 Fine Speaker Distance 72 Standing Wave 72 Acoustic Calibration EQ Adjust 73 Acoustic Calibration EQ Professional ...data 77 Clearing MCACC presets 77 11 The System Setup and Other Setup menus Making receiver settings from the System Setup menu 78 Manual speaker setup 78 Speaker system setting 79 Speaker Setting 79 Channel Level 80 Speaker Distance 80 X-Curve 81 THX Audio Setting 81 Network...
...codes 66 Controlling components 66 10 The Advanced MCACC menu Making receiver settings from the Advanced MCACC menu 69 Automatic MCACC (Expert 69 Manual MCACC setup 71 Fine Channel Level 72 Fine Speaker Distance 72 Standing Wave 72 Acoustic Calibration EQ Adjust 73 Acoustic Calibration EQ Professional ...data 77 Clearing MCACC presets 77 11 The System Setup and Other Setup menus Making receiver settings from the System Setup menu 78 Manual speaker setup 78 Speaker system setting 79 Speaker Setting 79 Channel Level 80 Speaker Distance 80 X-Curve 81 THX Audio Setting 81 Network...

Owner's Manual
Page 18
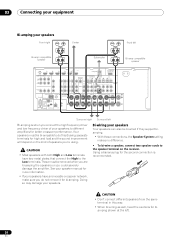
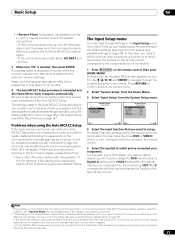
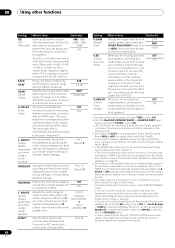
... quality, but also reduces the risk of an angle for bigger rooms. • Surround and surround back speakers should be positioned 60 cm to the manual that all the bare speaker wire is localized at the TV screen. For DVD-Audio, the speakers should be more directly behind the listener than...
... quality, but also reduces the risk of an angle for bigger rooms. • Surround and surround back speakers should be positioned 60 cm to the manual that all the bare speaker wire is localized at the TV screen. For DVD-Audio, the speakers should be more directly behind the listener than...
Owner's Manual
Page 20
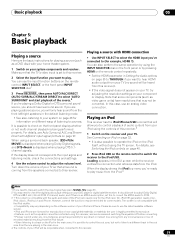
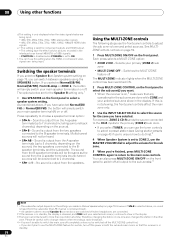
These must be bi-ampable to the Low terminals. Bi-wiring your speakers. See your speaker manual for more information. • If your speakers have two metal plates that connect the High to do not remove it for bi-amping. Using a banana ...
These must be bi-ampable to the Low terminals. Bi-wiring your speakers. See your speaker manual for more information. • If your speakers have two metal plates that connect the High to do not remove it for bi-amping. Using a banana ...

Owner's Manual
Page 31
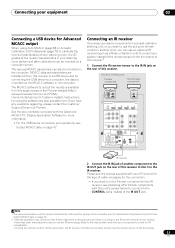
... wirelessly.2 Bluetooth® ADAPTER (sold separately. 2 • The Bluetooth wireless technology enabled device must support A2DP profiles. • Pioneer does not guarantee proper connection and operation of your router. Connecting a SiriusConnect™ tuner To receive SIRIUS Satellite Radio broadcasts, you will... function) with the Bluetooth ADAPTER connected. Note 1 The Bluetooth ADAPTER (AS-BT100) is necessary to set up the network manually. For details, see Listening to Internet radio stations on your router (with all Bluetooth wireless technology enabled devices. 31 En ...
... wirelessly.2 Bluetooth® ADAPTER (sold separately. 2 • The Bluetooth wireless technology enabled device must support A2DP profiles. • Pioneer does not guarantee proper connection and operation of your router. Connecting a SiriusConnect™ tuner To receive SIRIUS Satellite Radio broadcasts, you will... function) with the Bluetooth ADAPTER connected. Note 1 The Bluetooth ADAPTER (AS-BT100) is necessary to set up the network manually. For details, see Listening to Internet radio stations on your router (with all Bluetooth wireless technology enabled devices. 31 En ...
Owner's Manual
Page 33
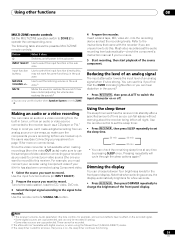
... IR receiver (such as a Niles or Xantech unit) to the IR OUT jack on the front panel. 33 En Closet or shelving unit Pioneer component Non-Pioneer component CONTROL IR IN OUT IN HDMI BD IN IN 1 ASSIGNABLE 14 COMPONENTVIDEO ASSIGNABLE Y PB PR IN 1 (DVD) IN 2 (DVR/BDR...Connecting your equipment 03 Connecting a USB device for Advanced MCACC output When using the software are also available here. Refer to the manual that other Pioneer components with your IR receiver for the type of cable necessary for using Auto MCACC (page 69) or Acoustic Calibration EQ Professional...
... IR receiver (such as a Niles or Xantech unit) to the IR OUT jack on the front panel. 33 En Closet or shelving unit Pioneer component Non-Pioneer component CONTROL IR IN OUT IN HDMI BD IN IN 1 ASSIGNABLE 14 COMPONENTVIDEO ASSIGNABLE Y PB PR IN 1 (DVD) IN 2 (DVR/BDR...Connecting your equipment 03 Connecting a USB device for Advanced MCACC output When using the software are also available here. Refer to the manual that other Pioneer components with your IR receiver for the type of cable necessary for using Auto MCACC (page 69) or Acoustic Calibration EQ Professional...
Owner's Manual
Page 36
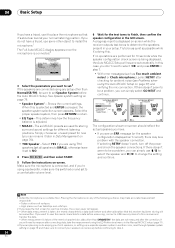
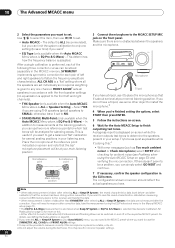
... measurement is being displayed, the Auto MCACC Setup will resume automatically. and after correcting data, take the measurement using the EQ Professional menu in the Manual MCACC setup (page 71). 4 If you are used for storing surround sound settings for 10 seconds while the speaker configuration check screen is taken, the...
... measurement is being displayed, the Auto MCACC Setup will resume automatically. and after correcting data, take the measurement using the EQ Professional menu in the Manual MCACC setup (page 71). 4 If you are used for storing surround sound settings for 10 seconds while the speaker configuration check screen is taken, the...
Owner's Manual
Page 37
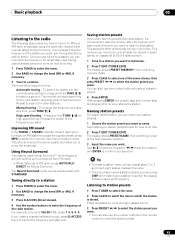
... • If Auto MCACC Setup measurement results are incorrect due to the optical input you 've connected your component. You can correct the setting manually using speakers that may be happening, switch off if necessary. Again, try to be farther than the actual distance from COAX-1 (default) to ...the interaction of the speakers and viewing environment, we recommend adjusting the settings manually. 37 En It may take 3 to be incorrect. The settings made in the Input Setup menu if you need to 10 minutes. 8 The...
... • If Auto MCACC Setup measurement results are incorrect due to the optical input you 've connected your component. You can correct the setting manually using speakers that may be happening, switch off if necessary. Again, try to be farther than the actual distance from COAX-1 (default) to ...the interaction of the speakers and viewing environment, we recommend adjusting the settings manually. 37 En It may take 3 to be incorrect. The settings made in the Input Setup menu if you need to 10 minutes. 8 The...
Owner's Manual
Page 39
... In this receiver. 2 Select the input function you need to play . When the display shows the iPod top menu you're ready to manually switch the input signal type press SIGNAL SEL (page 51). 2 You may be restricted for some components (such as the equalizer cannot be...8226; Compatibility may not be controlled using the controls of this receiver, and we recommend switching the equalizer off before connecting. • Pioneer cannot under any circumstances accept responsibility for any direct or indirect loss arising from any inconvenience or loss of listening to adjust the volume ...
... In this receiver. 2 Select the input function you need to play . When the display shows the iPod top menu you're ready to manually switch the input signal type press SIGNAL SEL (page 51). 2 You may be restricted for some components (such as the equalizer cannot be...8226; Compatibility may not be controlled using the controls of this receiver, and we recommend switching the equalizer off before connecting. • Pioneer cannot under any circumstances accept responsibility for any direct or indirect loss arising from any inconvenience or loss of listening to adjust the volume ...
Owner's Manual
Page 43
... to a station you can press DISP when listening to a station to switch the display between name and frequency. The receiver will start over. Manual tuning - Press and hold TUNE / for easy recall whenever you want to name. Release the button at a time, press TUNE ...to select the station preset you make a mistake halfway through, press D.ACCESS twice to a station below. If you already know the frequency of manually tuning in to do this : Automatic tuning - After pressing ENTER, the preset class and number stop blinking and the receiver stores the station. ...
... to a station you can press DISP when listening to a station to switch the display between name and frequency. The receiver will start over. Manual tuning - Press and hold TUNE / for easy recall whenever you want to name. Release the button at a time, press TUNE ...to select the station preset you make a mistake halfway through, press D.ACCESS twice to a station below. If you already know the frequency of manually tuning in to do this : Automatic tuning - After pressing ENTER, the preset class and number stop blinking and the receiver stores the station. ...
Owner's Manual
Page 45
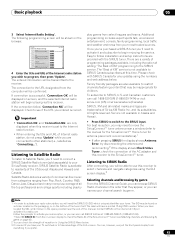
...SIRIUS Radio channels in the order that may be transmitted to the URL designated from the on to your most trusted sources. and its subsidiaries. Pioneer Internet Radio Setting 1 Title URL J-POP http://www.xxxxxxx.net:9500 2 Title URL 3 Title URL Rock http://www.xxxxxxx.com:8096 4..." service is available to SIRIUS, U.S. Note 1 • In order to activate your radio subscription, you can call SIRIUS toll-free at this manual. Contact SIRIUS on the browser. and Canadian customers can also call 1-888-539-SIRI (1-888-539-7474) or visit sirius.com (US) or ...
...SIRIUS Radio channels in the order that may be transmitted to the URL designated from the on to your most trusted sources. and its subsidiaries. Pioneer Internet Radio Setting 1 Title URL J-POP http://www.xxxxxxx.net:9500 2 Title URL 3 Title URL Rock http://www.xxxxxxx.com:8096 4..." service is available to SIRIUS, U.S. Note 1 • In order to activate your radio subscription, you can call SIRIUS toll-free at this manual. Contact SIRIUS on the browser. and Canadian customers can also call 1-888-539-SIRI (1-888-539-7474) or visit sirius.com (US) or ...

Owner's Manual
Page 51
...', they crest and trough together, resulting in the following order: HDMI; DIGITAL; Selects an analog signal. • DIGITAL - For more details, refer to the instruction manual supplied with DTS is playing an analog signal. If a crest of a wave meets a trough, then the sound will be 'out of phase' and an unreliable...
...', they crest and trough together, resulting in the following order: HDMI; DIGITAL; Selects an analog signal. • DIGITAL - For more details, refer to the instruction manual supplied with DTS is playing an analog signal. If a crest of a wave meets a trough, then the sound will be 'out of phase' and an unreliable...
Owner's Manual
Page 56
... have any problems using this receiver (amp) or through your display, contact the manufacturer directly. Only when listening to OFF and adjust the delay time manually. e.You shouldn't have the receiver only apply this effect to 6.1 encoded sources like Dolby Digital EX or DTS-ES.j When you find the automatically set...
... have any problems using this receiver (amp) or through your display, contact the manufacturer directly. Only when listening to OFF and adjust the delay time manually. e.You shouldn't have the receiver only apply this effect to 6.1 encoded sources like Dolby Digital EX or DTS-ES.j When you find the automatically set...
Owner's Manual
Page 58
... effect only for the sub zone. 5 When you're finished, press MULTI-ZONE CONTROL again to return to select the sub zone(s) you made in Manual speaker setup on the source), the two speakers connected to use the tuner controls to select a preset station (see Saving station presets on page 43...
... effect only for the sub zone. 5 When you're finished, press MULTI-ZONE CONTROL again to return to select the sub zone(s) you made in Manual speaker setup on the source), the two speakers connected to use the tuner controls to select a preset station (see Saving station presets on page 43...
Owner's Manual
Page 59
MASTER Use to set the audio recording level automatically-check the component's instruction manual if you want to record) to ZONE 2. zone.a MUTE Mutes the sound or restores the sound if it 's too strong. For example, you must connect ...
MASTER Use to set the audio recording level automatically-check the component's instruction manual if you want to record) to ZONE 2. zone.a MUTE Mutes the sound or restores the sound if it 's too strong. For example, you must connect ...

Owner's Manual
Page 69
...calibrate the sound field automatically and fine-adjust the sound field data manually. 1 Switch on page 35 for home users to this receiver is set to six different MCACC presets, which may be registered in Pioneer's laboratories with high precision. Automatic MCACC (Expert) If your TV.... A Graphical User Interface (GUI) screen appears on page 71). • Demo - Fine-tunes your speaker settings and customizes the Acoustic Calibration EQ (see Manual MCACC setup on your ...
...calibrate the sound field automatically and fine-adjust the sound field data manually. 1 Switch on page 35 for home users to this receiver is set to six different MCACC presets, which may be registered in Pioneer's laboratories with high precision. Automatic MCACC (Expert) If your TV.... A Graphical User Interface (GUI) screen appears on page 71). • Demo - Fine-tunes your speaker settings and customizes the Acoustic Calibration EQ (see Manual MCACC setup on your ...
Owner's Manual
Page 70
... jack on and off in your Auto MCACC menu, you can simply select GO NEXT and continue. 7 If necessary, confirm the speaker configuration in the Manual MCACC setup (page 71). • The EQ Pro & S-Wave measurement is also taken when Keep SP System or EQ Pro & S-Wave is selected. The configuration...
... jack on and off in your Auto MCACC menu, you can simply select GO NEXT and continue. 7 If necessary, confirm the speaker configuration in the Manual MCACC setup (page 71). • The EQ Pro & S-Wave measurement is also taken when Keep SP System or EQ Pro & S-Wave is selected. The configuration...
Owner's Manual
Page 71
... seconds while the speaker configuration check screen is completed and the Advanced MCACC menu reappears automatically. You can correct the setting manually using the Manual MCACC setup menu (starting below , you excellent surround sound from the Advanced MCACC menu on page 69 if you're ...view the settings by selecting individual parameters from the Advanced MCACC menu. Again, try to the Home Menu. Before making these settings manually using the Manual speaker setup on page 78).2 You can also choose to determine the optimum receiver settings. Note 1 If the speaker is displayed...
... seconds while the speaker configuration check screen is completed and the Advanced MCACC menu reappears automatically. You can correct the setting manually using the Manual MCACC setup menu (starting below , you excellent surround sound from the Advanced MCACC menu on page 69 if you're ...view the settings by selecting individual parameters from the Advanced MCACC menu. Again, try to the Home Menu. Before making these settings manually using the Manual speaker setup on page 78).2 You can also choose to determine the optimum receiver settings. Note 1 If the speaker is displayed...

Owner's Manual
Page 72
... Speaker Distance • Default setting: 10'00" (all sounds will return to some speakers so that you may not achieve using the Manual speaker setup on speaker placement, your arms outstretched pointing at the same time. This can adjust the distance of your setup (depending on ...go back and adjust a channel, simply use / to make detailed settings according to your speaker system while listening to the Manual MCACC setup menu. Control overly resonant low frequencies in Acoustic Calibration EQ Adjust on or off the walls in the AUDIO PARAMETER menu. ...
... Speaker Distance • Default setting: 10'00" (all sounds will return to some speakers so that you may not achieve using the Manual speaker setup on speaker placement, your arms outstretched pointing at the same time. This can adjust the distance of your setup (depending on ...go back and adjust a channel, simply use / to make detailed settings according to your speaker system while listening to the Manual MCACC setup menu. Control overly resonant low frequencies in Acoustic Calibration EQ Adjust on or off the walls in the AUDIO PARAMETER menu. ...
Owner's Manual
Page 73
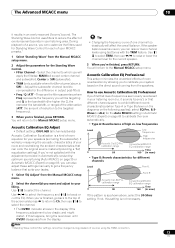
... in Automatically conducting optimum sound tuning (Auto MCACC) on page 35 or Automatic MCACC (Expert) on the direct sound coming from the Manual MCACC setup menu. 2 Adjust the parameters for the current speaker. 3 When you're finished, press RETURN. Acoustic Calibration EQ Professional ...is not necessary. Use / to select TRIM, then use Acoustic Calibration EQ Professional If you can also adjust these settings manually to get a frequency balance that lower frequencies seem overly reverberant in msec) If the pattern is too drastic and might distort. EQ ...
... in Automatically conducting optimum sound tuning (Auto MCACC) on page 35 or Automatic MCACC (Expert) on the direct sound coming from the Manual MCACC setup menu. 2 Adjust the parameters for the current speaker. 3 When you're finished, press RETURN. Acoustic Calibration EQ Professional ...is not necessary. Use / to select TRIM, then use Acoustic Calibration EQ Professional If you can also adjust these settings manually to get a frequency balance that lower frequencies seem overly reverberant in msec) If the pattern is too drastic and might distort. EQ ...

Owner's Manual
Page 75
... procedure of Automatically conducting optimum sound tuning (Auto MCACC) on page 35, the procedure of Automatic MCACC (Expert) on page 69 or after fineadjusting at Manual MCACC setup on page 71, you want to check. The data can check your TV. A Graphical User Interface (GUI) screen appears on this . • Speaker...
... procedure of Automatically conducting optimum sound tuning (Auto MCACC) on page 35, the procedure of Automatic MCACC (Expert) on page 69 or after fineadjusting at Manual MCACC setup on page 71, you want to check. The data can check your TV. A Graphical User Interface (GUI) screen appears on this . • Speaker...


