Owner's Manual
Page 4
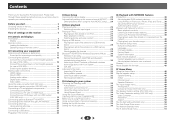
... Home Menu Using the Home Menu 46 Manual speaker setup 46 Speaker Setting 46 X.Over 47 Channel Level 48 Speaker Distance 48 The Input Assign menu 49 Analog Input 49 Component Input (VSX-1022 only 49 The Speaker System setting (VSX-1022 only 49 The Video Parameter setting (VSX-1022 only 49 Video Converter 49 Resolution 50 Aspect 50 The Pre Out Setting (VSX-822 only 50 The Auto Power Down menu 51 The Network Standby menu 51 The FL Demo Mode menu 51 4 Please read through LAN interface 20 Connecting antennas 21 Using external antennas...
... Home Menu Using the Home Menu 46 Manual speaker setup 46 Speaker Setting 46 X.Over 47 Channel Level 48 Speaker Distance 48 The Input Assign menu 49 Analog Input 49 Component Input (VSX-1022 only 49 The Speaker System setting (VSX-1022 only 49 The Video Parameter setting (VSX-1022 only 49 Video Converter 49 Resolution 50 Aspect 50 The Pre Out Setting (VSX-822 only 50 The Auto Power Down menu 51 The Network Standby menu 51 The FL Demo Mode menu 51 4 Please read through LAN interface 20 Connecting antennas 21 Using external antennas...
Owner's Manual
Page 6
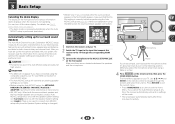
...; Using the Sound Retriever (page 34) • Better sound using a digital connection from the Blu-ray Disc/DVD player to the receiver. • About the video converter (VSX-1022 only) (page 16) • About video outputs connection (VSX-822 only) (page 16) • Connecting a TV and playback components (page 17) • Connecting antennas (page 21) • Plugging in the receiver (page 22) 3 Power On Make sure you've set the video input on -screen automatic MCACC setup to set...
...; Using the Sound Retriever (page 34) • Better sound using a digital connection from the Blu-ray Disc/DVD player to the receiver. • About the video converter (VSX-1022 only) (page 16) • About video outputs connection (VSX-822 only) (page 16) • Connecting a TV and playback components (page 17) • Connecting antennas (page 21) • Plugging in the receiver (page 22) 3 Power On Make sure you've set the video input on -screen automatic MCACC setup to set...
Owner's Manual
Page 7
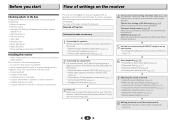
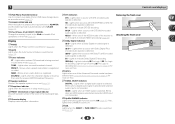
... SETUP MIC jack Use to on after the Auto MCACC setup (page 23)). 3 Receiver control buttons SPEAKERS - Switches between Auto surround mode (page 33) and Stream Direct playback (page 34). Switches between the modes of this unit. PRESET / - lights when the component is connected (page 17). 7 iPod iPhone iPad indicator Lights when an iPod/iPhone/iPad is connected and iPod/USB input is no sound output from the speakers. The listening mode when the sound is automatically set to connect a microphone when performing Auto...
... SETUP MIC jack Use to on after the Auto MCACC setup (page 23)). 3 Receiver control buttons SPEAKERS - Switches between Auto surround mode (page 33) and Stream Direct playback (page 34). Switches between the modes of this unit. PRESET / - lights when the component is connected (page 17). 7 iPod iPhone iPad indicator Lights when an iPod/iPhone/iPad is connected and iPod/USB input is no sound output from the speakers. The listening mode when the sound is automatically set to connect a microphone when performing Auto...
Owner's Manual
Page 8
... - Blinks when an HDMI signal is selected and selected HDMI input is not provided. 28 Up Mix/DIMMER indicator Lights when the Up Mix function is set to indicate Dolby Digital EX decoding. 2PLII(x) - Lights when the DIRECT or PURE DIRECT mode is switched on the iPod (page 28). Blinks when a radio station is selected. kHz/MHz - Lights to ON (page 35). Lights when a digital audio signal is registered. HDMI - Lights when one of the NEO:6 modes of the receiver is...
... - Blinks when an HDMI signal is selected and selected HDMI input is not provided. 28 Up Mix/DIMMER indicator Lights when the Up Mix function is set to indicate Dolby Digital EX decoding. 2PLII(x) - Lights when the DIRECT or PURE DIRECT mode is switched on the iPod (page 28). Blinks when a radio station is selected. kHz/MHz - Lights to ON (page 35). Lights when a digital audio signal is registered. HDMI - Lights when one of the NEO:6 modes of the receiver is...
Owner's Manual
Page 9
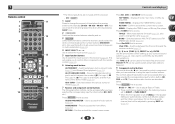
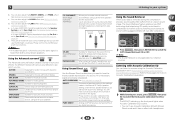
... 5 Input function buttons Use to select the input source to set up your surround sound system (page 46). Also used to control a component after you have selected the corresponding input function button (BD, DVD, etc.). Use to adjust Bass or Treble. • These controls are used to change the amount of 2 Pro Logic II, 2 Pro Logic IIx, 2 Pro Logic IIz and NEO:6, and the Auto level control stereo mode (page 33). 1 Remote control 1 RECEIVER SLEEP SOURCE 2 3 RECEIVER 4 INPUT 11 12 5 6 AUDIO PARAMETER TOP 7 MENU TUNE TOOLS MENU PRESET PRESET ENTER 8 HOME MENU PTY iPod...
... 5 Input function buttons Use to select the input source to set up your surround sound system (page 46). Also used to control a component after you have selected the corresponding input function button (BD, DVD, etc.). Use to adjust Bass or Treble. • These controls are used to change the amount of 2 Pro Logic II, 2 Pro Logic IIx, 2 Pro Logic IIz and NEO:6, and the Auto level control stereo mode (page 33). 1 Remote control 1 RECEIVER SLEEP SOURCE 2 3 RECEIVER 4 INPUT 11 12 5 6 AUDIO PARAMETER TOP 7 MENU TUNE TOOLS MENU PRESET PRESET ENTER 8 HOME MENU PTY iPod...
Owner's Manual
Page 10
...; Direct sunlight or fluorescent light is shining onto the remote sensor. • The receiver is located near a heater. Use to set the listening volume. 15 MUTE Mutes/unmutes the sound. 16 DISP Switches the display of the component to directly select a radio frequency (page 32) or the tracks on your country or area. - There are dedicated to control the TV assigned to this unit. Press to select the audio input signal...
...; Direct sunlight or fluorescent light is shining onto the remote sensor. • The receiver is located near a heater. Use to set the listening volume. 15 MUTE Mutes/unmutes the sound. 16 DISP Switches the display of the component to directly select a radio frequency (page 32) or the tracks on your country or area. - There are dedicated to control the TV assigned to this unit. Press to select the audio input signal...
Owner's Manual
Page 12
.... • When not connecting a subwoofer, connect speakers with a normal impedance between 6 Ω and 16 Ω. Be sure to conduct the Auto MCACC (speaker environment setting) procedure. In this unit to add a surround back or front height speaker. For DVD-Audio, the speakers should be sure to complete all speakers are securely installed. Connecting the speakers The receiver will work with just two stereo speakers (the front speakers in the diagram) but also reduces...
.... • When not connecting a subwoofer, connect speakers with a normal impedance between 6 Ω and 16 Ω. Be sure to conduct the Auto MCACC (speaker environment setting) procedure. In this unit to add a surround back or front height speaker. For DVD-Audio, the speakers should be sure to complete all speakers are securely installed. Connecting the speakers The receiver will work with just two stereo speakers (the front speakers in the diagram) but also reduces...
Owner's Manual
Page 13
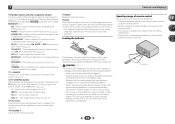
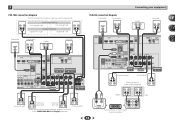
... LINE LEVEL INPUT Center Front left Subwoofer LINE LEVEL INPUT Front right Center Front left When using only one surround back speaker, connect it to the SURROUND BACK L (Single) terminals. 13 R L ANALOG AUDIO IN R SPEAKER Surround back or front height channel amplifier L SPEAKER CENTER SPEAKERS Class 2 Wiring FRONT HEIGHT SELECTABLE SEE INSTRUCTION MANUAL SELECTABLE VOIR LE MODE D'EMPLOI R L HDMI OUT IN LAN (10/100) DVD SAT/CBL PREOUT BSDUBWGOAMOE FERDVR/BDR VIDEO PRE OUT SUB WOOFER ADAPTER PORT COAXIAL ASSIGNABLE IN 1 (CD) OPTICAL ASSIGNABLE IN 1 (TV) (OUTPUT...
... LINE LEVEL INPUT Center Front left Subwoofer LINE LEVEL INPUT Front right Center Front left When using only one surround back speaker, connect it to the SURROUND BACK L (Single) terminals. 13 R L ANALOG AUDIO IN R SPEAKER Surround back or front height channel amplifier L SPEAKER CENTER SPEAKERS Class 2 Wiring FRONT HEIGHT SELECTABLE SEE INSTRUCTION MANUAL SELECTABLE VOIR LE MODE D'EMPLOI R L HDMI OUT IN LAN (10/100) DVD SAT/CBL PREOUT BSDUBWGOAMOE FERDVR/BDR VIDEO PRE OUT SUB WOOFER ADAPTER PORT COAXIAL ASSIGNABLE IN 1 (CD) OPTICAL ASSIGNABLE IN 1 (TV) (OUTPUT...
Owner's Manual
Page 14
... the power cord, switch the power into standby. Important • Before making or changing connections, switch off (SP) when headphones are for up to connect the terminal in the illustration). HDMI Be careful to 8 channels • Input of the following digital audio formats: - This receiver supports the functions described below through HDMI connections. • Digital transfer of multi-channel linear PCM digital audio signals (192 kHz or less) for the Surr.Back setting only. Use the SPEAKERS button...
... the power cord, switch the power into standby. Important • Before making or changing connections, switch off (SP) when headphones are for up to connect the terminal in the illustration). HDMI Be careful to 8 channels • Input of the following digital audio formats: - This receiver supports the functions described below through HDMI connections. • Digital transfer of multi-channel linear PCM digital audio signals (192 kHz or less) for the Surr.Back setting only. Use the SPEAKERS button...
Owner's Manual
Page 15
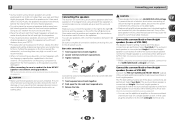
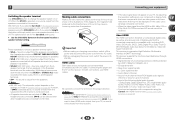
...When an HDMI cable with a built-in the audio may be used to connect to this way, interference between audio formats or beginning playback. • Turning on/off the device connected to connect analog audio components. Coaxial digital audio cable COAINXIAL OPTINICAL Optical cable Note • When connecting optical cables, be recognized. Yellow VIDEO Component video cables (VSX-1022 only) Use component video cables to damage the shutter protecting the optical socket. • When storing optical cable, coil loosely. White (Left) L AUDIO R Red (Right) Digital audio cables...
...When an HDMI cable with a built-in the audio may be used to connect to this way, interference between audio formats or beginning playback. • Turning on/off the device connected to connect analog audio components. Coaxial digital audio cable COAINXIAL OPTINICAL Optical cable Note • When connecting optical cables, be recognized. Yellow VIDEO Component video cables (VSX-1022 only) Use component video cables to damage the shutter protecting the optical socket. • When storing optical cable, coil loosely. White (Left) L AUDIO R Red (Right) Digital audio cables...
Owner's Manual
Page 20
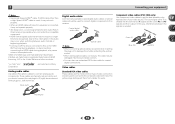
... cable (sold separately) IN LAN (10/100) VSX-822 COAXIAL ASSIGNABLE IN 1 SAT/CBL BD GAME DVR/BDR VIDEO (CD) PRE OUT SUB WOOFER ADAPTER PORT (OUTPUT 5 V SURR BACK/ 0.1 A MAX) L FRONT HEIGHT (Single) PRE OUT ANTENNA FRONT R L R AM LOOP CENTER SURROUND R L DVD IN VIDEO L IN R DVD SAT/CBL ANALOG IN 1 (CD) ASSIGNABLE FM UNBAL 75 AUDIO Class 2 Wiring SPEAKERS A CAUTION: AT SPEAKER IMPEDANCE ENC 6 -16 . 6 Connect the LAN terminal on this receiver to Internet radio stations, you...
... cable (sold separately) IN LAN (10/100) VSX-822 COAXIAL ASSIGNABLE IN 1 SAT/CBL BD GAME DVR/BDR VIDEO (CD) PRE OUT SUB WOOFER ADAPTER PORT (OUTPUT 5 V SURR BACK/ 0.1 A MAX) L FRONT HEIGHT (Single) PRE OUT ANTENNA FRONT R L R AM LOOP CENTER SURROUND R L DVD IN VIDEO L IN R DVD SAT/CBL ANALOG IN 1 (CD) ASSIGNABLE FM UNBAL 75 AUDIO Class 2 Wiring SPEAKERS A CAUTION: AT SPEAKER IMPEDANCE ENC 6 -16 . 6 Connect the LAN terminal on this receiver to Internet radio stations, you...
Owner's Manual
Page 23
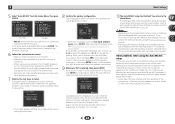
... speakers and the microphone. For details, see page 50). (Here is no settings will be selected as an input source. • VSX-1022 only: When both channel delay and channel level. Use HDMI connection for surround sound (MCACC) The Auto Multi-Channel Acoustic Calibration (MCACC) setup measures the acoustic characteristics of inactivity. 23 BAND TUNER EDIT CONTROL TUNE ON/OFF PRESET ENTER • The demo mode is canceled automatically when the Auto TO SURROUND/ ALC/ REAM DIRECT STANDARD SURR ADVANCED SURROUND SOUND iPod...
... speakers and the microphone. For details, see page 50). (Here is no settings will be selected as an input source. • VSX-1022 only: When both channel delay and channel level. Use HDMI connection for surround sound (MCACC) The Auto Multi-Channel Acoustic Calibration (MCACC) setup measures the acoustic characteristics of inactivity. 23 BAND TUNER EDIT CONTROL TUNE ON/OFF PRESET ENTER • The demo mode is canceled automatically when the Auto TO SURROUND/ ALC/ REAM DIRECT STANDARD SURR ADVANCED SURROUND SOUND iPod...
Owner's Manual
Page 24
... 're finished, go to the next step. If this . 1 . Manual SP Setup 3 . Input Assign 4 . HDMI Setup 6 . FL Demo Mode VSX-1022 VSX-822 • Mic In! Back [ --- ] Subwoofer [ YES ] 10:Next OK Return • With error messages (such as shown. 1 . If selecting RETRY doesn't fix the problem, turn on -screen should give you see Other problems when using the Auto MCACC setup below for notes regarding background noise and other possible interference. 7 Wait...
... 're finished, go to the next step. If this . 1 . Manual SP Setup 3 . Input Assign 4 . HDMI Setup 6 . FL Demo Mode VSX-1022 VSX-822 • Mic In! Back [ --- ] Subwoofer [ YES ] 10:Next OK Return • With error messages (such as shown. 1 . If selecting RETRY doesn't fix the problem, turn on -screen should give you see Other problems when using the Auto MCACC setup below for notes regarding background noise and other possible interference. 7 Wait...
Owner's Manual
Page 25
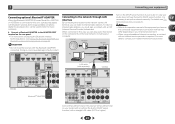
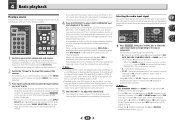
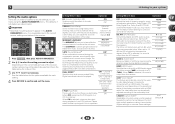
SLEEP SOURCE RECEIVER INPUT AUDIO PARAMETER TOP MENU TUNE TOOLS MENU PRESET PRESET ENTER HOME MENU PTY iPod CTRL TUNE BAND RETURN MUTE 1 Switch on the remote control, or by using a surround back speaker, 2D is selected for O1. Note • You may only get digital 2 channel stereo and analog sound. Selects an HDMI signal. For other components using the input function buttons. 1 2 3 DISP RECEIVER SLEEP SOURCE 4 5 6 CH INPUT 7 8 9 CH SHIFT CLR 0 ENTER Press RECEIVER , then press SIGNAL SEL to select the audio input signal corresponding to...
SLEEP SOURCE RECEIVER INPUT AUDIO PARAMETER TOP MENU TUNE TOOLS MENU PRESET PRESET ENTER HOME MENU PTY iPod CTRL TUNE BAND RETURN MUTE 1 Switch on the remote control, or by using a surround back speaker, 2D is selected for O1. Note • You may only get digital 2 channel stereo and analog sound. Selects an HDMI signal. For other components using the input function buttons. 1 2 3 DISP RECEIVER SLEEP SOURCE 4 5 6 CH INPUT 7 8 9 CH SHIFT CLR 0 ENTER Press RECEIVER , then press SIGNAL SEL to select the audio input signal corresponding to...
Owner's Manual
Page 34
... a stereo source, using just the front speakers and the subwoofer. Back (see Setting the Audio options on page 23. All unnecessary signal processing is only applicable to create natural surround sound effects using all of surround effects. c. ADVANCED GAME Suitable for acoustic music sources. AUTO SURROUND See Auto playback on Acoustic Calibration Equalization. Phase Control, Acoustic Calibration EQ, Sound Delay, Auto Delay, LFE Attenuate and Center image functions are available. effect (see which you to 2-channel sources. Try different modes...
... a stereo source, using just the front speakers and the subwoofer. Back (see Setting the Audio options on page 23. All unnecessary signal processing is only applicable to create natural surround sound effects using all of surround effects. c. ADVANCED GAME Suitable for acoustic music sources. AUTO SURROUND See Auto playback on Acoustic Calibration Equalization. Phase Control, Acoustic Calibration EQ, Sound Delay, Auto Delay, LFE Attenuate and Center image functions are available. effect (see which you to 2-channel sources. Try different modes...
Owner's Manual
Page 36
...) ON Switches on the operational status of this is the recommended value. When THRU is selected, no sound is output from front speakers F.PCM (Fixed PCM) OFF This is useful if you can make using a center speaker) Spreads the center channel between components connected with an HDMI cable. CH1 - Please select another input signal if this receiver (AMP) or through to 7 Default: 3 36 Important • Note that helps bring CD quality sound back to adjust. The LFE is output from...
...) ON Switches on the operational status of this is the recommended value. When THRU is selected, no sound is output from front speakers F.PCM (Fixed PCM) OFF This is useful if you can make using a center speaker) Spreads the center channel between components connected with an HDMI cable. CH1 - Please select another input signal if this receiver (AMP) or through to 7 Default: 3 36 Important • Note that helps bring CD quality sound back to adjust. The LFE is output from...
Owner's Manual
Page 46
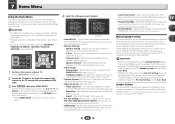
... standby (see below). - Set the audio return channel function or set to Surr. Manual speaker setup This receiver allows you to make detailed settings to adjust. Speaker Setting Use this receiver to the ANALOG IN1 audio input (page 49). - Auto MCACC 2 . Analog Input - Component Input (VSX-1022 only) - Back. • VSX-822 only: Depending on your TV. Manual SP Setup 3 . Specify the size and number of when the Speaker System setting is selected. 1 Switch on the remote control to navigate through the corresponding HDMI cable. 3 Press RECEIVER , then press HOME MENU...
... standby (see below). - Set the audio return channel function or set to Surr. Manual speaker setup This receiver allows you to make detailed settings to adjust. Speaker Setting Use this receiver to the ANALOG IN1 audio input (page 49). - Auto MCACC 2 . Analog Input - Component Input (VSX-1022 only) - Back. • VSX-822 only: Depending on your TV. Manual SP Setup 3 . Specify the size and number of when the Speaker System setting is selected. 1 Switch on the remote control to navigate through the corresponding HDMI cable. 3 Press RECEIVER , then press HOME MENU...
Owner's Manual
Page 52
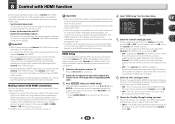
... corresponding HDMI cable. 3 Press RECEIVER , then press HOME MENU. Video Parameter 6 . Making Control with HDMI-compatible components. When the TV and receiver are possible when the component is input to switch on your TV. Press RECEIVER to the receiver via the HDMI terminal. • ON - Home Menu 6 . Input Assign 4 . Auto Power Down 8 . When a TV supporting the HDMI Audio Return Channel function is connected to the receiver, the sound of the TV is connected to the receiver using an HDMI cable. • Synchronized amp mode The receiver's volume can...
... corresponding HDMI cable. 3 Press RECEIVER , then press HOME MENU. Video Parameter 6 . Making Control with HDMI-compatible components. When the TV and receiver are possible when the component is input to switch on your TV. Press RECEIVER to the receiver via the HDMI terminal. • ON - Home Menu 6 . Input Assign 4 . Auto Power Down 8 . When a TV supporting the HDMI Audio Return Channel function is connected to the receiver, the sound of the TV is connected to the receiver using an HDMI cable. • Synchronized amp mode The receiver's volume can...
Owner's Manual
Page 59
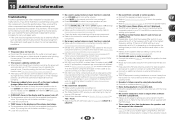
... receiver (see About video outputs connection (VSX-822 only) on page 16). VSX-1022 only: Check The Input Assign menu on page 49 to have an LFE channel. Switch the subwoofer setting in the display and the volume level drops. The temperature within the unit has exceeded the allowable value. If the message persists, call a Pioneer authorized independent service company. The power suddenly turns on . Disconnect the power plug...
... receiver (see About video outputs connection (VSX-822 only) on page 16). VSX-1022 only: Check The Input Assign menu on page 49 to have an LFE channel. Switch the subwoofer setting in the display and the volume level drops. The temperature within the unit has exceeded the allowable value. If the message persists, call a Pioneer authorized independent service company. The power suddenly turns on . Disconnect the power plug...
Owner's Manual
Page 61
... radio stations. The firewall settings for HDMI compatibility information). Set the display volume to the number of the source, or connect using the composite video jacks. Depending on this receiver cannot be displayed. Check whether the connection status is set to AMP (page 36). If the component is a DVI device, use a separate connection for the audio. HDMI format digital audio transmissions require a longer time to be limited to minimum when using an HDMI cable. Change the output settings...
... radio stations. The firewall settings for HDMI compatibility information). Set the display volume to the number of the source, or connect using the composite video jacks. Depending on this receiver cannot be displayed. Check whether the connection status is set to AMP (page 36). If the component is a DVI device, use a separate connection for the audio. HDMI format digital audio transmissions require a longer time to be limited to minimum when using an HDMI cable. Change the output settings...


