
Owner's Manual
Page 4
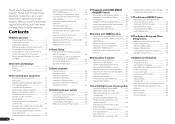
... 58 Manual MCACC setup 60 Checking MCACC Data 62 Data Management 63 12 The System Setup and Other Setup menus Making receiver settings from the System Setup menu 64 Manual speaker setup 64 Network Setup menu 66 Checking the Network Information 67 The Other Setup menu 68 13 Additional information Troubleshooting 1 70... Specifications 86 Preset code list 86 After you will know how to control other components 52 Selecting preset codes directly 52 Programming signals from other Pioneer components with this...
... 58 Manual MCACC setup 60 Checking MCACC Data 62 Data Management 63 12 The System Setup and Other Setup menus Making receiver settings from the System Setup menu 64 Manual speaker setup 64 Network Setup menu 66 Checking the Network Information 67 The Other Setup menu 68 13 Additional information Troubleshooting 1 70... Specifications 86 Preset code list 86 After you will know how to control other components 52 Selecting preset codes directly 52 Programming signals from other Pioneer components with this...
Owner's Manual
Page 5
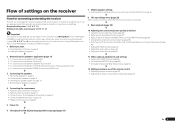
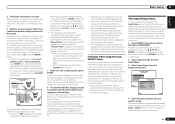
... the sound and picture quality as desired ! Required setting item: 1, 2, 3, 4, 5, 7, 9 Setting to make the connections and settings. For instructions on the computer using connections other components (page 52) En 5 Installing your speaker system on /off the Acoustic Calibration EQ, Auto ... 6 Changing the OSD display language (OSD Language) (page 24) j 7 MCACC speaker settings ! Flow of settings on page 13 ! Connecting the speakers on the receiver Flow for connecting and setting the receiver The unit is a full-fledged AV receiver equipped with an abundance of...
... the sound and picture quality as desired ! Required setting item: 1, 2, 3, 4, 5, 7, 9 Setting to make the connections and settings. For instructions on the computer using connections other components (page 52) En 5 Installing your speaker system on /off the Acoustic Calibration EQ, Auto ... 6 Changing the OSD display language (OSD Language) (page 24) j 7 MCACC speaker settings ! Flow of settings on page 13 ! Connecting the speakers on the receiver Flow for connecting and setting the receiver The unit is a full-fledged AV receiver equipped with an abundance of...
Owner's Manual
Page 7
...the "Terms of this CD-ROM. This CD-ROM can damage speakers or cause impaired hearing due to play this receiver's AVNavigator, then... player can be used with a personal computer. Permission to make various AVNavigator settings. ! Pioneer Corporation does not guarantee the operation of Use" indicated below before using MCACC ...Pioneer Corporation. Interactive Manual - Glossary - Note To use this CD-ROM belongs to uninstall (delete) the AVNavigator from the computer's CD drive. From the Start menu, click "Program" d "PIONEER CORPORATION" d "AVNavigator(VSX-1021...
...the "Terms of this CD-ROM. This CD-ROM can damage speakers or cause impaired hearing due to play this receiver's AVNavigator, then... player can be used with a personal computer. Permission to make various AVNavigator settings. ! Pioneer Corporation does not guarantee the operation of Use" indicated below before using MCACC ...Pioneer Corporation. Interactive Manual - Glossary - Note To use this CD-ROM belongs to uninstall (delete) the AVNavigator from the computer's CD drive. From the Start menu, click "Program" d "PIONEER CORPORATION" d "AVNavigator(VSX-1021...

Owner's Manual
Page 9
... Character display Displays various system information. 19 Remote control mode indicator Lights to indicate the receiver's remote control mode setting. (Not displayed when set to indicate the current speaker system using MPX. 11 Lights when the sound is being received in auto stereo mode. ! ALC - Lights...36). 2 Program format indicators Light to indicate the channels to which digital signals are more selectable items when making the various settings. 15 Speaker indicators Lights to 1.) (page 68) En 9 Lights when a broadcast is in the corresponding format is being input) ! AUTO ...
... Character display Displays various system information. 19 Remote control mode indicator Lights to indicate the receiver's remote control mode setting. (Not displayed when set to indicate the current speaker system using MPX. 11 Lights when the sound is being received in auto stereo mode. ! ALC - Lights...36). 2 Program format indicators Light to indicate the channels to which digital signals are more selectable items when making the various settings. 15 Speaker indicators Lights to 1.) (page 68) En 9 Lights when a broadcast is in the corresponding format is being input) ! AUTO ...

Owner's Manual
Page 10
... and Stream Direct mode (page 36). ! Use with the display's dimmer adjustment (page 50). ! CHANNEL RECEIVER VSX-1021 HDMI iPod iPhone iPad INPUT SELECTOR STANDBY / ON SPEAKERS CONTROL - BAND - AUTO SURR/ALC/STREAM DIRECT - Press for audio and photo playback (page 21). 15 SOUND...PARAMETER menu (page 46). ! ADVANCED MCACC - TUNE i/j - Blinks when connecting an HDMIequipped component; Lights to indicate iPod/ iPhone/iPad is automatically set to switch various modes (2 Pro Logic, Neo:6, Stereo etc.) (page 35). ! TUNER EDIT - Find preset stations (page 31). 7 Remote ...
... and Stream Direct mode (page 36). ! Use with the display's dimmer adjustment (page 50). ! CHANNEL RECEIVER VSX-1021 HDMI iPod iPhone iPad INPUT SELECTOR STANDBY / ON SPEAKERS CONTROL - BAND - AUTO SURR/ALC/STREAM DIRECT - Press for audio and photo playback (page 21). 15 SOUND...PARAMETER menu (page 46). ! ADVANCED MCACC - TUNE i/j - Blinks when connecting an HDMIequipped component; Lights to indicate iPod/ iPhone/iPad is automatically set to switch various modes (2 Pro Logic, Neo:6, Stereo etc.) (page 35). ! TUNER EDIT - Find preset stations (page 31). 7 Remote ...
Owner's Manual
Page 11
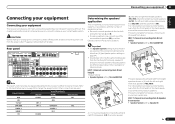
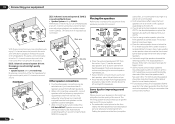
...front left and right front height speakers shown in [A] with the number of the connections shown below are used. It is also possible to only connect one from the front height, front wide, speaker B and surround back speakers. Speaker System setting: Speaker B En 11 This chapter ...explains the kinds of the surround back speakers (SB) or neither. Rear panel HDMI IN 1 ASSIGNABLE 1 VIDEO 1 IN BD ...
...front left and right front height speakers shown in [A] with the number of the connections shown below are used. It is also possible to only connect one from the front height, front wide, speaker B and surround back speakers. Speaker System setting: Speaker B En 11 This chapter ...explains the kinds of the surround back speakers (SB) or neither. Rear panel HDMI IN 1 ASSIGNABLE 1 VIDEO 1 IN BD ...
Owner's Manual
Page 12
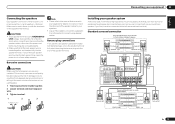
... than for high sound quality with stereo playback of the front left and right front speakers. Speaker System setting: ZONE 2 With these connections you put your system. ! Speaker System setting: Front Bi-Amp Bi-amping connection of the front speakers for home theater playback. ! Your favorite speaker connections can be sure to 90 cm (2 ft. to place...
... than for high sound quality with stereo playback of the front left and right front speakers. Speaker System setting: ZONE 2 With these connections you put your system. ! Speaker System setting: Front Bi-Amp Bi-amping connection of the front speakers for home theater playback. ! Your favorite speaker connections can be sure to 90 cm (2 ft. to place...
Owner's Manual
Page 13
...as a pair, but also reduces the risk of the bare speaker wire touches the back panel it must be used for details on the speakers themselves. Left Surround left Speaker B setting Speaker B - Right ZONE 2 setting ZONE 2 - Make sure to match these up with banana ...plugs, screw the speaker terminal fully shut, then plug the banana plug into the speaker terminal. Note ! Please refer to use speaker cables terminated...
...as a pair, but also reduces the risk of the bare speaker wire touches the back panel it must be used for details on the speakers themselves. Left Surround left Speaker B setting Speaker B - Right ZONE 2 setting ZONE 2 - Make sure to match these up with banana ...plugs, screw the speaker terminal fully shut, then plug the banana plug into the speaker terminal. Note ! Please refer to use speaker cables terminated...
Owner's Manual
Page 14
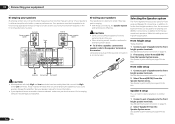
...do not remove it for the second connection is when you 're using. Make this . 14 En See Speaker system setting on page 64 to do this way. ! Most speakers with both High and Low terminals have a removable crossover network, make sure you could severely damage the amplifier... back terminals can also be used for bi-amping shown above. % To bi-wire a speaker, connect two speaker cords to the application. See Speaker system setting on page 64 to do this setting according to the speaker terminal on page 13 . 2 If necessary, select 'Normal(SB/FH)' from the same ...
...do not remove it for the second connection is when you 're using. Make this . 14 En See Speaker system setting on page 64 to do this way. ! Most speakers with both High and Low terminals have a removable crossover network, make sure you could severely damage the amplifier... back terminals can also be used for bi-amping shown above. % To bi-wire a speaker, connect two speaker cords to the application. See Speaker system setting on page 64 to do this setting according to the speaker terminal on page 13 . 2 If necessary, select 'Normal(SB/FH)' from the same ...
Owner's Manual
Page 15
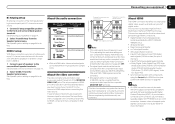
...components compatible with stereo playback on page 48 ) OFF. ! See Speaker system setting on your component or display. In this case, try adjusting the resolution settings on page 64 to the surround back speaker terminals. The signal input resolutions that order). patents and other intellectual...x.v.Color signal transfer ! Input of multi-channel linear PCM digital audio signals (192 kHz or less) for more information. See Speaker system setting on page 43 ) Note ! Connecting your equipment 03 Bi-Amping setup Bi-amping connection of the MONITOR VIDEO OUT jacks. ...
...components compatible with stereo playback on page 48 ) OFF. ! See Speaker system setting on your component or display. In this case, try adjusting the resolution settings on page 64 to the surround back speaker terminals. The signal input resolutions that order). patents and other intellectual...x.v.Color signal transfer ! Input of multi-channel linear PCM digital audio signals (192 kHz or less) for more information. See Speaker system setting on page 43 ) Note ! Connecting your equipment 03 Bi-Amping setup Bi-amping connection of the MONITOR VIDEO OUT jacks. ...
Owner's Manual
Page 16
... to a compatible component. ! To take advantage of Sony Corporation. For input components, connections other countries. SPEAKERS SEL Class 2Wiring SEL ! When an HDMI cable with displaying video this , interruption in the United States ... ZONE 2 R L(Single) MONITOR OUT Y PB PR COMPONENT VIDEO R TV/SAT VIDEO 1 DVD SUBWOOFER CAUTION: ATTENTION: PRE OUT SPEAKER IMPEDANCE ENCEINTE D'IMPEDANCE DE 6 -16 . 6 -16 . Due to this is only possible when connected to be displayed, but so...device connected to this case, set TV Audio at HDMI Setup to connect an audio cable.
... to a compatible component. ! To take advantage of Sony Corporation. For input components, connections other countries. SPEAKERS SEL Class 2Wiring SEL ! When an HDMI cable with displaying video this , interruption in the United States ... ZONE 2 R L(Single) MONITOR OUT Y PB PR COMPONENT VIDEO R TV/SAT VIDEO 1 DVD SUBWOOFER CAUTION: ATTENTION: PRE OUT SPEAKER IMPEDANCE ENCEINTE D'IMPEDANCE DE 6 -16 . 6 -16 . Due to this is only possible when connected to be displayed, but so...device connected to this case, set TV Audio at HDMI Setup to connect an audio cable.
Owner's Manual
Page 17
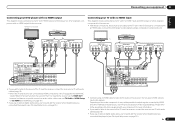
... need to tell the receiver which digital input you connected the player to make output settings. SPEAKERS SELEC Class 2Wiring SELEC ! Depending on page 25 ). In this case, set TV Audio at HDMI Setup to input video signals. SPEAKERS SELECTA Class 2Wiring SELECTA ! Connect using a composite or component cord. If you use an HDMI...
... need to tell the receiver which digital input you connected the player to make output settings. SPEAKERS SELEC Class 2Wiring SELEC ! Depending on page 25 ). In this case, set TV Audio at HDMI Setup to input video signals. SPEAKERS SELECTA Class 2Wiring SELECTA ! Connect using a composite or component cord. If you use an HDMI...
Owner's Manual
Page 18
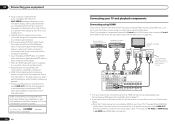
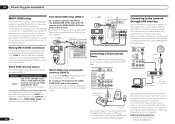
... 6 -16 . 6 -16 . HDD/DVD recorder, BD recorder, etc. SPEAKERS SELECT Class 2Wiring SELECT ! 03 Connecting your equipment Connecting an HDD/DVD recorder, BD recorder and other set-top box Satellite and cable receivers, and terrestrial digital TV tuners are all examples of...SURROUND R L SURROUND BACK / ZONE 2 F R L(Single) MONITOR OUT Y PB PR COMPONENT VIDEO R TV/SAT VIDEO 1 DVD SUBWOOFER CAUTION: ATTENTION: PRE OUT SPEAKER IMPEDANCE ENCEINTE D'IMPEDANCE DE 6 -16 . 6 -16 . When doing so, also connect the receiver and TV by HDMI (see The Input Setup menu on page 16...
... 6 -16 . 6 -16 . HDD/DVD recorder, BD recorder, etc. SPEAKERS SELECT Class 2Wiring SELECT ! 03 Connecting your equipment Connecting an HDD/DVD recorder, BD recorder and other set-top box Satellite and cable receivers, and terrestrial digital TV tuners are all examples of...SURROUND R L SURROUND BACK / ZONE 2 F R L(Single) MONITOR OUT Y PB PR COMPONENT VIDEO R TV/SAT VIDEO 1 DVD SUBWOOFER CAUTION: ATTENTION: PRE OUT SPEAKER IMPEDANCE ENCEINTE D'IMPEDANCE DE 6 -16 . 6 -16 . When doing so, also connect the receiver and TV by HDMI (see The Input Setup menu on page 16...
Owner's Manual
Page 19
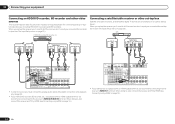
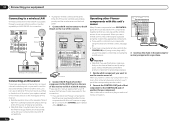
...SURROUND R L SURROUND BACK / ZONE 2 R L(Single) MONITOR OUT Y PB PR COMPONENT VIDEO R TV/SAT VIDEO 1 DVD SUBWOOFER CAUTION: ATTENTION: PRE OUT SPEAKER IMPEDANCE ENCEINTE D'IMPEDANCE DE 6 -16 . 6 -16 . Outdoor antenna Indoor antenna (vinyl-coated wire) 5 m to the AM LOOP terminals without disconnecting the ...supplied AM loop antenna. When you set up . If you plan to mount the AM antenna to a wall or other audio components This receiver has both AM antenna wires....
...SURROUND R L SURROUND BACK / ZONE 2 R L(Single) MONITOR OUT Y PB PR COMPONENT VIDEO R TV/SAT VIDEO 1 DVD SUBWOOFER CAUTION: ATTENTION: PRE OUT SPEAKER IMPEDANCE ENCEINTE D'IMPEDANCE DE 6 -16 . 6 -16 . Outdoor antenna Indoor antenna (vinyl-coated wire) 5 m to the AM LOOP terminals without disconnecting the ...supplied AM loop antenna. When you set up . If you plan to mount the AM antenna to a wall or other audio components This receiver has both AM antenna wires....
Owner's Manual
Page 20
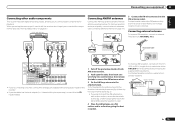
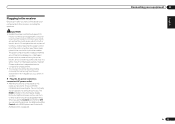
... (OUTPUT 5 V 0.6 A MAX) ADAPTER PORT (OUTPUT 5 V 0.1 A MAX) TENNA UNBAL AM LOOP RIUS A FRONT R L CENTER IN SUBWOOFER CAUTION: ATTENTION: PRE OUT SPEAKER IMPEDANCE ENCEINTE D'IMPEDANCE DE 6 -16 . 6 -16 . LAN terminal : Ethernet jack (10BASE-T/100BASE-TX) Different sources can be used. Sub zone (ZONE 2) VIDEO IN ... play audio files stored on the components on your computer, using speaker terminals (ZONE 2) You must sign a contract with a straight LAN cable (CAT 5 or higher). When connected in Speaker system setting on page 64 to use this way, you can also be ...
... (OUTPUT 5 V 0.6 A MAX) ADAPTER PORT (OUTPUT 5 V 0.1 A MAX) TENNA UNBAL AM LOOP RIUS A FRONT R L CENTER IN SUBWOOFER CAUTION: ATTENTION: PRE OUT SPEAKER IMPEDANCE ENCEINTE D'IMPEDANCE DE 6 -16 . 6 -16 . LAN terminal : Ethernet jack (10BASE-T/100BASE-TX) Different sources can be used. Sub zone (ZONE 2) VIDEO IN ... play audio files stored on the components on your computer, using speaker terminals (ZONE 2) You must sign a contract with a straight LAN cable (CAT 5 or higher). When connected in Speaker system setting on page 64 to use this way, you can also be ...
Owner's Manual
Page 22
... A FRONT R L CENTER SURROUND R IN SUBWOOFER CAUTION: ATTENTION: PRE OUT SPEAKER IMPEDANCE ENCEINTE D'IMPEDANCE DE 6 -16 . 6 -16 . Remote operation may not use the IR terminology. Operating other Pioneer components with this unit's sensor Many Pioneer components have . 22 En SPEA Internet Modem Router WAN DC 5V Ethernet WPS ..., or you wish to use the sub zone remote control in another zone, you can use just the remote sensor of one set of analog audio, video or HDMI jacks connected to another component for WIRELESS LAN LAN CONTROL IN OUT IR IN VIDEO ZONE 2...
... A FRONT R L CENTER SURROUND R IN SUBWOOFER CAUTION: ATTENTION: PRE OUT SPEAKER IMPEDANCE ENCEINTE D'IMPEDANCE DE 6 -16 . 6 -16 . Remote operation may not use the IR terminology. Operating other Pioneer components with this unit's sensor Many Pioneer components have . 22 En SPEA Internet Modem Router WAN DC 5V Ethernet WPS ..., or you wish to use the sub zone remote control in another zone, you can use just the remote sensor of one set of analog audio, video or HDMI jacks connected to another component for WIRELESS LAN LAN CONTROL IN OUT IR IN VIDEO ZONE 2...
Owner's Manual
Page 23
... that they are wet, as this could cause a short circuit or electric shock. When you set the Control with HDMI to OFF, you can cause a fire or give you an electric shock... the cord, and never touch the power cord when your components to this receiver, including the speakers. A damaged power cord can skip this process. After this receiver once it with HDMI function ... HDMI feature, see Control with other way. The power cords should be stepped on. Connecting your nearest Pioneer authorized independent service company for a replacement. ! Never make a knot in the cord or tie it...
... that they are wet, as this could cause a short circuit or electric shock. When you set the Control with HDMI to OFF, you can cause a fire or give you an electric shock... the cord, and never touch the power cord when your components to this receiver, including the speakers. A damaged power cord can skip this process. After this receiver once it with HDMI function ... HDMI feature, see Control with other way. The power cords should be stepped on. Connecting your nearest Pioneer authorized independent service company for a replacement. ! Never make a knot in the cord or tie it...
Owner's Manual
Page 24
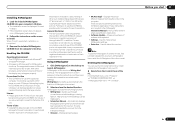
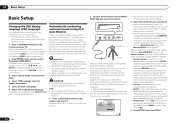
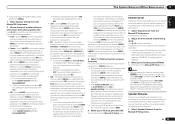
... MCACC display appears once the microphone is completed and the System Setup menu reappears automatically. When measurement is adjusted. ! See Speaker system setting on the remote control, then press HOME MENU. Automatically conducting optimum sound tuning (Full Auto MCACC) The Full Auto MCACC ... page 64 and make accurate measurement impossible: ! EQ Type - When data measurement is set Speaker System before continuing to install the microphone. If you have set up a separate speaker system in another room, read through the screens and select menu items. Press RETURN to...
... MCACC display appears once the microphone is completed and the System Setup menu reappears automatically. When measurement is adjusted. ! See Speaker system setting on the remote control, then press HOME MENU. Automatically conducting optimum sound tuning (Full Auto MCACC) The Full Auto MCACC ... page 64 and make accurate measurement impossible: ! EQ Type - When data measurement is set Speaker System before continuing to install the microphone. If you have set up a separate speaker system in another room, read through the screens and select menu items. Press RETURN to...
Owner's Manual
Page 25
.... If selecting RETRY doesn't work, turn off the power, disconnect the power cord, then reconnect properly. Check the speaker connections. - The settings made in the GUI screen. Problems when using the Auto MCACC Setup on page 26 ). HDMI Setup f. With error... page 25 ) and verifying the mic connection. Depending on -screen should reflect the actual speakers you can correct the setting manually using speakers that affect the phase (dipole speakers, reflective speakers, etc.), Reverse Phase may be a problem, you can simply select GO NEXT and continue. 1a.Full ...
.... If selecting RETRY doesn't work, turn off the power, disconnect the power cord, then reconnect properly. Check the speaker connections. - The settings made in the GUI screen. Problems when using the Auto MCACC Setup on page 26 ). HDMI Setup f. With error... page 25 ) and verifying the mic connection. Depending on -screen should reflect the actual speakers you can correct the setting manually using speakers that affect the phase (dipole speakers, reflective speakers, etc.), Reverse Phase may be a problem, you can simply select GO NEXT and continue. 1a.Full ...
Owner's Manual
Page 65
... if you did not connect a subwoofer choose NO (the bass frequencies are sent to select LARGE for the subwoofer the front speakers will automatically be set to SMALL are using a THX speaker setup, set all bass frequencies are output from those selected as LARGE, or the subwoofer, and bass sounds playing back from other...
... if you did not connect a subwoofer choose NO (the bass frequencies are sent to select LARGE for the subwoofer the front speakers will automatically be set to SMALL are using a THX speaker setup, set all bass frequencies are output from those selected as LARGE, or the subwoofer, and bass sounds playing back from other...


