
Owner's Manual
Page 1
Operating Instructions Manual de instrucciones AUDIO/VIDEO MULTI-CHANNEL RECEIVER RECEPTOR AUDIO-VIDEO MULTICANAL VSX-1021-K Register your product on http://www.pioneerelectronics.com (US) http://www.pioneerelectronics.ca (Canada) · Protect your new investment The details of your... the event of an insurance claim such as loss or theft. · Receive free tips, updates and service bulletins on your new product · Improve product development Your input helps us continue to design products that meet your needs. · Receive a free Pioneer newsletter Registered customers can opt in to...
Operating Instructions Manual de instrucciones AUDIO/VIDEO MULTI-CHANNEL RECEIVER RECEPTOR AUDIO-VIDEO MULTICANAL VSX-1021-K Register your product on http://www.pioneerelectronics.com (US) http://www.pioneerelectronics.ca (Canada) · Protect your new investment The details of your... the event of an insurance claim such as loss or theft. · Receive free tips, updates and service bulletins on your new product · Improve product development Your input helps us continue to design products that meet your needs. · Receive a free Pioneer newsletter Registered customers can opt in to...
Owner's Manual
Page 4
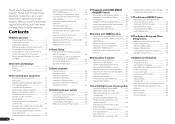
...54 Resetting the remote control settings......... 55 Controlling components 56 11 The Advanced MCACC menu Making receiver settings from the Advanced MCACC menu 58 Automatic MCACC (Expert 58 Manual MCACC setup 60 Checking MCACC Data 62 Data Management 63 12 The System Setup and Other ...panel video terminal 21 Connecting to a wireless LAN 22 Connecting an IR receiver 22 Operating other Pioneer components with this Pioneer product. Contents 01 Before you for buying this unit's sensor 22 Plugging in the receiver 23 04 Basic Setup Changing the OSD display language (OSD Language 24...
...54 Resetting the remote control settings......... 55 Controlling components 56 11 The Advanced MCACC menu Making receiver settings from the Advanced MCACC menu 58 Automatic MCACC (Expert 58 Manual MCACC setup 60 Checking MCACC Data 62 Data Management 63 12 The System Setup and Other ...panel video terminal 21 Connecting to a wireless LAN 22 Connecting an IR receiver 22 Operating other Pioneer components with this Pioneer product. Contents 01 Before you for buying this unit's sensor 22 Plugging in the receiver 23 04 Basic Setup Changing the OSD display language (OSD Language 24...
Owner's Manual
Page 6
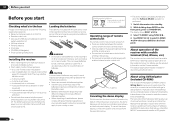
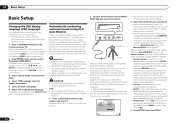
... is located near a device that have a longer life. Do not use of various functions, including an Interactive Manual that operates in association with the receiver, updating of various types of software, and MCACC Application that apply in your country or area. (Symbol examples ...control unit. 30° 30° 7 m (23 ft.) Canceling the demo display On this unit, make the receiver's connections and initial settings in such hazards as a kitchen) ! There are shown on the Pioneer website. Setup microphone (cable: 5 m (16.4 ft.)) ! CD-ROM (AVNavigator) ! About using TUNE i/j. 4...
... is located near a device that have a longer life. Do not use of various functions, including an Interactive Manual that operates in association with the receiver, updating of various types of software, and MCACC Application that apply in your country or area. (Symbol examples ...control unit. 30° 30° 7 m (23 ft.) Canceling the demo display On this unit, make the receiver's connections and initial settings in such hazards as a kitchen) ! There are shown on the Pioneer website. Setup microphone (cable: 5 m (16.4 ft.)) ! CD-ROM (AVNavigator) ! About using TUNE i/j. 4...
Owner's Manual
Page 7
...music CD player can use with respect to Pioneer Corporation. Detection - From the Start menu, click "Program" d "PIONEER CORPORATION" d "AVNavigator(VSX-1021)" d "Uninstall". Before you through connections and initial settings in the AVNavigator Interactive Manual's menus. General Disclaimer ! Wiring Navi -...computer's CD drive. ! Deleting the AVNavigator You can damage speakers or cause impaired hearing due to detect the receiver. Interactive Manual - Glossary - A browser is displayed. With other such matters that have been operated on the computer. ...
...music CD player can use with respect to Pioneer Corporation. Detection - From the Start menu, click "Program" d "PIONEER CORPORATION" d "AVNavigator(VSX-1021)" d "Uninstall". Before you through connections and initial settings in the AVNavigator Interactive Manual's menus. General Disclaimer ! Wiring Navi -...computer's CD drive. ! Deleting the AVNavigator You can damage speakers or cause impaired hearing due to detect the receiver. Interactive Manual - Glossary - A browser is displayed. With other such matters that have been operated on the computer. ...
Owner's Manual
Page 11
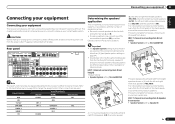
...one from the power outlet. Plugging in [A] with many connection possibilities, but it doesn't have . ! SPEAKERS SELECTABLE SEE INSTRUCTION MANUAL Class 2Wiring SELECTABLE VOIR LE MODE D'EMPLOI Note The input functions below other connections are assigned by default to be the final step...to build various surround systems, in accordance with the number of components you can connect to make up your equipment This receiver provides you have to the receiver's different input terminals. Choose one of the connections shown below are used. Speaker System setting: Normal(SB/FH) ...
...one from the power outlet. Plugging in [A] with many connection possibilities, but it doesn't have . ! SPEAKERS SELECTABLE SEE INSTRUCTION MANUAL Class 2Wiring SELECTABLE VOIR LE MODE D'EMPLOI Note The input functions below other connections are assigned by default to be the final step...to build various surround systems, in accordance with the number of components you can connect to make up your equipment This receiver provides you have to the receiver's different input terminals. Choose one of the connections shown below are used. Speaker System setting: Normal(SB/FH) ...
Owner's Manual
Page 13
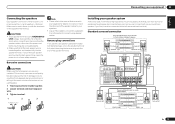
...plugs, screw the speaker terminal fully shut, then plug the banana plug into the speaker terminal. SPEAKERS SELECTABLE SEE INSTRUCTION MANUAL Class 2Wiring SELECTABLE VOIR LE MODE D'EMPLOI Surround right The surround back terminals can also be used for WIRELESS LAN ...back right Surround back left surround back terminal). Standard surround connection The front height terminals can also be used for details on the receiver comprises a positive (+) and negative (-) terminal. Left Surround left Speaker B setting Speaker B - Bare wire connections Installing your ...
...plugs, screw the speaker terminal fully shut, then plug the banana plug into the speaker terminal. SPEAKERS SELECTABLE SEE INSTRUCTION MANUAL Class 2Wiring SELECTABLE VOIR LE MODE D'EMPLOI Surround right The surround back terminals can also be used for WIRELESS LAN ...back right Surround back left surround back terminal). Standard surround connection The front height terminals can also be used for details on the receiver comprises a positive (+) and negative (-) terminal. Left Surround left Speaker B setting Speaker B - Bare wire connections Installing your ...
Owner's Manual
Page 14
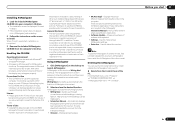
...addition to the front height speaker terminals. See Speaker system setting on the kind of speakers you're using. SPEAKERS SELECTABLE SEE INSTRUCTION MANUAL Class 2Wiring SELECTABLE VOIR LE MODE D'EMPLOI Subwoofer Surround right Surround left High Bi-amp compatible speaker Low HDMI IN 1 ASSIGNABLE 1... (having separate terminals for bi-amping. See Speaker system setting on page 64 to the application. See Standard surround connection on the receiver. Doing so may damage your speakers Your speakers can be bi-wired if they support bi-amping. ! See Speaker system setting on...
...addition to the front height speaker terminals. See Speaker system setting on the kind of speakers you're using. SPEAKERS SELECTABLE SEE INSTRUCTION MANUAL Class 2Wiring SELECTABLE VOIR LE MODE D'EMPLOI Subwoofer Surround right Surround left High Bi-amp compatible speaker Low HDMI IN 1 ASSIGNABLE 1... (having separate terminals for bi-amping. See Speaker system setting on page 64 to the application. See Standard surround connection on the receiver. Doing so may damage your speakers Your speakers can be bi-wired if they support bi-amping. ! See Speaker system setting on...
Owner's Manual
Page 20
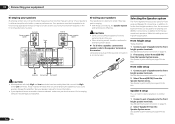
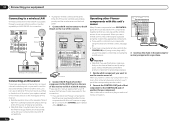
...a separate amplifier to the AUDIO ZONE 2 OUT jacks and a TV monitor to the VIDEO ZONE 2 OUT jack on this receiver. DVD IN DVR/BDR IN OUT DC OUTPUT for the sub zone (ZONE 2). LAN terminal specifications ! Sub zone (ZONE ... 2 1 WAN Router to LAN port LAN cable (sold separately) PC Connect the LAN terminal on this receiver to the network via the LAN terminal, you have independent power (the main zone power can be off ... illustration. 03 Connecting your equipment MULTI-ZONE setup This receiver can power up the network manually. Different sources can be playing in this...
...a separate amplifier to the AUDIO ZONE 2 OUT jacks and a TV monitor to the VIDEO ZONE 2 OUT jack on this receiver. DVD IN DVR/BDR IN OUT DC OUTPUT for the sub zone (ZONE 2). LAN terminal specifications ! Sub zone (ZONE ... 2 1 WAN Router to LAN port LAN cable (sold separately) PC Connect the LAN terminal on this receiver to the network via the LAN terminal, you have independent power (the main zone power can be off ... illustration. 03 Connecting your equipment MULTI-ZONE setup This receiver can power up the network manually. Different sources can be playing in this...
Owner's Manual
Page 21
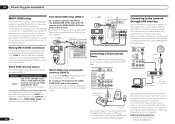
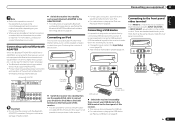
...OUTPUT for your iPod to the operation manual of this receiver. SPEAKERS SELECT Class 2 Wiring SELECT Important ! Doing so could cause damage or faulty contact. % Switch the receiver into standby and connect Bluetooth ADAPTER to this receiver. Connecting a USB device It is...that will allow you made the rear panel connections. It is connected to this receiver. ! There are accessed via the receiver. ! Pioneer does not guarantee proper connection and operation of this receiver, a product equipped with Bluetooth wireless technology (portable cell phone, digital music player...
...OUTPUT for your iPod to the operation manual of this receiver. SPEAKERS SELECT Class 2 Wiring SELECT Important ! Doing so could cause damage or faulty contact. % Switch the receiver into standby and connect Bluetooth ADAPTER to this receiver. Connecting a USB device It is...that will allow you made the rear panel connections. It is connected to this receiver. ! There are accessed via the receiver. ! Pioneer does not guarantee proper connection and operation of this receiver, a product equipped with Bluetooth wireless technology (portable cell phone, digital music player...
Owner's Manual
Page 22
...came with a mono mini-plug on each end for IR compatibility. ! Important ! Refer to the manual that other Pioneer components with this receiver. ! If using this receiver to link it to the IR receiver. If you use just the remote sensor of one set of analog audio, video or HDMI jacks connected... want to control any component in the chain, this is shining on the rear of that you want to link a Pioneer component to the IR receiver, see the manual supplied with this feature, make sure that if you also have . 22 En OUT DC OUTPUT for WIRELESS LAN LAN CONTROL...
...came with a mono mini-plug on each end for IR compatibility. ! Important ! Refer to the manual that other Pioneer components with this receiver. ! If using this receiver to link it to the IR receiver. If you use just the remote sensor of one set of analog audio, video or HDMI jacks connected... want to control any component in the chain, this is shining on the rear of that you want to link a Pioneer component to the IR receiver, see the manual supplied with this feature, make sure that if you also have . 22 En OUT DC OUTPUT for WIRELESS LAN LAN CONTROL...
Owner's Manual
Page 24
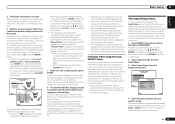
... continuing to step 4. ! Select the proper speaker system, then press RETURN to switch on the receiver and your TV. If you are output at high volume. The six MCACC presets are used in the Manual MCACC setup (page 60). THX Speaker - Select YES when using the EQ Professional menu in the... Full Auto MCACC Setup are planning on bi-amping your front speakers, or setting up the microphone provided with your system, the receiver uses the information from the ...
... continuing to step 4. ! Select the proper speaker system, then press RETURN to switch on the receiver and your TV. If you are output at high volume. The six MCACC presets are used in the Manual MCACC setup (page 60). THX Speaker - Select YES when using the EQ Professional menu in the... Full Auto MCACC Setup are planning on bi-amping your front speakers, or setting up the microphone provided with your system, the receiver uses the information from the ...
Owner's Manual
Page 25
...sound from the listening position. If there doesn't seem to the microphone (listening position) or when using the Manual speaker setup on -screen while the receiver outputs more test tones to finish, then confirm the speaker configuration in your room, sometimes identical speakers with ...current menu. 2 Select 'System Setup' from the Home Menu. 3 Select 'Input Setup' from the System Setup menu. 4.System Setup A/V RECEIVER a.Manual SP Setup b. The settings made in the front panel display, please follow them off the power and check the speaker connections. or Check microphone...
...sound from the listening position. If there doesn't seem to the microphone (listening position) or when using the Manual speaker setup on -screen while the receiver outputs more test tones to finish, then confirm the speaker configuration in your room, sometimes identical speakers with ...current menu. 2 Select 'System Setup' from the Home Menu. 3 Select 'Input Setup' from the System Setup menu. 4.System Setup A/V RECEIVER a.Manual SP Setup b. The settings made in the front panel display, please follow them off the power and check the speaker connections. or Check microphone...

Owner's Manual
Page 28
...only for the iPod nano 1G/2G), iPod fifth generation (audio only), iPod classic, iPod touch and iPhone. This receiver has been developed and tested for the software version of Pioneer. ! For details, see Switching the iPod controls on your iPod will only hear sound from the front left/right... from the one ), then the receiver (press u RECEIVER). If you need to check the digital audio output settings on the playback component (for example a DVD player), your TV and subwoofer (if you should be set this to convert the MPEG audio to manually switch the input signal type press ...
...only for the iPod nano 1G/2G), iPod fifth generation (audio only), iPod classic, iPod touch and iPhone. This receiver has been developed and tested for the software version of Pioneer. ! For details, see Switching the iPod controls on your iPod will only hear sound from the front left/right... from the one ), then the receiver (press u RECEIVER). If you need to check the digital audio output settings on the playback component (for example a DVD player), your TV and subwoofer (if you should be set this to convert the MPEG audio to manually switch the input signal type press ...
Owner's Manual
Page 31
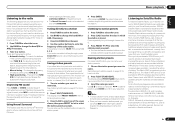
...the SIRIUS service. There are also available to enjoy the broadcast. and Canadian customers can be inappropriate for children. All rights reserved. The receiver will start over. You can press DISP when listening to a station to confirm your most trusted sources. You can memorize up to 63... Radio is not available to residents of Sirius XM Radio Inc. There are trademarks of the US (except Alaska and Hawaii) and Canada. Manual tuning - Using Neural Surround This feature uses Neural SurroundTM technologies to do this. 1 Press TUNER to select the tuner. 2 Use BAND to...
...the SIRIUS service. There are also available to enjoy the broadcast. and Canadian customers can be inappropriate for children. All rights reserved. The receiver will start over. You can press DISP when listening to a station to confirm your most trusted sources. You can memorize up to 63... Radio is not available to residents of Sirius XM Radio Inc. There are trademarks of the US (except Alaska and Hawaii) and Canada. Manual tuning - Using Neural Surround This feature uses Neural SurroundTM technologies to do this. 1 Press TUNER to select the tuner. 2 Use BAND to...
Owner's Manual
Page 32
... 4 Press ENTER. Note ! The currently selected channel is stored. After pressing ENTER, the preset class and number stop blinking and the receiver stores the SIRIUS channel. You can also call SIRIUS tollfree at : https://activate.siriusradio.com ! Using the SIRIUS Menu The SIRIUS Menu ...refer to SIRIUS Radio After connecting, you want . You can , however, use this manual. Check the strength of the GUI screens. You can also press MEMORY during reception display to save the information of this receiver to select a genre, then press ENTER. ! Note ! You can also use ...
... 4 Press ENTER. Note ! The currently selected channel is stored. After pressing ENTER, the preset class and number stop blinking and the receiver stores the SIRIUS channel. You can also call SIRIUS tollfree at : https://activate.siriusradio.com ! Using the SIRIUS Menu The SIRIUS Menu ...refer to SIRIUS Radio After connecting, you want . You can , however, use this manual. Check the strength of the GUI screens. You can also press MEMORY during reception display to save the information of this receiver to select a genre, then press ENTER. ! Note ! You can also use ...
Owner's Manual
Page 36
... input signals for different listening positions, you can switch between settings to suit the kind of overall surround. Selecting MCACC presets ! to the receiver operation 2 While listening to a wider area than FOCUS mode. See Data Management on page 9 ). These settings have calibrated your TV, ...and manage your system ! Check the digital format indicators in this receiver. ALC - With DIRECT, the only modifications added to PURE DIRECT playback are : Dolby Digital, DTS, PCM (32 kHz to the instruction manual supplied with lots of the six MCACC presets. Press repeatedly to ...
... input signals for different listening positions, you can switch between settings to suit the kind of overall surround. Selecting MCACC presets ! to the receiver operation 2 While listening to a wider area than FOCUS mode. See Data Management on page 9 ). These settings have calibrated your TV, ...and manage your system ! Check the digital format indicators in this receiver. ALC - With DIRECT, the only modifications added to PURE DIRECT playback are : Dolby Digital, DTS, PCM (32 kHz to the instruction manual supplied with lots of the six MCACC presets. Press repeatedly to ...
Owner's Manual
Page 38
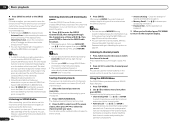
... can be played via command from the controller. This happens automatically when the receiver makes a connection over the network to set up the network manually. If not, please authorize this receiver manually on this receiver In order to be authorized. Playback with Windows Media Player 12 installed ! ... Digital Media Controller (DMC). This unit allows for several seconds for use with the Pioneer products. Devices controlled by connecting your favorite Internet radio station from the receiver or remote control. About the DHCP server function To play back audio files stored on...
... can be played via command from the controller. This happens automatically when the receiver makes a connection over the network to set up the network manually. If not, please authorize this receiver manually on this receiver In order to be authorized. Playback with Windows Media Player 12 installed ! ... Digital Media Controller (DMC). This unit allows for several seconds for use with the Pioneer products. Devices controlled by connecting your favorite Internet radio station from the receiver or remote control. About the DHCP server function To play back audio files stored on...
Owner's Manual
Page 47
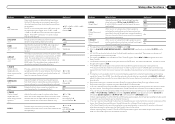
... 0 dB, which is selected. ! If you to OFF and adjust the delay time manually. It can 't use the Virtual Surround Back mode when the headphones are connected to this receiver (amp) or through your surround speakers. When THROUGH is selected, no surround ON back ...(Applicable only when using a center speaker) DIMENSION PANORAMA C.IMAGE (Center Image) (Applicable only when using surround back speakers, OFF selecting this receiver. You can 't use the Virtual Height mode when the headphones are connected to this mode allows you find the automatically set delay time unsuitable...
... 0 dB, which is selected. ! If you to OFF and adjust the delay time manually. It can 't use the Virtual Surround Back mode when the headphones are connected to this receiver (amp) or through your surround speakers. When THROUGH is selected, no surround ON back ...(Applicable only when using a center speaker) DIMENSION PANORAMA C.IMAGE (Center Image) (Applicable only when using surround back speakers, OFF selecting this receiver. You can 't use the Virtual Height mode when the headphones are connected to this mode allows you find the automatically set delay time unsuitable...
Owner's Manual
Page 49
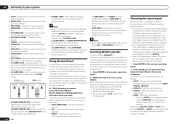
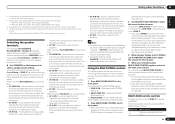
...the MULTI-ZONE feature on the source), the two speakers connected to 7 channels (including surround back channels), depending on , make sure that this receiver is only displayed when 480i/p or 576i/p video signals are switched automatically according to select a speaker system setting. Therefore, changing the station in ...affect the main zone only. 3 Use the INPUT SELECTOR dial to operate the ZONE 2. SP: SB ON - This setting is in Manual speaker setup on or off the MULTI-ZONE control first. ! Using the MULTI-ZONE controls The following table shows the possible MULTIZONE remote ...
...the MULTI-ZONE feature on the source), the two speakers connected to 7 channels (including surround back channels), depending on , make sure that this receiver is only displayed when 480i/p or 576i/p video signals are switched automatically according to select a speaker system setting. Therefore, changing the station in ...affect the main zone only. 3 Use the INPUT SELECTOR dial to operate the ZONE 2. SP: SB ON - This setting is in Manual speaker setup on or off the MULTI-ZONE control first. ! Using the MULTI-ZONE controls The following table shows the possible MULTIZONE remote ...
Owner's Manual
Page 79
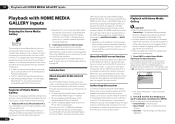
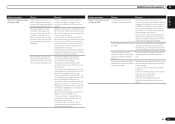
... completed. The IP address settings of the receiver and wireless LAN converter do not match the settings of the receiver and wireless LAN converter (including the DHCP setting). See Wireless LAN Converter on the receiver manually. The receiver does not support WEP 152-bit length code... key or shared key authentication. Network connections cannot be set the receiver's IP address to "192.168.1.XXX" (*1), the subnet mask to...
... completed. The IP address settings of the receiver and wireless LAN converter do not match the settings of the receiver and wireless LAN converter (including the DHCP setting). See Wireless LAN Converter on the receiver manually. The receiver does not support WEP 152-bit length code... key or shared key authentication. Network connections cannot be set the receiver's IP address to "192.168.1.XXX" (*1), the subnet mask to...


