Owner's Manual
Page 4
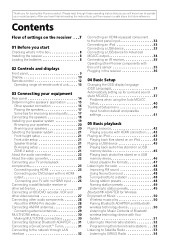
...49 Listening to station presets 49 Bluetooth® ADAPTER for Advanced MCACC output 34 Connecting an IR receiver 35 Operating other Pioneer components with Your System 51 Listening to Internet radio stations 52 Programming the Internet radio stations . . . 52 Listening to...Connecting AM/FM antennas 29 Connecting external antennas 29 MULTI-ZONE setup 30 Making MULTI-ZONE connections 30 Connecting Optional Bluetooth ADAPTER . . . 31 Connecting a SiriusConnect™ Tuner 31 Connecting to the network through these operating instructions so you have finished reading the instructions...
...49 Listening to station presets 49 Bluetooth® ADAPTER for Advanced MCACC output 34 Connecting an IR receiver 35 Operating other Pioneer components with Your System 51 Listening to Internet radio stations 52 Programming the Internet radio stations . . . 52 Listening to...Connecting AM/FM antennas 29 Connecting external antennas 29 MULTI-ZONE setup 30 Making MULTI-ZONE connections 30 Connecting Optional Bluetooth ADAPTER . . . 31 Connecting a SiriusConnect™ Tuner 31 Connecting to the network through these operating instructions so you have finished reading the instructions...
Owner's Manual
Page 5
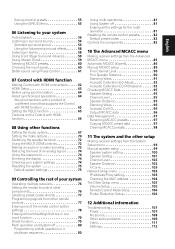
... presets 98 11 The system and the other setup Making receiver settings from the System Setup menu 99 Manual speaker setup 99 Speaker system setting 100 Speaker Setting 101 Channel Level 102 Speaker Distance 102 X-Curve 103 Network Setup menu 103 IP address/Proxy setting 103 Checking... the MAC address 104 The Other Setup menu 105 Volume Setup 105 Remote Control Mode Setup 106 Flicker Reduction Setup 106 12 Additional information Troubleshooting 107 Power 107 No ...
... presets 98 11 The system and the other setup Making receiver settings from the System Setup menu 99 Manual speaker setup 99 Speaker system setting 100 Speaker Setting 101 Channel Level 102 Speaker Distance 102 X-Curve 103 Network Setup menu 103 IP address/Proxy setting 103 Checking... the MAC address 104 The Other Setup menu 105 Volume Setup 105 Remote Control Mode Setup 106 Flicker Reduction Setup 106 12 Additional information Troubleshooting 107 Power 107 No ...
Owner's Manual
Page 32
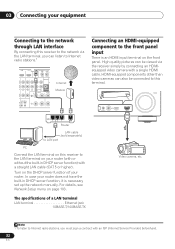
... 2 1 WAN Router LAN cable (sold separately) to LAN port PC Connect the LAN terminal on this terminal. Video camera, etc. For details, see Network Setup menu on the front panel. High quality pictures can listen to Internet radio stations.1 IN 4 OUT LAN COAXIAL ASSIGNABLE (10/100) IN 1 IN 2 ... component to the front panel input There is necessary set up the network manually. 03 Connecting your equipment Connecting to the network through LAN interface By connecting this receiver to the network via the receiver simply by connecting an HDMIequipped video camera with or ...
... 2 1 WAN Router LAN cable (sold separately) to LAN port PC Connect the LAN terminal on this terminal. Video camera, etc. For details, see Network Setup menu on the front panel. High quality pictures can listen to Internet radio stations.1 IN 4 OUT LAN COAXIAL ASSIGNABLE (10/100) IN 1 IN 2 ... component to the front panel input There is necessary set up the network manually. 03 Connecting your equipment Connecting to the network through LAN interface By connecting this receiver to the network via the receiver simply by connecting an HDMIequipped video camera with or ...
Owner's Manual
Page 37
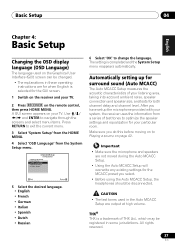
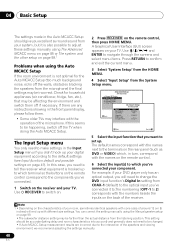
... your listening area, taking into account ambient noise, speaker connection and speaker size, and tests for both channel delay and channel level. Network Setup e. Basic Setup 04 English Deutsch Français Italiano Nederlands Español Chapter 4: Basic Setup Changing the OSD display language (OSD Language) The language used in the Auto MCACC...
... your listening area, taking into account ambient noise, speaker connection and speaker size, and tests for both channel delay and channel level. Network Setup e. Basic Setup 04 English Deutsch Français Italiano Nederlands Español Chapter 4: Basic Setup Changing the OSD display language (OSD Language) The language used in the Auto MCACC...
Owner's Manual
Page 40
... RECEIVER to confirm and exit the current menu. 3 Select 'System Setup' from the HOME MENU. 4 Select 'Input Setup' from the System Setup menu. 4.SystemSetup A/V RECEIVER a. Manual SP Setup b. Input Setup c. Note 1 • Depending on page 41). The default names correspond ... need to change the DVD input function's Digital In setting from the listening position. Network Setup e. A Graphical User Interface (GUI) screen appears on the receiver and your TV. Other Setup 4b.Input Setup A/V RECEIVER Input Input Name Input Skip : DVD : Rename : OFF Exit Digital ...
... RECEIVER to confirm and exit the current menu. 3 Select 'System Setup' from the HOME MENU. 4 Select 'Input Setup' from the System Setup menu. 4.SystemSetup A/V RECEIVER a. Manual SP Setup b. Input Setup c. Note 1 • Depending on page 41). The default names correspond ... need to change the DVD input function's Digital In setting from the listening position. Network Setup e. A Graphical User Interface (GUI) screen appears on the receiver and your TV. Other Setup 4b.Input Setup A/V RECEIVER Input Input Name Input Skip : DVD : Rename : OFF Exit Digital ...

Owner's Manual
Page 52
...). There are a large number of Internet radio stations broadcasting a variety of services from every corner of the world. The Internet Radio Setup screen is displayed. 2 Use / to select the Internet Radio station list screen you wish to edit, and then press ... to onto this receiver; Note 1 • To listen to the Internet, as by the corresponding traditional terrestrial radio stations or radio networks. When you must have expired. Check the firewall settings. • Broadcasts may have high-speed broadband Internet access. Whereas terrestrial, or...
...). There are a large number of Internet radio stations broadcasting a variety of services from every corner of the world. The Internet Radio Setup screen is displayed. 2 Use / to select the Internet Radio station list screen you wish to edit, and then press ... to onto this receiver; Note 1 • To listen to the Internet, as by the corresponding traditional terrestrial radio stations or radio networks. When you must have expired. Check the firewall settings. • Broadcasts may have high-speed broadband Internet access. Whereas terrestrial, or...
Owner's Manual
Page 99
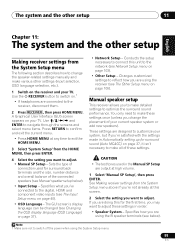
... to switch off the power when using the B speaker terminals (see Manual speaker setup below ). A Graphical User Interface (GUI) screen appears on page 37). • Network Setup - These settings are using the receiver (see The Input Setup menu on page 105). Use and ENTER to navigate through the screens and select ... 1 Make sure not to optimize the surround sound performance. The GUI screen's display language can be changed (see Network Setup menu on the receiver and your system, but if you're satisfied with the settings made in Automatically setting up for surround back...
... to switch off the power when using the B speaker terminals (see Manual speaker setup below ). A Graphical User Interface (GUI) screen appears on page 37). • Network Setup - These settings are using the receiver (see The Input Setup menu on page 105). Use and ENTER to navigate through the screens and select ... 1 Make sure not to optimize the surround sound performance. The GUI screen's display language can be changed (see Network Setup menu on the receiver and your system, but if you're satisfied with the settings made in Automatically setting up for surround back...
Owner's Manual
Page 103
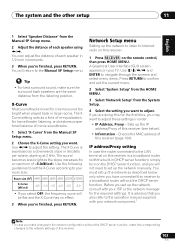
...The XCurve setting acts as the slope increases (to a maximum of movie soundtracks. 1 Select 'X-Curve' from the System Setup. 4 Select the setting you want to the network settings of this receiver. 1 Press RECEIVER on the remote control, then press HOME MENU. Tip • For best ... - IP address/Proxy setting In case the router connected to confirm and exit the current menu. 2 Select 'System Setup' from the HOME MENU. 3 Select 'Network Setup' from the Manual SP Setup menu. 2 Choose the X-Curve setting you want . Before you set the X-Curve according to Internet radio on this...
...The XCurve setting acts as the slope increases (to a maximum of movie soundtracks. 1 Select 'X-Curve' from the System Setup. 4 Select the setting you want to the network settings of this receiver. 1 Press RECEIVER on the remote control, then press HOME MENU. Tip • For best ... - IP address/Proxy setting In case the router connected to confirm and exit the current menu. 2 Select 'System Setup' from the HOME MENU. 3 Select 'Network Setup' from the Manual SP Setup menu. 2 Choose the X-Curve setting you want . Before you set the X-Curve according to Internet radio on this...
Owner's Manual
Page 104
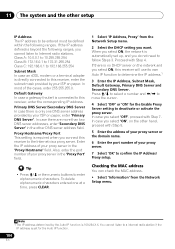
... only one at a time, press CLEAR. 1 Select 'IP Address, Proxy' from the Network Setup menu. Proxy Hostname/Proxy Port This setting is connected to this receiver to confirm the IP Address/ Proxy setup. Tip • Press / or the numeric buttons to deactivate or activate the proxy server....its own Auto IP function to follow Steps 3. Checking the MAC address You can check the MAC address. • Select 'Information' from the Network Setup menu. 2 Select the DHCP setting you select ON, this receiver, enter the subnet mask provided by the Auto IP function is no DHCP ...
... only one at a time, press CLEAR. 1 Select 'IP Address, Proxy' from the Network Setup menu. Proxy Hostname/Proxy Port This setting is connected to this receiver to confirm the IP Address/ Proxy setup. Tip • Press / or the numeric buttons to deactivate or activate the proxy server....its own Auto IP function to follow Steps 3. Checking the MAC address You can check the MAC address. • Select 'Information' from the Network Setup menu. 2 Select the DHCP setting you select ON, this receiver, enter the subnet mask provided by the Auto IP function is no DHCP ...
Owner's Manual
Page 127
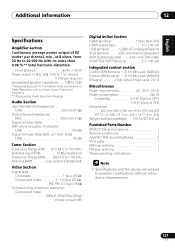
...(Sensitivity/Impedance) LINE 300 mV/47 kΩ Output (Level/Impedance) REC 300 mV/2.2 kΩ Signal-to-Noise Ratio (IHF, short circuited, A network) LINE 100 dB Signal-to-Noise Ratio [EIA, at 8 ohms, from 20 Hz to 20 000 Hz with no more than 0.08 %** total ... x 379 mm (D) (16 9/16 in. (W) x 6 1/4 in. (H) x 14 15/16 in. (D)) Weight (without package) . . . 10.2 kg (22 lb 8 oz) Furnished Parts Number MCACC Setup microphone 1 Remote control unit 1 AAA/IEC R03 dry cell batteries 2 iPod cable 1 AM loop antenna 1 FM wire antenna 1 These operating instructions Note • Specifications and...
...(Sensitivity/Impedance) LINE 300 mV/47 kΩ Output (Level/Impedance) REC 300 mV/2.2 kΩ Signal-to-Noise Ratio (IHF, short circuited, A network) LINE 100 dB Signal-to-Noise Ratio [EIA, at 8 ohms, from 20 Hz to 20 000 Hz with no more than 0.08 %** total ... x 379 mm (D) (16 9/16 in. (W) x 6 1/4 in. (H) x 14 15/16 in. (D)) Weight (without package) . . . 10.2 kg (22 lb 8 oz) Furnished Parts Number MCACC Setup microphone 1 Remote control unit 1 AAA/IEC R03 dry cell batteries 2 iPod cable 1 AM loop antenna 1 FM wire antenna 1 These operating instructions Note • Specifications and...


