Owner's Manual
Page 5
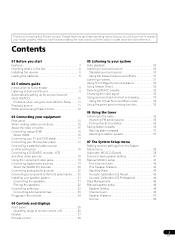
... 23 Connecting external antennas 23 Plugging in the receiver 24 04 Controls and displays Front panel 25 Operating range of remote control unit 26 Display 27 Remote control 28 05 Listening to your system Auto playback 30 Listening in surround sound 30 Standard surround sound 30 Using ...Management 46 Manual speaker setup 48 Speaker Setting 48 Channel Level 49 Speaker Distance 50 X-Curve 50 5 En After you for buying this Pioneer product. Thank you have finished reading the instructions, put them away in stereo 31 Using Front Stage Surround Advance 32 Using Stream Direct ...
... 23 Connecting external antennas 23 Plugging in the receiver 24 04 Controls and displays Front panel 25 Operating range of remote control unit 26 Display 27 Remote control 28 05 Listening to your system Auto playback 30 Listening in surround sound 30 Standard surround sound 30 Using ...Management 46 Manual speaker setup 48 Speaker Setting 48 Channel Level 49 Speaker Distance 50 X-Curve 50 5 En After you for buying this Pioneer product. Thank you have finished reading the instructions, put them away in stereo 31 Using Front Stage Surround Advance 32 Using Stream Direct ...
Owner's Manual
Page 6
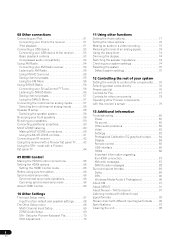
...components . . . . 76 Selecting preset codes directly 76 Preset code list 76 Controls for TVs 77 Controls for other components 78 Operating other Pioneer components with different input signal formats . . . . 96 Specifications 97 Cleaning the unit 98 6 En 08 Other connections Connecting an iPod 51...No sound 80 Other audio problems 82 Video 83 Settings 83 Professional Calibration EQ graphical output . . . . . 84 Display 84 Remote control 85 USB interface 85 HDMI 86 Important information regarding the HDMI connection 87 XM radio messages 87 SIRIUS radio messages 88 Surround ...
...components . . . . 76 Selecting preset codes directly 76 Preset code list 76 Controls for TVs 77 Controls for other components 78 Operating other Pioneer components with different input signal formats . . . . 96 Specifications 97 Cleaning the unit 98 6 En 08 Other connections Connecting an iPod 51...No sound 80 Other audio problems 82 Video 83 Settings 83 Professional Calibration EQ graphical output . . . . . 84 Display 84 Remote control 85 USB interface 85 HDMI 86 Important information regarding the HDMI connection 87 XM radio messages 87 SIRIUS radio messages 88 Surround ...
Owner's Manual
Page 8
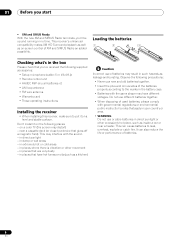
... and SIRIUS Ready With the new XM and SIRIUS Radio terminals, you 've received the following supplied accessories: • Setup microphone (cable: 5 m (16.4 ft.)) • Remote control unit • AA/IEC R6P dry cell batteries x2 • AM loop antenna • FM wire antenna • Warranty card • These operating instructions...
... and SIRIUS Ready With the new XM and SIRIUS Radio terminals, you 've received the following supplied accessories: • Setup microphone (cable: 5 m (16.4 ft.)) • Remote control unit • AA/IEC R6P dry cell batteries x2 • AM loop antenna • FM wire antenna • Warranty card • These operating instructions...
Owner's Manual
Page 9
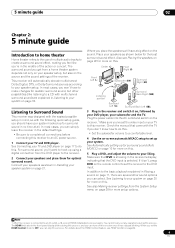
... (SBL) 3 Plug in Listening to your system on page 30. Make sure that the DVD input is selected. If it isn't, press DVD on the remote control to set the HDMI Control mode to OFF, you can turn on this . When you set the receiver to the DVD input. For details...
... (SBL) 3 Plug in Listening to your system on page 30. Make sure that the DVD input is selected. If it isn't, press DVD on the remote control to set the HDMI Control mode to OFF, you can turn on this . When you set the receiver to the DVD input. For details...
Owner's Manual
Page 11
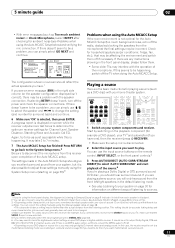
... TUNE TOOLS AUDIO DISPLAY MEM CH 4 5 6 1 Switch on your system on page 30 for ambient noise (see Listening in Listening to Surround Sound on the remote control, INPUT SELECT, or the front panel controls.5 3 Press AUTO/DIRECT (AUTO SURR/STREAM DIRECT) to a multichannel listening mode (see Problems when using the front...
... TUNE TOOLS AUDIO DISPLAY MEM CH 4 5 6 1 Switch on your system on page 30 for ambient noise (see Listening in Listening to Surround Sound on the remote control, INPUT SELECT, or the front panel controls.5 3 Press AUTO/DIRECT (AUTO SURR/STREAM DIRECT) to a multichannel listening mode (see Problems when using the front...
Owner's Manual
Page 13
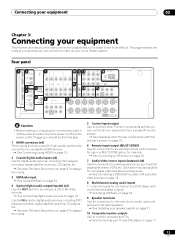
..., etc. See also The Input Setup menu on page 67 to assign the inputs. 5 Control input/output Use to connect other Pioneer components with many connection possibilities, but it doesn't have to be the final step. 1 HDMI connectors (x4) Three inputs and one output for...off the power and disconnect the power cord from a single IR remote sensor. See Operating other Pioneer components so that you with this receiver's sensor on page 79. 6 Remote input/output (MULTI-ZONE) Use for connection to an external remote control sensor for use in should be difficult. Rear panel 1...
..., etc. See also The Input Setup menu on page 67 to assign the inputs. 5 Control input/output Use to connect other Pioneer components with many connection possibilities, but it doesn't have to be the final step. 1 HDMI connectors (x4) Three inputs and one output for...off the power and disconnect the power cord from a single IR remote sensor. See Operating other Pioneer components so that you with this receiver's sensor on page 79. 6 Remote input/output (MULTI-ZONE) Use for connection to an external remote control sensor for use in should be difficult. Rear panel 1...
Owner's Manual
Page 16
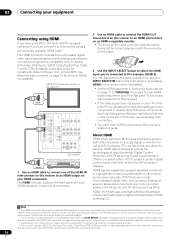
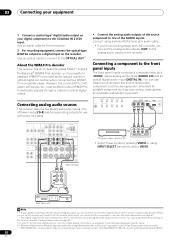
...IN OUT DVD AUDIO IN TV SAT IN DVR1 OUT IN L DVR OUT R MULTI CH IN SPEA A FRONT CENTER SURROUND SURROUND BACK L R SUBWOOFER VSX-1018AH HDMI/DVI-equipped component HDMI OUT 1 Use an HDMI cable to connect one of the HDMI IN interconnects on this receiver to protect digital content... transmitted and received by pressing HDMI on the remote control repeatedly. • Set the HDMI parameter in Setting the Audio options on your component or display. Note that some components (such as...
...IN OUT DVD AUDIO IN TV SAT IN DVR1 OUT IN L DVR OUT R MULTI CH IN SPEA A FRONT CENTER SURROUND SURROUND BACK L R SUBWOOFER VSX-1018AH HDMI/DVI-equipped component HDMI OUT 1 Use an HDMI cable to connect one of the HDMI IN interconnects on this receiver to protect digital content... transmitted and received by pressing HDMI on the remote control repeatedly. • Set the HDMI parameter in Setting the Audio options on your component or display. Note that some components (such as...
Owner's Manual
Page 20
...-R) has corresponding outputs for use these inputs by pressing VIDEO or using INPUT SELECT (remote) to output WMA9 Pro format audio signals through a coaxial or optical digital output. SELECTABLE SEE INSTRUCTION MANUAL SELECTABLE VOIR LE MODE D'EMPLOI VSX-1018AH OUT PLAY IN REC R L AUDIO IN/OUT Tape deck, etc. When you set -top...
...-R) has corresponding outputs for use these inputs by pressing VIDEO or using INPUT SELECT (remote) to output WMA9 Pro format audio signals through a coaxial or optical digital output. SELECTABLE SEE INSTRUCTION MANUAL SELECTABLE VOIR LE MODE D'EMPLOI VSX-1018AH OUT PLAY IN REC R L AUDIO IN/OUT Tape deck, etc. When you set -top...
Owner's Manual
Page 25
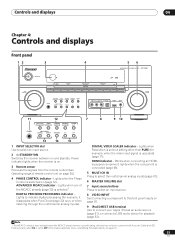
... on page 71). 25 En Controls and displays 04 Chapter 4: Controls and displays Front panel 12 3 4 56 AUDIO/VIDEO MULTI-CHANNEL RECEIVER VSX-1018AH INPUT SELECTOR STANDBY/ON PHASE CONTROL ADVANCED MCACC DIGITAL PRECISION PROCESSING DIGITAL VIDEO SCALER HDMI DVD BD TV SAT DVR 1/DVR 2 VIDEO HDMI 1/HDMI...connect your Apple iPod as an audio source (page 51), or connect a USB audio device for playback (page 53). Lights when one of remote control unit on (page 12). HDMI indicator - Lights to OFF in the Audio parameter menu (see Operating range of the MCACC presets (page...
... on page 71). 25 En Controls and displays 04 Chapter 4: Controls and displays Front panel 12 3 4 56 AUDIO/VIDEO MULTI-CHANNEL RECEIVER VSX-1018AH INPUT SELECTOR STANDBY/ON PHASE CONTROL ADVANCED MCACC DIGITAL PRECISION PROCESSING DIGITAL VIDEO SCALER HDMI DVD BD TV SAT DVR 1/DVR 2 VIDEO HDMI 1/HDMI...connect your Apple iPod as an audio source (page 51), or connect a USB audio device for playback (page 53). Lights when one of remote control unit on (page 12). HDMI indicator - Lights to OFF in the Audio parameter menu (see Operating range of the MCACC presets (page...
Owner's Manual
Page 26
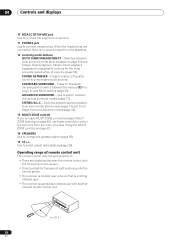
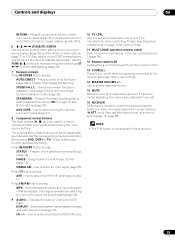
...AUTO SURR/STREAM DIRECT - Press for the most accurate reproduction of remote control unit The remote control may not work properly if: • There are connected, there is operated simultaneously with another infrared remote control unit. Use to connect headphones. STANDARD SURROUND - STEREO/A.L.C.... the MULTIZONE controls on page 30) and Stream Direct playback. Switches between the remote control and the receiver's remote sensor. • Direct sunlight or fluorescent light is shining onto the remote sensor. • The receiver is located near a device that is emitting infrared...
...AUTO SURR/STREAM DIRECT - Press for the most accurate reproduction of remote control unit The remote control may not work properly if: • There are connected, there is operated simultaneously with another infrared remote control unit. Use to connect headphones. STANDARD SURROUND - STEREO/A.L.C.... the MULTIZONE controls on page 30) and Stream Direct playback. Switches between the remote control and the receiver's remote sensor. • Direct sunlight or fluorescent light is shining onto the remote sensor. • The receiver is located near a device that is emitting infrared...
Owner's Manual
Page 28
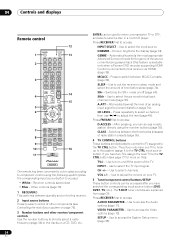
... for this ). TV - Use to access: AUDIO PARAMETER - VOL +/- - Press RECEIVER first to select the TV input signal. VIDEO PARAMETER - 04 Controls and displays Remote control 1 2 3 4 5 6 7 8 9 10 11 RECEIVER SOURCE DVD BD TV HDMI DVR 1 DVR 2 CD CD-R FM/AM XM SIRIUS iPod USB INPUT SELECT 1 2...page 36. Switches between the three banks (classes) of the source currently being played back (this feature is available only when a Pioneer DVD recorder supporting HDMI Control is connected to this system assign it to switch between standby and on /off the power of your...
... for this ). TV - Use to access: AUDIO PARAMETER - VOL +/- - Press RECEIVER first to select the TV input signal. VIDEO PARAMETER - 04 Controls and displays Remote control 1 2 3 4 5 6 7 8 9 10 11 RECEIVER SOURCE DVD BD TV HDMI DVR 1 DVR 2 CD CD-R FM/AM XM SIRIUS iPod USB INPUT SELECT 1 2...page 36. Switches between the three banks (classes) of the source currently being played back (this feature is available only when a Pioneer DVD recorder supporting HDMI Control is connected to this system assign it to switch between standby and on /off the power of your...
Owner's Manual
Page 29
...FM/AM first to select the VHF/UHF antennas or Cable TV. Use to perform operations in the main zone and zone 2 (page 60). 12 Remote control LED Lights when a command is not available for example DVD, DVR1 or TV). Use the TUNE / buttons to find preset stations ... Press RECEIVER first to turn on DVD discs. The controls above the number buttons (A.ATT, etc.)). Note • The THX button is sent from the remote control. 13 SOURCE Press to access: AUTO/DIRECT - Also used to control a component after you have selected the corresponding input source button (for...
...FM/AM first to select the VHF/UHF antennas or Cable TV. Use to perform operations in the main zone and zone 2 (page 60). 12 Remote control LED Lights when a command is not available for example DVD, DVR1 or TV). Use the TUNE / buttons to find preset stations ... Press RECEIVER first to turn on DVD discs. The controls above the number buttons (A.ATT, etc.)). Note • The THX button is sent from the remote control. 13 SOURCE Press to access: AUTO/DIRECT - Also used to control a component after you have selected the corresponding input source button (for...
Owner's Manual
Page 36
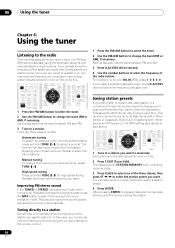
... how to do this: Automatic tuning To search for stations in the currently selected band, press and hold TUNE / for more on the remote control. 1 Press the FM/AM button to select the tuner. 2 Use the FM/AM button to change the band (FM or AM), if necessary. High...
... how to do this: Automatic tuning To search for stations in the currently selected band, press and hold TUNE / for more on the remote control. 1 Press the FM/AM button to select the tuner. 2 Use the FM/AM button to change the band (FM or AM), if necessary. High...

Owner's Manual
Page 37
..., you can name your selection. Choose from the following characters for how to recall the station preset. 37 En See Saving station presets on the remote control to do this . 2 Press T.EDIT (Tuner Edit).
..., you can name your selection. Choose from the following characters for how to recall the station preset. 37 En See Saving station presets on the remote control to do this . 2 Press T.EDIT (Tuner Edit).
Owner's Manual
Page 38
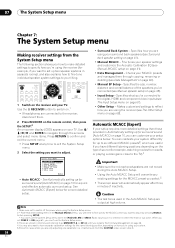
... tunes your TV. Use and ENTER to navigate through copying, renaming or deleting (see The Other Setup menu on page 68). 2 Press RECEIVER on the remote control, then press the SETUP.2 An on-screen display (OSD) appears on page 41). • Data Management - Other Setup Important • Make sure the microphone...
... tunes your TV. Use and ENTER to navigate through copying, renaming or deleting (see The Other Setup menu on page 68). 2 Press RECEIVER on the remote control, then press the SETUP.2 An on-screen display (OSD) appears on page 41). • Data Management - Other Setup Important • Make sure the microphone...

Owner's Manual
Page 49
... tone is to route all the bass sounds to the subwoofer by press RECEIVER, then press CH LEVEL, and then using / on the remote control. :Return ENTER:Next :Cancel Note 1 If you have a subwoofer and like lots of bass, it set to the Manual SP Setup menu. If you...
... tone is to route all the bass sounds to the subwoofer by press RECEIVER, then press CH LEVEL, and then using / on the remote control. :Return ENTER:Next :Cancel Note 1 If you have a subwoofer and like lots of bass, it set to the Manual SP Setup menu. If you...
Owner's Manual
Page 51
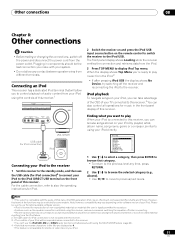
...after pressing iPod USB the display shows No Device, try switching off before connecting. • Pioneer cannot under any circumstances accept responsibility for music in the front panel display of iPod nano, iPod...make with the audio of this receiver. • You can browse songs stored on the remote control to switch the receiver to this receiver.4 You can also control all operations for ...control playback of audio content from the iPod failure. 2 The USB cable (for iPod connection) VSX-1018AH iPod MENU Connecting your iPod to the receiver 1 Set this receiver to the standby mode, ...
...after pressing iPod USB the display shows No Device, try switching off before connecting. • Pioneer cannot under any circumstances accept responsibility for music in the front panel display of iPod nano, iPod...make with the audio of this receiver. • You can browse songs stored on the remote control to switch the receiver to this receiver.4 You can also control all operations for ...control playback of audio content from the iPod failure. 2 The USB cable (for iPod connection) VSX-1018AH iPod MENU Connecting your iPod to the receiver 1 Set this receiver to the standby mode, ...

Owner's Manual
Page 52
.... Important If an error message lights in the front panel display. Input some music files compatible with the iPod (please use this receiver's remote control and OSD become inactive. 2 Press iPod CTRL again to switch back to work , try following table shows the basic playback controls for...61540; to start playback.1 Navigation through categories on this function is connected. 3 When this receiver. 52 En Press iPod USB to switch the remote control to the receiver. If you start playback. Switch off the receiver and reconnect the iPod to the iPod USB operation mode. When the ...
.... Important If an error message lights in the front panel display. Input some music files compatible with the iPod (please use this receiver's remote control and OSD become inactive. 2 Press iPod CTRL again to switch back to work , try following table shows the basic playback controls for...61540; to start playback.1 Navigation through categories on this function is connected. 3 When this receiver. 52 En Press iPod USB to switch the remote control to the receiver. If you start playback. Switch off the receiver and reconnect the iPod to the iPod USB operation mode. When the ...

Owner's Manual
Page 53
... All. If this receiver to switch between Shuffle On and Shuffle Off. Press repeatedly to a personal computer for USB playback. • Pioneer cannot guarantee compatibility (operation and/or bus power) with the device) for USB playback. TOP MENU Press to skip to previous/next track...No Device appears in the display, try following table shows the basic controls on the front panel. Press iPod USB to switch the remote control to previous/next track. AUTO SURR/ SOUND STANDARD ADVANCED STREAM DIRECT RETRIEVER SURROUND SURROUND STEREO/ A.L.C. Loading appears in the front ...
... All. If this receiver to switch between Shuffle On and Shuffle Off. Press repeatedly to a personal computer for USB playback. • Pioneer cannot guarantee compatibility (operation and/or bus power) with the device) for USB playback. TOP MENU Press to skip to previous/next track...No Device appears in the display, try following table shows the basic controls on the front panel. Press iPod USB to switch the remote control to previous/next track. AUTO SURR/ SOUND STANDARD ADVANCED STREAM DIRECT RETRIEVER SURROUND SURROUND STEREO/ A.L.C. Loading appears in the front ...

Owner's Manual
Page 55
... HD Surround can memorize up to select a preset. • The default for XM HD Surround listening. You can , however, use the number buttons on the remote control to select the channel preset you want . Press repeatedly to cycle through classes A, B and C. 2 Press / to recall the channel preset. Check the...
... HD Surround can memorize up to select a preset. • The default for XM HD Surround listening. You can , however, use the number buttons on the remote control to select the channel preset you want . Press repeatedly to cycle through classes A, B and C. 2 Press / to recall the channel preset. Check the...


