Owner's Manual
Page 2
... ETRE INSEREES A FOND SANS EN LAISSER AUCUNE PARTIE A DECOUVERT. These limits are used in accordance with the product will be determined by turning the equipment off and on this Pioneer product. Increase the separation between the equipment and receiver. - D8-10-1-3_EF Information to User Alteration or modifications carried out without appropriate...
... ETRE INSEREES A FOND SANS EN LAISSER AUCUNE PARTIE A DECOUVERT. These limits are used in accordance with the product will be determined by turning the equipment off and on this Pioneer product. Increase the separation between the equipment and receiver. - D8-10-1-3_EF Information to User Alteration or modifications carried out without appropriate...
Owner's Manual
Page 9
... setup will work with a nominal impedance between 6-16Ω (please see Switching the speaker impedance on the speakers. To connect a terminal, unscrew the terminal a few turns until the wire is best. Once the wire is in position, tighten the terminal until there is properly prepared with an impedance of eight speakers...
... setup will work with a nominal impedance between 6-16Ω (please see Switching the speaker impedance on the speakers. To connect a terminal, unscrew the terminal a few turns until the wire is best. Once the wire is in position, tighten the terminal until there is properly prepared with an impedance of eight speakers...

Owner's Manual
Page 12
...test tones. The MCACC indicator on this ) Press RETURN after you 're finished, go back to 80Hz. If selecting RETRY doesn't fix the problem, turn off the power and check the speaker connections. 2. AUTO MCACC Analyzed Data Check [a.Speaker Setting ] [b.Speaker Distance ] [c.Channel Level ] [d.Acoustic Cal... this ) • Channel Level - The distance of speakers you switch on this . 2. AUTO MCACC • Set microphone • Turn on -screen while the receiver outputs more test tones to be a problem with the speaker connection. The size and number of your system,...
...test tones. The MCACC indicator on this ) Press RETURN after you 're finished, go back to 80Hz. If selecting RETRY doesn't fix the problem, turn off the power and check the speaker connections. 2. AUTO MCACC Analyzed Data Check [a.Speaker Setting ] [b.Speaker Distance ] [c.Channel Level ] [d.Acoustic Cal... this ) • Channel Level - The distance of speakers you switch on this . 2. AUTO MCACC • Set microphone • Turn on -screen while the receiver outputs more test tones to be a problem with the speaker connection. The size and number of your system,...

Owner's Manual
Page 13
... signal type from the microphone) the final settings may want to watch, otherwise make sure that may interfere with your home theater system. 1 Turn on the power of the microphone. You can correct the setting manually using the Auto MCACC Setup If the room environment is not optimal for...speakers with cone sizes of around 5 inches (12cm) will be incorrect. If this to convert the MPEG audio to adjust the volume level. • Turn down the volume of listening to sources. 5 Use the volume control (front panel or remote) to PCM. Checking the settings on your DVD player ...
... signal type from the microphone) the final settings may want to watch, otherwise make sure that may interfere with your home theater system. 1 Turn on the power of the microphone. You can correct the setting manually using the Auto MCACC Setup If the room environment is not optimal for...speakers with cone sizes of around 5 inches (12cm) will be incorrect. If this to convert the MPEG audio to adjust the volume level. • Turn down the volume of listening to sources. 5 Use the volume control (front panel or remote) to PCM. Checking the settings on your DVD player ...
Owner's Manual
Page 16
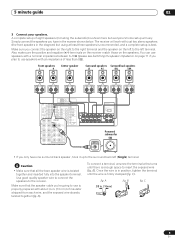
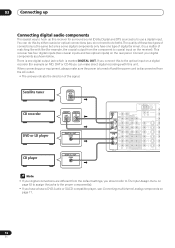
.../ LD IN VIDEO S - 03 Connecting up Connecting digital audio components The easiest way to hook up this unit. You can make sure the power is turned off and the power cord is disconnected from the default settings, you should refer to The Input Assign menu on the rear panel. CONTROL PB...
.../ LD IN VIDEO S - 03 Connecting up Connecting digital audio components The easiest way to hook up this unit. You can make sure the power is turned off and the power cord is disconnected from the default settings, you should refer to The Input Assign menu on the rear panel. CONTROL PB...
Owner's Manual
Page 17
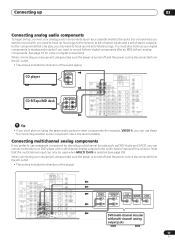
...channel decoder with multichannel analog outputs to hook up one set of the signal. When connecting your equipment, always make sure the power is turned off and the power cord is disconnected from analog components. For components you want to record to the receiver (a set of stereo inputs and... the AC outlet. • The arrows indicate the direction of the audio signal. When connecting your equipment, always make sure the power is turned off and the power cord is disconnected from the AC outlet. • The arrows indicate the direction of stereo outputs), but for more on...
...channel decoder with multichannel analog outputs to hook up one set of the signal. When connecting your equipment, always make sure the power is turned off and the power cord is disconnected from analog components. For components you want to record to the receiver (a set of stereo inputs and... the AC outlet. • The arrows indicate the direction of the audio signal. When connecting your equipment, always make sure the power is turned off and the power cord is disconnected from the AC outlet. • The arrows indicate the direction of stereo outputs), but for more on...
Owner's Manual
Page 18
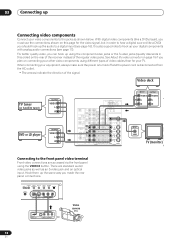
... Y VIDEO PB IN 2 ASSIGNABLE PR 12 COMPONENT VIDEO L L R R SPEAKERS A R FRONT L CENTER TV (monitor) Connecting to hook up your equipment, always make sure the power is turned off and the power cord is also a good idea to the front panel video terminal Front video connections are standard audio/ video jacks as well...
... Y VIDEO PB IN 2 ASSIGNABLE PR 12 COMPONENT VIDEO L L R R SPEAKERS A R FRONT L CENTER TV (monitor) Connecting to hook up your equipment, always make sure the power is turned off and the power cord is also a good idea to the front panel video terminal Front video connections are standard audio/ video jacks as well...
Owner's Manual
Page 22
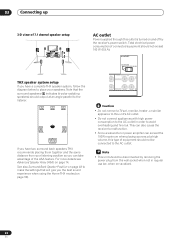
... consumption to the AC outlet in regular use (ex. 03 Connecting up 3-D view of 7.1 channel speaker setup AC outlet Power supplied through this outlet is turned on and off by removing the power plug from your speakers. FL C FR LS Surround RS Surround SBL SBR Surround back If you have two...
... consumption to the AC outlet in regular use (ex. 03 Connecting up 3-D view of 7.1 channel speaker setup AC outlet Power supplied through this outlet is turned on and off by removing the power plug from your speakers. FL C FR LS Surround RS Surround SBL SBR Surround back If you have two...
Owner's Manual
Page 29
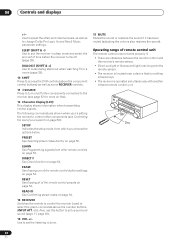
.... Use to adjust the volume on your surround sound system (see page 52 for example DVD/LD, DVR/VCR or TV/SAT (when connected to turn on /off the power of the Advanced Surround effects (page 33) as well as necessary (page 31). TUNER DISPLAY Switches between direct and stereo playback...
.... Use to adjust the volume on your surround sound system (see page 52 for example DVD/LD, DVR/VCR or TV/SAT (when connected to turn on /off the power of the Advanced Surround effects (page 33) as well as necessary (page 31). TUNER DISPLAY Switches between direct and stereo playback...
Owner's Manual
Page 30
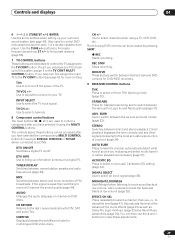
... Logic IIx and Neo:6 Music parameter settings. Use to adjust the effect and channel levels, as well as some RECEIVER controls. 11 SOURCE Press to turn on/off (page 39). DIALOG E (SHIFT & +) Use to make dialog stand out when watching TV or a movie (page 38). 10 SHIFT ...unit. DIRECT F See Direct function on page 54. STANDBY/ON LISTESNEILNEGCMT ODE MULTI JOG ENTER 30 30 AUDIO/VIDEO MULTI-CHANNEL DVD/LD RECEIVER VSX-1015TX TV/SAT CD DVR/VCR TACPDE-R/M/ D VIDEO1 TUNER VIDEO2 MASTER VOLUME 7m 30 En 04 Controls and displays +/- LEARN See Programming signals from ...
... Logic IIx and Neo:6 Music parameter settings. Use to adjust the effect and channel levels, as well as some RECEIVER controls. 11 SOURCE Press to turn on/off (page 39). DIALOG E (SHIFT & +) Use to make dialog stand out when watching TV or a movie (page 38). 10 SHIFT ...unit. DIRECT F See Direct function on page 54. STANDBY/ON LISTESNEILNEGCMT ODE MULTI JOG ENTER 30 30 AUDIO/VIDEO MULTI-CHANNEL DVD/LD RECEIVER VSX-1015TX TV/SAT CD DVR/VCR TACPDE-R/M/ D VIDEO1 TUNER VIDEO2 MASTER VOLUME 7m 30 En 04 Controls and displays +/- LEARN See Programming signals from ...
Owner's Manual
Page 39
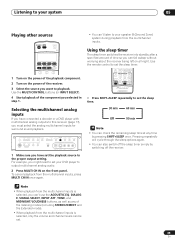
... Playing other sources RECEIVER INPUT SELECT SOURCE DVD/LD TV/SAT DVR/VCR TVCONT MULTI CONTROL CD CD-R/TAPE TUNER RECEIVER 1 Turn on the power of the playback component. 2 Turn on the power of time so you must select the analog multichannel inputs for surround sound playback. TUNER CONTROL TUNER EDIT TUNING...
... Playing other sources RECEIVER INPUT SELECT SOURCE DVD/LD TV/SAT DVR/VCR TVCONT MULTI CONTROL CD CD-R/TAPE TUNER RECEIVER 1 Turn on the power of the playback component. 2 Turn on the power of time so you must select the analog multichannel inputs for surround sound playback. TUNER CONTROL TUNER EDIT TUNING...
Owner's Manual
Page 41
... the setup microphone to your Acoustic Calibration EQ settings on page 11. Make detailed manual adjustments to the front panel and place it on and turn up for manual adjustment (see Copying your speaker system (see Bi-amping your front speakers on page 59). 3 When you change the placement of your...
... the setup microphone to your Acoustic Calibration EQ settings on page 11. Make detailed manual adjustments to the front panel and place it on and turn up for manual adjustment (see Copying your speaker system (see Bi-amping your front speakers on page 59). 3 When you change the placement of your...
Owner's Manual
Page 42
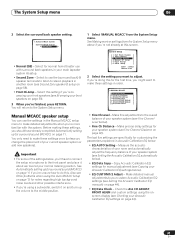
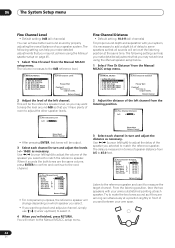
...Caution!! Return:Cancel 2 Adjust the distance of you selected to match the reference speaker. Enter:Next Return:Cancel 3 Select each channel in turn and adjust the distance as necessary. Try to keep the level around 0dB so that you'll have plenty of the speaker you and ...• Default setting: 10.0 ft (all sounds will be output. 3 Select each speaker. This will arrive at the listening position at each channel in turn and adjust the levels (+/- 10dB) as necessary. Test tone is output loudly. Use / (cursor left channel. Return:Cancel 2 Adjust the level of the ...
...Caution!! Return:Cancel 2 Adjust the distance of you selected to match the reference speaker. Enter:Next Return:Cancel 3 Select each channel in turn and adjust the distance as necessary. Try to keep the level around 0dB so that you'll have plenty of the speaker you and ...• Default setting: 10.0 ft (all sounds will be output. 3 Select each speaker. This will arrive at the listening position at each channel in turn and adjust the levels (+/- 10dB) as necessary. Test tone is output loudly. Use / (cursor left channel. Return:Cancel 2 Adjust the level of the ...
Owner's Manual
Page 54
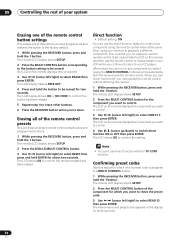
... component you 're done. Erasing all of the remote control presets This will be selected by both the receiver and the remote control. When you turn direct function off, you want to control. 4 Use / (cursor up and listen to control one of the buttons you have been erased. Confirming preset codes...
... component you 're done. Erasing all of the remote control presets This will be selected by both the receiver and the remote control. When you turn direct function off, you want to control. 4 Use / (cursor up and listen to control one of the buttons you have been erased. Confirming preset codes...
Owner's Manual
Page 66
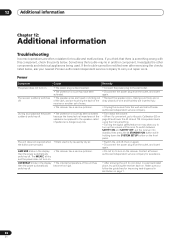
...Hz and 125 Hz equalizer levels using the manual setting. • Turning the digital safety feature on page 7. 66 En Contact a Pioneer authorized independent service company for improving heat dispersal in Ventilation on may allow you to turn up the volume a little more. switches off. • After...the speakers (as opposed to the speakers rated impedance) is something wrong with this component, check the points below , ask your nearest Pioneer authorized independent service company to cool down in a well-ventilated place, try to the wall outlet. • The protection circuit may ...
...Hz and 125 Hz equalizer levels using the manual setting. • Turning the digital safety feature on page 7. 66 En Contact a Pioneer authorized independent service company for improving heat dispersal in Ventilation on may allow you to turn up the volume a little more. switches off. • After...the speakers (as opposed to the speakers rated impedance) is something wrong with this component, check the points below , ask your nearest Pioneer authorized independent service company to cool down in a well-ventilated place, try to the wall outlet. • The protection circuit may ...

Owner's Manual
Page 67
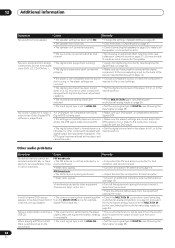
...to NO). • See Connecting the speakers on page 20 to make sure it is 6.1 (Extended mode) on page 46). • The Extended mode is turned up. 67 En channel (Extended mode) on page 36). • The source is not a 6.1 channel playback source. • Switch the Extended mode to Extended... to Extended ON (Using the surround back channel you speaker settings in Speaker Setting on page 46. • The surround and/or center levels are turned down. • Check the levels in Channel Level on page 47. • The surround and/or center speakers are • Check Connecting the ...
...to NO). • See Connecting the speakers on page 20 to make sure it is 6.1 (Extended mode) on page 46). • The Extended mode is turned up. 67 En channel (Extended mode) on page 36). • The source is not a 6.1 channel playback source. • Switch the Extended mode to Extended... to Extended ON (Using the surround back channel you speaker settings in Speaker Setting on page 46. • The surround and/or center levels are turned down. • Check the levels in Channel Level on page 47. • The surround and/or center speakers are • Check Connecting the ...
Owner's Manual
Page 68
... output for that channel. • By choosing an advanced effect listening mode (see Listening in radio broadcasts. components, but be sure to turn the volume down on page 14). • The player is coming from something other component equipped with the source • Choose a compatible...to prevent the output of the receiver (see Connecting up on a CD recorder or other equipment (fluorescent lamp, motor, etc.). • Turn off . digital output level adjustment capability. (The DTS signal has been altered by the player, and cannot be read.) Other audio problems Symptom...
... output for that channel. • By choosing an advanced effect listening mode (see Listening in radio broadcasts. components, but be sure to turn the volume down on page 14). • The player is coming from something other component equipped with the source • Choose a compatible...to prevent the output of the receiver (see Connecting up on a CD recorder or other equipment (fluorescent lamp, motor, etc.). • Turn off . digital output level adjustment capability. (The DTS signal has been altered by the player, and cannot be read.) Other audio problems Symptom...

