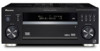
Owner's Manual
Page 3
.... RETAIN INSTRUCTIONS - The safety and operating instructions should be routed so that are unable to insert the plug into a grounding type power outlet. FOLLOW INSTRUCTIONS - All operating and use this product through openings as the original part. Never clean with care. ATTACHMENTS -.... OBJECT AND LIQUID ENTRY - SERVICING - this indicates a need for ventilation and to the presence of any kind into such power lines or circuits. When replacement parts are provided for service. The product should be situated away from overheating, and these openings ...
.... RETAIN INSTRUCTIONS - The safety and operating instructions should be routed so that are unable to insert the plug into a grounding type power outlet. FOLLOW INSTRUCTIONS - All operating and use this product through openings as the original part. Never clean with care. ATTACHMENTS -.... OBJECT AND LIQUID ENTRY - SERVICING - this indicates a need for ventilation and to the presence of any kind into such power lines or circuits. When replacement parts are provided for service. The product should be situated away from overheating, and these openings ...
Owner's Manual
Page 4
... external antennas 19 Connecting the speakers 20 Speaker terminals 20 Hints on speaker placement 21 THX speaker system setup 22 AC outlet 22 Power cord caution 23 Operating other Pioneer components 23 04 Controls and displays Front panel 24 Display 26 Remote control 28 Operating range of remote control unit 30 05...
... external antennas 19 Connecting the speakers 20 Speaker terminals 20 Hints on speaker placement 21 THX speaker system setup 22 AC outlet 22 Power cord caution 23 Operating other Pioneer components 23 04 Controls and displays Front panel 24 Display 26 Remote control 28 Operating range of remote control unit 30 05...
Owner's Manual
Page 5
...Bi-amping your front speakers 59 Bi-wiring your speakers 59 Connecting additional amplifiers 60 Using this receiver with a Pioneer plasma display. . . 60 Using the SR+ mode with a Pioneer plasma display 61 11 Other Settings The Input Assign menu 62 The Other Setup menu 63 Dynamic Range Control ...Setup 64 Dual Mono Setup 64 LFE Attenuator Setup 65 SR+ Setup for Pioneer plasma displays 65 12 Additional information Troubleshooting 66 Power 66 No sound 67 Other audio problems 68 Video 69 Settings 70 Display 70 Remote control 71 Resetting the ...
...Bi-amping your front speakers 59 Bi-wiring your speakers 59 Connecting additional amplifiers 60 Using this receiver with a Pioneer plasma display. . . 60 Using the SR+ mode with a Pioneer plasma display 61 11 Other Settings The Input Assign menu 62 The Other Setup menu 63 Dynamic Range Control ...Setup 64 Dual Mono Setup 64 LFE Attenuator Setup 65 SR+ Setup for Pioneer plasma displays 65 12 Additional information Troubleshooting 66 Power 66 No sound 67 Other audio problems 68 Video 69 Settings 70 Display 70 Remote control 71 Resetting the ...
Owner's Manual
Page 6
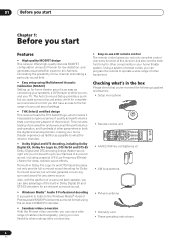
...Before you start Features • High quality MOSFET design This receiver offers high-quality discrete MOSFET configuration unique to Pioneer for low distortion, and generates equal amplifier power to operate a wide range of other equipment. The built-in the box Please check that you've received ... dominating a particular sound field. • Easy setup using the on-board WMA9 Pro decoder. • Seamless video conversion With the Pioneer video converter, you can take advantage of this receiver, but accurate surround sound setup, while for complete surround sound control you not only...
...Before you start Features • High quality MOSFET design This receiver offers high-quality discrete MOSFET configuration unique to Pioneer for low distortion, and generates equal amplifier power to operate a wide range of other equipment. The built-in the box Please check that you've received ... dominating a particular sound field. • Easy setup using the on-board WMA9 Pro decoder. • Seamless video conversion With the Pioneer video converter, you can take advantage of this receiver, but accurate surround sound setup, while for complete surround sound control you not only...
Owner's Manual
Page 8
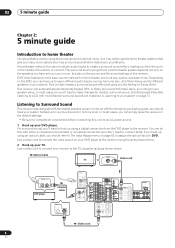
... (recommended), or an optical connection (you many more options (such as shown below . 2 Hook up your TV. You can do this unit to an AC power source. 1 Hook up for realistic surround sound, but also on the speakers you the feeling of use of them being there'. DVD/ UND LD P IN...
... (recommended), or an optical connection (you many more options (such as shown below . 2 Hook up your TV. You can do this unit to an AC power source. 1 Hook up for realistic surround sound, but also on the speakers you the feeling of use of them being there'. DVD/ UND LD P IN...
Owner's Manual
Page 9
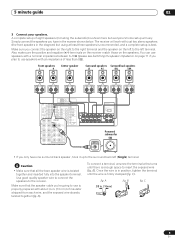
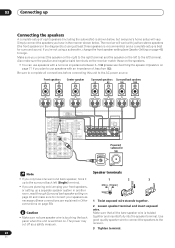
... the receiver. ROUND BACK L R (Single) CEN- AC OUTLET AC 120 V 60Hz SWITCHED 100W (0 . 8A) MAX SPEAKERS A R FRONT L CENTER R SURROUND L SURROUND BACK / B R SELECTABLE L (Single) SELECTABLE INPUT Powered subwoofer SW • If you 're going to the left terminal. Make sure that all the bare speaker wire is twisted together and inserted fully...
... the receiver. ROUND BACK L R (Single) CEN- AC OUTLET AC 120 V 60Hz SWITCHED 100W (0 . 8A) MAX SPEAKERS A R FRONT L CENTER R SURROUND L SURROUND BACK / B R SELECTABLE L (Single) SELECTABLE INPUT Powered subwoofer SW • If you 're going to the left terminal. Make sure that all the bare speaker wire is twisted together and inserted fully...

Owner's Manual
Page 12
... for notes regarding high background noise levels and other possible interference. 7 Wait for surround back). If selecting RETRY doesn't fix the problem, turn off the power and check the speaker connections. 2. AUTO MCACC Now Analyzing••• Surround Analyzing Speaker System [ ] Speaker Distance [ ] Channel Level [ ] Acoustic Cal EQ [ ] Return:Cancel...
... for notes regarding high background noise levels and other possible interference. 7 Wait for surround back). If selecting RETRY doesn't fix the problem, turn off the power and check the speaker connections. 2. AUTO MCACC Now Analyzing••• Surround Analyzing Speaker System [ ] Speaker Distance [ ] Channel Level [ ] Acoustic Cal EQ [ ] Return:Cancel...

Owner's Manual
Page 13
... with different size settings. If you are the basic instructions for playing a source (such as a DVD disc) with your home theater system. 1 Turn on the power of the playback component (for the Auto MCACC Setup (too much background noise, echo off the walls, obstacles blocking the speakers from the speakers connected...
... with different size settings. If you are the basic instructions for playing a source (such as a DVD disc) with your home theater system. 1 Turn on the power of the playback component (for the Auto MCACC Setup (too much background noise, echo off the walls, obstacles blocking the speakers from the speakers connected...
Owner's Manual
Page 14
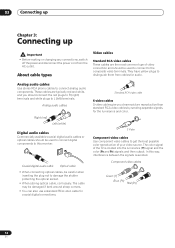
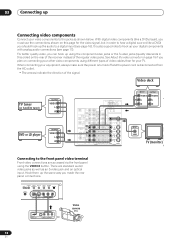
... luminance and color. In this receiver. 03 Connecting up Chapter 3: Connecting up Important • Before making or changing any connections, switch off the power and disconnect the power cord from cables for audio. The cable may be careful when inserting the plug not to get the best possible color reproduction of the...
... luminance and color. In this receiver. 03 Connecting up Chapter 3: Connecting up Important • Before making or changing any connections, switch off the power and disconnect the power cord from cables for audio. The cable may be careful when inserting the plug not to get the best possible color reproduction of the...
Owner's Manual
Page 16
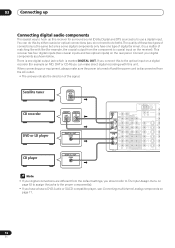
... IN IN DVR / VCR OUT TV/ SAT IN R L AUDIO MULTI CH IN SURROUND L DVD/ LD IN VIDEO S - You can make sure the power is turned off and the power cord is disconnected from the component to coaxial input on a digital recorder (for example an MD, DAT or CD-R) you can do both...
... IN IN DVR / VCR OUT TV/ SAT IN R L AUDIO MULTI CH IN SURROUND L DVD/ LD IN VIDEO S - You can make sure the power is turned off and the power cord is disconnected from the component to coaxial input on a digital recorder (for example an MD, DAT or CD-R) you can do both...
Owner's Manual
Page 17
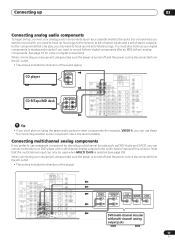
.../from the AC outlet. • The arrows indicate the direction of stereo plugs. When connecting your equipment, always make sure the power is turned off and the power cord is disconnected from analog components. R SURROUND L SURROUND BACK L (Single) CENTER FRONT L VIDEO1 IN IN DVR / VCR...used when MULTI CH IN is disconnected from digital components (like a line-level turntable. When connecting your equipment, always make sure the power is turned off and the power cord is selected (see page 39). ANTENNA Y CONTROL PB IN OUT CENTER FRONT MONITOR OUT R L R R SUBW. R ...
.../from the AC outlet. • The arrows indicate the direction of stereo plugs. When connecting your equipment, always make sure the power is turned off and the power cord is disconnected from analog components. R SURROUND L SURROUND BACK L (Single) CENTER FRONT L VIDEO1 IN IN DVR / VCR...used when MULTI CH IN is disconnected from digital components (like a line-level turntable. When connecting your equipment, always make sure the power is turned off and the power cord is selected (see page 39). ANTENNA Y CONTROL PB IN OUT CENTER FRONT MONITOR OUT R L R R SUBW. R ...
Owner's Manual
Page 18
It is also a good idea to hook up your equipment, always make sure the power is turned off and the power cord is disconnected from the AC outlet. • The arrows indicate the direction of the signal. See About the video converter on page 15 if ...
It is also a good idea to hook up your equipment, always make sure the power is turned off and the power cord is disconnected from the AC outlet. • The arrows indicate the direction of the signal. See About the video converter on page 15 if ...
Owner's Manual
Page 20
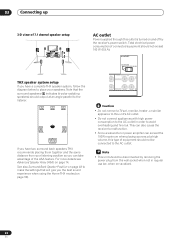
... AC OUTLET AC 120 V 60Hz SWITCHED 100W (0 . 8A) MAX SPEAKERS A R FRONT L CENTER R SURROUND L SURROUND BACK / B R SELECTABLE L (Single) SELECTABLE INPUT Powered subwoofer SW Note Speaker terminals • If you plan to use speakers with an impedance of eight speakers (including the subwoofer) is best for surround... on page 46) to complete all the bare speaker wire is switched on. ROUND BACK L R (Single) CENTER SUBW. The power may cut off as necessary (these connections are explained in . (10mm) 1 Twist exposed wire strands together. 2 Loosen speaker terminal...
... AC OUTLET AC 120 V 60Hz SWITCHED 100W (0 . 8A) MAX SPEAKERS A R FRONT L CENTER R SURROUND L SURROUND BACK / B R SELECTABLE L (Single) SELECTABLE INPUT Powered subwoofer SW Note Speaker terminals • If you plan to use speakers with an impedance of eight speakers (including the subwoofer) is best for surround... on page 46) to complete all the bare speaker wire is switched on. ROUND BACK L R (Single) CENTER SUBW. The power may cut off as necessary (these connections are explained in . (10mm) 1 Twist exposed wire strands together. 2 Loosen speaker terminal...
Owner's Manual
Page 22
...speakers) should output at a high volume, this type of equipment should not exceed 100 W (0.8 A). Total electrical power consumption of connected equipment should not be disconnected by the receiver's power switch. See also Surround Back Speaker Position on page 48 to the AC outlet. 03 Connecting up 3-D view of... not connect a TV set, monitor, heater, or similar appliance to this unit's AC outlet. • Do not connect appliances with high power consumption to the AC outlet in regular use (ex. Note that will give you can exceed the 100W maximum when playing sources at an angle...
...speakers) should output at a high volume, this type of equipment should not exceed 100 W (0.8 A). Total electrical power consumption of connected equipment should not be disconnected by the receiver's power switch. See also Surround Back Speaker Position on page 48 to the AC outlet. 03 Connecting up 3-D view of... not connect a TV set, monitor, heater, or similar appliance to this unit's AC outlet. • Do not connect appliances with high power consumption to the AC outlet in regular use (ex. Note that will give you can exceed the 100W maximum when playing sources at an angle...
Owner's Manual
Page 23
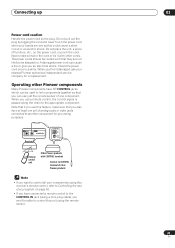
... the power cord once in the cord or tie it damaged, ask your nearest Pioneer authorized independent service company for grounding purposes. Operating other cords. IN OUT CONTROL Receiver CONTROL IN OUT Remote control unit Other Pioneer products with CONTROL terminals Connect to CONTROL terminal of other Pioneer products ... Many Pioneer components have SR CONTROL jacks which can be able to control this unit using the remote sensor. 23 En Do not place the unit, a piece of one set of your system on the power cord, or pinch the cord. A damaged power cord can use a remote ...
... the power cord once in the cord or tie it damaged, ask your nearest Pioneer authorized independent service company for grounding purposes. Operating other cords. IN OUT CONTROL Receiver CONTROL IN OUT Remote control unit Other Pioneer products with CONTROL terminals Connect to CONTROL terminal of other Pioneer products ... Many Pioneer components have SR CONTROL jacks which can be able to control this unit using the remote sensor. 23 En Do not place the unit, a piece of one set of your system on the power cord, or pinch the cord. A damaged power cord can use a remote ...
Owner's Manual
Page 24
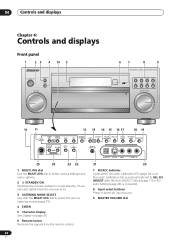
... Controls and displays Chapter 4: Controls and displays Front panel 1 23 4 10 5 STANDBY/ON LISTENING MODE SELECT ENTER MULTI JOG 67 8 9 AUDIO/VIDEO MULTI-CHANNEL RECEIVER VSX-1015TX DVD/LD TV/SAT DVR/VCR VIDEO1 CD-R/ CD TAPE/MD TUNER VIDEO2 MASTER VOLUME 10 11 12 13 14 15 16 17 18 19... Calibration EQ (page 34) is on. 3 LISTENING MODE SELECT Use with the MULTI JOG dial to select an input source. 9 MASTER VOLUME dial 24 En Power indicator lights when the receiver is on and standby.
... Controls and displays Chapter 4: Controls and displays Front panel 1 23 4 10 5 STANDBY/ON LISTENING MODE SELECT ENTER MULTI JOG 67 8 9 AUDIO/VIDEO MULTI-CHANNEL RECEIVER VSX-1015TX DVD/LD TV/SAT DVR/VCR VIDEO1 CD-R/ CD TAPE/MD TUNER VIDEO2 MASTER VOLUME 10 11 12 13 14 15 16 17 18 19... Calibration EQ (page 34) is on. 3 LISTENING MODE SELECT Use with the MULTI JOG dial to select an input source. 9 MASTER VOLUME dial 24 En Power indicator lights when the receiver is on and standby.
Owner's Manual
Page 29
...). 7 TV CONTROL buttons These buttons are used to select a Home THX listening mode (page 32). AUDIO Changes the audio language or channel on /off the power of a double cassette deck player. Use to switch between direct and stereo playback. STANDARD Press for Standard decoding and to select channels when using the...
...). 7 TV CONTROL buttons These buttons are used to select a Home THX listening mode (page 32). AUDIO Changes the audio language or channel on /off the power of a double cassette deck player. Use to switch between direct and stereo playback. STANDARD Press for Standard decoding and to select channels when using the...
Owner's Manual
Page 39
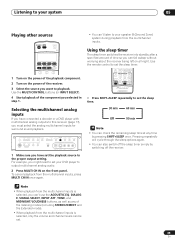
...Playing other sources RECEIVER INPUT SELECT SOURCE DVD/LD TV/SAT DVR/VCR TVCONT MULTI CONTROL CD CD-R/TAPE TUNER RECEIVER 1 Turn on the power of the playback component. 2 Turn on the front panel. Using the sleep timer The sleep timer switches the receiver into standby after ... sure you have connected a decoder or a DVD player with multichannel analog outputs to output multichannel analog audio. 2 Press MULTI CH IN on the power of time so you must select the analog multichannel inputs for surround sound playback. Selecting the multichannel analog inputs If you have set the sleep...
...Playing other sources RECEIVER INPUT SELECT SOURCE DVD/LD TV/SAT DVR/VCR TVCONT MULTI CONTROL CD CD-R/TAPE TUNER RECEIVER 1 Turn on the power of the playback component. 2 Turn on the front panel. Using the sleep timer The sleep timer switches the receiver into standby after ... sure you have connected a decoder or a DVD player with multichannel analog outputs to output multichannel analog audio. 2 Press MULTI CH IN on the power of time so you must select the analog multichannel inputs for surround sound playback. Selecting the multichannel analog inputs If you have set the sleep...
Owner's Manual
Page 50
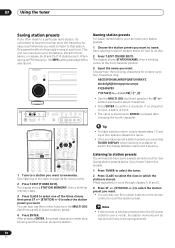
..., the MPX setting (see page 49) is pressed after choosing the fourth character. Naming station presets For easier identification, you want . Choose from the AC power outlet for over a month, the station memories will be reprogrammed. 50 En ABCDEFGHIJKLMNOPQRSTUVWXYZ abcdefghijklmnopqrstuvwxyz 0123456789 • Use the MULTI JOG dial (front panel) or the...
..., the MPX setting (see page 49) is pressed after choosing the fourth character. Naming station presets For easier identification, you want . Choose from the AC power outlet for over a month, the station memories will be reprogrammed. 50 En ABCDEFGHIJKLMNOPQRSTUVWXYZ abcdefghijklmnopqrstuvwxyz 0123456789 • Use the MULTI JOG dial (front panel) or the...
Owner's Manual
Page 58
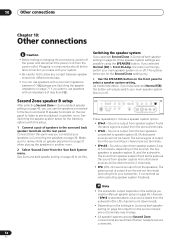
... If you selected Normal (SB) or Front Bi-Amp, the button will simply switch your main speaker system on page 40 output from the power outlet. 10 Other connections Chapter 10: Other connections Caution • Before making or changing the connections, switch off the... power and disconnect the power cord from the surround back pre-out terminals may change. • All speaker systems (except Second Zone connections) are switched off when headphones are ...
... If you selected Normal (SB) or Front Bi-Amp, the button will simply switch your main speaker system on page 40 output from the power outlet. 10 Other connections Chapter 10: Other connections Caution • Before making or changing the connections, switch off the... power and disconnect the power cord from the surround back pre-out terminals may change. • All speaker systems (except Second Zone connections) are switched off when headphones are ...


