Owner's Manual
Page 4
... speaker placement 21 THX speaker system setup 22 AC outlet 22 Power cord caution 23 Operating other Pioneer components 23 04 Controls and displays Front panel 24 Display 26 Remote control 28 Operating range of remote control unit 30 05 Listening to your system Auto playback 31 Listening in surround sound 31 Standard...
... speaker placement 21 THX speaker system setup 22 AC outlet 22 Power cord caution 23 Operating other Pioneer components 23 04 Controls and displays Front panel 24 Display 26 Remote control 28 Operating range of remote control unit 30 05 Listening to your system Auto playback 31 Listening in surround sound 31 Standard...
Owner's Manual
Page 5
... Bi-amping your front speakers 59 Bi-wiring your speakers 59 Connecting additional amplifiers 60 Using this receiver with a Pioneer plasma display. . . 60 Using the SR+ mode with a Pioneer plasma display 61 11 Other Settings The Input Assign menu 62 The Other Setup menu 63 Dynamic Range Control Setup... displays 65 12 Additional information Troubleshooting 66 Power 66 No sound 67 Other audio problems 68 Video 69 Settings 70 Display 70 Remote control 71 Resetting the main unit 71 Switching the speaker impedance 71 Surround sound formats 72 Dolby 72 DTS 72 Windows Media® ...
... Bi-amping your front speakers 59 Bi-wiring your speakers 59 Connecting additional amplifiers 60 Using this receiver with a Pioneer plasma display. . . 60 Using the SR+ mode with a Pioneer plasma display 61 11 Other Settings The Input Assign menu 62 The Other Setup menu 63 Dynamic Range Control Setup... displays 65 12 Additional information Troubleshooting 66 Power 66 No sound 67 Other audio problems 68 Video 69 Settings 70 Display 70 Remote control 71 Resetting the main unit 71 Switching the speaker impedance 71 Surround sound formats 72 Dolby 72 DTS 72 Windows Media® ...
Owner's Manual
Page 6
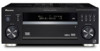
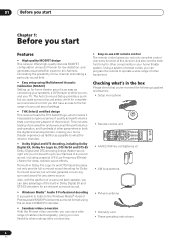
...sound effects. 01 Before you start Features • High quality MOSFET design This receiver offers high-quality discrete MOSFET configuration unique to Pioneer for low distortion, and generates equal amplifier power to all channels, eliminating the possibility of one channel dominating a particular sound field.... • Easy setup using the on-board WMA9 Pro decoder. • Seamless video conversion With the Pioneer video converter, you can program the remote to operate a wide range of other equipment. The Auto Surround Setup provides a quick but will also generate convincing...
...sound effects. 01 Before you start Features • High quality MOSFET design This receiver offers high-quality discrete MOSFET configuration unique to Pioneer for low distortion, and generates equal amplifier power to all channels, eliminating the possibility of one channel dominating a particular sound field.... • Easy setup using the on-board WMA9 Pro decoder. • Seamless video conversion With the Pioneer video converter, you can program the remote to operate a wide range of other equipment. The Auto Surround Setup provides a quick but will also generate convincing...
Owner's Manual
Page 10
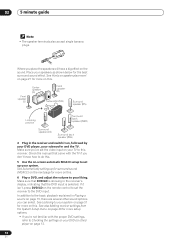
... position Surround back speaker (SBR) Surround speaker (LS) Surround back speaker (SBL) 4 Plug in the receiver and switch it isn't, press DVD/LD on the remote control to set the video input on your subwoofer and the TV. Make sure that DVD/LD is showing in Playing a source on page 13...
... position Surround back speaker (SBR) Surround speaker (LS) Surround back speaker (SBL) 4 Plug in the receiver and switch it isn't, press DVD/LD on the remote control to set the video input on your subwoofer and the TV. Make sure that DVD/LD is showing in Playing a source on page 13...
Owner's Manual
Page 11
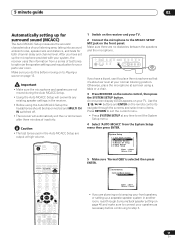
... at any existing speaker settings in the receiver. • Before using a table or a chair. 3 Press RECEIVER on the remote control, then press the SYSTEM SETUP button. Use the / / / buttons and ENTER on the remote control to navigate through Surround back speaker setting on page 40 and make sure to connect your speakers...
... at any existing speaker settings in the receiver. • Before using a table or a chair. 3 Press RECEIVER on the remote control, then press the SYSTEM SETUP button. Use the / / / buttons and ENTER on the remote control to navigate through Surround back speaker setting on page 40 and make sure to connect your speakers...

Owner's Manual
Page 13
..., set to a multichannel listening mode (see The System Setup menu on different ways of listening to sources. 5 Use the volume control (front panel or remote) to adjust the volume level. • Turn down the volume of the DVD (or other ) player Before continuing, you may only get digital 2.... • Adjust the volume to PCM. If there are playing a stereo source, you will be made. • Depending on the remote control. 4 Press AUTO SURR (remote control) and start playback of your DVD player/satellite receiver is set to your system on page 31 for more detailed surround sound...
..., set to a multichannel listening mode (see The System Setup menu on different ways of listening to sources. 5 Use the volume control (front panel or remote) to adjust the volume level. • Turn down the volume of the DVD (or other ) player Before continuing, you may only get digital 2.... • Adjust the volume to PCM. If there are playing a stereo source, you will be made. • Depending on the remote control. 4 Press AUTO SURR (remote control) and start playback of your DVD player/satellite receiver is set to your system on page 31 for more detailed surround sound...
Owner's Manual
Page 23
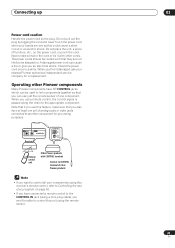
... Many Pioneer components have SR CONTROL jacks which can use this feature, make a knot in a while. Do not pull out the plug by the plug. When you also have connected a remote control to the CONTROL IN jack (using this receiver's remote control, refer to another component for a ...mini-plug cable), you can be stepped on. When you an electrical shock. IN OUT CONTROL Receiver CONTROL IN OUT Remote control unit Other Pioneer products with other Pioneer products Note • If you want to the appropriate component. Connecting up 03 Power cord caution Handle the power ...
... Many Pioneer components have SR CONTROL jacks which can use this feature, make a knot in a while. Do not pull out the plug by the plug. When you also have connected a remote control to the CONTROL IN jack (using this receiver's remote control, refer to another component for a ...mini-plug cable), you can be stepped on. When you an electrical shock. IN OUT CONTROL Receiver CONTROL IN OUT Remote control unit Other Pioneer products with other Pioneer products Note • If you want to the appropriate component. Connecting up 03 Power cord caution Handle the power ...
Owner's Manual
Page 24
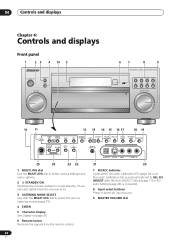
...the MULTI JOG dial to select the various listening modes (page 31). 4 ENTER 5 Character display See Display on page 26. 6 Remote sensor Receives the signals from the remote control. 21 20 7 MCACC indicator Lights when Acoustic Calibration EQ (page 34) is on (Acoustic Calibration EQ is automatically set to ... Chapter 4: Controls and displays Front panel 1 23 4 10 5 STANDBY/ON LISTENING MODE SELECT ENTER MULTI JOG 67 8 9 AUDIO/VIDEO MULTI-CHANNEL RECEIVER VSX-1015TX DVD/LD TV/SAT DVR/VCR VIDEO1 CD-R/ CD TAPE/MD TUNER VIDEO2 MASTER VOLUME 10 11 12 13 14 15 16 17 18 19...
...the MULTI JOG dial to select the various listening modes (page 31). 4 ENTER 5 Character display See Display on page 26. 6 Remote sensor Receives the signals from the remote control. 21 20 7 MCACC indicator Lights when Acoustic Calibration EQ (page 34) is on (Acoustic Calibration EQ is automatically set to ... Chapter 4: Controls and displays Front panel 1 23 4 10 5 STANDBY/ON LISTENING MODE SELECT ENTER MULTI JOG 67 8 9 AUDIO/VIDEO MULTI-CHANNEL RECEIVER VSX-1015TX DVD/LD TV/SAT DVR/VCR VIDEO1 CD-R/ CD TAPE/MD TUNER VIDEO2 MASTER VOLUME 10 11 12 13 14 15 16 17 18 19...
Owner's Manual
Page 28
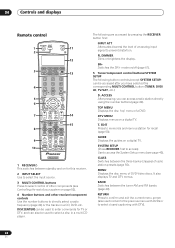
... TV or DTV, and can also be accessed after you can access a radio station directly using the number buttons (page 49). 04 Controls and displays Remote control RECEIVER INPUT SELECT 1 2 SOURCE 11 12 DVD/LD TV/SAT DVR/VCR TVCONT 3 MULTI CONTROL CD CD-R/TAPE TUNER RECEIVER 13 4 INPUT ATT FL...
... TV or DTV, and can also be accessed after you can access a radio station directly using the number buttons (page 49). 04 Controls and displays Remote control RECEIVER INPUT SELECT 1 2 SOURCE 11 12 DVD/LD TV/SAT DVR/VCR TVCONT 3 MULTI CONTROL CD CD-R/TAPE TUNER RECEIVER 13 4 INPUT ATT FL...
Owner's Manual
Page 30
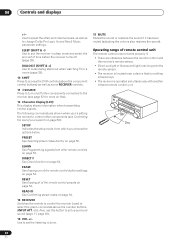
... sound if it has been muted (adjusting the volume also restores the sound). LEARN See Programming signals from which you 're setting the remote to control other components connected to access the DVR controls (above the number buttons (INPUT ATT, etc). Use to adjust the effect and...page 53. 04 Controls and displays +/- STANDBY/ON LISTESNEILNEGCMT ODE MULTI JOG ENTER 30 30 AUDIO/VIDEO MULTI-CHANNEL DVD/LD RECEIVER VSX-1015TX TV/SAT CD DVR/VCR TACPDE-R/M/ D VIDEO1 TUNER VIDEO2 MASTER VOLUME 7m 30 En PRESET See Selecting preset codes directly on page 54....
... sound if it has been muted (adjusting the volume also restores the sound). LEARN See Programming signals from which you 're setting the remote to control other components connected to access the DVR controls (above the number buttons (INPUT ATT, etc). Use to adjust the effect and...page 53. 04 Controls and displays +/- STANDBY/ON LISTESNEILNEGCMT ODE MULTI JOG ENTER 30 30 AUDIO/VIDEO MULTI-CHANNEL DVD/LD RECEIVER VSX-1015TX TV/SAT CD DVR/VCR TACPDE-R/M/ D VIDEO1 TUNER VIDEO2 MASTER VOLUME 7m 30 En PRESET See Selecting preset codes directly on page 54....
Owner's Manual
Page 39
... RECEIVER 1 Turn on the power of the playback component. 2 Turn on the power of the receiver. 3 Select the source you selected in step 1. Use the remote control to set your DVD player to the proper output setting. MPX AUDIO THX CH RETURN SUBTITLE HDD DVD CH CH RECEIVER CONTROL STANDARD ADV...
... RECEIVER 1 Turn on the power of the playback component. 2 Turn on the power of the receiver. 3 Select the source you selected in step 1. Use the remote control to set your DVD player to the proper output setting. MPX AUDIO THX CH RETURN SUBTITLE HDD DVD CH CH RECEIVER CONTROL STANDARD ADV...

Owner's Manual
Page 40
Input Assign ] [ 6. Use the / / / buttons and ENTER on the remote control, then press the SYSTEM SETUP button. See Making receiver settings from the System Setup menu above if you're not already at any time ... MCACC - Fine tune your TV. In addition to a normal home theater setup where they are connected to the receiver, disconnect them. 2 Press RECEIVER on the remote control to navigate through the screens and select menu items. Press RETURN to confirm and exit the current menu. • Press SYSTEM SETUP at this...
Input Assign ] [ 6. Use the / / / buttons and ENTER on the remote control, then press the SYSTEM SETUP button. See Making receiver settings from the System Setup menu above if you're not already at any time ... MCACC - Fine tune your TV. In addition to a normal home theater setup where they are connected to the receiver, disconnect them. 2 Press RECEIVER on the remote control to navigate through the screens and select menu items. Press RETURN to confirm and exit the current menu. • Press SYSTEM SETUP at this...
Owner's Manual
Page 48
... receiver can set the channel levels at any time by using the THX Select2 Cinema and THX MusicMode listening modes (see About THX on the remote control. Channel Level ] [ d. Speaker Distance ] [ e . Surround Back Speaker Position For the most effective results when using EFFECT/CH SEL and +/- See THX speaker system setup...
... receiver can set the channel levels at any time by using the THX Select2 Cinema and THX MusicMode listening modes (see About THX on the remote control. Channel Level ] [ d. Speaker Distance ] [ e . Surround Back Speaker Position For the most effective results when using EFFECT/CH SEL and +/- See THX speaker system setup...
Owner's Manual
Page 49
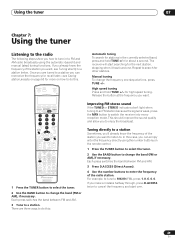
.... 2 Use the BAND button to change the band (FM or AM), if necessary. RECEIVER INPUT SELECT SOURCE Automatic tuning To search for more on the remote control. 1 Press the TUNER button to select the tuner. 2 Use the BAND button to change the band (FM or AM), if necessary. Manual tuning To...
.... 2 Use the BAND button to change the band (FM or AM), if necessary. RECEIVER INPUT SELECT SOURCE Automatic tuning To search for more on the remote control. 1 Press the TUNER button to select the tuner. 2 Use the BAND button to change the band (FM or AM), if necessary. Manual tuning To...
Owner's Manual
Page 50
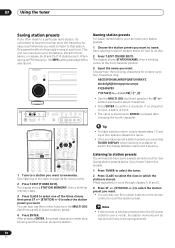
See Listening to the radio on page 49 for more on the remote control to recall the station preset. Listening to station presets You will have to be lost and will need to have some presets stored to ... station presets For easier identification, you can name your station presets. 1 Choose the station preset you can also use the number buttons on this . buttons (remote) to select characters. • Press ENTER to select a station preset. 4 Press ENTER.
See Listening to the radio on page 49 for more on the remote control to recall the station preset. Listening to station presets You will have to be lost and will need to have some presets stored to ... station presets For easier identification, you can name your station presets. 1 Choose the station preset you can also use the number buttons on this . buttons (remote) to select characters. • Press ENTER to select a station preset. 4 Press ENTER.
Owner's Manual
Page 52
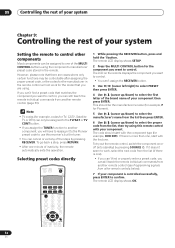
... commands from another component, you will not work , select the next code from the list, then try out the remote control, switch the component on the remote displays the component you want to control. Selecting preset codes directly RECEIVER INPUT SELECT SOURCE 1 While pressing the RECEIVER button,...letter of the brand name of your component is more than one, start with your component. If it to the Pioneer preset code to use this remote control with the component type (for Pioneer). 5 Use / (cursor up/down) to select the manufacturer's name from the list then press ENTER. 6 ...
... commands from another component, you will not work , select the next code from the list, then try out the remote control, switch the component on the remote displays the component you want to control. Selecting preset codes directly RECEIVER INPUT SELECT SOURCE 1 While pressing the RECEIVER button,...letter of the brand name of your component is more than one, start with your component. If it to the Pioneer preset code to use this remote control with the component type (for Pioneer). 5 Use / (cursor up/down) to select the manufacturer's name from the list then press ENTER. 6 ...
Owner's Manual
Page 53
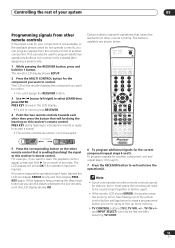
...has been learned. Controlling the rest of your system 09 Programming signals from other remote controls If the preset code for your component is full. Note • Some commands from the remote control of the remote control button settings below : RECEIVER INPUT SELECT SOURCE DVD/LD TV/SAT DVR/...signal, press and hold the 1 button. PRES KEY starts flashing to indicate the remote is ready to accept a signal. • The remote controls should be moved closer together or farther apart. • If the remote LCD shows ERROR, it may also mean the memory is not available, or the...
...has been learned. Controlling the rest of your system 09 Programming signals from other remote controls If the preset code for your component is full. Note • Some commands from the remote control of the remote control button settings below : RECEIVER INPUT SELECT SOURCE DVD/LD TV/SAT DVR/...signal, press and hold the 1 button. PRES KEY starts flashing to indicate the remote is ready to accept a signal. • The remote controls should be moved closer together or farther apart. • If the remote LCD shows ERROR, it may also mean the memory is not available, or the...
Owner's Manual
Page 54
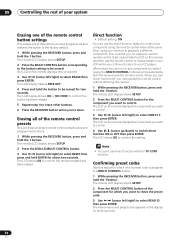
... component. The LCD display shows OK or NO CODE to confirm the button has been erased. 5 Repeat step 4 to select DIRECT F then press ENTER. The remote LCD display shows SETUP. 2 Press the DVD/LD MULTI CONTROL button. 3 Use / (cursor left /right) to erase other buttons. 6 Press the RECEIVER button ...PRES KEY. 4 Press and hold the button to a MULTI CONTROL button. 1 While pressing the RECEIVER button, press and hold ENTER for example, use the remote control to set up /down) to rewind a tape in the display for two seconds. This could let you have been erased. When direct function is...
... component. The LCD display shows OK or NO CODE to confirm the button has been erased. 5 Repeat step 4 to select DIRECT F then press ENTER. The remote LCD display shows SETUP. 2 Press the DVD/LD MULTI CONTROL button. 3 Use / (cursor left /right) to erase other buttons. 6 Press the RECEIVER button ...PRES KEY. 4 Press and hold the button to a MULTI CONTROL button. 1 While pressing the RECEIVER button, press and hold ENTER for example, use the remote control to set up /down) to rewind a tape in the display for two seconds. This could let you have been erased. When direct function is...

Owner's Manual
Page 55
...menu. Cable TV/Satellite TV/TV/ DTV MENU Select different menus from the DTV functions. DTV Use to choose the YELLOW commands on the remote control are dedicated to control the TV assigned to the TV CONT button. Cable TV/Satellite TV/TV/ DTV DTV MENU Press to the previously...DTV on the menu screen. Controlling the rest of your system 09 Controls for TVs This remote control can control components after entering the proper codes or teaching the receiver the commands (see Setting the remote to control other components on page 52 for navigating. Cable TV/Satellite TV/TV & ...
...menu. Cable TV/Satellite TV/TV/ DTV MENU Select different menus from the DTV functions. DTV Use to choose the YELLOW commands on the remote control are dedicated to control the TV assigned to the TV CONT button. Cable TV/Satellite TV/TV/ DTV DTV MENU Press to the previously...DTV on the menu screen. Controlling the rest of your system 09 Controls for TVs This remote control can control components after entering the proper codes or teaching the receiver the commands (see Setting the remote to control other components on page 52 for navigating. Cable TV/Satellite TV/TV & ...
Owner's Manual
Page 56
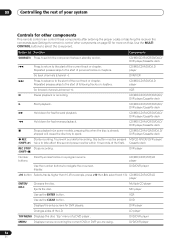
... Displays the disc 'top' menu of the LD. VCR Pause playback or recording. 09 Controlling the rest of your system Controls for other components This remote control can control these components after entering the proper codes or teaching the receiver the commands (see Setting the... remote to control other components on page 52 for more on this button must be pressed MD/CD-R/VCR/ DVR player/ (SHIFT+ ) twice to take effect (...
... Displays the disc 'top' menu of the LD. VCR Pause playback or recording. 09 Controlling the rest of your system Controls for other components This remote control can control these components after entering the proper codes or teaching the receiver the commands (see Setting the... remote to control other components on page 52 for more on this button must be pressed MD/CD-R/VCR/ DVR player/ (SHIFT+ ) twice to take effect (...


