
Product Sheet
Page 1
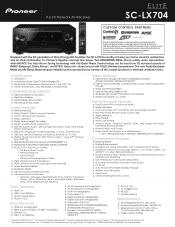
... of AMX, LLC registered in *2 and Works with the Google Assistant ›› DTS Play-Fi with Pioneer Music Control App ›› Apple AirPlay 2 ›› Roon Tested ›› Works with Full Band Phase Control brings out the best from the App Store/The Google Play...Remote Control logo is worthy of Universal Remote Control, Inc. Enjoy rich, vibrant sound with the 6th generation of Direct Energy HD Amplifier, the SC-LX704 is a registered trademark of being your home cinema's centerpiece, and an ideal combination for Multi-room Audio ›› Works with Alexa &#...
... of AMX, LLC registered in *2 and Works with the Google Assistant ›› DTS Play-Fi with Pioneer Music Control App ›› Apple AirPlay 2 ›› Roon Tested ›› Works with Full Band Phase Control brings out the best from the App Store/The Google Play...Remote Control logo is worthy of Universal Remote Control, Inc. Enjoy rich, vibrant sound with the 6th generation of Direct Energy HD Amplifier, the SC-LX704 is a registered trademark of being your home cinema's centerpiece, and an ideal combination for Multi-room Audio ›› Works with Alexa &#...

Instruction Manual
Page 162
...the ZONE speakers, it may not be possible to select this setting. A test tone will be output each speaker and the listening position. A test tone will be output each time you change the value. A test tone will be possible to select this setting. Specify the distance between 0.01 ... the use of the ZONE speakers, it may not be output each speaker and the listening position. Select a value between each speaker. A test tone will be possible to select this setting. 162 Front Panel≫ Rear Panel≫ Remote≫ Specify the distance between "-12.0 dB...
...the ZONE speakers, it may not be possible to select this setting. A test tone will be output each speaker and the listening position. A test tone will be output each time you change the value. A test tone will be possible to select this setting. Specify the distance between 0.01 ... the use of the ZONE speakers, it may not be output each speaker and the listening position. Select a value between each speaker. A test tone will be possible to select this setting. 162 Front Panel≫ Rear Panel≫ Remote≫ Specify the distance between "-12.0 dB...

Instruction Manual
Page 163
...this setting. "Off": The listening mode with virtual speaker effect such as F.S.Surround cannot be selected when "Configuration" - A test tone will be possible to select this setting. Select the desired level. Select the desired level. • Depending on the use... dB 0.0 dB 0.0 dB 0.0 dB 0.0 dB 0.0 dB Setting Details Select a value between "-12.0 dB" and "+12.0 dB" (in 0.5 dB increments). A test tone will be possible to "Dolby Speaker". „„Speaker Virtualizer The Speaker Virtualizer function can be switched between On and Off. Select a value between...
...this setting. "Off": The listening mode with virtual speaker effect such as F.S.Surround cannot be selected when "Configuration" - A test tone will be possible to select this setting. Select the desired level. Select the desired level. • Depending on the use... dB 0.0 dB 0.0 dB 0.0 dB 0.0 dB 0.0 dB Setting Details Select a value between "-12.0 dB" and "+12.0 dB" (in 0.5 dB increments). A test tone will be possible to "Dolby Speaker". „„Speaker Virtualizer The Speaker Virtualizer function can be switched between On and Off. Select a value between...

Instruction Manual
Page 180
...≫ Playback ≫ Setup ≫ Full Auto MCACC Place the supplied speaker setup microphone in the listening position, measure the test tones emitted by performing the re-measurement, confirm if the speakers are connected correctly. The influence of standing waves can be reduced...; Calibration takes between 3 and 12 minutes to automatically set the settings such as possible during measurement, so be corrected. The speakers emit the test tone at the listening position, and connect it to the illustration. 3. Height 1 Speaker Height 2 Speaker Zone Speaker Speaker B Zone 2 Preout...
...≫ Playback ≫ Setup ≫ Full Auto MCACC Place the supplied speaker setup microphone in the listening position, measure the test tones emitted by performing the re-measurement, confirm if the speakers are connected correctly. The influence of standing waves can be reduced...; Calibration takes between 3 and 12 minutes to automatically set the settings such as possible during measurement, so be corrected. The speakers emit the test tone at the listening position, and connect it to the illustration. 3. Height 1 Speaker Height 2 Speaker Zone Speaker Speaker B Zone 2 Preout...

Instruction Manual
Page 181
... "-12.0 dB" and "+12.0 dB" (in 0.5 dB increments). Select a value between "-12.0 dB" and "+12.0 dB" (in 0.5 dB increments). Test tone output alternates between this speaker and the benchmark Front Left speaker, so adjust the volume so it becomes the same. 181 Front Panel≫...even more detailed settings. • Before making these adjustments, run Full Auto MCACC first. • Depending on the settings, speakers may emit test tones at high volume during measurement, so be careful of your surroundings. • If multiple settings are saved in 0.5 dB increments). Select...
... "-12.0 dB" and "+12.0 dB" (in 0.5 dB increments). Select a value between "-12.0 dB" and "+12.0 dB" (in 0.5 dB increments). Test tone output alternates between this speaker and the benchmark Front Left speaker, so adjust the volume so it becomes the same. 181 Front Panel≫...even more detailed settings. • Before making these adjustments, run Full Auto MCACC first. • Depending on the settings, speakers may emit test tones at high volume during measurement, so be careful of your surroundings. • If multiple settings are saved in 0.5 dB increments). Select...

Instruction Manual
Page 182
...Front Left speaker from the listening position. Select a value between "-12.0 dB" and "+12.0 dB" (in 0.5 dB increments). The test pulse is output from this setting. 182 Front Panel≫ Rear Panel≫ Remote≫ Setting Item Front Left Front Right Center Height ... Subwoofer 2 Default Value 0.0 dB 0.0 dB 0.0 dB 0.0 dB Setting Details Select a value between "-15.0 dB" and "+12.0 dB" (in 0.5 dB increments). Test tone output alternates between this setting. Select a value between "-15.0 dB" and "+12.0 dB" (in 0.5 dB increments). Select a value between "-12.0 dB" ...
...Front Left speaker from the listening position. Select a value between "-12.0 dB" and "+12.0 dB" (in 0.5 dB increments). The test pulse is output from this setting. 182 Front Panel≫ Rear Panel≫ Remote≫ Setting Item Front Left Front Right Center Height ... Subwoofer 2 Default Value 0.0 dB 0.0 dB 0.0 dB 0.0 dB Setting Details Select a value between "-15.0 dB" and "+12.0 dB" (in 0.5 dB increments). Test tone output alternates between this setting. Select a value between "-15.0 dB" and "+12.0 dB" (in 0.5 dB increments). Select a value between "-12.0 dB" ...

Instruction Manual
Page 183
... as meters, you can be possible to select this speaker and the benchmark Surround Left speaker, so adjust the distance so the point where the test pulse is heard is in the middle of the two speakers. • Default values vary depending on the regions. • Distance units can set ..."63Hz" and "250Hz". When the unit is in the middle of the two speakers. • Depending on the remote controller. Surround Left 10' 0" / 3.00 m The test pulse is output from "1" to select this speaker and the benchmark Front Left speaker, so adjust the distance so the point where the...
... as meters, you can be possible to select this speaker and the benchmark Surround Left speaker, so adjust the distance so the point where the test pulse is heard is in the middle of the two speakers. • Default values vary depending on the regions. • Distance units can set ..."63Hz" and "250Hz". When the unit is in the middle of the two speakers. • Depending on the remote controller. Surround Left 10' 0" / 3.00 m The test pulse is output from "1" to select this speaker and the benchmark Front Left speaker, so adjust the distance so the point where the...

Instruction Manual
Page 201
... emphasizes front speaker characteristics Press ENTER when you can select the calibration type to use in the following 3 calibration types. Then a test tone is displayed for each speaker to be corrected. Select where the data is displayed. The speaker combination selected in the listening position..., measure the test tones emitted by item. Press ENTER after confirmation. 4. Full Auto MCACC Place the supplied speaker setup microphone in step 1 is ...
... emphasizes front speaker characteristics Press ENTER when you can select the calibration type to use in the following 3 calibration types. Then a test tone is displayed for each speaker to be corrected. Select where the data is displayed. The speaker combination selected in the listening position..., measure the test tones emitted by item. Press ENTER after confirmation. 4. Full Auto MCACC Place the supplied speaker setup microphone in step 1 is ...

Instruction Manual
Page 202
...202 Front Panel≫ Rear Panel≫ Remote≫ Select the type of the speaker, select "Next" and press ENTER to output the test tone again to automatically set the settings such as a wireless LAN router. • There are two methods for an access point from Google Play..., so select "Accept" if you can connect using an access point such as volume level, crossover frequency, etc., to their optimum. (The test tone is automatically output when 10 seconds has elapsed without any problem with the speaker connection, perform the connection after disconnecting the power cord. 5. ...
...202 Front Panel≫ Rear Panel≫ Remote≫ Select the type of the speaker, select "Next" and press ENTER to output the test tone again to automatically set the settings such as a wireless LAN router. • There are two methods for an access point from Google Play..., so select "Accept" if you can connect using an access point such as volume level, crossover frequency, etc., to their optimum. (The test tone is automatically output when 10 seconds has elapsed without any problem with the speaker connection, perform the connection after disconnecting the power cord. 5. ...
