Basic Manual English/French
Page 1
... start > Hookup > Setup > Playback > Part Names Basic Manual SC-LX801 SC-LX701 AV RECEIVER RECEPTEUR AV En Fr Hookup Step1: Speaker Layout 3 Step2: Connect the Speakers 10 Step3: Connect the TV 12 Step4: Connect the AV Components 14 Step5: Multi-zone Connection 18 Step6: Connect Other Cables 21 Setup Step7: Power On & Initial Setup 22 HDMI Setup 23 Playback Basic Playback 24 Network Functions 25 Others 27 Part Names Front Panel 30 Rear Panel 31 Remote Controller 33 Display 33 This manual includes information...
... start > Hookup > Setup > Playback > Part Names Basic Manual SC-LX801 SC-LX701 AV RECEIVER RECEPTEUR AV En Fr Hookup Step1: Speaker Layout 3 Step2: Connect the Speakers 10 Step3: Connect the TV 12 Step4: Connect the AV Components 14 Step5: Multi-zone Connection 18 Step6: Connect Other Cables 21 Setup Step7: Power On & Initial Setup 22 HDMI Setup 23 Playback Basic Playback 24 Network Functions 25 Others 27 Part Names Front Panel 30 Rear Panel 31 Remote Controller 33 Display 33 This manual includes information...

Basic Manual English/French
Page 2
... (Audio Return Channel) feature transfers TV audio signals via HDMI cable so that have independent motion in the box 1. We will not accept responsibility for your TV to see if it supports ARC. (P12) HDMI CEC functionality Control features such as linking input switching with the input selector and players conforming to the CEC standard, switching audio output and volume using the remote controller of sound objects that you can be connected...
... (Audio Return Channel) feature transfers TV audio signals via HDMI cable so that have independent motion in the box 1. We will not accept responsibility for your TV to see if it supports ARC. (P12) HDMI CEC functionality Control features such as linking input switching with the input selector and players conforming to the CEC standard, switching audio output and volume using the remote controller of sound objects that you can be connected...

Basic Manual English/French
Page 8
... can connect with Bi-Amping speakers. - The effects and placements for speakers are the same as for a case where only the front speakers are BiAmping connected, when multiple speakers are combined in a Bi-Amping connection, the maximum speaker configuration is possible to connect front speakers, a center speaker, and surround speakers supporting Bi-Amping to improve quality of the bass and treble. > Before start > Hookup > Setup > Playback > Part Names ˎ1 ˎ2 ˎ3 Bi-Amping the Speakers...
... can connect with Bi-Amping speakers. - The effects and placements for speakers are the same as for a case where only the front speakers are BiAmping connected, when multiple speakers are combined in a Bi-Amping connection, the maximum speaker configuration is possible to connect front speakers, a center speaker, and surround speakers supporting Bi-Amping to improve quality of the bass and treble. > Before start > Hookup > Setup > Playback > Part Names ˎ1 ˎ2 ˎ3 Bi-Amping the Speakers...

Basic Manual English/French
Page 9
... 1 jack, ZONE 3 speakers need to be connected to the SURROUND BACK jacks, and height speakers need to be connected. > Before start > Hookup > Setup > Playback > Part Names Speaker combinations In any of the combinations, up to two powered subwoofers can be connected to the HEIGHT 2 jacks. ˎ 6: This unit consists of a 9 ch amplifier, so when using a Bi-Amping connection for the front speakers, use an RCA cable to connect the power amplifier to the PRE OUT HEIGHT 2 jacks, then connect...
... 1 jack, ZONE 3 speakers need to be connected to the SURROUND BACK jacks, and height speakers need to be connected. > Before start > Hookup > Setup > Playback > Part Names Speaker combinations In any of the combinations, up to two powered subwoofers can be connected to the HEIGHT 2 jacks. ˎ 6: This unit consists of a 9 ch amplifier, so when using a Bi-Amping connection for the front speakers, use an RCA cable to connect the power amplifier to the PRE OUT HEIGHT 2 jacks, then connect...
Basic Manual English/French
Page 13
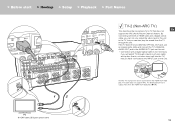
... a DIGITAL OPTICAL OUT jack, use a tuner built into the TV) that does not En support the ARC (Audio Return Channel) feature. For details about how to output video from the TV through a device such as a cable set-top box (that is not necessary if you can be connected to the INPUT jack on this unit. 0 Connection with both an HDMI cable and a digital optical cable, you can not only output the video input to...
... a DIGITAL OPTICAL OUT jack, use a tuner built into the TV) that does not En support the ARC (Audio Return Channel) feature. For details about how to output video from the TV through a device such as a cable set-top box (that is not necessary if you can be connected to the INPUT jack on this unit. 0 Connection with both an HDMI cable and a digital optical cable, you can not only output the video input to...
Basic Manual English/French
Page 14
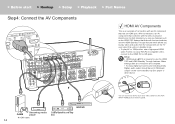
... IN5 jacks. Make settings after all connections are complete. 0 To enjoy digital surround sound including Dolby Digital, audio output should be set to "Bitstream output" on the connected Blu-ray Disc player or other device. 1 BD/DVD GAME Streaming media player Cable/Satellite set-top box 1 HDMI cable 14 You can use features such as a video camera to the AUX INPUT HDMI jack on the front panel. With connection to an AV component that conforms with the input selector, and the HDMI Standby...
... IN5 jacks. Make settings after all connections are complete. 0 To enjoy digital surround sound including Dolby Digital, audio output should be set to "Bitstream output" on the connected Blu-ray Disc player or other device. 1 BD/DVD GAME Streaming media player Cable/Satellite set-top box 1 HDMI cable 14 You can use features such as a video camera to the AUX INPUT HDMI jack on the front panel. With connection to an AV component that conforms with the input selector, and the HDMI Standby...

Basic Manual English/French
Page 15
... player does not support 480i or 576i output, use the VIDEO IN jack. 0 To enjoy digital surround sound including Dolby Digital, audio output should also be set the output resolution of the input jacks you input video signals to the COMPONENT VIDEO IN jacks, set to "Bitstream output" on , so that does not have an HDMI jack. When you see the Advanced Manual. > Before start > Hookup > Setup > Playback > Part Names OR 3 2 1 BD/DVD 1 Component video cable, 2 Digital coaxial cable, 3 Analog audio cable Non-HDMI AV Components This is an example of connection with a digital...
... player does not support 480i or 576i output, use the VIDEO IN jack. 0 To enjoy digital surround sound including Dolby Digital, audio output should also be set the output resolution of the input jacks you input video signals to the COMPONENT VIDEO IN jacks, set to "Bitstream output" on , so that does not have an HDMI jack. When you see the Advanced Manual. > Before start > Hookup > Setup > Playback > Part Names OR 3 2 1 BD/DVD 1 Component video cable, 2 Digital coaxial cable, 3 Analog audio cable Non-HDMI AV Components This is an example of connection with a digital...
Basic Manual English/French
Page 19
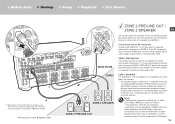
... audio output of the AV component to internet radio in the main room. ZONE 2 PRE/LINE OUT It is analog or 2ch PCM audio. Setup 0 Settings are enabled, no sound is heard from externally connected AV components can enjoy audio in the separate room by, for details. 1 Analog audio cable, 2 Speaker cable MAIN ROOM ZONE2 2 LINE IN ZONE 2 SPEAKER ZONE 2 PRE/LINE OUT ZONE 2 PRE/LINE OUT / ZONE 2 SPEAKER En You can only be selected. If you have an HDMI jack, connect using a digital optical cable, digital coaxial cable...
... audio output of the AV component to internet radio in the main room. ZONE 2 PRE/LINE OUT It is analog or 2ch PCM audio. Setup 0 Settings are enabled, no sound is heard from externally connected AV components can enjoy audio in the separate room by, for details. 1 Analog audio cable, 2 Speaker cable MAIN ROOM ZONE2 2 LINE IN ZONE 2 SPEAKER ZONE 2 PRE/LINE OUT ZONE 2 PRE/LINE OUT / ZONE 2 SPEAKER En You can only be selected. If you have an HDMI jack, connect using a digital optical cable, digital coaxial cable...

Basic Manual English/French
Page 20
... > Hookup > Setup > Playback > Part Names 1 BD/DVD ˎ Depending on the combination of the pre-main amplifier or the power amplifier in a separate room with an HDMI cable or digital optical/coaxial cable. Connections with the main room and ZONE 2, you can also enjoy audio in the main room. Output to note with speaker combinations" (P9) for details. 1 Analog audio cable, 2 Speaker cable 20 ᴧ 2 LINE IN MAIN ROOM ZONE3 ZONE 3 SPEAKER ZONE 3 PRE/LINE OUT / ZONE 3 SPEAKER Along...
... > Hookup > Setup > Playback > Part Names 1 BD/DVD ˎ Depending on the combination of the pre-main amplifier or the power amplifier in a separate room with an HDMI cable or digital optical/coaxial cable. Connections with the main room and ZONE 2, you can also enjoy audio in the main room. Output to note with speaker combinations" (P9) for details. 1 Analog audio cable, 2 Speaker cable 20 ᴧ 2 LINE IN MAIN ROOM ZONE3 ZONE 3 SPEAKER ZONE 3 PRE/LINE OUT / ZONE 3 SPEAKER Along...

Basic Manual English/French
Page 22
... of the speakers (i /j) in the listening position, measure the test tones emitted by the acoustic environment of your surroundings. > Before start > Hookup > Setup > Playback > Part Names Step7: Power On & Initial Setup 1. "Initial Setup" from the listening position. Even if the connections are correct, "Reverse Phase" may have touch the rear panel or other wires and tripped the protection circuit. Initial Setup starts automatically Switch the input on a tripod...
... of the speakers (i /j) in the listening position, measure the test tones emitted by the acoustic environment of your surroundings. > Before start > Hookup > Setup > Playback > Part Names Step7: Power On & Initial Setup 1. "Initial Setup" from the listening position. Even if the connections are correct, "Reverse Phase" may have touch the rear panel or other wires and tripped the protection circuit. Initial Setup starts automatically Switch the input on a tripod...
Basic Manual English/French
Page 23
... settings with External Power Amplifier" when connecting a power amplifier. is also CEC-compliant. Audio Return En Channel" in the separate room. Press the button on the remote controller to set to "Off". 0 "Last": You can reduce power consumption in a room other than the main room (ZONE 2/ZONE 3). To select whether to enjoy video and audio in standby mode. 0 Input selector names for devices complying with "ˎ" or display it in 2nd room?" Multi Zone Setup...
... settings with External Power Amplifier" when connecting a power amplifier. is also CEC-compliant. Audio Return En Channel" in the separate room. Press the button on the remote controller to set to "Off". 0 "Last": You can reduce power consumption in a room other than the main room (ZONE 2/ZONE 3). To select whether to enjoy video and audio in standby mode. 0 Input selector names for devices complying with "ˎ" or display it in 2nd room?" Multi Zone Setup...
Basic Manual English/French
Page 24
... for 2 channel input signals, etc.) is connected to the HDMI OUT SUB jack Press the button on the input signal and speaker configuration, the Dolby Surround and DTS Neural:X modes that assigned to a maximum of listening modes. AUTO/DIRECT button (c) Press repeatedly and the listening modes suited to display the AV Adjust, and set "Other" - The listening mode last selected for that content is disabled. 0 Depending on the remote controller to the input signal are the Dolby Digital, DTS-HD Master Audio, and Stereo modes that is...
... for 2 channel input signals, etc.) is connected to the HDMI OUT SUB jack Press the button on the input signal and speaker configuration, the Dolby Surround and DTS Neural:X modes that assigned to a maximum of listening modes. AUTO/DIRECT button (c) Press repeatedly and the listening modes suited to display the AV Adjust, and set "Other" - The listening mode last selected for that content is disabled. 0 Depending on the remote controller to the input signal are the Dolby Digital, DTS-HD Master Audio, and Stereo modes that is...
Basic Manual English/French
Page 25
... introduced by firmware updates and service providers may cease services, meaning that assigned to the unit. 2. Play starts when 100% is displayed for buffering. 0 This unit is displayed for buffering. For details, see the Advanced Manual. a b 3. Internet Radio When this player in the future. Music Server You can listen to confirm and start > Hookup > Setup > Playback > Part Names Network Functions Network Services 1. Switch the input on your selection (a). To return...
... introduced by firmware updates and service providers may cease services, meaning that assigned to the unit. 2. Play starts when 100% is displayed for buffering. 0 This unit is displayed for buffering. For details, see the Advanced Manual. a b 3. Internet Radio When this player in the future. Music Server You can listen to confirm and start > Hookup > Setup > Playback > Part Names Network Functions Network Services 1. Switch the input on your selection (a). To return...
Basic Manual English/French
Page 27
... registered, the preset number stops flashing. "AM/FM Frequency Step" or "AM Frequency Step" and select the frequency step for 3 seconds or more until the remote indicator flashes once. 2. Switch the remote controller to select "System Setup" - "Z2" or "Z3" lights on the remote controller to the mode for 3 or more seconds until the remote indicator blinks three times. e f bc d a Multi-zone Play En 1. To switch to display either "AM" or "FM" on the remote controller, press ZONE 2 (b) for...
... registered, the preset number stops flashing. "AM/FM Frequency Step" or "AM Frequency Step" and select the frequency step for 3 seconds or more until the remote indicator flashes once. 2. Switch the remote controller to select "System Setup" - "Z2" or "Z3" lights on the remote controller to the mode for 3 or more seconds until the remote indicator blinks three times. e f bc d a Multi-zone Play En 1. To switch to display either "AM" or "FM" on the remote controller, press ZONE 2 (b) for...

Basic Manual English/French
Page 28
... are switched to control the volume with an HDMI cable, have you can adjust frequently used settings, such as the switching the speakers and adjusting sound quality, using on the TV screen when the input selector is in standby will also switch the playback mode to output video signals from an AV component with the MASTER VOLUME dial. 0 The information for controlling ZONE 2 or ZONE 3 on the power amplifier in the mode for a connected device can be used . AV Adjust Tone Level MCACC Other Bass Treble BD/DVD "Tone...
... are switched to control the volume with an HDMI cable, have you can adjust frequently used settings, such as the switching the speakers and adjusting sound quality, using on the TV screen when the input selector is in standby will also switch the playback mode to output video signals from an AV component with the MASTER VOLUME dial. 0 The information for controlling ZONE 2 or ZONE 3 on the power amplifier in the mode for a connected device can be used . AV Adjust Tone Level MCACC Other Bass Treble BD/DVD "Tone...

Basic Manual English/French
Page 29
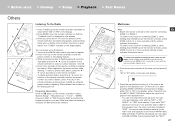
... from the display. The low range elements will be output from the subwoofer, make one of the following settings. 1. Note them down AUTO/DIRECT on the main unit, press Í STANDBY/ON on the main unit. 2. If you would rather output from the front speakers rather than the front speakers. > Before start > Hookup > Setup > Playback > Part Names Home When you press on the remote controller, the Home is displayed and...
... from the display. The low range elements will be output from the subwoofer, make one of the following settings. 1. Note them down AUTO/DIRECT on the main unit, press Í STANDBY/ON on the main unit. 2. If you would rather output from the front speakers rather than the front speakers. > Before start > Hookup > Setup > Playback > Part Names Home When you press on the remote controller, the Home is displayed and...

Basic Manual English/French
Page 30
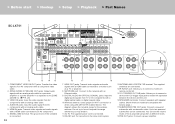
ZONE CONTROL button (P27) 8. INFO button: Switches the information on or off . 7. MULTI-ZONE MUSIC button (P28) 9. MCACC PRO indicator: This lights when you have enabled the speaker calibration made with a standard plug (1/4 inch or ø6.3 mm) are connected. 22.MCACC SETUP MIC jack (P22) 23.PHASE CONTROL button: This turns on , this lights when functions such as HDMI CEC and network standby are enabled. ZONE 3 ON/OFF button: Turn ZONE 3 on , however. 12.Remote control sensor 13...
ZONE CONTROL button (P27) 8. INFO button: Switches the information on or off . 7. MULTI-ZONE MUSIC button (P28) 9. MCACC PRO indicator: This lights when you have enabled the speaker calibration made with a standard plug (1/4 inch or ø6.3 mm) are connected. 22.MCACC SETUP MIC jack (P22) 23.PHASE CONTROL button: This turns on , this lights when functions such as HDMI CEC and network standby are enabled. ZONE 3 ON/OFF button: Turn ZONE 3 on , however. 12.Remote control sensor 13...
Basic Manual English/French
Page 31
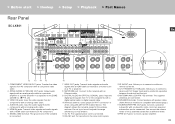
...an AV component. 6. DIGITAL AUDIO IN OPTICAL/COAXIAL jacks: Input the digital audio signals from AV components with an analog video cable. 4. AC IN: The supplied power cord is connected. 16 17 18 7. NETWORK port: Connect to the network with a HDMI cable connected to different levels. 18.PRE OUT jacks: Connect a power amplifier. 31 HDMI IN jacks: Transmit video signals and audio signals with an Ethernet cable. 9. The diagram shows the movable range for Wi-Fi connection or when using a BLUETOOTH enabled device. > Before start > Hookup > Setup > Playback > Part Names Rear Panel SC...
...an AV component. 6. DIGITAL AUDIO IN OPTICAL/COAXIAL jacks: Input the digital audio signals from AV components with an analog video cable. 4. AC IN: The supplied power cord is connected. 16 17 18 7. NETWORK port: Connect to the network with a HDMI cable connected to different levels. 18.PRE OUT jacks: Connect a power amplifier. 31 HDMI IN jacks: Transmit video signals and audio signals with an Ethernet cable. 9. The diagram shows the movable range for Wi-Fi connection or when using a BLUETOOTH enabled device. > Before start > Hookup > Setup > Playback > Part Names Rear Panel SC...
Basic Manual English/French
Page 32
... OUT jacks: Transmit video signals and audio signals with a HDMI cable connected to the network with a digital optical cable or digital coaxial cable. 10.Wireless antenna: Used upright for the wireless antenna. AC IN: The supplied power cord is connected. 32 16 17 18 7. DIGITAL AUDIO IN OPTICAL/COAXIAL jacks: Input the digital audio signals from TV or AV components with an Ethernet cable. 9. Up to two powered subwoofers can set the volume levels of the 2 powered subwoofers to different levels. 18.PRE OUT jacks: Connect a power amplifier. NETWORK port: Connect to a monitor...
... OUT jacks: Transmit video signals and audio signals with a HDMI cable connected to the network with a digital optical cable or digital coaxial cable. 10.Wireless antenna: Used upright for the wireless antenna. AC IN: The supplied power cord is connected. 32 16 17 18 7. DIGITAL AUDIO IN OPTICAL/COAXIAL jacks: Input the digital audio signals from TV or AV components with an Ethernet cable. 9. Up to two powered subwoofers can set the volume levels of the 2 powered subwoofers to different levels. 18.PRE OUT jacks: Connect a power amplifier. NETWORK port: Connect to a monitor...

Basic Manual English/French
Page 33
....MODE button: Switches tuning to an AM/FM station between automatic tuning and manual tuning. 8 15.+Fav button: Used to be displayed on or into standby mode. 2. It will flash if the connection to the selected listening mode. 33 Lights when headphones are possible in 3 to the network. Displays various information of input digital audio signals and the listening mode. 4. Lights when adjusting the volume. 10.Speaker/Channel display: Displays the output channel that cannot be played. Lights when operating the "NET", "USB" input selector indicating remote controller cursor...
....MODE button: Switches tuning to an AM/FM station between automatic tuning and manual tuning. 8 15.+Fav button: Used to be displayed on or into standby mode. 2. It will flash if the connection to the selected listening mode. 33 Lights when headphones are possible in 3 to the network. Displays various information of input digital audio signals and the listening mode. 4. Lights when adjusting the volume. 10.Speaker/Channel display: Displays the output channel that cannot be played. Lights when operating the "NET", "USB" input selector indicating remote controller cursor...


