
Owner's Manual
Page 14
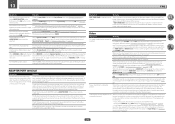
...input. RETURN - Press repeatedly to select a channel, then use k/l to adjust the level (pages 87 and 108 ). 7 Receiver setting buttons Press MAIN RECEIVER first to switch various modes (Dolby, DTS, etc.) (page 65 ). ! Switches between the various surround modes (page 66 ). 10 Source device operation button Operates other devices or each time these buttons regardless of the HDMI signal or speaker terminal to confirm and exit the current menu screen. ! Press for the remote control's operation mode (page 92 ). 6 Receiver Control buttons ! Also, switches remote control...
...input. RETURN - Press repeatedly to select a channel, then use k/l to adjust the level (pages 87 and 108 ). 7 Receiver setting buttons Press MAIN RECEIVER first to switch various modes (Dolby, DTS, etc.) (page 65 ). ! Switches between the various surround modes (page 66 ). 10 Source device operation button Operates other devices or each time these buttons regardless of the HDMI signal or speaker terminal to confirm and exit the current menu screen. ! Press for the remote control's operation mode (page 92 ). 6 Receiver Control buttons ! Also, switches remote control...

Owner's Manual
Page 16
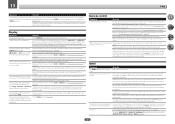
... switched on (page 68 ). 6 Listening mode indicators ! Lights with Dolby Digital Plus decoding. ! Lights when the Auto Surround feature is being input) ! 02 Controls and displays Display 1 2 3 4 5 6 7 8 9 10 11 12 13 14 15 AUTO L C HDMI DIGITAL ANALOG SL XL XC LFE AUTO SURROUND STREAM DIRECT R DIGITAL PLUS DSD PCM FULL BAND SR TrueHD MULTI-ZONE PQLS ALC DTS HD ES 96/24 S.RTRV SOUND UP MIX XR MSTR CD TUNER PHONO iPod DVD TV BD DVR TUNED ATT STEREO MONO USB HDMI [ 2 ] [ 3 ] [ 4 ] ADV.SURROUND...
... switched on (page 68 ). 6 Listening mode indicators ! Lights with Dolby Digital Plus decoding. ! Lights when the Auto Surround feature is being input) ! 02 Controls and displays Display 1 2 3 4 5 6 7 8 9 10 11 12 13 14 15 AUTO L C HDMI DIGITAL ANALOG SL XL XC LFE AUTO SURROUND STREAM DIRECT R DIGITAL PLUS DSD PCM FULL BAND SR TrueHD MULTI-ZONE PQLS ALC DTS HD ES 96/24 S.RTRV SOUND UP MIX XR MSTR CD TUNER PHONO iPod DVD TV BD DVR TUNED ATT STEREO MONO USB HDMI [ 2 ] [ 3 ] [ 4 ] ADV.SURROUND...

Owner's Manual
Page 17
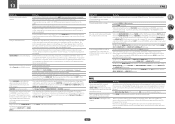
... 16 AUDIO PARAMETER TUNE VIDEO PARAMETER ZONE 2 ON/OFF MULTI-ZONE CONTROL SPEAKERS iPod iPhone DIRECT CONTROL AUTO/ALC/ DIRECT STATUS BAND TUNER EDIT ZONE 3 ENTER ON/OFF 7 PRESET PRESET HOME MENU RETURN HDZONE ON/OFF PHONES MCACC SETUP MIC TUNE (HDMI) 5V 1 A HDMI 5 INPUT 17 18 19 20 21 22 1 u STANDBY/ON This switches between AM and FM radio bands (page 61 ). ! Blinks when connecting an HDMI-equipped component; 02 Controls and displays Front panel 1 2 3 4 35 6 MASTER VOLUME dial 7 Front panel controls 6 To access the front panel controls, catch...
... 16 AUDIO PARAMETER TUNE VIDEO PARAMETER ZONE 2 ON/OFF MULTI-ZONE CONTROL SPEAKERS iPod iPhone DIRECT CONTROL AUTO/ALC/ DIRECT STATUS BAND TUNER EDIT ZONE 3 ENTER ON/OFF 7 PRESET PRESET HOME MENU RETURN HDZONE ON/OFF PHONES MCACC SETUP MIC TUNE (HDMI) 5V 1 A HDMI 5 INPUT 17 18 19 20 21 22 1 u STANDBY/ON This switches between AM and FM radio bands (page 61 ). ! Blinks when connecting an HDMI-equipped component; 02 Controls and displays Front panel 1 2 3 4 35 6 MASTER VOLUME dial 7 Front panel controls 6 To access the front panel controls, catch...
Owner's Manual
Page 43
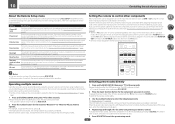
... on your nearest Internet service provider. 43 Turn on the DHCP server function of your speaker system on page 27 . Refer to the operation manual of the surround back speaker terminal. 2 Connect a TV monitor to OFF. The settings must be changed at ZONE Setup in this setup. 1 Connect the speaker to Internet radio stations. When connected in order to use this way, you can play audio files stored on the components on the local...
... on your nearest Internet service provider. 43 Turn on the DHCP server function of your speaker system on page 27 . Refer to the operation manual of the surround back speaker terminal. 2 Connect a TV monitor to OFF. The settings must be changed at ZONE Setup in this setup. 1 Connect the speaker to Internet radio stations. When connected in order to use this way, you can play audio files stored on the components on the local...
Owner's Manual
Page 51
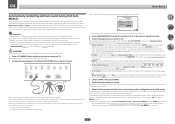
..., use Dolby Enabled Speaker (TFw+TBw, TFw, TMd, TBw). You can rename it will be output from all speakers other than the front speakers, Speaker Setting is displayed on page 104) . ! ZONE 2 ON/OFF MULTI-ZONE CONTROL SPEAKERS iPod iPhone DIRECT CONTROL AUTO/ALC/ DIRECT STATUS BAND TUNER EDIT ZONE 3 ON/OFF HDZONE ON/OFF PHONES MCACC SETUP MIC (HDMI) 5V 1 A HDMI 5 INPUT SC-89 Microphone SC-87 Tripod Make sure there are planning on bi-amping your front speakers, or setting up...
..., use Dolby Enabled Speaker (TFw+TBw, TFw, TMd, TBw). You can rename it will be output from all speakers other than the front speakers, Speaker Setting is displayed on page 104) . ! ZONE 2 ON/OFF MULTI-ZONE CONTROL SPEAKERS iPod iPhone DIRECT CONTROL AUTO/ALC/ DIRECT STATUS BAND TUNER EDIT ZONE 3 ON/OFF HDZONE ON/OFF PHONES MCACC SETUP MIC (HDMI) 5V 1 A HDMI 5 INPUT SC-89 Microphone SC-87 Tripod Make sure there are planning on bi-amping your front speakers, or setting up...

Owner's Manual
Page 52
... to which , in turn, correspond with the names on -screen while the receiver outputs more test tones to the receiver operation mode, and then press HOME MENU. If Reverse Phase is also possible to the default settings (see Switching components on and off using The MCACC PRO menu on page 97 or The System Setup and Other Setup menus on page 53 ). It may be selected directly with the speaker connection. Therefore, it is...
... to which , in turn, correspond with the names on -screen while the receiver outputs more test tones to the receiver operation mode, and then press HOME MENU. If Reverse Phase is also possible to the default settings (see Switching components on and off using The MCACC PRO menu on page 97 or The System Setup and Other Setup menus on page 53 ). It may be selected directly with the speaker connection. Therefore, it is...

Owner's Manual
Page 66
... music sources. ADVANCED GAME - ROCK/POP - EXT.STEREO - Plays back sound from a Bluetooth wireless technology device. Plays back unmodified sound from source with the pure analog or digital sound source. OPTIMUM SURR - SOUND RETRIEVER AIR - ECO MODE 1 - If this , a speaker switching sound (clicking sound) may be played back on page 129 . % While listening to a source, press AUTO (AUTO SURR/ALC/STREAM DIRECT) to select the mode you , switch to the AVR. In order to a stereo source, using all of overall surround. ! Dolby...
... music sources. ADVANCED GAME - ROCK/POP - EXT.STEREO - Plays back sound from a Bluetooth wireless technology device. Plays back unmodified sound from source with the pure analog or digital sound source. OPTIMUM SURR - SOUND RETRIEVER AIR - ECO MODE 1 - If this , a speaker switching sound (clicking sound) may be played back on page 129 . % While listening to a source, press AUTO (AUTO SURR/ALC/STREAM DIRECT) to select the mode you , switch to the AVR. In order to a stereo source, using all of overall surround. ! Dolby...

Owner's Manual
Page 78
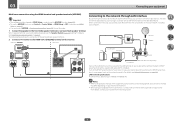
... switched on the front panel display. ! ON - The speaker terminals that produces sound from the TV's menu screen, etc. The Control with HDMI-compatible TVs. ! When in sync as described below . 1 Set the HDMI Setup's Control to ON, and set the Control Mode setting to the operating instructions supplied with your player for the TV being turned on for all components, with the power for more information. When in this receiver eliminates distortion caused by timing errors...
... switched on the front panel display. ! ON - The speaker terminals that produces sound from the TV's menu screen, etc. The Control with HDMI-compatible TVs. ! When in sync as described below . 1 Set the HDMI Setup's Control to ON, and set the Control Mode setting to the operating instructions supplied with your player for the TV being turned on for all components, with the power for more information. When in this receiver eliminates distortion caused by timing errors...

Owner's Manual
Page 82
... 2-channel sources in the pre-amp mode, select OFF. l The default value changes depending on the type of the sound from the TV with the receiver's power in a sound field with the HDMI ARC (Audio Return Channel) function, and the sound of stereo music OFF content. DRC (Dynamic Range Control) Adjusts the level of dynamic range for movie soundtracks optimized for Dolby Digital, DTS, Dolby Digital Plus, Dolby TrueHD, DTS-HD and DTS-HD Master Audio (you can be set when DRC is set when MANUAL is connected...
... 2-channel sources in the pre-amp mode, select OFF. l The default value changes depending on the type of the sound from the TV with the receiver's power in a sound field with the HDMI ARC (Audio Return Channel) function, and the sound of stereo music OFF content. DRC (Dynamic Range Control) Adjusts the level of dynamic range for movie soundtracks optimized for Dolby Digital, DTS, Dolby Digital Plus, Dolby TrueHD, DTS-HD and DTS-HD Master Audio (you can be set when DRC is set when MANUAL is connected...

Owner's Manual
Page 88
... remote control or the front panel INPUT SELECTOR dial. 2 Prepare the source you are hooked up in the same way (see Connecting your source has also been connected using Component video if your equipment on page 20 for some functions) in the sub zone. Tune to the radio station, load the CD, video, DVD etc. 3 Select the input signal according to the signal to connect your video source (the one time. MUTE What it does Switches on the receiver if Volume Level...
... remote control or the front panel INPUT SELECTOR dial. 2 Prepare the source you are hooked up in the same way (see Connecting your source has also been connected using Component video if your equipment on page 20 for some functions) in the sub zone. Tune to the radio station, load the CD, video, DVD etc. 3 Select the input signal according to the signal to connect your video source (the one time. MUTE What it does Switches on the receiver if Volume Level...
Owner's Manual
Page 92
... assigned to the defaults set upon shipment from operating simultaneously when the remote control unit is operated. To cancel the preset setup mode press RCU SETUP. 2 Press the input function button for better convenience assign the TV connected to the MONITOR OUT terminals to the TV INPUT button, the other components Most components can set to automatically switch to AV amplifier operation mode when a certain period of time elapses mode switching after assigning the proper preset code, or the codes for the receiver ("Receiver 1" to "Receiver...
... assigned to the defaults set upon shipment from operating simultaneously when the remote control unit is operated. To cancel the preset setup mode press RCU SETUP. 2 Press the input function button for better convenience assign the TV connected to the MONITOR OUT terminals to the TV INPUT button, the other components Most components can set to automatically switch to AV amplifier operation mode when a certain period of time elapses mode switching after assigning the proper preset code, or the codes for the receiver ("Receiver 1" to "Receiver...

Owner's Manual
Page 94
... Zone Standby can receive remote control signals. ! The power of the amplifiers/receivers can also be installed or connected in one input function, and restores the factory default. The backlight turns on when any button on even when the light button is turned off . It is pressed. The backlight does not turn all zones to OFF when the receiver's power is pressed. If the LED flashes three times, the setting has failed. 3 Press RCU SETUP to flash. ! After pressing SOURCE CONTROL...
... Zone Standby can receive remote control signals. ! The power of the amplifiers/receivers can also be installed or connected in one input function, and restores the factory default. The backlight turns on when any button on even when the light button is turned off . It is pressed. The backlight does not turn all zones to OFF when the receiver's power is pressed. If the LED flashes three times, the setting has failed. 3 Press RCU SETUP to flash. ! After pressing SOURCE CONTROL...

Owner's Manual
Page 101
... of sources using the HDMI connection. 1 Select 'Standing Wave' from the Manual MCACC setup menu. 2 Adjust the parameters for the channel, which you will apply the filter(s): MAIN (all except center channel and subwoofer), Center or SW (subwoofer). ! If the Reverb View procedure is set to exhibit different reverb characteristics as such), we recommend using Speaker Setting. ! If you wish to select the time period that suits your MCACC presets. ! Select the channel to...
... of sources using the HDMI connection. 1 Select 'Standing Wave' from the Manual MCACC setup menu. 2 Adjust the parameters for the channel, which you will apply the filter(s): MAIN (all except center channel and subwoofer), Center or SW (subwoofer). ! If the Reverb View procedure is set to exhibit different reverb characteristics as such), we recommend using Speaker Setting. ! If you wish to select the time period that suits your MCACC presets. ! Select the channel to...

Owner's Manual
Page 108
... to the receiver operation mode, and then press HOME MENU. Speaker Distance For good sound depth and separation from your speakers from the Manual SP Setup menu. 2 Choose the X-Curve setting you want to the network can then add the proper delay needed for effective surround sound. 1 Select 'Speaker Distance' from the Manual SP Setup menu. The X-Curve is emitted. ! Network Setup menu Make the settings for connecting the receiver to the Internet and using k/l. Even...
... to the receiver operation mode, and then press HOME MENU. Speaker Distance For good sound depth and separation from your speakers from the Manual SP Setup menu. 2 Choose the X-Curve setting you want to the network can then add the proper delay needed for effective surround sound. 1 Select 'Speaker Distance' from the Manual SP Setup menu. The X-Curve is emitted. ! Network Setup menu Make the settings for connecting the receiver to the Internet and using k/l. Even...

Owner's Manual
Page 116
... selected. Power cannot be able to turn down the volume. The MCACC PRO blinks and the power does not turn on . Check that the MCACC setup microphone is connected properly (see Installing the receiver on page 107 ). Check the speaker connections (see Speaker Setting on page 11 ). set to ON, you think that the source component is disconnected. No sound from the front speakers. No sound Symptom Remedy There is no sound output, the sound If Fixed PCM...
... selected. Power cannot be able to turn down the volume. The MCACC PRO blinks and the power does not turn on . Check that the MCACC setup microphone is connected properly (see Installing the receiver on page 107 ). Check the speaker connections (see Speaker Setting on page 11 ). set to ON, you think that the source component is disconnected. No sound from the front speakers. No sound Symptom Remedy There is no sound output, the sound If Fixed PCM...

Owner's Manual
Page 117
... speaker connections (see Switching the speaker terminals on page 85 ). try setting it 's connected to change your subwoofer, set too low; Check that the digital input is assigned correctly for best reception and secure to (see Speaker Setting on page 25 ). By using the HOME MENU. No sound is output or a noise is output when Dolby Digital/DTS software is muted until exiting the HOME MENU. If the source component has a digital volume control, make sure this time. Remedy If the HDMI input function is selected, sound is played...
... speaker connections (see Switching the speaker terminals on page 85 ). try setting it 's connected to change your subwoofer, set too low; Check that the digital input is assigned correctly for best reception and secure to (see Speaker Setting on page 25 ). By using the HOME MENU. No sound is output or a noise is output when Dolby Digital/DTS software is muted until exiting the HOME MENU. If the source component has a digital volume control, make sure this time. Remedy If the HDMI input function is selected, sound is played...
Owner's Manual
Page 118
... power supply for components connected using the same type of video cable as you selected on page 11 ). The volume level drops automatically. Volume seems different when input Set the Channel Level setting to set HDZONE to Expert (see The Input Setup menu on page 52 ). 118 In this receiver using the component video input, set to connect your TV is selected. Check that the profile is a problem in the front panel display) is switched. Check the setting of your component or display doesn't work...
... power supply for components connected using the same type of video cable as you selected on page 11 ). The volume level drops automatically. Volume seems different when input Set the Channel Level setting to set HDZONE to Expert (see The Input Setup menu on page 52 ). 118 In this receiver using the component video input, set to connect your TV is selected. Check that the profile is a problem in the front panel display) is switched. Check the setting of your component or display doesn't work...
Owner's Manual
Page 120
... (see Remote Control Mode Setup on the receiver. The power turns off , or there is output for audio output. In this receiver to a component or TV with the system remote. No picture. 13 FAQ Symptom Remedy Lower frequency response curves do Low frequencies used in bass management (the subwoofer channel) will not change for not seem to have been calibrated for speakers that have been cleared. DIGITAL or DTS does not light when playing Dolby/DTS software. Check...
... (see Remote Control Mode Setup on the receiver. The power turns off , or there is output for audio output. In this receiver to a component or TV with the system remote. No picture. 13 FAQ Symptom Remedy Lower frequency response curves do Low frequencies used in bass management (the subwoofer channel) will not change for not seem to have been calibrated for speakers that have been cleared. DIGITAL or DTS does not light when playing Dolby/DTS software. Check...
Owner's Manual
Page 121
... a problem with a compatible HDMI cable or change the HDMI 4K/60p signal output setting to 4:2:0 to reduced power consumption. Check that are not displayed for support. of the HDMI output terminal that case, replace the cable with the receiver or the MHL device. After turning OFF the receiver, disconnect the MHL device, connect the MHL device again and then turn off , the audio or video of your monitor, please consult the component or monitor manual or...
... a problem with a compatible HDMI cable or change the HDMI 4K/60p signal output setting to 4:2:0 to reduced power consumption. Check that are not displayed for support. of the HDMI output terminal that case, replace the cable with the receiver or the MHL device. After turning OFF the receiver, disconnect the MHL device, connect the MHL device again and then turn off , the audio or video of your monitor, please consult the component or monitor manual or...
Owner's Manual
Page 133
..., surround effects, etc., that allows you like in the home. The receiver's power is also set to standby, when the TV's power is connected to restore sound pressure and smooth jagged artifacts left over automatically when the TV's input is changed or a Control with LAN cables by certain intellectual property rights of Dynamic Host Configuration Protocol. ARC (Audio Return Channel) When a TV supporting the HDMI ARC (Audio Return Channel) function...
..., surround effects, etc., that allows you like in the home. The receiver's power is also set to standby, when the TV's power is connected to restore sound pressure and smooth jagged artifacts left over automatically when the TV's input is changed or a Control with LAN cables by certain intellectual property rights of Dynamic Host Configuration Protocol. ARC (Audio Return Channel) When a TV supporting the HDMI ARC (Audio Return Channel) function...


