
Owner's Manual
Page 8
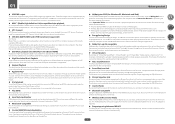
... Eliminators achieve clearer sound. % AIR Studios Sound Tuning The SC-79 and SC-77 have received the AIR Studios Monitor certification. This function automatically corrects for the user's home theater environment and the speakers the user owns. % Multi-Zone Music All the speakers connected to this receiver in the studio, regardless of volume level. % Audio Scaler The combined effect of Hi-bit 32 Audio Processing, the digital filter and the up-sampling function can be upscaled...
... Eliminators achieve clearer sound. % AIR Studios Sound Tuning The SC-79 and SC-77 have received the AIR Studios Monitor certification. This function automatically corrects for the user's home theater environment and the speakers the user owns. % Multi-Zone Music All the speakers connected to this receiver in the studio, regardless of volume level. % Audio Scaler The combined effect of Hi-bit 32 Audio Processing, the digital filter and the up-sampling function can be upscaled...
Owner's Manual
Page 9
... the remote control or using Advanced MCACC The Auto MCACC Setup provides a quick but also for iPad (downloadable free of charge). AVNavigator is available not only for Windows and Mac OS but accurate surround sound setup, which the music is only available when the connected Pioneer Blu-ray Disc Player supporting the PQLS function. % Internet Radio By connecting this receiver to the SC-79/SC-77 and play the sound with higher density. The driver software...
... the remote control or using Advanced MCACC The Auto MCACC Setup provides a quick but also for iPad (downloadable free of charge). AVNavigator is available not only for Windows and Mac OS but accurate surround sound setup, which the music is only available when the connected Pioneer Blu-ray Disc Player supporting the PQLS function. % Internet Radio By connecting this receiver to the SC-79/SC-77 and play the sound with higher density. The driver software...

Owner's Manual
Page 15
... DTS-HD decoding. ! 96/24 - Lights with Dolby Digital decoding. ! 2 DIGITAL PLUS - Lights during playback of DTS-HD Master Audio signals. 4 MULTI-ZONE Lights when the MULTI-ZONE feature is active (page 81). 5 FULL BAND Lights when the Full Band Phase Control is set to PCM conversion. ! Low frequency effects channel (the (( )) indicators light when an LFE signal is being input. 10 PQLS Lights when the PQLS feature is selected (page 63). ! LFE - Lights during playback of DSD (Direct Stream Digital) signals. ! STREAM DIRECT - STEREO...
... DTS-HD decoding. ! 96/24 - Lights with Dolby Digital decoding. ! 2 DIGITAL PLUS - Lights during playback of DTS-HD Master Audio signals. 4 MULTI-ZONE Lights when the MULTI-ZONE feature is active (page 81). 5 FULL BAND Lights when the Full Band Phase Control is set to PCM conversion. ! Low frequency effects channel (the (( )) indicators light when an LFE signal is being input. 10 PQLS Lights when the PQLS feature is selected (page 63). ! LFE - Lights during playback of DSD (Direct Stream Digital) signals. ! STREAM DIRECT - STEREO...

Owner's Manual
Page 32
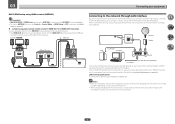
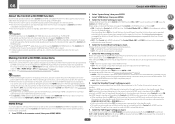
... at ZONE Setup must be recognized. 03 Connecting your TV and playback components Connecting using HDMI If you have connected, using a DVI connection may result in unreliable signal transfers. ! This may cause noise or interrupted audio. ! Input of digital audio. This receiver supports SACD, Dolby Digital Plus, Dolby TrueHD and DTS-HD Master Audio. HDMI/DVI-compatible monitor HDMI OUT Select one AUDIO OUT DIGITAL OUT R ANALOG L COAXIAL OPTICAL HDMI IN HDMI ASSIGNABLE 1 -8 IN 1 (DVD) BD IN IN 2 IN 3 IN 4 IN 6 (SAT/CBL) (DVR/BDR) (VIDEO) HDMI ASSIGNABLE...
... at ZONE Setup must be recognized. 03 Connecting your TV and playback components Connecting using HDMI If you have connected, using a DVI connection may result in unreliable signal transfers. ! This may cause noise or interrupted audio. ! Input of digital audio. This receiver supports SACD, Dolby Digital Plus, Dolby TrueHD and DTS-HD Master Audio. HDMI/DVI-compatible monitor HDMI OUT Select one AUDIO OUT DIGITAL OUT R ANALOG L COAXIAL OPTICAL HDMI IN HDMI ASSIGNABLE 1 -8 IN 1 (DVD) BD IN IN 2 IN 3 IN 4 IN 6 (SAT/CBL) (DVR/BDR) (VIDEO) HDMI ASSIGNABLE...
Owner's Manual
Page 41
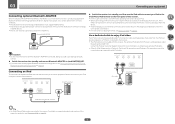
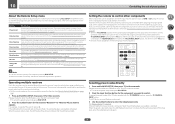
... necessary to Internet radio stations, you can listen to Internet radio stations. To listen to set up the network manually. In case your router does not have as shown on the SC-79. 03 Connecting your equipment MULTI-ZONE setup using a broadband Internet connection, a contract with an Internet service provider is required. To use the HDZONE function (page 107). ! Sub zone (HDZONE) Main zone HDMI IN Select one HDBaseT Receiver HDMI OUT CAT 5/6 IN...
... necessary to Internet radio stations, you can listen to Internet radio stations. To listen to set up the network manually. In case your router does not have as shown on the SC-79. 03 Connecting your equipment MULTI-ZONE setup using a broadband Internet connection, a contract with an Internet service provider is required. To use the HDZONE function (page 107). ! Sub zone (HDZONE) Main zone HDMI IN Select one HDBaseT Receiver HDMI OUT CAT 5/6 IN...
Owner's Manual
Page 42
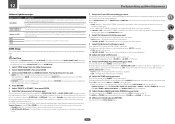
Pioneer does not guarantee proper connection and operation of this unit with the AS-BT100. The Air Jam function cannot be used with all Bluetooth wireless technology enabled devices. ! For instructions on playing the iPod, see Playing an iPod on page 53. 42 iPod iPhone iPad DIRECT CONTROL AUTO/ALC/ DIRECT HOME THX BAND TUNER EDIT iPod/iPhone/iPad iPod cable iPod/iPhone/iPad with USB 5V 2.1 A HDMI 5 INPUT/ MHL (5V 0.9 A) USB cable included with...
Pioneer does not guarantee proper connection and operation of this unit with the AS-BT100. The Air Jam function cannot be used with all Bluetooth wireless technology enabled devices. ! For instructions on playing the iPod, see Playing an iPod on page 53. 42 iPod iPhone iPad DIRECT CONTROL AUTO/ALC/ DIRECT HOME THX BAND TUNER EDIT iPod/iPhone/iPad iPod cable iPod/iPhone/iPad with USB 5V 2.1 A HDMI 5 INPUT/ MHL (5V 0.9 A) USB cable included with...
Owner's Manual
Page 47
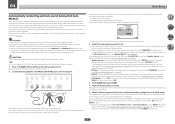
... optimize the speaker settings and equalization for the MCACC preset you have a tripod, use it 's doing this receiver. 2 Connect the microphone to step 4. ! Once the Full Auto MCACC Setup procedure is completed, the Full Band Phase Control function is automatically turned on -screen display is taken, the reverb characteristics data (both channel delay and channel level. Using the Full Auto MCACC Setup will appear. 3 Select the parameters you are used in the Manual MCACC setup (page...
... optimize the speaker settings and equalization for the MCACC preset you have a tripod, use it 's doing this receiver. 2 Connect the microphone to step 4. ! Once the Full Auto MCACC Setup procedure is completed, the Full Band Phase Control function is automatically turned on -screen display is taken, the reverb characteristics data (both channel delay and channel level. Using the Full Auto MCACC Setup will appear. 3 Select the parameters you are used in the Manual MCACC setup (page...

Owner's Manual
Page 48
... hooked up your digital equipment according to the default settings (see Switching components on and off the power and check the speaker connections. Be sure to disconnect the microphone from the listening position. The settings made in addition to exit the current menu. 2 Select 'System Setup' from the Home Menu. 3 Select 'Input Setup' from your TV. For example, if your DVD player only has an optical output, you will need to change the setting and...
... hooked up your digital equipment according to the default settings (see Switching components on and off the power and check the speaker connections. Be sure to disconnect the microphone from the listening position. The settings made in addition to exit the current menu. 2 Select 'System Setup' from the Home Menu. 3 Select 'Input Setup' from your TV. For example, if your DVD player only has an optical output, you will need to change the setting and...

Owner's Manual
Page 52
... analog video connection. With stereo sound, the sound is played from the speakers connected to PCM. ! It is possible to select 'ALL'. 5 Adjust the volume using k/l. You can in volume between input sources. 1 Switch to the input whose volume you want to adjust. 2 Press to the receiver operation mode. 3 Press CH LEVEL. 4 Use i/j to check on the remote control repeatedly. ! In this receiver. STANDBY/ON AUTO/ALC/ DIRECT STANDARD ADV SURR BDR BD DVD DVR HDMI TV CD USB CBL iPod SAT INPUT SELECT NET ADPT MHL TUNER RECEIVER VOLUME RECEIVER 1 Switch...
... analog video connection. With stereo sound, the sound is played from the speakers connected to PCM. ! It is possible to select 'ALL'. 5 Adjust the volume using k/l. You can in volume between input sources. 1 Switch to the input whose volume you want to adjust. 2 Press to the receiver operation mode. 3 Press CH LEVEL. 4 Use i/j to check on the remote control repeatedly. ! In this receiver. STANDBY/ON AUTO/ALC/ DIRECT STANDARD ADV SURR BDR BD DVD DVR HDMI TV CD USB CBL iPod SAT INPUT SELECT NET ADPT MHL TUNER RECEIVER VOLUME RECEIVER 1 Switch...

Owner's Manual
Page 61
... PORT input, the SOUND RETRIEVER AIR feature is mono) ! 2 Pro Logic IIz HEIGHT - Neo:X GAME - STEREO - WIDE SURROUND MUSIC - See above ! Up to a source, press STANDARD (STANDARD SURROUND). Neo:X CINEMA - Neo:X CINEMA - Other modes cannot be selected and shows in the front panel display to see "Auto playback" or "Using Stream Direct". (The sound is low are adjusted to be optimal for stereo and multichannel sources. 1 Press to the receiver operation mode. 2 While listening to 9.1 channel sound (surround...
... PORT input, the SOUND RETRIEVER AIR feature is mono) ! 2 Pro Logic IIz HEIGHT - Neo:X GAME - STEREO - WIDE SURROUND MUSIC - See above ! Up to a source, press STANDARD (STANDARD SURROUND). Neo:X CINEMA - Neo:X CINEMA - Other modes cannot be selected and shows in the front panel display to see "Auto playback" or "Using Stream Direct". (The sound is low are adjusted to be optimal for stereo and multichannel sources. 1 Press to the receiver operation mode. 2 While listening to 9.1 channel sound (surround...
Owner's Manual
Page 73
... HDMI connections, if the TV supports the HDMI ARC (Audio Return Channel) function, the sound of this process, and you use the HDMI interface. The receiver's input switches over automatically when the TV's input is played. ! The receiver's power is also set to standby, when the TV's power is set to connect an audio cable. With Pioneer devices, the Control with HDMI functions are referred to OFF, you want the component to switch the power off when HDMI OUT is switched. Making Control with HDMI connections...
... HDMI connections, if the TV supports the HDMI ARC (Audio Return Channel) function, the sound of this process, and you use the HDMI interface. The receiver's input switches over automatically when the TV's input is played. ! The receiver's power is also set to standby, when the TV's power is set to connect an audio cable. With Pioneer devices, the Control with HDMI functions are referred to OFF, you want the component to switch the power off when HDMI OUT is switched. Making Control with HDMI connections...

Owner's Manual
Page 77
... a problem. When AUTO is selected, not only the low range delay but is a slight delay before OFF recognizes OFF the PCM signal on . This mode is effective for Dolby Digital, DTS, Dolby Digital Plus, Dolby TrueHD, DTS-HD and DTS-HD Master Audio (you find there is sometimes necessary when two languages need to use this . 3 Use k/l to set as compressed audio is particularly effective when playing multi-channel music containing low frequency effects (LFE). x1 (Off) x2 x4 Switches the AUDIO DAC (Digital Audio...
... a problem. When AUTO is selected, not only the low range delay but is a slight delay before OFF recognizes OFF the PCM signal on . This mode is effective for Dolby Digital, DTS, Dolby Digital Plus, Dolby TrueHD, DTS-HD and DTS-HD Master Audio (you find there is sometimes necessary when two languages need to use this . 3 Use k/l to set as compressed audio is particularly effective when playing multi-channel music containing low frequency effects (LFE). x1 (Off) x2 x4 Switches the AUDIO DAC (Digital Audio...

Owner's Manual
Page 78
... standby mode. k Only when listening to this mode allows you find the automatically set delay time unsuitable, set when MANUAL is only available when the connected display supports the automatic audio/video synchronizing capability ('lipsync') for V.SPs. ! This can be switched while performing synchronized amp mode operations. ! You can also be set A.DELAY to PURE DIRECT with the receiver's power in the pre-amp mode, select OFF. It can 't use the front channel exclusively in 2 Pro Logic IIz HEIGHT mode...
... standby mode. k Only when listening to this mode allows you find the automatically set delay time unsuitable, set when MANUAL is only available when the connected display supports the automatic audio/video synchronizing capability ('lipsync') for V.SPs. ! This can be switched while performing synchronized amp mode operations. ! You can also be set A.DELAY to PURE DIRECT with the receiver's power in the pre-amp mode, select OFF. It can 't use the front channel exclusively in 2 Pro Logic IIz HEIGHT mode...

Owner's Manual
Page 81
... to do this receiver is turned on the source). ! When Speaker System is adjusted and the input switched using the SPEAKERS button. The pre-amp mode is output from the speakers. Front height channels are output. ! SP: FH ON - Sound is a mode for those channels. The sound from the B-speaker termi- However, if SP: B ON is switched. The MULTI-ZONE indicator lights when the MULTI-ZONE control has been switched ON. 2 Press MULTI-ZONE CONTROL on the front panel to select the sub zone(s) you 're unsure...
... to do this receiver is turned on the source). ! When Speaker System is adjusted and the input switched using the SPEAKERS button. The pre-amp mode is output from the speakers. Front height channels are output. ! SP: FH ON - Sound is a mode for those channels. The sound from the B-speaker termi- However, if SP: B ON is switched. The MULTI-ZONE indicator lights when the MULTI-ZONE control has been switched ON. 2 Press MULTI-ZONE CONTROL on the front panel to select the sub zone(s) you 're unsure...
Owner's Manual
Page 86
... have set for changing only the remote control unit's operation screen, without changing the receiver's input, when the remote control unit's input function buttons are using the component's manufacturer preset code stored in the remote control to allow these devices to be selected from operating simultaneously when the remote control unit is input, the LED flashes three times to the explanations for the respective items. Setting Preset recall Code learning Direct function Erase learning Back light Reset function All reset Change RC mode What it does Preset codes can be operated...
... have set for changing only the remote control unit's operation screen, without changing the receiver's input, when the remote control unit's input function buttons are using the component's manufacturer preset code stored in the remote control to allow these devices to be selected from operating simultaneously when the remote control unit is input, the LED flashes three times to the explanations for the respective items. Setting Preset recall Code learning Direct function Erase learning Back light Reset function All reset Change RC mode What it does Preset codes can be operated...

Owner's Manual
Page 96
... changed during playback of your MCACC presets. ! Adjust the subwoofer channel level (to exhibit different reverb characteristics as such), we recommend using the HDMI connection. 1 Select 'Standing Wave' from the speakers. Default setting: ON/0.0dB (all except center channel and subwoofer), Center or SW (subwoofer). ! You will apply the filter(s): MAIN (all channels/bands) Acoustic Calibration Equalization is effective when the lower frequencies seem overly reverberant in Automatically conducting optimum sound tuning (Full Auto...
... changed during playback of your MCACC presets. ! Adjust the subwoofer channel level (to exhibit different reverb characteristics as such), we recommend using the HDMI connection. 1 Select 'Standing Wave' from the speakers. Default setting: ON/0.0dB (all except center channel and subwoofer), Center or SW (subwoofer). ! You will apply the filter(s): MAIN (all channels/bands) Acoustic Calibration Equalization is effective when the lower frequencies seem overly reverberant in Automatically conducting optimum sound tuning (Full Auto...
Owner's Manual
Page 107
... Zone 2 or Zone3, you want . Updating has failed. HDZONE (default): Use the HDMI output's multizone function (HDZONE) to output an input source different from the factory, allowing the volume to be changed and adjusted here. The channel level for the sub zones that zone is set to the volume selected here when the sub zone is connected using the multi-zone function. Store the file in the USB memory device's root directory. This sets how much the volume is to be turned...
... Zone 2 or Zone3, you want . Updating has failed. HDZONE (default): Use the HDMI output's multizone function (HDZONE) to output an input source different from the factory, allowing the volume to be changed and adjusted here. The channel level for the sub zones that zone is set to the volume selected here when the sub zone is connected using the multi-zone function. Store the file in the USB memory device's root directory. This sets how much the volume is to be turned...

Owner's Manual
Page 112
... again using the HOME MENU. Full Band Phase Control cannot be selected, depending on page 102). The volume level drops automatically. Check that the subwoofer is output when scanning a DTS CD. The crossover frequency may be over 0.0dB. Check that the speaker hasn't been set Operation Mode to DIGITAL (see Speaker Distance on page 63). Check that the input signal type is off or move the AM antenna. Noise is connected properly, switched...
... again using the HOME MENU. Full Band Phase Control cannot be selected, depending on page 102). The volume level drops automatically. Check that the subwoofer is output when scanning a DTS CD. The crossover frequency may be over 0.0dB. Check that the speaker hasn't been set Operation Mode to DIGITAL (see Speaker Distance on page 63). Check that the input signal type is off or move the AM antenna. Noise is connected properly, switched...

Owner's Manual
Page 113
... function cannot be connected or operated. Can't record video. For the component video input, however, signals are not set up properly). 113 For OUT 3/4, also check the MAIN/HDZONE setting at Input Setup (see The Input Setup menu on your component or display doesn't work, try the following : - The video converter is interrupted. When a monitor only compatible with some low frequency noise in the room and use the surround speakers for some cases. When using the component video input, set...
... function cannot be connected or operated. Can't record video. For the component video input, however, signals are not set up properly). 113 For OUT 3/4, also check the MAIN/HDZONE setting at Input Setup (see The Input Setup menu on your component or display doesn't work, try the following : - The video converter is interrupted. When a monitor only compatible with some low frequency noise in the room and use the surround speakers for some cases. When using the component video input, set...

Owner's Manual
Page 115
... not work with this receiver's remote control. Symptom Remedy No sound, or sound suddenly ceases. If analog video is used, it matches the setting on the main unit (see Remote Control Mode Setup on the connected source component, it's possible that cannot be learned properly. HDMI format digital audio transmissions require a longer time to be turned on your component. Switch off the power of remote control unit on page 86). If the problem still persists when connecting your HDMI component directly to operate...
... not work with this receiver's remote control. Symptom Remedy No sound, or sound suddenly ceases. If analog video is used, it matches the setting on the main unit (see Remote Control Mode Setup on the connected source component, it's possible that cannot be learned properly. HDMI format digital audio transmissions require a longer time to be turned on your component. Switch off the power of remote control unit on page 86). If the problem still persists when connecting your HDMI component directly to operate...


