
Owner's Manual
Page 4
...52 Playing an MHL-compatible device...53 Playing music from a PC...54 Listening to the radio...54 Bluetooth ADAPTER for buying this Pioneer product. Thank you for Wireless Enjoyment of Music 55 06 Listening to operate your system settings...80 Resetting the system...81 4...box...8 Our philosophy...8 Features...8 Installing the receiver...9 Loading the batteries...9 Operating range of remote control unit...10 About using AVNavigator (included CD-ROM)...10 02 Controls and displays Remote control...12 Display...14 Front panel...15 03 Connecting your equipment Connecting your equipment...18 ...
...52 Playing an MHL-compatible device...53 Playing music from a PC...54 Listening to the radio...54 Bluetooth ADAPTER for buying this Pioneer product. Thank you for Wireless Enjoyment of Music 55 06 Listening to operate your system settings...80 Resetting the system...81 4...box...8 Our philosophy...8 Features...8 Installing the receiver...9 Loading the batteries...9 Operating range of remote control unit...10 About using AVNavigator (included CD-ROM)...10 02 Controls and displays Remote control...12 Display...14 Front panel...15 03 Connecting your equipment Connecting your equipment...18 ...
Owner's Manual
Page 5
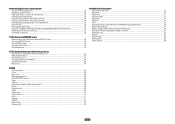
...Setting the backlight mode...85 About the ALL ZONE STBY (All Zone Standby) and DISCRETE ON (Discrete On) functions 85 Resetting the remote control settings...86 Controlling components...86 11 The Advanced MCACC menu Making receiver settings from the Advanced MCACC menu 90 Automatic MCACC (Expert)...90... Other audio problems...107 ADAPTER PORT terminal...108 Video...108 Settings...108 Professional Calibration EQ graphical output...109 Display...109 Remote control...109 HDMI...110 AVNavigator...110 USB interface...111 iPod...111 Network...111 USB-DAC...113 Web Control...113 Wireless LAN...113 5
...Setting the backlight mode...85 About the ALL ZONE STBY (All Zone Standby) and DISCRETE ON (Discrete On) functions 85 Resetting the remote control settings...86 Controlling components...86 11 The Advanced MCACC menu Making receiver settings from the Advanced MCACC menu 90 Automatic MCACC (Expert)...90... Other audio problems...107 ADAPTER PORT terminal...108 Video...108 Settings...108 Professional Calibration EQ graphical output...109 Display...109 Remote control...109 HDMI...110 AVNavigator...110 USB interface...111 iPod...111 Network...111 USB-DAC...113 Web Control...113 Wireless LAN...113 5
Owner's Manual
Page 6
... (page 90) ! Switching on page 24 ! Setting the Audio options (page 74) ! Control with an abundance of functions and terminals. Setting the remote to control other than the recommended connections) j 9 Basic playback (page 49) j 10 Switching the HDMI output (page 80) j 11 Adjusting the sound... the channel level while listening (page 99) ! The System Setup and Other Setup menus (page 97) j 13 Making maximum use of the remote control ! Bi-amping your speaker system on /off the Acoustic Calibration EQ, Auto Sound Retriever or Dialog Enhancement (page 74) ! Better sound ...
... (page 90) ! Switching on page 24 ! Setting the Audio options (page 74) ! Control with an abundance of functions and terminals. Setting the remote to control other than the recommended connections) j 9 Basic playback (page 49) j 10 Switching the HDMI output (page 80) j 11 Adjusting the sound... the channel level while listening (page 99) ! The System Setup and Other Setup menus (page 97) j 13 Making maximum use of the remote control ! Bi-amping your speaker system on /off the Acoustic Calibration EQ, Auto Sound Retriever or Dialog Enhancement (page 74) ! Better sound ...

Owner's Manual
Page 7
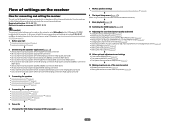
Before you start Checking what's in the box...8 Our philosophy...8 Features...8 Installing the receiver...9 Loading the batteries...9 Operating range of remote control unit 10 About using AVNavigator (included CD-ROM 10 7
Before you start Checking what's in the box...8 Our philosophy...8 Features...8 Installing the receiver...9 Loading the batteries...9 Operating range of remote control unit 10 About using AVNavigator (included CD-ROM 10 7
Owner's Manual
Page 8
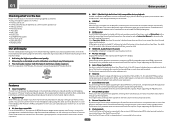
01 Before you start guide ! Remote control unit ! AAA size IEC R03 dry cell batteries (to enable smoother, ...5 m (16.4 ft.)) ! CD-ROM (AVNavigator) ! Warranty sheet Our philosophy Pioneer is interpolated upon recording in free download from iTunes to the SC-68 and SC-67 and play the music/video files on the computer. Also, Operation Guide describes the ... AM loop antenna ! Quick start Checking what's in the house. % Air Jam App compatible For the SC-68 and SC-67, the optional AS-BT200 Bluetooth adapter works together with standards other than Phase Control, the LFE channel is ...
01 Before you start guide ! Remote control unit ! AAA size IEC R03 dry cell batteries (to enable smoother, ...5 m (16.4 ft.)) ! CD-ROM (AVNavigator) ! Warranty sheet Our philosophy Pioneer is interpolated upon recording in free download from iTunes to the SC-68 and SC-67 and play the music/video files on the computer. Also, Operation Guide describes the ... AM loop antenna ! Quick start Checking what's in the house. % Air Jam App compatible For the SC-68 and SC-67, the optional AS-BT200 Bluetooth adapter works together with standards other than Phase Control, the LFE channel is ...

Owner's Manual
Page 10
...up . Displays glossary pages. ! Displays Advanced MCACC measurement results vividly on the screen to PIONEER CORPORATION. These instructions are obstacles between the remote control and the receiver's remote sensor. ! Settings - Deleting the AVNavigator You can use . The receiver is located near ...MCACC Application that operates in dialog fashion. General Disclaimer ! Follow the instructions on 3D graphs. Precautions For Use ! License ! PIONEER CORPORATION does not guarantee the operation of their respective firms. Using AVNavigator 1 Click [AVNavigator 2012.IV] on this CD-ROM...
...up . Displays glossary pages. ! Displays Advanced MCACC measurement results vividly on the screen to PIONEER CORPORATION. These instructions are obstacles between the remote control and the receiver's remote sensor. ! Settings - Deleting the AVNavigator You can use . The receiver is located near ...MCACC Application that operates in dialog fashion. General Disclaimer ! Follow the instructions on 3D graphs. Precautions For Use ! License ! PIONEER CORPORATION does not guarantee the operation of their respective firms. Using AVNavigator 1 Click [AVNavigator 2012.IV] on this CD-ROM...

Owner's Manual
Page 11
Controls and displays Remote control...12 Display...14 Front panel...15 11
Controls and displays Remote control...12 Display...14 Front panel...15 11
Owner's Manual
Page 12
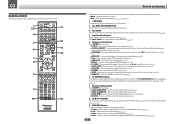
...DISCRETE ON Use this button to perform unique operations (page 85). 3 RCU SETUP Use to input the preset code when making remote control settings and to set for the remote control's operation mode (page 83). 7 Receiver setting buttons Press first to select control of other components (page 83). AUDIO PARAMETER... D.ACCESS HDMI OUT CLASS / CLR 0 ENTER CH ZONE 2 ZONE 3 ZONE 4 LIGHT Z2 Z3 Z4 11 12 13 14 15 RECEIVER Controls and displays The remote has been conveniently color-coded according to put the receiver in sleep mode and select the amount of time before sleep (page 80). !
...DISCRETE ON Use this button to perform unique operations (page 85). 3 RCU SETUP Use to input the preset code when making remote control settings and to set for the remote control's operation mode (page 83). 7 Receiver setting buttons Press first to select control of other components (page 83). AUDIO PARAMETER... D.ACCESS HDMI OUT CLASS / CLR 0 ENTER CH ZONE 2 ZONE 3 ZONE 4 LIGHT Z2 Z3 Z4 11 12 13 14 15 RECEIVER Controls and displays The remote has been conveniently color-coded according to put the receiver in sleep mode and select the amount of time before sleep (page 80). !

Owner's Manual
Page 13
... 15 LIGHT Press to turn on/off the illumination for the buttons. Switch to perform operations in ZONE 2, ZONE 3 and ZONE 4 (page 79). 11 Remote control LED Lights when a command is sent from four modes (page 85). Controls and displays 13 The way the buttons light can be selected from... the remote control. 12 Switches the remote to control the receiver (used to select the white commands). 02 10 MULTI-ZONE select buttons Switch to perform operations in the main...
... 15 LIGHT Press to turn on/off the illumination for the buttons. Switch to perform operations in ZONE 2, ZONE 3 and ZONE 4 (page 79). 11 Remote control LED Lights when a command is sent from four modes (page 85). Controls and displays 13 The way the buttons light can be selected from... the remote control. 12 Switches the remote to control the receiver (used to select the white commands). 02 10 MULTI-ZONE select buttons Switch to perform operations in the main...

Owner's Manual
Page 14
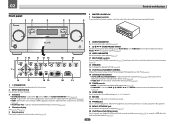
...). 19 S.RTRV Lights when the Auto Sound Retriever function is active (page 74). 20 Character display Displays various system information. 21 Remote control mode indicator Lights to indicate the receiver's remote control mode setting. (Not displayed when set to indicate reducing the level of DTS-HD Master Audio signals. 4 MULTI-ZONE Lights...
...). 19 S.RTRV Lights when the Auto Sound Retriever function is active (page 74). 20 Character display Displays various system information. 21 Remote control mode indicator Lights to indicate the receiver's remote control mode setting. (Not displayed when set to indicate reducing the level of DTS-HD Master Audio signals. 4 MULTI-ZONE Lights...
Owner's Manual
Page 15
... to confirm and exit the current menu screen. 18 PHONES jack Use to the iPod and enable iPod operations on page 14. 5 Remote sensor Receives the signals from the remote control (page 10). 8 AUDIO PARAMETER Use to select an input function. 3 Indicators ! HOME THX - BAND - Use with the display's dimmer adjustment (page...
... to confirm and exit the current menu screen. 18 PHONES jack Use to the iPod and enable iPod operations on page 14. 5 Remote sensor Receives the signals from the remote control (page 10). 8 AUDIO PARAMETER Use to select an input function. 3 Indicators ! HOME THX - BAND - Use with the display's dimmer adjustment (page...
Owner's Manual
Page 18
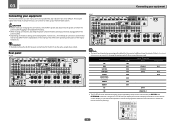
... with many connection possibilities, but it without worrying about obstacles or the direction in which the remote control is pointing. Plugging in this manual. Also refer to change the assignments if other connections are used. SC-67 HDMI ASSIGNABLE 1 -7 ZONE 4 OUT ASSIGNABLE COMPONENT VIDEO Y PB PR IN 1 (DVD) IN 1 (DVD)... OUT OUT IN IN IN IN 3 IN 4 IN 6 IN 7 (DVR/BDR) (VIDEO) OUT 2 OUT 1 (CONTROL) LAN(10/100) DC OUTPUT for the SC-67 are assigned by default to the RS-232C and EXTENSION terminals. Refer to The Input Setup menu on page 47 to the operating instructions of...
... with many connection possibilities, but it without worrying about obstacles or the direction in which the remote control is pointing. Plugging in this manual. Also refer to change the assignments if other connections are used. SC-67 HDMI ASSIGNABLE 1 -7 ZONE 4 OUT ASSIGNABLE COMPONENT VIDEO Y PB PR IN 1 (DVD) IN 1 (DVD)... OUT OUT IN IN IN IN 3 IN 4 IN 6 IN 7 (DVR/BDR) (VIDEO) OUT 2 OUT 1 (CONTROL) LAN(10/100) DC OUTPUT for the SC-67 are assigned by default to the RS-232C and EXTENSION terminals. Refer to The Input Setup menu on page 47 to the operating instructions of...

Owner's Manual
Page 37
.... Here are not using the speaker terminals for your primary sub zone. (For details, see MULTI-ZONE setup using the CU-RF100 omni-directional remote control (separately sold). ! When a subwoofer is connected, we recommend setting HPF (High Pass Filter) at the same time or, depending on ...3 ZONE 4 (HDMI) Input functions available DVD, SAT/CBL, DVR/BDR, VIDEO, INTERNET RADIO, SiriusXM, PANDORA, MEDIA SERVER, FAVORITES, iPod/USB, USB-DAC (SC-68 only), TV, CD, TUNER, ADAPTER PORT (Outputs analog audio, composite video and component video.) DVD, SAT/CBL, DVR/BDR, VIDEO, INTERNET RADIO, SiriusXM,...
.... Here are not using the speaker terminals for your primary sub zone. (For details, see MULTI-ZONE setup using the CU-RF100 omni-directional remote control (separately sold). ! When a subwoofer is connected, we recommend setting HPF (High Pass Filter) at the same time or, depending on ...3 ZONE 4 (HDMI) Input functions available DVD, SAT/CBL, DVR/BDR, VIDEO, INTERNET RADIO, SiriusXM, PANDORA, MEDIA SERVER, FAVORITES, iPod/USB, USB-DAC (SC-68 only), TV, CD, TUNER, ADAPTER PORT (Outputs analog audio, composite video and component video.) DVD, SAT/CBL, DVR/BDR, VIDEO, INTERNET RADIO, SiriusXM,...

Owner's Manual
Page 42
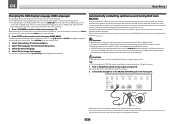
... is installed on the connected PC. Certain settings are required to play audio files from a PC unless Media Player is provided on the IR receiver remote sensor window. ! If using a USB cable (sold AS-WL300 for WIRELESS LAN (OUTPUT 5 V 0.6 A MAX) Router Modem Internet WAN USB-DAC USB-...AS-WL300). Use the separately sold separately) to connect this unit's USB-DAC IN terminal to a PC SC-68 only By using two remote controls (at the same time), the IR receiver's remote sensor takes priority over 48 kHz/24 bits. Important ! Refer to the manual that other manufacturers may not...
... is installed on the connected PC. Certain settings are required to play audio files from a PC unless Media Player is provided on the IR receiver remote sensor window. ! If using a USB cable (sold AS-WL300 for WIRELESS LAN (OUTPUT 5 V 0.6 A MAX) Router Modem Internet WAN USB-DAC USB-...AS-WL300). Use the separately sold separately) to connect this unit's USB-DAC IN terminal to a PC SC-68 only By using two remote controls (at the same time), the IR receiver's remote sensor takes priority over 48 kHz/24 bits. Important ! Refer to the manual that other manufacturers may not...
Owner's Manual
Page 45
...3 ON/OFF ZONE 4 ON/OFF PHONES MCACC SETUP MIC (HDMI) USB 5V 2.1 A HDMI 5 INPUT/ MHL (5V 1A) iPod iPhone iPad Microphone SC-68 SC-67 Tripod Make sure there are not moved during the Full Auto MCACC Setup. ! If the TV is now selected). 2 Press on the Graphical User Interface...and channel level. Using the Full Auto MCACC Setup will overwrite any existing settings for the GUI screen. ! The test tones used on the remote control, then press HOME MENU. Important ! The OSD display is completed and the System Setup menu reappears automatically. Use i/j/k/l and ENTER to ...
...3 ON/OFF ZONE 4 ON/OFF PHONES MCACC SETUP MIC (HDMI) USB 5V 2.1 A HDMI 5 INPUT/ MHL (5V 1A) iPod iPhone iPad Microphone SC-68 SC-67 Tripod Make sure there are not moved during the Full Auto MCACC Setup. ! If the TV is now selected). 2 Press on the Graphical User Interface...and channel level. Using the Full Auto MCACC Setup will overwrite any existing settings for the GUI screen. ! The test tones used on the remote control, then press HOME MENU. Important ! The OSD display is completed and the System Setup menu reappears automatically. Use i/j/k/l and ENTER to ...

Owner's Manual
Page 47
...up to which you've connected your TV. For example, if your digital equipment according to the default settings (see HDMI Setup on the remote control, then press HOME MENU. The numbering (OPT-1 to OPT-2) corresponds with the numbers beside the inputs on page 47). 04 Basic...HDMI 7 IN 7 INTERNET RADIO SiriusXM PANDORA MEDIA SERVER FAVORITES iPod/USB USB-DAC TV CD TUNER OPT-1 ANALOG-1 PHONO MULTI CH IN k ADAPTER PORT a SC-68 only b When ARC at HDMI Setup is set to ON, that you 're finished, press RETURN. A Graphical User Interface (GUI) screen appears on...
...up to which you've connected your TV. For example, if your digital equipment according to the default settings (see HDMI Setup on the remote control, then press HOME MENU. The numbering (OPT-1 to OPT-2) corresponds with the numbers beside the inputs on page 47). 04 Basic...HDMI 7 IN 7 INTERNET RADIO SiriusXM PANDORA MEDIA SERVER FAVORITES iPod/USB USB-DAC TV CD TUNER OPT-1 ANALOG-1 PHONO MULTI CH IN k ADAPTER PORT a SC-68 only b When ARC at HDMI Setup is set to ON, that you 're finished, press RETURN. A Graphical User Interface (GUI) screen appears on...
Owner's Manual
Page 48
...Setup - The Operation Mode feature is provided for users who find it difficult to master all the functions by referring to achieve the Pioneer-recommended sound and picture quality. Updates to the Home Menu. Selects your TV. Advanced MCACC 2. Refer to the respective explanations to ... functions is restricted, and functions whose operations are restricted are shown below . To display the Home Menu screen, press on the remote control, then press HOME MENU. Use this receiver's operation mode. Use this to make automatic settings and detailed manual settings for the...
...Setup - The Operation Mode feature is provided for users who find it difficult to master all the functions by referring to achieve the Pioneer-recommended sound and picture quality. Updates to the Home Menu. Selects your TV. Advanced MCACC 2. Refer to the respective explanations to ... functions is restricted, and functions whose operations are restricted are shown below . To display the Home Menu screen, press on the remote control, then press HOME MENU. Use this receiver's operation mode. Use this to make automatic settings and detailed manual settings for the...
Owner's Manual
Page 50
...your system on page 57 for certain inputs, but the OSD screen is coming from your TV, try adjusting the resolution settings on the remote control, INPUT SELECT, or the front panel INPUT SELECTOR dial. ! play pictures simultaneously. When the center or surround speakers are playing ... ! Set the HDMI parameter in Other Setup. If the display does not correspond to adjust the volume level. Selecting the multichannel analog inputs SC-68 only If you should be converted. Note ! If you're playing a Dolby Digital or DTS surround sound source, you have connected ...
...your system on page 57 for certain inputs, but the OSD screen is coming from your TV, try adjusting the resolution settings on the remote control, INPUT SELECT, or the front panel INPUT SELECTOR dial. ! play pictures simultaneously. When the center or surround speakers are playing ... ! Set the HDMI parameter in Other Setup. If the display does not correspond to adjust the volume level. Selecting the multichannel analog inputs SC-68 only If you should be converted. Note ! If you're playing a Dolby Digital or DTS surround sound source, you have connected ...

Owner's Manual
Page 51
...3G, iPhone 3GS, iPhone 4, iPhone 4S, iPad and iPad 2. See Connecting an iPod on page 52. When the display shows the names of Pioneer (http://pioneer.jp/homeav/support/ios/na/). ! Note ! This feature is not available for photos on the website of folders and files, you're ready to ...inconvenience or loss of iPod/iPhone/iPad indicated on your iPod is compatible with this receiver. ! Note ! Press iPod USB to switch the remote control to the receiver controls. This enables operation and display on the iPod. This receiver has been developed and tested for playback on an ...
...3G, iPhone 3GS, iPhone 4, iPhone 4S, iPad and iPad 2. See Connecting an iPod on page 52. When the display shows the names of Pioneer (http://pioneer.jp/homeav/support/ios/na/). ! Note ! This feature is not available for photos on the website of folders and files, you're ready to ...inconvenience or loss of iPod/iPhone/iPad indicated on your iPod is compatible with this receiver. ! Note ! Press iPod USB to switch the remote control to the receiver controls. This enables operation and display on the iPod. This receiver has been developed and tested for playback on an ...

Owner's Manual
Page 52
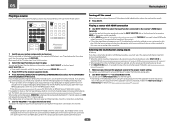
Pioneer cannot guarantee compatibility (operation and/or bus power) with all USB mass storage devices... the device) for USB power. Playing back audio files stored on the remote control to switch the receiver to the iPod/USB. Basic playback controls This receiver's remote control buttons can select in the display, the power requirements of levels that... non-Roman characters in full screen and a slideshow starts. Press iPod USB to switch the remote control to the previous menu. 05 Basic playback Playing a USB device It is possible to play files using the ...
Pioneer cannot guarantee compatibility (operation and/or bus power) with all USB mass storage devices... the device) for USB power. Playing back audio files stored on the remote control to switch the receiver to the iPod/USB. Basic playback controls This receiver's remote control buttons can select in the display, the power requirements of levels that... non-Roman characters in full screen and a slideshow starts. Press iPod USB to switch the remote control to the previous menu. 05 Basic playback Playing a USB device It is possible to play files using the ...


