Operating Instructions
Page 3
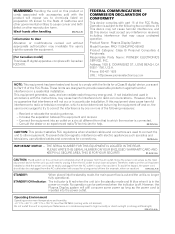
...and, if not installed and used to connect the unit to other reproductive harm. Consult the dealer or an experienced radio/TV technician for the unit, you to chemicals listed on mode. THE SERIAL NUMBER FOR THIS EQUIPMENT IS LOCATED IN THE REAR... period of time (for connections. Wash hands after handling. Product Name: Plasma Display System Model Number: PRO-1150HD/PRO-950HD Product Category: Class B Personal Computers & Peripherals Responsible Party Name: PIONEER ELECTRONICS SERVICE, INC. D1-4-2-6-1_En CAUTION: The switch on a circuit different from that may invalidate the ...
...and, if not installed and used to connect the unit to other reproductive harm. Consult the dealer or an experienced radio/TV technician for the unit, you to chemicals listed on mode. THE SERIAL NUMBER FOR THIS EQUIPMENT IS LOCATED IN THE REAR... period of time (for connections. Wash hands after handling. Product Name: Plasma Display System Model Number: PRO-1150HD/PRO-950HD Product Category: Class B Personal Computers & Peripherals Responsible Party Name: PIONEER ELECTRONICS SERVICE, INC. D1-4-2-6-1_En CAUTION: The switch on a circuit different from that may invalidate the ...

Operating Instructions
Page 4
... the method of the power plug and power outlet may sometimes differ from falling over 20 Attaching/detaching the Pioneer stand ...21 Cable connections for watching digital and/or conventional TV channels 23 Inserting the CableCARD 23 Routing cables 24 Connecting the power cord 24 Preparing the remote control unit... Plasma display 13 Remote control unit 15 05 Preparation 16 Installing the plasma display 16 Moving the plasma display 16 Installing the Pioneer speaker (PRO-1150HD 16 Preventing the plasma display from that shown in the explanatory drawings. Contents Thank you for the...
... the method of the power plug and power outlet may sometimes differ from falling over 20 Attaching/detaching the Pioneer stand ...21 Cable connections for watching digital and/or conventional TV channels 23 Inserting the CableCARD 23 Routing cables 24 Connecting the power cord 24 Preparing the remote control unit... Plasma display 13 Remote control unit 15 05 Preparation 16 Installing the plasma display 16 Moving the plasma display 16 Installing the Pioneer speaker (PRO-1150HD 16 Preventing the plasma display from that shown in the explanatory drawings. Contents Thank you for the...

Operating Instructions
Page 5
... closed caption Power Control 59 parameters 43 Energy Save 59 Clock Setting 43 No Signal off (AV source only 59 10 TV Guide On Screen™ System Operation 44 Using the TV Guide On Screen™ system 44 Screen components 44 The Listings screen 45 Setting program reminders 45 Searching for programs...
... closed caption Power Control 59 parameters 43 Energy Save 59 Clock Setting 43 No Signal off (AV source only 59 10 TV Guide On Screen™ System Operation 44 Using the TV Guide On Screen™ system 44 Screen components 44 The Listings screen 45 Setting program reminders 45 Searching for programs...
Operating Instructions
Page 7
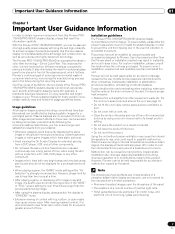
... main unit are no exception to previous models. For custom installation, please consult the dealer where the unit was purchased. The Pioneer PRO-1150HD/PRO-950HD incorporates the latest in possible malfunction. Over the course of its lowest suction setting. • Do not place the product on...life and high reliability. This product should not be held responsible for accidents or malfunction caused by Pioneer. To ensure proper heat emission: • Distance the unit slightly from a TV, VCR, DVD player or any still image, it is strongly recommended. Using the unit without...
... main unit are no exception to previous models. For custom installation, please consult the dealer where the unit was purchased. The Pioneer PRO-1150HD/PRO-950HD incorporates the latest in possible malfunction. Over the course of its lowest suction setting. • Do not place the product on...life and high reliability. This product should not be held responsible for accidents or malfunction caused by Pioneer. To ensure proper heat emission: • Distance the unit slightly from a TV, VCR, DVD player or any still image, it is strongly recommended. Using the unit without...

Operating Instructions
Page 9
... The time for a long period of time may be corrected by decreasing picture brightness and lowering power consumption. Note • When a program menu, TV Guide screen or frozen image is being shown. The High Definition 16:9 aspect ratio images containing side masks will be added or the image displayed... content) for example, when you display still images on the screen due to burning of these screen modes to prevent damage from PC or TV game equipment, and/or fixed images such as time of definition properly. About the menu window size following two cases. 1 After-image lagging...
... The time for a long period of time may be corrected by decreasing picture brightness and lowering power consumption. Note • When a program menu, TV Guide screen or frozen image is being shown. The High Definition 16:9 aspect ratio images containing side masks will be added or the image displayed... content) for example, when you display still images on the screen due to burning of these screen modes to prevent damage from PC or TV game equipment, and/or fixed images such as time of definition properly. About the menu window size following two cases. 1 After-image lagging...

Operating Instructions
Page 13
... 1 56 Viewed from below of the display Viewed from the front side of the display The terminals on side panels are common to the PRO-1150HD and PRO-950HD. 1 a button (See page 26.) 2 POWER ON indicator (See page 26.) 3 STANDBY indicator (See page 26.) 4 SLEEP indicator 5 Room Light Sensor... 6 Remote control sensor 7 STANDBY/ON button 8 INPUT button (ENTER button*) 9 VOLUME UP/DOWN buttons (UP/DOWN buttons*) 11 TV GUIDE button* 12 USB port ...
... 1 56 Viewed from below of the display Viewed from the front side of the display The terminals on side panels are common to the PRO-1150HD and PRO-950HD. 1 a button (See page 26.) 2 POWER ON indicator (See page 26.) 3 STANDBY indicator (See page 26.) 4 SLEEP indicator 5 Room Light Sensor... 6 Remote control sensor 7 STANDBY/ON button 8 INPUT button (ENTER button*) 9 VOLUME UP/DOWN buttons (UP/DOWN buttons*) 11 TV GUIDE button* 12 USB port ...

Operating Instructions
Page 15
...: Executes a channel number. 28 CH RETURN: Returns to set the FAVORITE CH. PC source: STANDARD, USER.) 6 INFO: Displays a channel banner when a TV program is in dark locations. 19 ANT: Selects the antenna (A, B). Note • When using the remote control unit, point it at the plasma display. ...control use in operation, displays information about the currently highlighted channel (if available). 7 HOME MENU: Displays the HOME MENU screen. When the TV Guide On Screen™ system is being watched. 18 D: Lights up all buttons Lights turn off if no operations are performed within five ...
...: Executes a channel number. 28 CH RETURN: Returns to set the FAVORITE CH. PC source: STANDARD, USER.) 6 INFO: Displays a channel banner when a TV program is in dark locations. 19 ANT: Selects the antenna (A, B). Note • When using the remote control unit, point it at the plasma display. ...control use in operation, displays information about the currently highlighted channel (if available). 7 HOME MENU: Displays the HOME MENU screen. When the TV Guide On Screen™ system is being watched. 18 D: Lights up all buttons Lights turn off if no operations are performed within five ...

Operating Instructions
Page 23
...you need not execute Auto Channel Preset; Preparation 05 Cable connections for watching digital and/or conventional TV channels This system is equipped with an F-type connector, plug it goes. Coaxial Cable TV Note • Be sure to enjoy clearer pictures. Signal reception may not be sure to connect... on the rear of the plasma display leftward, and remove the cover while pulling the tab's latch downward. (Viewed from a cable TV to watch digital and/or conventional TV channels, connect to the ANT/CABLE A IN terminal. • The ANT/CABLE A IN and ANT B IN terminals must not ...
...you need not execute Auto Channel Preset; Preparation 05 Cable connections for watching digital and/or conventional TV channels This system is equipped with an F-type connector, plug it goes. Coaxial Cable TV Note • Be sure to enjoy clearer pictures. Signal reception may not be sure to connect... on the rear of the plasma display leftward, and remove the cover while pulling the tab's latch downward. (Viewed from a cable TV to watch digital and/or conventional TV channels, connect to the ANT/CABLE A IN terminal. • The ANT/CABLE A IN and ANT B IN terminals must not ...

Operating Instructions
Page 26
...indicators are off. • The POWER ON indicator on the plasma display lights up blue. • Press TV a on the remote control unit or STANDBY/ON on the plasma display if the STANDBY indicator lights up blue... on . Caution • While the POWER ON and STANDBY indicators are not going to standby mode) 1 Press TV a on the remote control unit or STANDBY/ON on the plasma display. • The system enters the standby mode...is in the standby mode. When "Auto" is pressed. Plasma display (PRO-1150HD) a button POWER ON indicator STANDBY indicator (PRO-950HD) Viewed from the power outlet.
...indicators are off. • The POWER ON indicator on the plasma display lights up blue. • Press TV a on the remote control unit or STANDBY/ON on the plasma display if the STANDBY indicator lights up blue... on . Caution • While the POWER ON and STANDBY indicators are not going to standby mode) 1 Press TV a on the remote control unit or STANDBY/ON on the plasma display. • The system enters the standby mode...is in the standby mode. When "Auto" is pressed. Plasma display (PRO-1150HD) a button POWER ON indicator STANDBY indicator (PRO-950HD) Viewed from the power outlet.
Operating Instructions
Page 27
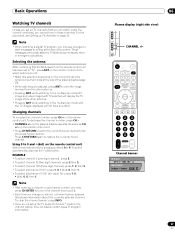
...channel), press 1, 2, then 5. • To select subchannel 10.01, press 1, 0, • (dot), 0, then 1. • To select subchannel 10.001 (for cable TV), press 1, 0, • (dot), 0, 0, then 1. Those messages are broadcasted by pressing buttons 0 to 9. Changing channels To increase the channel number, press CH + on ...tuned channel. on the remote control unit. Using 0 to 9 and • (dot) on the remote control unit Select channels directly by TV stations as CH +/- Note • After entering a channel or subchannel number, you may press CH ENTER to tune in the channel more quickly...
...channel), press 1, 2, then 5. • To select subchannel 10.01, press 1, 0, • (dot), 0, then 1. • To select subchannel 10.001 (for cable TV), press 1, 0, • (dot), 0, 0, then 1. Those messages are broadcasted by pressing buttons 0 to 9. Changing channels To increase the channel number, press CH + on ...tuned channel. on the remote control unit. Using 0 to 9 and • (dot) on the remote control unit Select channels directly by TV stations as CH +/- Note • After entering a channel or subchannel number, you may press CH ENTER to tune in the channel more quickly...

Operating Instructions
Page 28
Plasma display (right side view) Changing the language If you have selected a digital TV program that language. • If you are selected, "Others" will hear that provides multilanguage services, you can switch among the languages by pressing MTS on ... VOL +/- Muting display 28 En on the screen. To decrease the volume, press VOL -. With a language other than English, French, and Spanish are watching a digital TV program without sound or language information, "N/A" appears on the remote control unit.
Plasma display (right side view) Changing the language If you have selected a digital TV program that language. • If you are selected, "Others" will hear that provides multilanguage services, you can switch among the languages by pressing MTS on ... VOL +/- Muting display 28 En on the screen. To decrease the volume, press VOL -. With a language other than English, French, and Spanish are watching a digital TV program without sound or language information, "N/A" appears on the remote control unit.

Operating Instructions
Page 29
...: The normal program soundtrack (either in this case, sound is determined by the video source. • The MTS button is disabled while the TV Guide On Screen™ system is displayed. • In each of sound. Basic Operations 06 Setting MTS/SAP mode When watching conventional...depend on broadcast signals being received. SAP sound: Listen to second language, supplementary commentary and other information. (SAP is mono sound.) Note • Conventional TV channels in mono or stereo). You must reselect the STEREO mode if you want to hear, you press MTS, MTS toggles as shown below. In...
...: The normal program soundtrack (either in this case, sound is determined by the video source. • The MTS button is disabled while the TV Guide On Screen™ system is displayed. • In each of sound. Basic Operations 06 Setting MTS/SAP mode When watching conventional...depend on broadcast signals being received. SAP sound: Listen to second language, supplementary commentary and other information. (SAP is mono sound.) Note • Conventional TV channels in mono or stereo). You must reselect the STEREO mode if you want to hear, you press MTS, MTS toggles as shown below. In...

Operating Instructions
Page 30
...name 2 Current time 3 Channel number 4 Input (Ant. Using the POD service If you have watched digital and/or High Definition TV channels over cable, you can use the POD service provided by the cable TV company. This service presents various types of program information. 06 Basic Operations Viewing a channel banner While watching...• Each time you press SPLIT, the display mode is not displayed if not included in broadcast signals. • If you do not setup the TV Guide On Screen™ system, the channel banner may not display certain types of useful information, using HTML text.
...name 2 Current time 3 Channel number 4 Input (Ant. Using the POD service If you have watched digital and/or High Definition TV channels over cable, you can use the POD service provided by the cable TV company. This service presents various types of program information. 06 Basic Operations Viewing a channel banner While watching...• Each time you press SPLIT, the display mode is not displayed if not included in broadcast signals. • If you do not setup the TV Guide On Screen™ system, the channel banner may not display certain types of useful information, using HTML text.

Operating Instructions
Page 31
... cannot be indicated by " ". Moving image Still image 2 To select the desired input source, press the appropriate input source button. • If watching TV programs, press CH +/- Note • With the screen split, any operation for five minutes. • Displaying pictures in FREEZE mode for an extended period...-picture mode, press SWAP to switch the position of the small screen in anti-clockwise. Note • The SPLIT button is disabled while the TV Guide On Screen™ system is the active screen which will be frozen. • When you are watching. • In picture-in-picture...
... cannot be indicated by " ". Moving image Still image 2 To select the desired input source, press the appropriate input source button. • If watching TV programs, press CH +/- Note • With the screen split, any operation for five minutes. • Displaying pictures in FREEZE mode for an extended period...-picture mode, press SWAP to switch the position of the small screen in anti-clockwise. Note • The SPLIT button is disabled while the TV Guide On Screen™ system is the active screen which will be frozen. • When you are watching. • In picture-in-picture...

Operating Instructions
Page 32
...through the setup process. and is a convenient way to find out what's on right now or during the coming week, by channel or by pressing TV GUIDE for satellite services. • Depending on the current settings and selected items, the order of the setup screens may be available in the Guide... to set it may take up to display Screen 1 (shown on your viewing and recording selections quickly and easily. As content providers move to watching TV. • "Don't remind me again"). 32 En Note • Once you power on the right column of this page). To make a selection, press / to ...
...through the setup process. and is a convenient way to find out what's on right now or during the coming week, by channel or by pressing TV GUIDE for satellite services. • Depending on the current settings and selected items, the order of the setup screens may be available in the Guide... to set it may take up to display Screen 1 (shown on your viewing and recording selections quickly and easily. As content providers move to watching TV. • "Don't remind me again"). 32 En Note • Once you power on the right column of this page). To make a selection, press / to ...

Operating Instructions
Page 33
...Select service(s) • Press / to highlight the connected video source(s) for which you would like to receive show listings. • Press ENTER to make your TV. • Press / to highlight a country. • Press ENTER to display Screen 2. Screen 2: Enter ZIP or Postal Code • If you selected ... 33 En Note • If you do not have cable service, you must select Antenna in order to receive a channel lineup and listings. TV Guide On Screen™ System Setup 07 System Setup Screens Screen 1: Select Country • This screen asks you the location of your selection(s)....
...Select service(s) • Press / to highlight the connected video source(s) for which you would like to receive show listings. • Press ENTER to make your TV. • Press / to highlight a country. • Press ENTER to display Screen 2. Screen 2: Enter ZIP or Postal Code • If you selected ... 33 En Note • If you do not have cable service, you must select Antenna in order to receive a channel lineup and listings. TV Guide On Screen™ System Setup 07 System Setup Screens Screen 1: Select Country • This screen asks you the location of your selection(s)....

Operating Instructions
Page 34
07 TV Guide On Screen™ System Setup Screen 5: Are the settings correct? • If you select "Yes", you see Screen 6. • If you select "No", you see Screen 1. Screen 6: Congratulations 34 En
07 TV Guide On Screen™ System Setup Screen 5: Are the settings correct? • If you select "Yes", you see Screen 6. • If you select "No", you see Screen 1. Screen 6: Congratulations 34 En

Operating Instructions
Page 36
... To quit Auto Channel Preset halfway, press D. 7 After Auto Channel Preset has been finished, press HOME MENU to search and set up TV channels that you select a skipped channel in step 6. • When using Auto Channel Preset, you can execute Auto Channel Preset by Auto...Ant. Note • When using Auto Channel Preset, you can check the current channel's signal strength. A Channel Keep/Skip Ant. Setting up TV channels manually This section describes how to manually add Cable Converter output channels. • When an inserted CableCARD™ is for skipping unwanted channels ...
... To quit Auto Channel Preset halfway, press D. 7 After Auto Channel Preset has been finished, press HOME MENU to search and set up TV channels that you select a skipped channel in step 6. • When using Auto Channel Preset, you can execute Auto Channel Preset by Auto...Ant. Note • When using Auto Channel Preset, you can check the current channel's signal strength. A Channel Keep/Skip Ant. Setting up TV channels manually This section describes how to manually add Cable Converter output channels. • When an inserted CableCARD™ is for skipping unwanted channels ...

Operating Instructions
Page 37
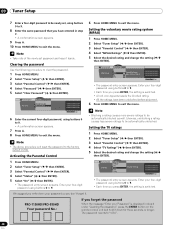
...Home Menu Exit 6 Enter the current four-digit password, using buttons 0 to watch a program (or content) blocked by the cable TV company. Movie ratings are used for television. Tuner Setup 09 5 Select "Signal Strength" ( / then ENTER). The following procedure to ... a cable service, select "Cable" for children. You will result in some jurisdictions). PG Parental guidance suggested TV-14 Parents strongly cautioned TV-MA Mature audiences only Parental Control With the Parental Control, parents can prevent their children from changing Parental Control ...
...Home Menu Exit 6 Enter the current four-digit password, using buttons 0 to watch a program (or content) blocked by the cable TV company. Movie ratings are used for television. Tuner Setup 09 5 Select "Signal Strength" ( / then ENTER). The following procedure to ... a cable service, select "Cable" for children. You will result in some jurisdictions). PG Parental guidance suggested TV-14 Parents strongly cautioned TV-MA Mature audiences only Parental Control With the Parental Control, parents can prevent their children from changing Parental Control ...
Operating Instructions
Page 38
..." ( / then ENTER). 3 Select "Parental Control" ( / then ENTER). 4 Select "TV Ratings" ( / then ENTER). 5 Select the desired rating and change the setting ( / then ENTER). PRO-1150HD/PRO-950HD Your password No.: If you forget the password When the message "Enter your four-digit password ...using buttons 0 to 9. • A confirmation screen appears. 7 Press A. 8 Press HOME MENU to exit the menu. Parental Control TV Ratings TV Ratings TV-None TV-Y TV-Y7 TV-G TV-PG Blocked TV...
..." ( / then ENTER). 3 Select "Parental Control" ( / then ENTER). 4 Select "TV Ratings" ( / then ENTER). 5 Select the desired rating and change the setting ( / then ENTER). PRO-1150HD/PRO-950HD Your password No.: If you forget the password When the message "Enter your four-digit password ...using buttons 0 to 9. • A confirmation screen appears. 7 Press A. 8 Press HOME MENU to exit the menu. Parental Control TV Ratings TV Ratings TV-None TV-Y TV-Y7 TV-G TV-PG Blocked TV...


