
Owner's Manual
Page 1
You will know how to handle the product. PIONEER cannot assume liabilities for purchasing this PIONEER product. Before using your dealer install and set up the product. Keep this manual to the customer and explain to the customer how to operate the Plasma Display properly. En English Operating Instructions ...
You will know how to handle the product. PIONEER cannot assume liabilities for purchasing this PIONEER product. Before using your dealer install and set up the product. Keep this manual to the customer and explain to the customer how to operate the Plasma Display properly. En English Operating Instructions ...
Owner's Manual
Page 2
... equipment does cause harmful interference to the monitor and unplug the power cord. Refer all other than 99.99 percent active cells. Set the unit away from liquids and small metal objects. To ensure proper ventilation, cleaning of the ventilation areas must be determined by...potentially dangerous high voltage components inside of a static image over a long period. 6. NO USER-SERVICEABLE PARTS INSIDE. Attaching the ferrite cores: Set the ferrite cores on the next page. These limits are not taken. Provide adequate space for 60 minutes to cause electric shock. In case ...
... equipment does cause harmful interference to the monitor and unplug the power cord. Refer all other than 99.99 percent active cells. Set the unit away from liquids and small metal objects. To ensure proper ventilation, cleaning of the ventilation areas must be determined by...potentially dangerous high voltage components inside of a static image over a long period. 6. NO USER-SERVICEABLE PARTS INSIDE. Attaching the ferrite cores: Set the ferrite cores on the next page. These limits are not taken. Provide adequate space for 60 minutes to cause electric shock. In case ...

Owner's Manual
Page 3
... Rules. 4iii En English IMPORTANT SAFETY INSTRUCTIONS Read before operating equipment 1. No.: PIONEER ELECTRONICS (USA) INC. Use only with a cart, stand, tripod, bracket...apparatus. 11. Heedallwarnings. 4. The appliance should be placed on the top of the set and cause product damage and/or personal injury . 17. Tilt/Stability - The ...connectors, location of Product: Plasma Display Equipment Classification: Class B Peripheral Models: PRO-1410HD We hereby declare that produce heat. 9. Unplugthisapparatusduringlightningstormsorwhen unused for the grounding electrode...
... Rules. 4iii En English IMPORTANT SAFETY INSTRUCTIONS Read before operating equipment 1. No.: PIONEER ELECTRONICS (USA) INC. Use only with a cart, stand, tripod, bracket...apparatus. 11. Heedallwarnings. 4. The appliance should be placed on the top of the set and cause product damage and/or personal injury . 17. Tilt/Stability - The ...connectors, location of Product: Plasma Display Equipment Classification: Class B Peripheral Models: PRO-1410HD We hereby declare that produce heat. 9. Unplugthisapparatusduringlightningstormsorwhen unused for the grounding electrode...
Owner's Manual
Page 4
...Tone adjustments 16 Adjusting the pedestal level (black level 17 Adjusting the colors 17 Setting the picture to suit the movie 17 Setting the picture modes according to the brightness of the room 17 SOUND Settings Menu 18 Adjusting the treble, bass and left/right balance and audio input select...Zooming up pictures 11 Adjusting the OSD controls 11 OSD (On Screen Display) Controls 12 Menu Operations 12 Setting the language for computer images ..... 22 STANDBY/ON indicator 22 Setting the Input Skip 22 Erasing the sub screen image when there is no input signal 22 Displaying the entire...
...Tone adjustments 16 Adjusting the pedestal level (black level 17 Adjusting the colors 17 Setting the picture to suit the movie 17 Setting the picture modes according to the brightness of the room 17 SOUND Settings Menu 18 Adjusting the treble, bass and left/right balance and audio input select...Zooming up pictures 11 Adjusting the OSD controls 11 OSD (On Screen Display) Controls 12 Menu Operations 12 Setting the language for computer images ..... 22 STANDBY/ON indicator 22 Setting the Input Skip 22 Erasing the sub screen image when there is no input signal 22 Displaying the entire...
Owner's Manual
Page 5
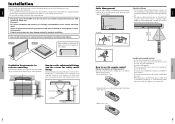
... the installer. clamp mounting hole To detach cables How to use the remote control Battery Installation and Replacement Insert the 2 "AAA" batteries, making sure to set them into a fire. • When disposing of up to approximately 30°. * The remote control operation may not function if the monitor's remote control sensor...
... the installer. clamp mounting hole To detach cables How to use the remote control Battery Installation and Replacement Insert the 2 "AAA" batteries, making sure to set them into a fire. • When disposing of up to approximately 30°. * The remote control operation may not function if the monitor's remote control sensor...
Owner's Manual
Page 6
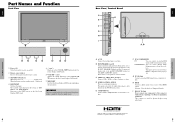
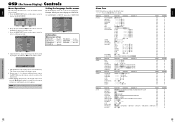
...power cord here. Lights red. r INPUT/EXIT Switches the input. Functions as the EXIT buttons in the OnScreen Display (OSD) mode. u MENU/SET Sets the On-Screen Display (OSD) mode and displays the main menu. B EXT SPEAKER L and R Connect speakers (optional) here. This connector is... E COMPONENT 1 Connect DVD's, High Definition or Laser Discs, etc. This input can be set for the details of HDMI Licensing LLC. 5 En I RS-232C (D-Sub) Never connect any component to your Pioneer installation technician. w Remote sensor window Receives the signals from a computer, etc. t and ...
...power cord here. Lights red. r INPUT/EXIT Switches the input. Functions as the EXIT buttons in the OnScreen Display (OSD) mode. u MENU/SET Sets the On-Screen Display (OSD) mode and displays the main menu. B EXT SPEAKER L and R Connect speakers (optional) here. This connector is... E COMPONENT 1 Connect DVD's, High Definition or Laser Discs, etc. This input can be set for the details of HDMI Licensing LLC. 5 En I RS-232C (D-Sub) Never connect any component to your Pioneer installation technician. w Remote sensor window Receives the signals from a computer, etc. t and ...
Owner's Manual
Page 7
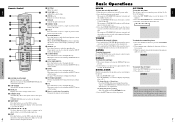
... monitor. !6 COMPONENT1 Press this button to show a couple of pictures in the picture-in a row. 2. r SCREEN SIZE Automatically detects the signal and sets the aspect ratio. y CURSOR (L / M Use these buttons to select the input directly. En English Basic Operations POWER To turn off ) Press the... LMᮤ ᮣ buttons. 2. SCREEN SIZE button is not active for all signals. !9 PICTURE MEMORY Switches sequentially between picture memory settings 1 to 6. @0 PC1 Press this button during the display of the main unit is still supplied to restore. Press this button to ...
... monitor. !6 COMPONENT1 Press this button to show a couple of pictures in the picture-in a row. 2. r SCREEN SIZE Automatically detects the signal and sets the aspect ratio. y CURSOR (L / M Use these buttons to select the input directly. En English Basic Operations POWER To turn off ) Press the... LMᮤ ᮣ buttons. 2. SCREEN SIZE button is not active for all signals. !9 PICTURE MEMORY Switches sequentially between picture memory settings 1 to 6. @0 PC1 Press this button during the display of the main unit is still supplied to restore. Press this button to ...
Owner's Manual
Page 8
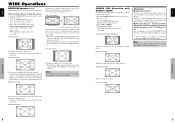
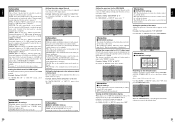
... size screen 8 En English SCREEN SIZE Operation with a vertical frequency of 60 Hz and horizontal frequency of 31.7 (31.0) kHz are input Select an appropriate setting for theater size (wide) movies, etc. 2.35:1 size screen Ł Original image Information is lost on the left and right margins. • This feature is...
... size screen 8 En English SCREEN SIZE Operation with a vertical frequency of 60 Hz and horizontal frequency of 31.7 (31.0) kHz are input Select an appropriate setting for theater size (wide) movies, etc. 2.35:1 size screen Ł Original image Information is lost on the left and right margins. • This feature is...
Owner's Manual
Page 9
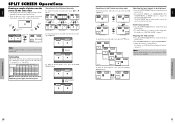
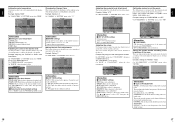
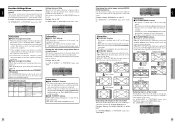
... Use the ZOOM ( or )button to your preference. Adjusting the OSD controls 1. Adjust the setting to enlage the picture. Note: During enhanced split screen, some functions of OSD controls are not always of the same height. Information Split ...the cursor ᮤ ᮣ or ᮢ button. For details, see "OSD (On Screen Display) Controls" on page 12. Press the MENU/SET button to be displayed 1. SPLIT SCREEN Operations SPLIT SCREEN Operations 10 11 En En VIDEO1 PC1DSUB B A ACTIVE SELECT button VIDEO1 PC1DSUB B A Selecting ...
... Use the ZOOM ( or )button to your preference. Adjusting the OSD controls 1. Adjust the setting to enlage the picture. Note: During enhanced split screen, some functions of OSD controls are not always of the same height. Information Split ...the cursor ᮤ ᮣ or ᮢ button. For details, see "OSD (On Screen Display) Controls" on page 12. Press the MENU/SET button to be displayed 1. SPLIT SCREEN Operations SPLIT SCREEN Operations 10 11 En En VIDEO1 PC1DSUB B A ACTIVE SELECT button VIDEO1 PC1DSUB B A Selecting ...
Owner's Manual
Page 10
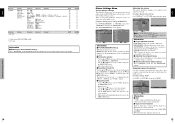
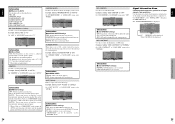
...sub menu or item. EXIT RETURN 4. French ESPAÑOL ....... The adjustments or the settings that are stored in memory. The change the setting of seven languages. Press the MENU/SET button on the remote control to highlight the menu you change it again. 6. SEL. ... items. 1. PICTURE PICTURE MEMORY : OFF CONTRAST BRIGHTNESS SHARPNESS COLOR TINT R G DNR : LOW COLOR TEMP. : MIDDLE GAMMA : 2.1 LOW TONE : AUTO SET UP LEVEL : 0 COLOR MGT PURECINEMA : ON AV SELECTION : DYNAMIC SEL. Note: The main menu disappears by using the cursor buttons ᮤ ᮣ...
...sub menu or item. EXIT RETURN 4. French ESPAÑOL ....... The adjustments or the settings that are stored in memory. The change the setting of seven languages. Press the MENU/SET button on the remote control to highlight the menu you change it again. 6. SEL. ... items. 1. PICTURE PICTURE MEMORY : OFF CONTRAST BRIGHTNESS SHARPNESS COLOR TINT R G DNR : LOW COLOR TEMP. : MIDDLE GAMMA : 2.1 LOW TONE : AUTO SET UP LEVEL : 0 COLOR MGT PURECINEMA : ON AV SELECTION : DYNAMIC SEL. Note: The main menu disappears by using the cursor buttons ᮤ ᮣ...
Owner's Manual
Page 11
... MEMORY : OFF CONTRAST BRIGHTNESS SHARPNESS COLOR TINT R G DNR : LOW COLOR TEMP. : MIDDLE CONTRAST 10 GAMMA : 2.1 LOW TONE : AUTO SET UP LEVEL : 0 COLOR MGT PURECINEMA : ON AV SELECTION : DYNAMIC SEL. SHARPNESS: Changes the picture's sharpness. Adjust for Digital Noise Reduction.... * This function reduces noise in the picture Use these settings when necessary. EXIT RETURN DNR : HIGH Information Ⅵ DNR * "DNR" stands for natural colored skin, background, etc. Ⅵ...
... MEMORY : OFF CONTRAST BRIGHTNESS SHARPNESS COLOR TINT R G DNR : LOW COLOR TEMP. : MIDDLE CONTRAST 10 GAMMA : 2.1 LOW TONE : AUTO SET UP LEVEL : 0 COLOR MGT PURECINEMA : ON AV SELECTION : DYNAMIC SEL. SHARPNESS: Changes the picture's sharpness. Adjust for Digital Noise Reduction.... * This function reduces noise in the picture Use these settings when necessary. EXIT RETURN DNR : HIGH Information Ⅵ DNR * "DNR" stands for natural colored skin, background, etc. Ⅵ...
Owner's Manual
Page 12
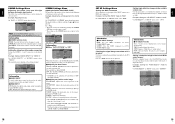
.... PICTURE PICTURE MEMORY : OFF CONTRAST BRIGHTNESS SHARPNESS COLOR TINT R G DNR : LOW COLOR TEMP. : MIDDLE GAMMA : 2.1 LOW TONE : AUTO SET UP LEVEL : 0 COLOR MGT PURECINEMA : OFF AV SELECTION : DYNAMIC SEL. PICTURE PICTURE MEMORY : OFF CONTRAST BRIGHTNESS SHARPNESS COLOR TINT R G DNR...EXIT RETURN Information Ⅵ PURECINEMA ON: Automatic discrimination of "PICTURE" menu, select "OFF". EXIT RETURN Information Ⅵ Setting the color temperature LOW: Redder MIDDLE LOW: Slightly red MIDDLE: Standard (slightly bluer) HIGH: Bluer Adjusting the color to...
.... PICTURE PICTURE MEMORY : OFF CONTRAST BRIGHTNESS SHARPNESS COLOR TINT R G DNR : LOW COLOR TEMP. : MIDDLE GAMMA : 2.1 LOW TONE : AUTO SET UP LEVEL : 0 COLOR MGT PURECINEMA : OFF AV SELECTION : DYNAMIC SEL. PICTURE PICTURE MEMORY : OFF CONTRAST BRIGHTNESS SHARPNESS COLOR TINT R G DNR...EXIT RETURN Information Ⅵ PURECINEMA ON: Automatic discrimination of "PICTURE" menu, select "OFF". EXIT RETURN Information Ⅵ Setting the color temperature LOW: Redder MIDDLE LOW: Slightly red MIDDLE: Standard (slightly bluer) HIGH: Bluer Adjusting the color to...
Owner's Manual
Page 13
...correct image automatically. 1080I: Standard digital broadcasts 1035I: Japanese "High Vision" signal format 540P: Special Digital broadcasts (for example : DTC100) Setting a computer image to RGB and can adjust them. Ⅵ Adjusting the Auto Picture ON: The CLOCK, PHASE and Position adjustments are not... Adjusts the vertical size of the image. (Except for flickering. OSD (On Screen Display) Controls 18 En English SET UP Settings Menu Setting the BNC connectors Select whether to set whether the number of vertical lines of the 5 BNC connectors to "VIDEO 2" On "AUDIO INPUT1" of the ...
...correct image automatically. 1080I: Standard digital broadcasts 1035I: Japanese "High Vision" signal format 540P: Special Digital broadcasts (for example : DTC100) Setting a computer image to RGB and can adjust them. Ⅵ Adjusting the Auto Picture ON: The CLOCK, PHASE and Position adjustments are not... Adjusts the vertical size of the image. (Except for flickering. OSD (On Screen Display) Controls 18 En English SET UP Settings Menu Setting the BNC connectors Select whether to set whether the number of vertical lines of the 5 BNC connectors to "VIDEO 2" On "AUDIO INPUT1" of the ...
Owner's Manual
Page 14
...on the background when there is being input The color displayed on the screen. EXIT RETURN Information Ⅵ HDMI SET UP settings COLOR1: When connected to "TOP CENTER" On "OSD ADJ." Setting the video signal format Use these 8 modes must be compressed horizontally. SECAM: This is the standard format used ...ALL RESET : OFF SEL. AUTO: Select the suitable mode for a motion image from 0 to page 13 for the signal transmitted via the VIDEO3 terminal. Set to "AUTO" On "S1/S2" of the black (the gray level) for video signals. WIDE4: When an 1280 dot ן768 line...
...on the background when there is being input The color displayed on the screen. EXIT RETURN Information Ⅵ HDMI SET UP settings COLOR1: When connected to "TOP CENTER" On "OSD ADJ." Setting the video signal format Use these 8 modes must be compressed horizontally. SECAM: This is the standard format used ...ALL RESET : OFF SEL. AUTO: Select the suitable mode for a motion image from 0 to page 13 for the signal transmitted via the VIDEO3 terminal. Set to "AUTO" On "S1/S2" of the black (the gray level) for video signals. WIDE4: When an 1280 dot ן768 line...
Owner's Manual
Page 15
...of "FUNCTION" menu, select "BTM LEFT". EXIT RETURN 23 En Horizontal and/or Operate the keyboard or vertical synchronizing mouse. Example: Setting "PICTURE FREEZE" to "OFF" On "SUB. EXIT RETURN Information Ⅵ PICTURE FREEZE Function * This feature is available only for...SUB. P DETECT : OFF ZOOM NAV : BTM LEFT PICTURE FREEZE : S BY S1 LONG LIFE : MANUAL SEL. English Function Settings Menu Setting the power management for computer images This energy-saving (power management) function automatically reduces the monitor's power consumption if no operation is ...
...of "FUNCTION" menu, select "BTM LEFT". EXIT RETURN 23 En Horizontal and/or Operate the keyboard or vertical synchronizing mouse. Example: Setting "PICTURE FREEZE" to "OFF" On "SUB. EXIT RETURN Information Ⅵ PICTURE FREEZE Function * This feature is available only for...SUB. P DETECT : OFF ZOOM NAV : BTM LEFT PICTURE FREEZE : S BY S1 LONG LIFE : MANUAL SEL. English Function Settings Menu Setting the power management for computer images This energy-saving (power management) function automatically reduces the monitor's power consumption if no operation is ...
Owner's Manual
Page 16
... to reduce the brightness of the screen to display a white screen. ADJ. EXIT RETURN Information Ⅵ OSD CONTRAST settings NORMAL: OSD brightness is displayed. Signal Information Menu Checking the frequencies, polarities of input signals, and resolution Use this to... check the frequencies and polarities of "LONG LIFE" menu, select "WHITE". The "SIGNAL INFORMATION" is set to ON, a white vertical bar moves repeatedly from a computer, etc. SIGNAL INFORMATION H. FREQUENCY : 48.4kHz V. POLARITY : NEGATIVE : NEGATIVE...
... to reduce the brightness of the screen to display a white screen. ADJ. EXIT RETURN Information Ⅵ OSD CONTRAST settings NORMAL: OSD brightness is displayed. Signal Information Menu Checking the frequencies, polarities of input signals, and resolution Use this to... check the frequencies and polarities of "LONG LIFE" menu, select "WHITE". The "SIGNAL INFORMATION" is set to ON, a white vertical bar moves repeatedly from a computer, etc. SIGNAL INFORMATION H. FREQUENCY : 48.4kHz V. POLARITY : NEGATIVE : NEGATIVE...
Owner's Manual
Page 18
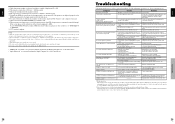
...; Are the tint and colors properly adjusted? • Is the computer's power turned on the remote control and adjust properly. • Set to the proper resolution. • Check the input signal. • Promptly switch off mode? • Is the position adjustment appropriate?... a resolution of International Business Machines, Inc. Remote control operates erroneously. This will not affect performance. • Is a connected component set automatically. Picture is produced. Cable interconnections. It is recommended that is capable of displaying 852ן480. *2 This signal ...
...; Are the tint and colors properly adjusted? • Is the computer's power turned on the remote control and adjust properly. • Set to the proper resolution. • Check the input signal. • Promptly switch off mode? • Is the position adjustment appropriate?... a resolution of International Business Machines, Inc. Remote control operates erroneously. This will not affect performance. • Is a connected component set automatically. Picture is produced. Cable interconnections. It is recommended that is capable of displaying 852ן480. *2 This signal ...

Owner's Manual
Page 19
... Hz) *2 The 5-BNC connectors are used as PC2 and COMPONENT2 input. The problem may not be an inconsistency with standards from the source equipment (DVD, Set-top box, etc...). If you do experience such a problem please contact your dealer and also the manufacturer of them under "BNC INPUT". *3 HDMI input signals...
... Hz) *2 The 5-BNC connectors are used as PC2 and COMPONENT2 input. The problem may not be an inconsistency with standards from the source equipment (DVD, Set-top box, etc...). If you do experience such a problem please contact your dealer and also the manufacturer of them under "BNC INPUT". *3 HDMI input signals...


