Owner's Manual
Page 4
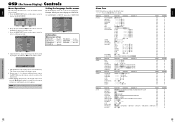
...View 4 Rear View/ Terminal Board 5 Remote Control 6 Basic Operations 7 POWER 7 To turn the unit ON and OFF 7 VOLUME 7 To adjust the sound volume 7 MUTING 7 To mute the sound 7 DISPLAY 7 To check the settings 7 DIGITAL ZOOM 7 OFF TIMER 7 To set the off timer 7 To check the remaining time 7 To cancel ...Adjusting the colors 17 Setting the picture to suit the movie 17 Setting the picture modes according to the brightness of the room 17 SOUND Settings Menu 18 Adjusting the treble, bass and left/right balance and audio input select 18 Setting the allocation of the audio connectors...
...View 4 Rear View/ Terminal Board 5 Remote Control 6 Basic Operations 7 POWER 7 To turn the unit ON and OFF 7 VOLUME 7 To adjust the sound volume 7 MUTING 7 To mute the sound 7 DISPLAY 7 To check the settings 7 DIGITAL ZOOM 7 OFF TIMER 7 To set the off timer 7 To check the remaining time 7 To cancel ...Adjusting the colors 17 Setting the picture to suit the movie 17 Setting the picture modes according to the brightness of the room 17 SOUND Settings Menu 18 Adjusting the treble, bass and left/right balance and audio input select 18 Setting the allocation of the audio connectors...
Owner's Manual
Page 6
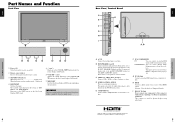
.... WARNING The Power on/off . Connect the (positive) speaker wire to the EXT SPEAKER terminal and the (negative) speaker wire to allot them from the SOUND menu screen. C VIDEO1, 2, 3 (BNC, RCA, S-Video) Connect VCR's, DVD's or Video Cameras, etc. G PC1 (D-Sub) Connect an analog RGB ...component source (see page 19). See page 30 for use with a HDMI output. I RS-232C (D-Sub) Never connect any component to your Pioneer installation technician. w Remote sensor window Receives the signals from a computer, etc. Maintain the correct polarity. Set which video image to the EXT SPEAKER...
.... WARNING The Power on/off . Connect the (positive) speaker wire to the EXT SPEAKER terminal and the (negative) speaker wire to allot them from the SOUND menu screen. C VIDEO1, 2, 3 (BNC, RCA, S-Video) Connect VCR's, DVD's or Video Cameras, etc. G PC1 (D-Sub) Connect an analog RGB ...component source (see page 19). See page 30 for use with a HDMI output. I RS-232C (D-Sub) Never connect any component to your Pioneer installation technician. w Remote sensor window Receives the signals from a computer, etc. Maintain the correct polarity. Set which video image to the EXT SPEAKER...
Owner's Manual
Page 7
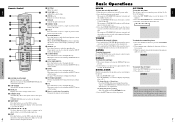
...the button is still supplied to turn off . A slight current is not pressed for a long period of the monitor. English o VOLUME (+ /-) Adjusts the sound volume. !0 ZOOM (+ /-) Enlarges or reduces the image. !1 SINGLE Cancels the split screen mode. !2 SIDE BY SIDE Press this button to show a couple ... turns off timer: 1. These inputs can be selected using the INPUT button on the unit) to the monitor. VOLUME To adjust the sound volume: 1. Press the OFF TIMER button to access the OSD controls. Press the OFF TIMER button twice in -picture mode. !4 ACTIVE...
...the button is still supplied to turn off . A slight current is not pressed for a long period of the monitor. English o VOLUME (+ /-) Adjusts the sound volume. !0 ZOOM (+ /-) Enlarges or reduces the image. !1 SINGLE Cancels the split screen mode. !2 SIDE BY SIDE Press this button to show a couple ... turns off timer: 1. These inputs can be selected using the INPUT button on the unit) to the monitor. VOLUME To adjust the sound volume: 1. Press the OFF TIMER button to access the OSD controls. Press the OFF TIMER button twice in -picture mode. !4 ACTIVE...
Owner's Manual
Page 10
...;→TOP RIGHT←→BTM LEFT←→BTM CENTER←→BTM RIGHT YES ON←→OFF - MAIN MENU PICTURE SET UP SOUND FUNCTION SCREEN SIGNAL INFO. EXIT RETURN 4. EXIT RETURN Information Ⅵ Language settings ENGLISH ........ German FRANÇAIS ...... Swedish У Russian CONTRAST 10...the bar at the bottom of the screen, press the ᮤ or ᮣ button within 5 seconds. Main menu PICTURE Main menu SOUND Main menu SCREEN Sub menu PICTURE MEMORY CONTRAST BRIGHTNESS SHARPNESS COLOR TINT DNR COLOR TEMP. REFERENCE 15 15 15 15 15 15 15 16 16...
...;→TOP RIGHT←→BTM LEFT←→BTM CENTER←→BTM RIGHT YES ON←→OFF - MAIN MENU PICTURE SET UP SOUND FUNCTION SCREEN SIGNAL INFO. EXIT RETURN 4. EXIT RETURN Information Ⅵ Language settings ENGLISH ........ German FRANÇAIS ...... Swedish У Russian CONTRAST 10...the bar at the bottom of the screen, press the ᮤ or ᮣ button within 5 seconds. Main menu PICTURE Main menu SOUND Main menu SCREEN Sub menu PICTURE MEMORY CONTRAST BRIGHTNESS SHARPNESS COLOR TINT DNR COLOR TEMP. REFERENCE 15 15 15 15 15 15 15 16 16...
Owner's Manual
Page 13
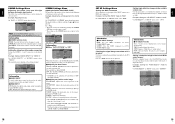
...On "AUDIO INPUT1" of "SET UP" menu, select "RGB". Example: Setting the "HD SELECT" mode to "RGB" On "BNC INPUT" of "SOUND" menu, select "VIDEO2". BASS TREBLE BALANCE AUDIO INPUT1 AUDIO INPUT2 AUDIO INPUT3 HDMI INPUT SEL. OFF: Disables the digital audio input signal. S I Z.... 1080I: Standard digital broadcasts 1035I: Japanese "High Vision" signal format 540P: Special Digital broadcasts (for a moving pictures on the SOUND menu correctly. The mode switches as (video) mode, wide mode or digital broadcast. OFF: The CLOCK, PHASE and Position adjustments ...
...On "AUDIO INPUT1" of "SET UP" menu, select "RGB". Example: Setting the "HD SELECT" mode to "RGB" On "BNC INPUT" of "SOUND" menu, select "VIDEO2". BASS TREBLE BALANCE AUDIO INPUT1 AUDIO INPUT2 AUDIO INPUT3 HDMI INPUT SEL. OFF: Disables the digital audio input signal. S I Z.... 1080I: Standard digital broadcasts 1035I: Japanese "High Vision" signal format 540P: Special Digital broadcasts (for a moving pictures on the SOUND menu correctly. The mode switches as (video) mode, wide mode or digital broadcast. OFF: The CLOCK, PHASE and Position adjustments ...
Owner's Manual
Page 14
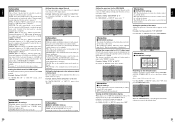
..., select "ON", then press the MENU/SET button. EXIT RETURN ALL RESET SETTING NOW When the "SETTING NOW" screen disappears, then all the settings (PICTURE, SOUND, SCREEN, SET UP, etc) to "TOP CENTER" On "OSD ADJ." AUTO: The color systems are restored to the S1/S2 video signal. SET UP LANGUAGE...
..., select "ON", then press the MENU/SET button. EXIT RETURN ALL RESET SETTING NOW When the "SETTING NOW" screen disappears, then all the settings (PICTURE, SOUND, SCREEN, SET UP, etc) to "TOP CENTER" On "OSD ADJ." AUTO: The color systems are restored to the S1/S2 video signal. SET UP LANGUAGE...
Owner's Manual
Page 18
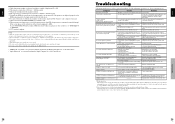
...interference. Incorrect RGB connector pin connections. • Are the tint and colors properly adjusted? • Is the computer's power turned on the SOUND menu correctly. • Adjust picture control as needed . Check pin assignments and connections. • Adjust the tint and color (under PICTURE).... frequency greater than the aforementioned is input. • If you may sometimes be unstable (jumpy). Tint is produced. Image is noisy. Sound is too large or too small. See*1. • Prompty switch off 5 seconds after powering on Green", set the RGB mode prepared for...
...interference. Incorrect RGB connector pin connections. • Are the tint and colors properly adjusted? • Is the computer's power turned on the SOUND menu correctly. • Adjust picture control as needed . Check pin assignments and connections. • Adjust the tint and color (under PICTURE).... frequency greater than the aforementioned is input. • If you may sometimes be unstable (jumpy). Tint is produced. Image is noisy. Sound is too large or too small. See*1. • Prompty switch off 5 seconds after powering on Green", set the RGB mode prepared for...

Owner's Manual
Page 19
...;1*1 BNC (Y, PB[CB], PR[CR])ן1*1, *2 HDMI connector*3 Audio Stereo RCAן3 (Selectable) RS-232C D-sub 9-pinן1 Sound output 9W+9W at 6 ohm Power Supply AC120V 60Hz Current Rating 6.7A (maximum) Power Consumption 540W (typical) (standby 0.9W) Dimensions 59.1 (W)ן35...
...;1*1 BNC (Y, PB[CB], PR[CR])ן1*1, *2 HDMI connector*3 Audio Stereo RCAן3 (Selectable) RS-232C D-sub 9-pinן1 Sound output 9W+9W at 6 ohm Power Supply AC120V 60Hz Current Rating 6.7A (maximum) Power Consumption 540W (typical) (standby 0.9W) Dimensions 59.1 (W)ן35...


