Owner's Manual
Page 3
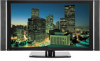
...with the instructions, may cause undesired operation. However, there is connected. - If this device must accept any interference received, including interference that interference will expose you to lead, a chemical known to comply with Canadian ICES-003. Wash ...IN THE REAR. Product Name: Plasma Display System (Plasma Display) (Media Receiver) Model Number: PRO-1130HD PRO-930HD (PRO-506PU) (PRO-436PU) (PRO-R06U) (PRO-R06U) Product Category: Class B Personal Computers & Peripherals Responsible Party Name: PIONEER ELECTRONICS SERVICE, INC. Address: 1925 E. D8-10-1-2_En CAUTION: ...
...with the instructions, may cause undesired operation. However, there is connected. - If this device must accept any interference received, including interference that interference will expose you to lead, a chemical known to comply with Canadian ICES-003. Wash ...IN THE REAR. Product Name: Plasma Display System (Plasma Display) (Media Receiver) Model Number: PRO-1130HD PRO-930HD (PRO-506PU) (PRO-436PU) (PRO-R06U) (PRO-R06U) Product Category: Class B Personal Computers & Peripherals Responsible Party Name: PIONEER ELECTRONICS SERVICE, INC. Address: 1925 E. D8-10-1-2_En CAUTION: ...
Owner's Manual
Page 4
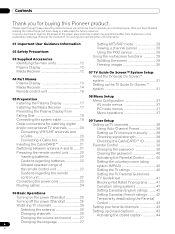
...same. 01 Important User Guidance Information 02 Safety Precautions 03 Supplied Accessories Identifying the main units 12 Plasma Display 12 Media Receiver 12 04 Part Names Plasma Display 13 Media Receiver 14 Remote control unit 16 Setting MTS/SAP mode 28 Viewing a channel banner 29 Using the POD service 29...22 Allowed operation range of the power plug and power outlet may sometimes differ from that shown in a safe place for buying this Pioneer product. In some countries or regions, the shape of the remote control unit 22 Cautions regarding the remote control unit 22 Connecting ...
...same. 01 Important User Guidance Information 02 Safety Precautions 03 Supplied Accessories Identifying the main units 12 Plasma Display 12 Media Receiver 12 04 Part Names Plasma Display 13 Media Receiver 14 Remote control unit 16 Setting MTS/SAP mode 28 Viewing a channel banner 29 Using the POD service 29...22 Allowed operation range of the power plug and power outlet may sometimes differ from that shown in a safe place for buying this Pioneer product. In some countries or regions, the shape of the remote control unit 22 Cautions regarding the remote control unit 22 Connecting ...
Owner's Manual
Page 7
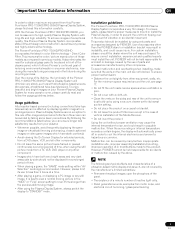
... Media Receiver. • Do not invert the product. Over the course of its lowest suction setting. • Do not place the product on your plasma: • Whenever possible, avoid frequently displaying the same image or virtually still moving image. • After using a vacuum cleaner set to its lifetime, the luminosity of the Pioneer PRO-1130HD/PRO...
... Media Receiver. • Do not invert the product. Over the course of its lowest suction setting. • Do not place the product on your plasma: • Whenever possible, avoid frequently displaying the same image or virtually still moving image. • After using a vacuum cleaner set to its lifetime, the luminosity of the Pioneer PRO-1130HD/PRO...
Owner's Manual
Page 8
... period of time • If you clean the surface of ultra-precision technology and undergo individual quality control. Use the handles as pesticide. Pioneer plasma display panels contain a very large number of extremely single handle. Also note that time. 8 En You may be adversely affected. Depending... and VCR close up or during single dusty or hard cloth or if you rub the screen hard, the surface of the Media Receiver becomes high. fine pixels and these chemicals may result in quality deterioration or equipment at that the rotation speed of the cooling fan...
... period of time • If you clean the surface of ultra-precision technology and undergo individual quality control. Use the handles as pesticide. Pioneer plasma display panels contain a very large number of extremely single handle. Also note that time. 8 En You may be adversely affected. Depending... and VCR close up or during single dusty or hard cloth or if you rub the screen hard, the surface of the Media Receiver becomes high. fine pixels and these chemicals may result in quality deterioration or equipment at that the rotation speed of the cooling fan...
Owner's Manual
Page 12
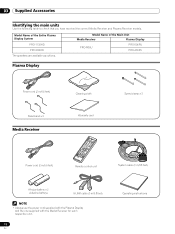
... the Entire Plasma Display System PRO-1130HD PRO-930HD Model Name of the Main Unit Media Receiver Plasma Display PRO-R06U PRO-506PU PRO-436PU The speakers are available as options. 03 Supplied Accessories Supplied Accessories Identifying the main units Use the following table to check that you have received the correct Media Receiver and Plasma Receiver models. Plasma Display Power cord...
... the Entire Plasma Display System PRO-1130HD PRO-930HD Model Name of the Main Unit Media Receiver Plasma Display PRO-R06U PRO-506PU PRO-436PU The speakers are available as options. 03 Supplied Accessories Supplied Accessories Identifying the main units Use the following table to check that you have received the correct Media Receiver and Plasma Receiver models. Plasma Display Power cord...
Owner's Manual
Page 14
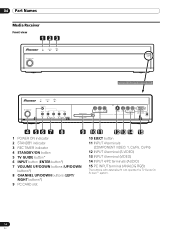
04 Part Names Media Receiver Front view 123 STANDBY/ON REC ON STANDBY TIMER PULL OPEN Pull this section to open the door. STANDBY/ON REC ON STANDBY TIMER TV ...
04 Part Names Media Receiver Front view 123 STANDBY/ON REC ON STANDBY TIMER PULL OPEN Pull this section to open the door. STANDBY/ON REC ON STANDBY TIMER TV ...
Owner's Manual
Page 17
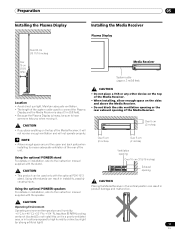
... manual supplied with the speaker. Using the optional PIONEER speakers For details on the sides and above the Media Receiver. • Do not block the side ventilation opening or the rear exhaust opening CAUTION Placing the Media Receiver in the vertical position can result in instability, ...adequate ventilation. • The length of the system cable used only with the optional PDK-1013 stand. Using the optional PIONEER stand For details on the top of the Media Receiver. STANDBY/ON REC ON STANDBY TIMER Over 5 cm (2 inches) PULL OPEN Over 5 cm (2 inches) Over 5 cm...
... manual supplied with the speaker. Using the optional PIONEER speakers For details on the sides and above the Media Receiver. • Do not block the side ventilation opening or the rear exhaust opening CAUTION Placing the Media Receiver in the vertical position can result in instability, ...adequate ventilation. • The length of the system cable used only with the optional PDK-1013 stand. Using the optional PIONEER stand For details on the top of the Media Receiver. STANDBY/ON REC ON STANDBY TIMER Over 5 cm (2 inches) PULL OPEN Over 5 cm (2 inches) Over 5 cm...

Owner's Manual
Page 19
... Display (rear view) SYSTEM CABLE WHITE BLACK SYSTEM CABLE WHITE BLACK (BLACK) For details on optional PIONEER speaker installation, refer to the instruction manual that came with the speaker. (WHITE) Connecting the system cable to the Media Receiver Media Receiver (rear view) MONITOR OUT ANT/ CABLE A IN INPUT 2 G-LINK INPUT 3 S400 (TS) R-AUDIO-L OPTICAL DIGITAL...
... Display (rear view) SYSTEM CABLE WHITE BLACK SYSTEM CABLE WHITE BLACK (BLACK) For details on optional PIONEER speaker installation, refer to the instruction manual that came with the speaker. (WHITE) Connecting the system cable to the Media Receiver Media Receiver (rear view) MONITOR OUT ANT/ CABLE A IN INPUT 2 G-LINK INPUT 3 S400 (TS) R-AUDIO-L OPTICAL DIGITAL...
Owner's Manual
Page 20
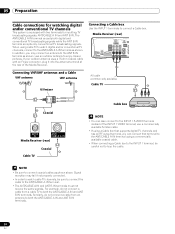
...of the INPUT 1 VIDEO terminal; Similarly, do not connect a cable from an antenna to the INPUT 1 S-VIDEO terminal instead of the Media Receiver. use an outdoor antenna to loop the cable. When using a commercially available coaxial cable. • When connecting a Cable box to the ... shown. NOTE • Be sure to connect a Cable box. Connecting a Cable box Use the INPUT 1 terminals to connect coaxial cables as shown above. Media Receiver (rear) MONITOR OUT ANT/ CABLE A IN INPUT 2 G-LINK INPUT 3 I N OUT CONTROL ANT B IN SERVICE ONLY R-AUDIO-L VIDEO S-VIDEO INPUT ...
...of the INPUT 1 VIDEO terminal; Similarly, do not connect a cable from an antenna to the INPUT 1 S-VIDEO terminal instead of the Media Receiver. use an outdoor antenna to loop the cable. When using a commercially available coaxial cable. • When connecting a Cable box to the ... shown. NOTE • Be sure to connect a Cable box. Connecting a Cable box Use the INPUT 1 terminals to connect coaxial cables as shown above. Media Receiver (rear) MONITOR OUT ANT/ CABLE A IN INPUT 2 G-LINK INPUT 3 I N OUT CONTROL ANT B IN SERVICE ONLY R-AUDIO-L VIDEO S-VIDEO INPUT ...
Owner's Manual
Page 21
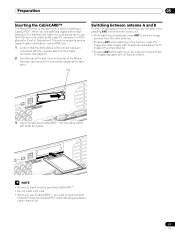
...HTML text. 1 Confirm that the ANT/CABLE A IN terminal has been connected with a slot for Point of Deployment. Preparation 05 Inserting the CableCARD™ The Media Receiver is equipped with the coaxial cable from the other antenna. • Pressing ANT while watching in the 2-screen mode with two TV images displayed will...antenna. • Pressing ANT while watching in the 2-screen mode (TV image and video image) with TV selected will display the TV image of the Media Receiver, and remove the cover while releasing the tab's latch. the POD stands for inserting a CableCARD™.
...HTML text. 1 Confirm that the ANT/CABLE A IN terminal has been connected with a slot for Point of Deployment. Preparation 05 Inserting the CableCARD™ The Media Receiver is equipped with the coaxial cable from the other antenna. • Pressing ANT while watching in the 2-screen mode with two TV images displayed will...antenna. • Pressing ANT while watching in the 2-screen mode (TV image and video image) with TV selected will display the TV image of the Media Receiver, and remove the cover while releasing the tab's latch. the POD stands for inserting a CableCARD™.
Owner's Manual
Page 23
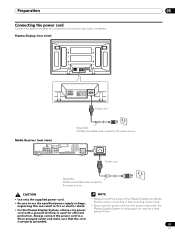
... • Use only the supplied power cord. • Be sure to be used for a long period of the Plasma Display and Media Receiver when connecting or disconnecting power cords. • Disconnect the power cord from the power outlet when the Plasma Display System is properly grounded..... Always connect the power cord to a three-pronged outlet and make sure that the cord is not going to use the specified power supply voltage; Media Receiver (rear view) MONITOR OUT ANT/ CABLE A IN INPUT 2 G-LINK INPUT 3 S400 (TS) R-AUDIO-L OPTICAL DIGITAL OUT SUB WOOFER Cable CARD I N OUT CONTROL ...
... • Use only the supplied power cord. • Be sure to be used for a long period of the Plasma Display and Media Receiver when connecting or disconnecting power cords. • Disconnect the power cord from the power outlet when the Plasma Display System is properly grounded..... Always connect the power cord to a three-pronged outlet and make sure that the cord is not going to use the specified power supply voltage; Media Receiver (rear view) MONITOR OUT ANT/ CABLE A IN INPUT 2 G-LINK INPUT 3 S400 (TS) R-AUDIO-L OPTICAL DIGITAL OUT SUB WOOFER Cable CARD I N OUT CONTROL ...
Owner's Manual
Page 25
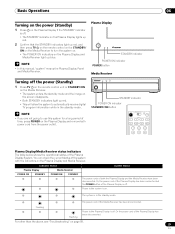
... Display is in the standby mode. NOTE • In this system for a long period of time, press POWER on the Plasma Display and Media Receiver light up blue. You can check the current status of both power cord from the power outlet. The system is off. Or the power cord...of the system with the indicators on . NOTE • If you are not going to use this manual, "system" means the Plasma Display Panel and Media Receiver. For other than the above, see "Troubleshooting" on the screen disappears. • Both STANDBY indicators light up red. • This will allow the system...
... Display is in the standby mode. NOTE • In this system for a long period of time, press POWER on the Plasma Display and Media Receiver light up blue. You can check the current status of both power cord from the power outlet. The system is off. Or the power cord...of the system with the indicators on . NOTE • If you are not going to use this manual, "system" means the Plasma Display Panel and Media Receiver. For other than the above, see "Troubleshooting" on the screen disappears. • Both STANDBY indicators light up red. • This will allow the system...

Owner's Manual
Page 26
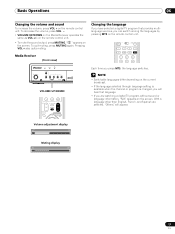
...(for cable TV), press 1, 0, • (dot), 0, 0, then 1. To decrease the channel number, press CH -. • CHANNEL UP/DOWN on the Media Receiver operates the same as necessary when in those channels. Using 0 - 9 and • (dot) on the remote control unit Select channels directly by TV stations as...the remote control unit to select antenna A or B. • Make this selection depending on the connections to the antenna input terminals on the Media Receiver (page 20). NOTE • After entering a channel or subchannel number, you may see "Setting up TV channels that you can watch ...
...(for cable TV), press 1, 0, • (dot), 0, 0, then 1. To decrease the channel number, press CH -. • CHANNEL UP/DOWN on the Media Receiver operates the same as necessary when in those channels. Using 0 - 9 and • (dot) on the remote control unit Select channels directly by TV stations as...the remote control unit to select antenna A or B. • Make this selection depending on the connections to the antenna input terminals on the Media Receiver (page 20). NOTE • After entering a channel or subchannel number, you may see "Setting up TV channels that you can watch ...
Owner's Manual
Page 27
...selected a digital TV program that language. • If you can switch among the languages by pressing MTS on the remote control unit. Media Receiver (front view) STANDBY/ON REC ON STANDBY TIMER TV GUIDE ENTER DOWN UP LEFT RIGHT INPUT DOWN UP VOLUME DOWN UP CHANNEL HOM PC...the volume, press VOL -. • VOLUME UP/DOWN on the remote control unit. • To mute the sound output, press MUTING. on the Media Receiver operates the same as VOL +/- " " appears on the current broadcast. • If the language selected through language setting is available when the channel ...
...selected a digital TV program that language. • If you can switch among the languages by pressing MTS on the remote control unit. Media Receiver (front view) STANDBY/ON REC ON STANDBY TIMER TV GUIDE ENTER DOWN UP LEFT RIGHT INPUT DOWN UP VOLUME DOWN UP CHANNEL HOM PC...the volume, press VOL -. • VOLUME UP/DOWN on the remote control unit. • To mute the sound output, press MUTING. on the Media Receiver operates the same as VOL +/- " " appears on the current broadcast. • If the language selected through language setting is available when the channel ...
Owner's Manual
Page 38
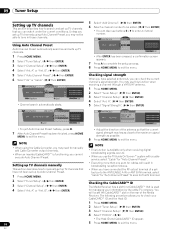
... Maximum: 100 Current: 100 xxxxxxxxxxxxxxxxxxxxx xxxxxxxxxxxxxxxxxxxxx xxxxxxxxxxxxxxxxxxxxx Home Menu Exit • Adjust the direction of the Media Receiver. NOTE • This function is available only when receiving digital broadcasting signals over air. • When you use the TV Guide On Screen™ system ...halfway, press D. 7 After Auto Channel Preset has been finished, press HOME MENU to exit the menu. Checking the CableCARD™ ID The Media Receiver has a slot for managing your CableCARD™ ID and the Host ID. 1 Press HOME MENU. 2 Select "Tuner Setup". ( / then...
... Maximum: 100 Current: 100 xxxxxxxxxxxxxxxxxxxxx xxxxxxxxxxxxxxxxxxxxx xxxxxxxxxxxxxxxxxxxxx Home Menu Exit • Adjust the direction of the Media Receiver. NOTE • This function is available only when receiving digital broadcasting signals over air. • When you use the TV Guide On Screen™ system ...halfway, press D. 7 After Auto Channel Preset has been finished, press HOME MENU to exit the menu. Checking the CableCARD™ ID The Media Receiver has a slot for managing your CableCARD™ ID and the Host ID. 1 Press HOME MENU. 2 Select "Tuner Setup". ( / then...
Owner's Manual
Page 46
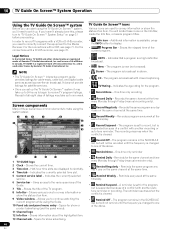
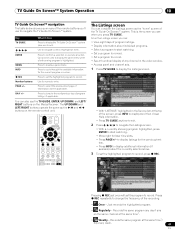
... components Many of a conflict with a VCR or D-VHS recorder, you need to set it may take up to 24 hours to begin to receive TV program listings. Indicates the age rating for cable-ready, cable box, and digital cable services as well as over-the-air broadcast. Records the... Screen™ system Before you can start using the TV Guide On Screen™ system, you'll need to correctly connect the equipment to the Media Receiver. The program is new (not a repeat). • Stereo - Shows the elapsed time of the Guide. 7 Tile - Shows information about the highlighted item. 13...
... components Many of a conflict with a VCR or D-VHS recorder, you need to set it may take up to 24 hours to begin to receive TV program listings. Indicates the age rating for cable-ready, cable box, and digital cable services as well as over-the-air broadcast. Records the... Screen™ system Before you can start using the TV Guide On Screen™ system, you'll need to correctly connect the equipment to the Media Receiver. The program is new (not a repeat). • Stereo - Shows the elapsed time of the Guide. 7 Tile - Shows information about the highlighted item. 13...
Owner's Manual
Page 47
Key TV GUIDE What it airs on the Media Receiver. ENTER Press to navigate screens (highlight an item). DAY +/- You can also use to record. Just records the highlighted program. • Regularly - From the Listings ...
Key TV GUIDE What it airs on the Media Receiver. ENTER Press to navigate screens (highlight an item). DAY +/- You can also use to record. Just records the highlighted program. • Regularly - From the Listings ...
Owner's Manual
Page 63
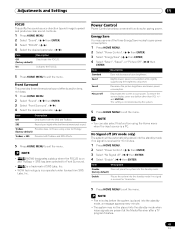
... and TruBass + SRS has been selected for saving power. Energy Save You may not be automatically placed into the standby mode if no signal is received for 15 minutes. 1 Press HOME MENU. 2 Select "Power Control". ( / then ENTER) 3 Select "No Signal off". ( / then ENTER) 4 Select "Enable". ( / then ENTER)...the system. 5 Press HOME MENU to exit the menu. This setting is placed into the standby mode when noise signals are present at the Media Receiver after a TV program finishes. 63 En TruBass Provides deep, rich bass using the Home menu when the input source is a trademark of the...
... and TruBass + SRS has been selected for saving power. Energy Save You may not be automatically placed into the standby mode if no signal is received for 15 minutes. 1 Press HOME MENU. 2 Select "Power Control". ( / then ENTER) 3 Select "No Signal off". ( / then ENTER) 4 Select "Enable". ( / then ENTER)...the system. 5 Press HOME MENU to exit the menu. This setting is placed into the standby mode when noise signals are present at the Media Receiver after a TV program finishes. 63 En TruBass Provides deep, rich bass using the Home menu when the input source is a trademark of the...
Owner's Manual
Page 64
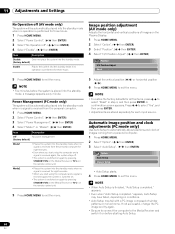
... MENU to exit the menu. 5 Adjust the vertical position ( / ) or horizontal position ( / ). 6 Press HOME MENU to the Media Receiver and switch it on conditions. • Auto Setup may have failed, depending on before the system is placed into the standby mode, a message...; The system is finished, "Auto Setup completed." A confirmation screen appears. NOTE • When Auto Setup is switched on again by pressing STANDBY/ON on the Media Receiver or TV on the Plasma Display. 1 Press HOME MENU. 2 Select "Option". ( / then ENTER) 3 Select "Position". ( / then ENTER) 4 Select "H/V...
... MENU to exit the menu. 5 Adjust the vertical position ( / ) or horizontal position ( / ). 6 Press HOME MENU to the Media Receiver and switch it on conditions. • Auto Setup may have failed, depending on before the system is placed into the standby mode, a message...; The system is finished, "Auto Setup completed." A confirmation screen appears. NOTE • When Auto Setup is switched on again by pressing STANDBY/ON on the Media Receiver or TV on the Plasma Display. 1 Press HOME MENU. 2 Select "Option". ( / then ENTER) 3 Select "Position". ( / then ENTER) 4 Select "H/V...
Owner's Manual
Page 68
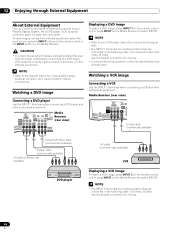
...desired connection for viewing. 68 En Watching a DVD image Connecting a DVD player Use the INPUT 1 terminals when connecting a DVD player and other audiovisual equipment. Media Receiver (rear view) MONITOR OUT ANT/ CABLE A IN INPUT 2 G-LINK INPUT 3 I N OUT CONTROL ANT B IN SERVICE ONLY R-AUDIO-L VIDEO S-VIDEO ... 1 HD Displaying a DVD image To watch a VCR image, press INPUT 2 on the remote control unit or press INPUT on the Media Receiver. To view images coming from the power outlet before making connections. NOTE • Refer to your Plasma Display System, like a DVD ...
...desired connection for viewing. 68 En Watching a DVD image Connecting a DVD player Use the INPUT 1 terminals when connecting a DVD player and other audiovisual equipment. Media Receiver (rear view) MONITOR OUT ANT/ CABLE A IN INPUT 2 G-LINK INPUT 3 I N OUT CONTROL ANT B IN SERVICE ONLY R-AUDIO-L VIDEO S-VIDEO ... 1 HD Displaying a DVD image To watch a VCR image, press INPUT 2 on the remote control unit or press INPUT on the Media Receiver. To view images coming from the power outlet before making connections. NOTE • Refer to your Plasma Display System, like a DVD ...


