Owner's Manual
Page 2
NO USER-SERVICEABLE PARTS INSIDE. THE POWER ON/OFF/HOLD SWITCH IS SECONDARY CONNECTED AND THEREFORE DOES NOT SEPARATE THE UNIT FROM MAINS POWER IN THE STANDBY POSITION. REFER ...
NO USER-SERVICEABLE PARTS INSIDE. THE POWER ON/OFF/HOLD SWITCH IS SECONDARY CONNECTED AND THEREFORE DOES NOT SEPARATE THE UNIT FROM MAINS POWER IN THE STANDBY POSITION. REFER ...
Owner's Manual
Page 6
...on this Player ... 11 Using These Operating Instructions 14 BEFORE USING Checking the Accessories 15 Remote Control Unit and Main Unit Preparations 16 Part Names and Functions 19 Connecting the Player to Other Components 29 Connecting to a TV 29 Connecting to a Dolby Digital/DTS/ MPEG ...a Dolby Pro-Logic decoder/stereo device 32 Connecting to active speaker systems .. 33 Connecting headphones 34 Connecting to a video component, etc. (PDV-LC10 only 35 Using the Battery 36 Recharging the battery pack 36 Attaching the battery pack and player .... 38 Removing the player and battery pack ...
...on this Player ... 11 Using These Operating Instructions 14 BEFORE USING Checking the Accessories 15 Remote Control Unit and Main Unit Preparations 16 Part Names and Functions 19 Connecting the Player to Other Components 29 Connecting to a TV 29 Connecting to a Dolby Digital/DTS/ MPEG ...a Dolby Pro-Logic decoder/stereo device 32 Connecting to active speaker systems .. 33 Connecting headphones 34 Connecting to a video component, etc. (PDV-LC10 only 35 Using the Battery 36 Recharging the battery pack 36 Attaching the battery pack and player .... 38 Removing the player and battery pack ...
Owner's Manual
Page 9
... clean dirt off the liquid crystal display, wipe the display gently with a dry cloth. Note that alcohol, thinner, benzene, insecticides, etc., may result in 5 to 6 parts water to peel off. INTRODUCTION 9 En Always unplug the power cord from the power outlet before cleaning the player. For tough dirt, use a commercially available...
... clean dirt off the liquid crystal display, wipe the display gently with a dry cloth. Note that alcohol, thinner, benzene, insecticides, etc., may result in 5 to 6 parts water to peel off. INTRODUCTION 9 En Always unplug the power cord from the power outlet before cleaning the player. For tough dirt, use a commercially available...
Owner's Manual
Page 19
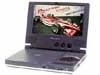
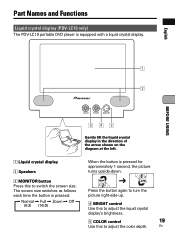
... each time the button is pressed: = Normal = Full = Zoom = Off (4:3) (16:9) When the button is equipped with a liquid crystal display. En Part Names and Functions Liquid crystal display (PDV-LC10 only) The PDV-LC10 portable DVD player is pressed for approximately 1 second, the picture turns upside-down. English BEFORE USING 1 2 COLOR BRIGHT MONITOR 543 Gently...
... each time the button is pressed: = Normal = Full = Zoom = Off (4:3) (16:9) When the button is equipped with a liquid crystal display. En Part Names and Functions Liquid crystal display (PDV-LC10 only) The PDV-LC10 portable DVD player is pressed for approximately 1 second, the picture turns upside-down. English BEFORE USING 1 2 COLOR BRIGHT MONITOR 543 Gently...
Owner's Manual
Page 20
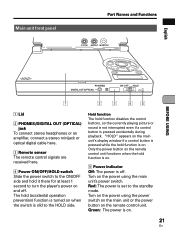
... playing picture or sound. p Display window The player's operating status is held when the previous or next button (4 or ¢) is displayed here. (Page 24) Part Names and Functions MENU BEFORE USING Main unit control section ◊ÛN¿ÇΩ,? The setup screen can be called out at any time...
... playing picture or sound. p Display window The player's operating status is held when the previous or next button (4 or ¢) is displayed here. (Page 24) Part Names and Functions MENU BEFORE USING Main unit control section ◊ÛN¿ÇΩ,? The setup screen can be called out at any time...
Owner's Manual
Page 21
...'s power on and off . Red: The power is on . 21 En Green: The power is slid to the HOLD side. English Main unit front panel Part Names and Functions COLOR BRIGHT MONITOR BEFORE USING PHONES DIGITAL OUT (OPTICAL) ON/OFF HOLD 1 2 3 45 1 Lid 2 PHONES/DIGITAL OUT (OPTICAL) jack To connect stereo...
...'s power on and off . Red: The power is on . 21 En Green: The power is slid to the HOLD side. English Main unit front panel Part Names and Functions COLOR BRIGHT MONITOR BEFORE USING PHONES DIGITAL OUT (OPTICAL) ON/OFF HOLD 1 2 3 45 1 Lid 2 PHONES/DIGITAL OUT (OPTICAL) jack To connect stereo...
Owner's Manual
Page 22
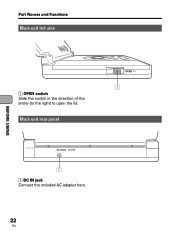
OPEN 1 22 En Main unit rear panel DC IN 9V 1 1 DC IN jack Connect the included AC adapter here. Part Names and Functions Main unit left side BEFORE USING 1 OPEN switch Slide the switch in the direction of the arrow (to the right) to open the lid.
OPEN 1 22 En Main unit rear panel DC IN 9V 1 1 DC IN jack Connect the included AC adapter here. Part Names and Functions Main unit left side BEFORE USING 1 OPEN switch Slide the switch in the direction of the arrow (to the right) to open the lid.
Owner's Manual
Page 23
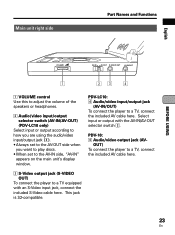
... the included AV cable here. 3 S-Video output jack (S-VIDEO OUT) To connect the player to a TV equipped with the AV-IN/AV-OUT selector switch 2. PDV-LC10: 4 Audio/video input/output jack (AV-IN/OUT) To connect the player to the AV-IN side, "AV-IN" appears on the main unit's display... window. Main unit right side Part Names and Functions English BEFORE USING VOLUME AV-IN AV-OUT S-VIDEO OUT AV-IN/OUT 1 23 4 1 VOLUME control Use this to adjust the volume of the speakers or headphones. 2 Audio/video input/output selector switch (AV-IN/AV-OUT) (PDV-LC10 only) Select input or output...
... the included AV cable here. 3 S-Video output jack (S-VIDEO OUT) To connect the player to a TV equipped with the AV-IN/AV-OUT selector switch 2. PDV-LC10: 4 Audio/video input/output jack (AV-IN/OUT) To connect the player to the AV-IN side, "AV-IN" appears on the main unit's display... window. Main unit right side Part Names and Functions English BEFORE USING VOLUME AV-IN AV-OUT S-VIDEO OUT AV-IN/OUT 1 23 4 1 VOLUME control Use this to adjust the volume of the speakers or headphones. 2 Audio/video input/output selector switch (AV-IN/AV-OUT) (PDV-LC10 only) Select input or output...
Owner's Manual
Page 24
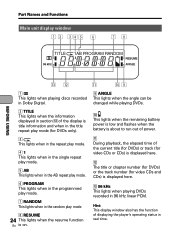
... has the function of displaying the player's operating status in 96 kHz linear PCM. e 96 kHz This lights when playing DVDs recorded in real time. Part Names and Functions Main unit display window 1 2 34 5 6 78 TITLE 96 kHz 1AB PROGRAM RANDOM RESUME ANGLE BEFORE USING ew q p9 12 This lights when...
... has the function of displaying the player's operating status in 96 kHz linear PCM. e 96 kHz This lights when playing DVDs recorded in real time. Part Names and Functions Main unit display window 1 2 34 5 6 78 TITLE 96 kHz 1AB PROGRAM RANDOM RESUME ANGLE BEFORE USING ew q p9 12 This lights when...
Owner's Manual
Page 25
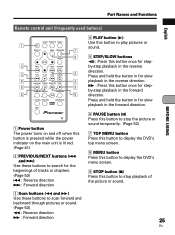
.... Press and hold the button in for stepby-step playback in the reverse direction. E : Press this button once for slow playback in the reverse direction. Part Names and Functions English BEFORE USING Remote control unit (frequently used buttons) 1 2 3 4 5 6 AUDIO SUBTITLE ANGLE DISPLAY MENU TOP MENU ENTER SETUP PREV 4 NEXT RETURN ¢...
.... Press and hold the button in for stepby-step playback in the reverse direction. E : Press this button once for slow playback in the reverse direction. Part Names and Functions English BEFORE USING Remote control unit (frequently used buttons) 1 2 3 4 5 6 AUDIO SUBTITLE ANGLE DISPLAY MENU TOP MENU ENTER SETUP PREV 4 NEXT RETURN ¢...
Owner's Manual
Page 26
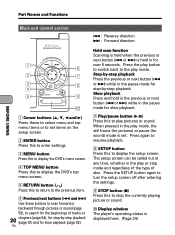
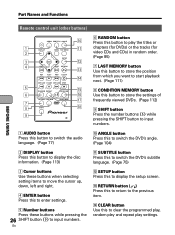
... these buttons when selecting setting items to move the cursor up, down, left and right. 4 ENTER button Press this to the previous item. MEM. COND. Part Names and Functions BEFORE USING Remote control unit (other buttons) 1 2 3 4 5 6 7 8 9 AUDIO SUBTITLE ANGLE DISPLAY MENU TOP MENU ENTER SETUP PREV 4 NEXT RETURN ¢ REV PLAY...
... these buttons when selecting setting items to move the cursor up, down, left and right. 4 ENTER button Press this to the previous item. MEM. COND. Part Names and Functions BEFORE USING Remote control unit (other buttons) 1 2 3 4 5 6 7 8 9 AUDIO SUBTITLE ANGLE DISPLAY MENU TOP MENU ENTER SETUP PREV 4 NEXT RETURN ¢ REV PLAY...
Owner's Manual
Page 27
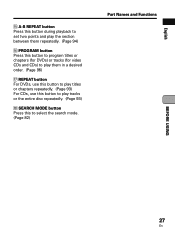
English t A-B REPEAT button Press this button during playback to set two points and play the section between them repeatedly. (Page 94) y PROGRAM button Press this button to program titles or chapters (for DVDs) or tracks (for video CDs and CDs) to play them in a desired order. (Page 96) u REPEAT button For DVDs, use this button to play titles or chapters repeatedly. (Page 93) For CDs, use this button to play tracks or the entire disc repeatedly. (Page 93) i SEARCH MODE button Press this to select the search mode. (Page 82) Part Names and Functions BEFORE USING 27 En
English t A-B REPEAT button Press this button during playback to set two points and play the section between them repeatedly. (Page 94) y PROGRAM button Press this button to program titles or chapters (for DVDs) or tracks (for video CDs and CDs) to play them in a desired order. (Page 96) u REPEAT button For DVDs, use this button to play titles or chapters repeatedly. (Page 93) For CDs, use this button to play tracks or the entire disc repeatedly. (Page 93) i SEARCH MODE button Press this to select the search mode. (Page 82) Part Names and Functions BEFORE USING 27 En
Owner's Manual
Page 28
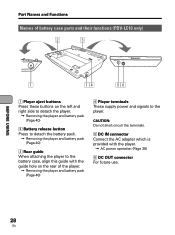
... the player and battery pack (Page 40) 3 Rear guide When attaching the player to the player. BEFORE USING 28 En Part Names and Functions Names of battery case parts and their functions (PDV-LC10 only) 2 3 DC IN SV DC OUT 1 14 56 1 Player eject buttons Press these buttons on the rear of the player...
... the player and battery pack (Page 40) 3 Rear guide When attaching the player to the player. BEFORE USING 28 En Part Names and Functions Names of battery case parts and their functions (PDV-LC10 only) 2 3 DC IN SV DC OUT 1 14 56 1 Player eject buttons Press these buttons on the rear of the player...
Owner's Manual
Page 38
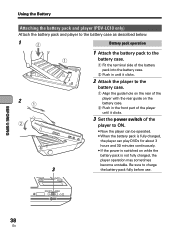
... fully charged, the player operation may sometimes become unstable. ON/OFF HOLD BEFORE USING 38 En Using the Battery Attaching the battery pack and player (PDV-LC10 only) Attach the battery pack and player to the battery case as described below. 1 2 Battery pack operation 1 21 2 3 1 Attach the battery pack to the battery... the battery case. 1 Align the guide hole on the rear of the player with the rear guide on the battery case. 2 Push in the front part of the player until it clicks. 3 Set the power switch of the player to charge the battery pack fully before use.
... fully charged, the player operation may sometimes become unstable. ON/OFF HOLD BEFORE USING 38 En Using the Battery Attaching the battery pack and player (PDV-LC10 only) Attach the battery pack and player to the battery case as described below. 1 2 Battery pack operation 1 21 2 3 1 Attach the battery pack to the battery... the battery case. 1 Align the guide hole on the rear of the player with the rear guide on the battery case. 2 Push in the front part of the player until it clicks. 3 Set the power switch of the player to charge the battery pack fully before use.
Owner's Manual
Page 39
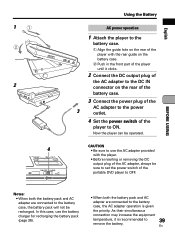
... temperature, it clicks. 2 Connect the DC output plug of the AC adapter to the DC IN connector on the battery case. 2 Push in the front part of the player until it is given the priority. BEFORE USING Notes: • When both the battery pack and AC adapter are connected to 39...
... temperature, it clicks. 2 Connect the DC output plug of the AC adapter to the DC IN connector on the battery case. 2 Push in the front part of the player until it is given the priority. BEFORE USING Notes: • When both the battery pack and AC adapter are connected to 39...
Owner's Manual
Page 40
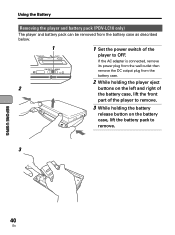
... the battery release button on the left and right of the battery case, lift the front part of the player to remove. 3 BEFORE USING 40 En Using the Battery Removing the player and battery pack (PDV-LC10 only) The player and battery pack can be removed from the battery case. 2 While holding the...
... the battery release button on the left and right of the battery case, lift the front part of the player to remove. 3 BEFORE USING 40 En Using the Battery Removing the player and battery pack (PDV-LC10 only) The player and battery pack can be removed from the battery case. 2 While holding the...
Owner's Manual
Page 58
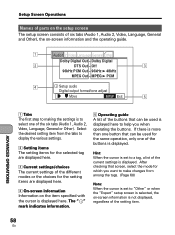
... guide A list of the buttons that can be used for which you when operating the buttons. Dolby Digital 2 DTS Out - Setup Screen Operations Names of parts on the setup screen The setup screen consists of six tabs (Audio 1, Audio 2, Video, Language, General and Other), the on the item specified with the...
... guide A list of the buttons that can be used for which you when operating the buttons. Dolby Digital 2 DTS Out - Setup Screen Operations Names of parts on the setup screen The setup screen consists of six tabs (Audio 1, Audio 2, Video, Language, General and Other), the on the item specified with the...
Owner's Manual
Page 122
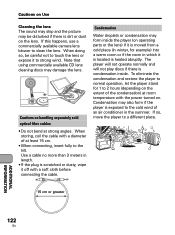
... or condensation may form inside . The player will not operate normally and will not play discs if there is condensation inside the player (on operating parts or the lens) if it is moved from a cold place (in winter, for 1 to 2 hours (depending on the extent of the condensation) at room temperature...
... or condensation may form inside . The player will not operate normally and will not play discs if there is condensation inside the player (on operating parts or the lens) if it is moved from a cold place (in winter, for 1 to 2 hours (depending on the extent of the condensation) at room temperature...

Owner's Manual
Page 125
... playback, AC adapter/220 to 240 V) 1.6 W (standby, AC adapter/220 to 240 V) Main unit weight 690 g (PDV-LC10) 370 g (PDV-10) External dimensions 190 (W) x 142 (D) x 28 (H) mm (PDV-LC10) (not including protruding parts) 190 (W) x 142 (D) x 18 (H) mm (PDV-10) (not including protruding parts) Operating temperature +5°C to +35°C Operating humidity 5% to 85% (no condensation) S video output Y output...
... playback, AC adapter/220 to 240 V) 1.6 W (standby, AC adapter/220 to 240 V) Main unit weight 690 g (PDV-LC10) 370 g (PDV-10) External dimensions 190 (W) x 142 (D) x 28 (H) mm (PDV-LC10) (not including protruding parts) 190 (W) x 142 (D) x 18 (H) mm (PDV-10) (not including protruding parts) Operating temperature +5°C to +35°C Operating humidity 5% to 85% (no condensation) S video output Y output...