
Operating Instructions
Page 2
... or color distortion. Installation ÷ Consult your nearest Pioneer authorized dealer or service center. CAUTION About compatibility This product is not liable for any damage resulting from improper installation, improper use the speaker with sufficient care, as the grille net and the cabinet... connected devices off from the main unit and fall over. ÷ When installing the speaker, tighten the screws firmly. ÷ Please handle the speaker with anything other than the specified Pioneer Plasma Display. English Thank you for buying this happens, distance the monitor from the...
... or color distortion. Installation ÷ Consult your nearest Pioneer authorized dealer or service center. CAUTION About compatibility This product is not liable for any damage resulting from improper installation, improper use the speaker with sufficient care, as the grille net and the cabinet... connected devices off from the main unit and fall over. ÷ When installing the speaker, tighten the screws firmly. ÷ Please handle the speaker with anything other than the specified Pioneer Plasma Display. English Thank you for buying this happens, distance the monitor from the...
Operating Instructions
Page 3
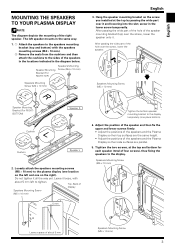
... height. • Adjust the positions of the right speaker. Loosely attach the speakers mounting screws (M5 × 10 mm) to the display. Top, Back of Display Speakers Mounting Screw (M5 × 10 mm) 5 mm Tighten the bottom speaker mounting bracket to the display temporarily (one on the...After passing the wide part of four screws), thus fixing the speakers to the plasma display (one location on the left speaker mounts in the same way. 1. 1 Attach the speakers to the speakers mounting bracket (top and bottom) with about 5 mm Speakers Mounting Screw (M5 × 10 mm) 3 The left...
... height. • Adjust the positions of the right speaker. Loosely attach the speakers mounting screws (M5 × 10 mm) to the display. Top, Back of Display Speakers Mounting Screw (M5 × 10 mm) 5 mm Tighten the bottom speaker mounting bracket to the display temporarily (one on the...After passing the wide part of four screws), thus fixing the speakers to the plasma display (one location on the left speaker mounts in the same way. 1. 1 Attach the speakers to the speakers mounting bracket (top and bottom) with about 5 mm Speakers Mounting Screw (M5 × 10 mm) 3 The left...

Operating Instructions
Page 4
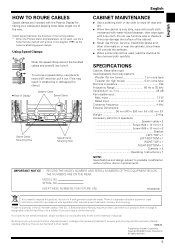
... devices off and remove the power cord from the wall outlet beforehand when changing the connection or installation method. • If you insert the speaker cable too far so that is a short in the and cables caused by slightly tugging on the cable after making connections. (The gray line... represents the red terminal) Connecting your Speaker Cables (to the speaker) Gray line Red Black White Push the lever, insert the end of the cable. • When you may not get any sound. ...
... devices off and remove the power cord from the wall outlet beforehand when changing the connection or installation method. • If you insert the speaker cable too far so that is a short in the and cables caused by slightly tugging on the cable after making connections. (The gray line... represents the red terminal) Connecting your Speaker Cables (to the speaker) Gray line Red Black White Push the lever, insert the end of the cable. • When you may not get any sound. ...
Operating Instructions
Page 5
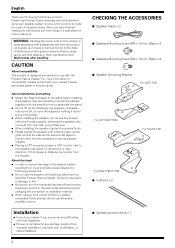
... the cabinet. ÷ Never use furniture wax or cleaners. then wipe again with water-diluted cleanser; K058_En Published by Pioneer Corporation. English English HOW TO ROURE CABLES Speed clamps are marked with arrows in accordance with legislation that your disposed product ... the speed clamp around the bundled cables and press B into hole A. They may return their used electronic products in the diagram ( ) as the holes for 2 speakers Speaker cable × 2 Screw (M4 × 10 mm) × 8 Screw (M5 × 10 mm) × 8 Bracket LEFT-TOP × 1 LEFT-...
... the cabinet. ÷ Never use furniture wax or cleaners. then wipe again with water-diluted cleanser; K058_En Published by Pioneer Corporation. English English HOW TO ROURE CABLES Speed clamps are marked with arrows in accordance with legislation that your disposed product ... the speed clamp around the bundled cables and press B into hole A. They may return their used electronic products in the diagram ( ) as the holes for 2 speakers Speaker cable × 2 Screw (M4 × 10 mm) × 8 Screw (M5 × 10 mm) × 8 Bracket LEFT-TOP × 1 LEFT-...