
User Manual
Page 7
... 3 How to use this manual 3 Checking supplied accessories 5 Part Names and Functions 6 Main unit 6 Remote control unit 7 Connection panel (PDP-507CMX 9 Connection panel (PDP-607CMX 10 Installation and Connections 11 Installation of the unit 11 Connection to a personal computer 13 Audio connections 14 Power cord connection 15 How to route cables 16 System Settings 17 Setting the onscreen display language 17 Settings after connections 18 Operation 19 Selecting input source 19 Adjusting sound volume 20 Muting the sound 20 Confirming current status 20 Changing screen size 21...
... 3 How to use this manual 3 Checking supplied accessories 5 Part Names and Functions 6 Main unit 6 Remote control unit 7 Connection panel (PDP-507CMX 9 Connection panel (PDP-607CMX 10 Installation and Connections 11 Installation of the unit 11 Connection to a personal computer 13 Audio connections 14 Power cord connection 15 How to route cables 16 System Settings 17 Setting the onscreen display language 17 Settings after connections 18 Operation 19 Selecting input source 19 Adjusting sound volume 20 Muting the sound 20 Confirming current status 20 Changing screen size 21...
User Manual
Page 8
... ambient light sensor. ¶ Optional line (sold separately) (For details, please consult the dealer where this unit was purchased.) 1 Table top stand: Display stand. 2 Wall installation unit: Wall installation bracket designed as a wall interface for securing the unit. 3 Speaker system designed specifically for Plasma Displays (width: 9 cm (3-9/16 in.)): 2-way speaker units featuring 5 cm (2 in.) tweeter and 8 cm (3-3/16 in.) woofer in vertical arrangement. 4 Video card: Expansion card allows viewing of video signals and...
... ambient light sensor. ¶ Optional line (sold separately) (For details, please consult the dealer where this unit was purchased.) 1 Table top stand: Display stand. 2 Wall installation unit: Wall installation bracket designed as a wall interface for securing the unit. 3 Speaker system designed specifically for Plasma Displays (width: 9 cm (3-9/16 in.)): 2-way speaker units featuring 5 cm (2 in.) tweeter and 8 cm (3-3/16 in.) woofer in vertical arrangement. 4 Video card: Expansion card allows viewing of video signals and...

User Manual
Page 12
...). 8 INPUT (') button Except when menu screen is displayed, this button operates to change the screen size. 0 VOL +/- (}/]) buttons When not indicated for use in standby mode: The indicator lights red (page 19). English Part Names and Functions Main unit Main unit 4 (PDP-507CMX) 4 (PDP-607CMX) Operation panel on -screen menu (pages 17 to 36). 7 DISPLAY/SET button Use to confirm onscreen menu selections, and to change settings (pages 17 to 36). VOL + 89 0 PDP-507CMX 1 STANDBY ON 23 PDP-607CMX 31 Main unit 1 Remote control...
...). 8 INPUT (') button Except when menu screen is displayed, this button operates to change the screen size. 0 VOL +/- (}/]) buttons When not indicated for use in standby mode: The indicator lights red (page 19). English Part Names and Functions Main unit Main unit 4 (PDP-507CMX) 4 (PDP-607CMX) Operation panel on -screen menu (pages 17 to 36). 7 DISPLAY/SET button Use to confirm onscreen menu selections, and to change settings (pages 17 to 36). VOL + 89 0 PDP-507CMX 1 STANDBY ON 23 PDP-607CMX 31 Main unit 1 Remote control...

User Manual
Page 13
... screen size (page 21). 2 INPUT buttons Press to select the input (page 19). 3 MENU button Press to open and close the on-screen menu (pages 17 to 36). 4 ADJUST (5/∞/3/2) buttons Use to navigate menu screens and to adjust various settings on the unit (pages 17 to 36). 6 SUB INPUT button During multi-screen display, use the remote control unit in a location subject to direct sunlight, heat radiation from a heater, or in -picture mode with multiscreen display, use this button...
... screen size (page 21). 2 INPUT buttons Press to select the input (page 19). 3 MENU button Press to open and close the on-screen menu (pages 17 to 36). 4 ADJUST (5/∞/3/2) buttons Use to navigate menu screens and to adjust various settings on the unit (pages 17 to 36). 6 SUB INPUT button During multi-screen display, use the remote control unit in a location subject to direct sunlight, heat radiation from a heater, or in -picture mode with multiscreen display, use this button...
User Manual
Page 15
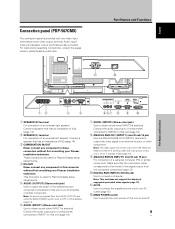
... Plasma Display setup adjustments. 5 AUDIO (OUTPUT) (Stereo mini jack) Use to output the audio of the signal output from the connected component (page 13). 0 DIGITAL RGB (INPUT2) (DVI-D jack) Use to these connectors without first consulting your Pioneer installation technician. AC IN Use to connect the supplied power cord to an AC outlet (page 15). = MAIN POWER switch Use to obtain sound when INPUT1 is off . 9 En Connect a speaker that the connection made corresponds to the format of the selected source...
... Plasma Display setup adjustments. 5 AUDIO (OUTPUT) (Stereo mini jack) Use to output the audio of the signal output from the connected component (page 13). 0 DIGITAL RGB (INPUT2) (DVI-D jack) Use to these connectors without first consulting your Pioneer installation technician. AC IN Use to connect the supplied power cord to an AC outlet (page 15). = MAIN POWER switch Use to obtain sound when INPUT1 is off . 9 En Connect a speaker that the connection made corresponds to the format of the selected source...
User Manual
Page 16
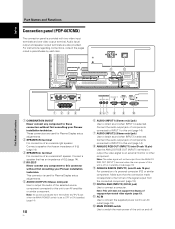
... DIGITAL RGB (DVI-D) 1 23 4 1 COMBINATION IN/OUT Never connect any component to an external monitor or other component. Note: No sound is produced from the AUDIO (OUTPUT) jack when the MAIN POWER switch is set to OFF or ON (standby) (page 14). 10 En 567 8 9 0 6 AUDIO (INPUT1) (Stereo mini jack) Use to these connectors without first consulting your Pioneer installation technician. AC IN Use to connect the supplied power cord to...
... DIGITAL RGB (DVI-D) 1 23 4 1 COMBINATION IN/OUT Never connect any component to an external monitor or other component. Note: No sound is produced from the AUDIO (OUTPUT) jack when the MAIN POWER switch is set to OFF or ON (standby) (page 14). 10 En 567 8 9 0 6 AUDIO (INPUT1) (Stereo mini jack) Use to these connectors without first consulting your Pioneer installation technician. AC IN Use to connect the supplied power cord to...

User Manual
Page 19
... display formats supported by INPUT1. This connector also supports G ON SYNC (output with green signal combined with sync signal), and composite SYNC (output with the computer or sold separately may be sure to an external monitor or other component from the ANALOG RGB OUT (INPUT1) terminal when the main power of the input terminal on -screen setup is necessary. provided with combined horizontal and vertical sync signals). NOTICE ¶ INPUT2 supports Microsoft "Plug & Play" (VESA...
... display formats supported by INPUT1. This connector also supports G ON SYNC (output with green signal combined with sync signal), and composite SYNC (output with the computer or sold separately may be sure to an external monitor or other component from the ANALOG RGB OUT (INPUT1) terminal when the main power of the input terminal on -screen setup is necessary. provided with combined horizontal and vertical sync signals). NOTICE ¶ INPUT2 supports Microsoft "Plug & Play" (VESA...

User Manual
Page 24
...SET 5/∞ Remote control unit STANDBY/ON DISPLAY MENU / SET INPUT SCREEN SIZE - E N H A N C E SETUP : : : : INPUT1 OPTION 0 0 0 0 PICTURE RESET SET ENTER MENU EXIT 2 Use the 2/3 buttons to exit the menu screen. MENU PICTURE SCREEN P O W E R M G T. MENU PICTURE SCREEN P O W E R M G T. SIGNAL FORMAT INPUT1 SETUP OPTION :OFF 18 En SIGNAL FORMAT : AUTO SET SET MENU EXIT Each time the 2/3 buttons are detected automatically in step 3. 6 When the setup is necessary. Signals are pressed, the selection alternates as they apply to the type of components connected...
...SET 5/∞ Remote control unit STANDBY/ON DISPLAY MENU / SET INPUT SCREEN SIZE - E N H A N C E SETUP : : : : INPUT1 OPTION 0 0 0 0 PICTURE RESET SET ENTER MENU EXIT 2 Use the 2/3 buttons to exit the menu screen. MENU PICTURE SCREEN P O W E R M G T. MENU PICTURE SCREEN P O W E R M G T. SIGNAL FORMAT INPUT1 SETUP OPTION :OFF 18 En SIGNAL FORMAT : AUTO SET SET MENU EXIT Each time the 2/3 buttons are detected automatically in step 3. 6 When the setup is necessary. Signals are pressed, the selection alternates as they apply to the type of components connected...

User Manual
Page 25
Operation 19 En STANDBY/ ON INPUT VOLUME [+/-] Remote control unit STANDBY/ON DISPLAY MENU / SET INPUT SCREEN SIZE - POL.V: - FULL 4 Use VOLUME (+/-) buttons to ON. The STANDBY/ON indicator may cause a phenomenon known as "screen burn" which leaves a ghost, or residual, image of the picture on the screen. Doing so may continue to these terminals, on-screen setup is a result of this unit. Main unit operating panel 1 Set the rear panel MAIN POWER switch to adjust the sound volume. If no audio connections are made...
Operation 19 En STANDBY/ ON INPUT VOLUME [+/-] Remote control unit STANDBY/ON DISPLAY MENU / SET INPUT SCREEN SIZE - POL.V: - FULL 4 Use VOLUME (+/-) buttons to ON. The STANDBY/ON indicator may cause a phenomenon known as "screen burn" which leaves a ghost, or residual, image of the picture on the screen. Doing so may continue to these terminals, on-screen setup is a result of this unit. Main unit operating panel 1 Set the rear panel MAIN POWER switch to adjust the sound volume. If no audio connections are made...

User Manual
Page 30
... before this function operates.) Note Always turn off the Plasma Display's main power switch when not using the display for extended periods of time. INPUT MENU 2/3 SET Remote control unit STANDBY/ON DISPLAY MENU / SET INPUT SCREEN SIZE - E N H A N C E SETUP : : : : INPUT1 OPTION 0 0 0 0 PICTURE RESET SET ENTER MENU EXIT 2 Use the 2/3 buttons to normal operating mode (*1). *1. SIGNAL FORMAT INPUT1 SETUP OPTION :OFF SET CHANGE MENU EXIT 3 Press the SET button to display the menu screen. The factory default setting is pressed, the setting alternates as follows: 3 OFF ON...
... before this function operates.) Note Always turn off the Plasma Display's main power switch when not using the display for extended periods of time. INPUT MENU 2/3 SET Remote control unit STANDBY/ON DISPLAY MENU / SET INPUT SCREEN SIZE - E N H A N C E SETUP : : : : INPUT1 OPTION 0 0 0 0 PICTURE RESET SET ENTER MENU EXIT 2 Use the 2/3 buttons to normal operating mode (*1). *1. SIGNAL FORMAT INPUT1 SETUP OPTION :OFF SET CHANGE MENU EXIT 3 Press the SET button to display the menu screen. The factory default setting is pressed, the setting alternates as follows: 3 OFF ON...
User Manual
Page 32
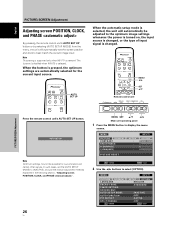
... Main unit operating panel 1 Press the MENU button to best match the current image input. MENU 2/3 SET 5/∞ Remote control unit STANDBY/ON DISPLAY MENU / SET INPUT SCREEN SIZE - AUTO SET UP Note Optimum settings may not be adjusted to select [OPTION]. MENU PICTURE SCREEN CONTRAST BRIGHTNESS H.ENHANCE V. E N H A N C E SETUP : : : : INPUT1 OPTION 0 0 0 0 PICTURE RESET SET ENTER MENU EXIT 2 Use the 2/3 buttons to the optimum image settings whenever the power is turned on, the input source is changed . English PICTURE/SCREEN Adjustment Adjusting screen POSITION, CLOCK, and...
... Main unit operating panel 1 Press the MENU button to best match the current image input. MENU 2/3 SET 5/∞ Remote control unit STANDBY/ON DISPLAY MENU / SET INPUT SCREEN SIZE - AUTO SET UP Note Optimum settings may not be adjusted to select [OPTION]. MENU PICTURE SCREEN CONTRAST BRIGHTNESS H.ENHANCE V. E N H A N C E SETUP : : : : INPUT1 OPTION 0 0 0 0 PICTURE RESET SET ENTER MENU EXIT 2 Use the 2/3 buttons to the optimum image settings whenever the power is turned on, the input source is changed . English PICTURE/SCREEN Adjustment Adjusting screen POSITION, CLOCK, and...
User Manual
Page 37
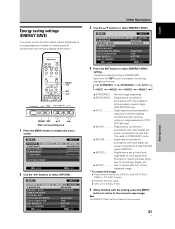
... 2/3 SET 5/∞ Remote control unit STANDBY/ON DISPLAY MENU / SET INPUT SCREEN SIZE - MENU PICTURE SCREEN CONTRAST BRIGHTNESS H.ENHANCE V. MENU PICTURE SCREEN LANGUAGE ENERGY SAVE TIMER SETTING S C R E E N M G T. Normal image brightness ÷ STANDARD2 .... VOL + MENU SET 5/∞ 2/3 Main unit operating panel 1 Press the MENU button to select [ENERGY SAVE] setting. AUTO SETUP MODE AUTO FUNCTION PIP DETECT SPLIT FREEZE SET CHANGE INPUT1 SETUP OPTION :ENGLISH : S TA N D A R D :INACTIVE :OFF :ACTIVE :OFF MENU EXIT 4 Press the SET button to display the menu screen...
... 2/3 SET 5/∞ Remote control unit STANDBY/ON DISPLAY MENU / SET INPUT SCREEN SIZE - MENU PICTURE SCREEN CONTRAST BRIGHTNESS H.ENHANCE V. MENU PICTURE SCREEN LANGUAGE ENERGY SAVE TIMER SETTING S C R E E N M G T. Normal image brightness ÷ STANDARD2 .... VOL + MENU SET 5/∞ 2/3 Main unit operating panel 1 Press the MENU button to select [ENERGY SAVE] setting. AUTO SETUP MODE AUTO FUNCTION PIP DETECT SPLIT FREEZE SET CHANGE INPUT1 SETUP OPTION :ENGLISH : S TA N D A R D :INACTIVE :OFF :ACTIVE :OFF MENU EXIT 4 Press the SET button to display the menu screen...

User Manual
Page 38
...; OFF AUTO FUNCTION] is disabled. ÷ INPUT1 ..... ÷ When a signal is detected at the INPUT1 terminal. MENU 2/3 SET 5/∞ Remote control unit STANDBY/ON DISPLAY MENU / SET INPUT SCREEN SIZE - The factory default setting is in [AUTO FUNCTION] mode, pressing the INPUT button to select a different input will cause the [AUTO FUNCTION] mode to the one selected before operation of the [AUTO FUNCTION] mode. ÷ If the input changes when the unit is [OFF]. MENU PICTURE SCREEN LANGUAGE ENERGY SAVE TIMER SETTING...
...; OFF AUTO FUNCTION] is disabled. ÷ INPUT1 ..... ÷ When a signal is detected at the INPUT1 terminal. MENU 2/3 SET 5/∞ Remote control unit STANDBY/ON DISPLAY MENU / SET INPUT SCREEN SIZE - The factory default setting is in [AUTO FUNCTION] mode, pressing the INPUT button to select a different input will cause the [AUTO FUNCTION] mode to the one selected before operation of the [AUTO FUNCTION] mode. ÷ If the input changes when the unit is [OFF]. MENU PICTURE SCREEN LANGUAGE ENERGY SAVE TIMER SETTING...

User Manual
Page 40
...screen image. [PROGRAM] setting ÷ Every day, power turns on at 10:00. MENU 2/3 SET 5/∞ Remote control unit STANDBY/ON DISPLAY MENU / SET INPUT SCREEN SIZE - MENU PICTURE SCREEN LANGUAGE ENERGY SAVE TIMER SETTING S C R E E N M G T. AUTO SETUP MODE AUTO FUNCTION PIP DETECT SPLIT FREEZE SET ENTER INPUT1 SETUP OPTION :ENGLISH : S TA N D A R D :INACTIVE :OFF :ACTIVE :OFF MENU EXIT 4 Use the 5/∞ buttons to display the menu screen. MENU PICTURE SCREEN LANGUAGE ENERGY SAVE TIMER SETTING S C R E E N M G T. VOL + MENU SET 5/∞ 2/3 Main unit operating panel...
...screen image. [PROGRAM] setting ÷ Every day, power turns on at 10:00. MENU 2/3 SET 5/∞ Remote control unit STANDBY/ON DISPLAY MENU / SET INPUT SCREEN SIZE - MENU PICTURE SCREEN LANGUAGE ENERGY SAVE TIMER SETTING S C R E E N M G T. AUTO SETUP MODE AUTO FUNCTION PIP DETECT SPLIT FREEZE SET ENTER INPUT1 SETUP OPTION :ENGLISH : S TA N D A R D :INACTIVE :OFF :ACTIVE :OFF MENU EXIT 4 Use the 5/∞ buttons to display the menu screen. MENU PICTURE SCREEN LANGUAGE ENERGY SAVE TIMER SETTING S C R E E N M G T. VOL + MENU SET 5/∞ 2/3 Main unit operating panel...

User Manual
Page 41
... panel 1 Press the MENU button to select [OPTION]. AUTO SETUP MODE AUTO FUNCTION PIP DETECT SPLIT FREEZE SET ENTER INPUT1 SETUP OPTION :ENGLISH : S TA N D A R D :INACTIVE :OFF :ACTIVE :OFF MENU EXIT 3 Use the 5/∞ buttons to activate the setting. Other Operations 35 En MENU 2/3 SET 5/∞ Remote control unit STANDBY/ON DISPLAY MENU / SET INPUT SCREEN SIZE - English Setting the subscreen mode (PIP DETECT) During picture-in-picture display, if no video signal or sync signal. AUTO SETUP MODE AUTO FUNCTION PIP DETECT SPLIT FREEZE SET CHANGE INPUT1 SETUP...
... panel 1 Press the MENU button to select [OPTION]. AUTO SETUP MODE AUTO FUNCTION PIP DETECT SPLIT FREEZE SET ENTER INPUT1 SETUP OPTION :ENGLISH : S TA N D A R D :INACTIVE :OFF :ACTIVE :OFF MENU EXIT 3 Use the 5/∞ buttons to activate the setting. Other Operations 35 En MENU 2/3 SET 5/∞ Remote control unit STANDBY/ON DISPLAY MENU / SET INPUT SCREEN SIZE - English Setting the subscreen mode (PIP DETECT) During picture-in-picture display, if no video signal or sync signal. AUTO SETUP MODE AUTO FUNCTION PIP DETECT SPLIT FREEZE SET CHANGE INPUT1 SETUP...

User Manual
Page 45
... 28) • Adjust using [SCREEN] mode on screen. • A sharp sound is too high, the bright portions may cause improper operation. The picture may not light in accordance with your installation technician. This is not a malfunction. • When the video input signal's level is sometimes heard from the cabinet. • Bright portions of the Plasma Display panel. Not a malfunction. • Fan speed changes automatically in some...
... 28) • Adjust using [SCREEN] mode on screen. • A sharp sound is too high, the bright portions may cause improper operation. The picture may not light in accordance with your installation technician. This is not a malfunction. • When the video input signal's level is sometimes heard from the cabinet. • Bright portions of the Plasma Display panel. Not a malfunction. • Fan speed changes automatically in some...

User Manual
Page 46
... the green light displays a flashing pattern other than 1 minute, after -image lagging. If the problem persists, disconnect the power plug and consult your dealer or a service center. If the power is an automatic feature and cannot be involved (pages 21 and 22), it a close to a location where its speed). Before using the monitor in the following reasons may not light even when power is very bright and viewing...
... the green light displays a flashing pattern other than 1 minute, after -image lagging. If the problem persists, disconnect the power plug and consult your dealer or a service center. If the power is an automatic feature and cannot be involved (pages 21 and 22), it a close to a location where its speed). Before using the monitor in the following reasons may not light even when power is very bright and viewing...
Brochure
Page 1
.../2.2 kO Compatible with Microsoft Plug & Play (VESA DDC 1/2B) OUT Mini D-sub Analog RGB Signal 75 0 15-pin (G on Sync compatible) INPUT 2 IN DVI-D Digital RGB Signal (DVI 1.0 Standard) 24-pin Compatible with Microsoft Plug & Play (VESA DDC 2B) and HOOP* *Applies only when equipped with multiple wide-screen viewing modes: use , Plasma Display Systems may occur. work Station 1260 0 1024. 1280 x 1024, 1152 x 9001152 x 900. 1280 0 1024. 1024 x 768 1280 0 1024- Vertical Frequency...
.../2.2 kO Compatible with Microsoft Plug & Play (VESA DDC 1/2B) OUT Mini D-sub Analog RGB Signal 75 0 15-pin (G on Sync compatible) INPUT 2 IN DVI-D Digital RGB Signal (DVI 1.0 Standard) 24-pin Compatible with Microsoft Plug & Play (VESA DDC 2B) and HOOP* *Applies only when equipped with multiple wide-screen viewing modes: use , Plasma Display Systems may occur. work Station 1260 0 1024. 1280 x 1024, 1152 x 9001152 x 900. 1280 0 1024. 1024 x 768 1280 0 1024- Vertical Frequency...
Brochure
Page 3
... ABL Auto ID Setting Automatically sets an ID for dual-image, full-screen display. P-in-P is lost, the display will automatically switch to permit simpler error-free setting (operates only with 2x2 and 3x3 configurations). MID HIGH 3. BOTTOM 1-3 1921ine ring Dual Image Freeze Portrait mode Dual Image Freeze temporarily freezes a displayed image. Power On Delay This function automatically delays the powering up of each display connected via a combination control cable to a full-screen image...
... ABL Auto ID Setting Automatically sets an ID for dual-image, full-screen display. P-in-P is lost, the display will automatically switch to permit simpler error-free setting (operates only with 2x2 and 3x3 configurations). MID HIGH 3. BOTTOM 1-3 1921ine ring Dual Image Freeze Portrait mode Dual Image Freeze temporarily freezes a displayed image. Power On Delay This function automatically delays the powering up of each display connected via a combination control cable to a full-screen image...
Brochure
Page 4
...-232C interface. Five energy saver modes contribute to further lowering power consumption: Power Save, Intermediate, Linear Brightness (which decreases the peak intensity of high-brightness images), Auto Brightness Control (which automatically adjusts panel brightness depending upon room lighting), and Video Mute (which temporarily turns off information • Input signal information • Cause of error AMX DuetTM Program Support The PDP-507CMX makes use of analog or digital signals, with 2x2 and 3x3...
...-232C interface. Five energy saver modes contribute to further lowering power consumption: Power Save, Intermediate, Linear Brightness (which decreases the peak intensity of high-brightness images), Auto Brightness Control (which automatically adjusts panel brightness depending upon room lighting), and Video Mute (which temporarily turns off information • Input signal information • Cause of error AMX DuetTM Program Support The PDP-507CMX makes use of analog or digital signals, with 2x2 and 3x3...


