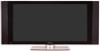
Owner's Manual
Page 4
...Precautions 03 Operational Precautions 04 Supplied Accessories Plasma Display 11 Media Receiver 11 05 Part Names Plasma Display 12 Media Receiver 12 Remote control unit 14 06 Preparation Installing the Plasma Display 15 Installing the Media Receiver 16 Installing the Media Receiver vertically 16 Connecting ... menus 30 Menu operations 30 09 Tuner Setup Setting up TV channels 31 Using Auto Channel Preset 31 Setting for buying this Pioneer product. In some countries or regions, the shape of conventional closed captions .. 38 Selecting digital closed captions 38 Selecting digital ...
...Precautions 03 Operational Precautions 04 Supplied Accessories Plasma Display 11 Media Receiver 11 05 Part Names Plasma Display 12 Media Receiver 12 Remote control unit 14 06 Preparation Installing the Plasma Display 15 Installing the Media Receiver 16 Installing the Media Receiver vertically 16 Connecting ... menus 30 Menu operations 30 09 Tuner Setup Setting up TV channels 31 Using Auto Channel Preset 31 Setting for buying this Pioneer product. In some countries or regions, the shape of conventional closed captions .. 38 Selecting digital closed captions 38 Selecting digital ...

Owner's Manual
Page 5
... chart 58 Connecting the VCR controller 59 The lists of controllable recording equipment manufactures 60 Connecting control cords 61 About SR 61 13 Useful Remote Control Features Learning function of the remote control unit 62 Using the learning ...function 62 Presetting manufacture codes 62 Manufacture codes 63 Using the remote control unit to control other devices 64 Receiver control buttons 64 Cable control buttons 65 SAT control buttons 66 VCR control buttons 67 DVD/DVR control...
... chart 58 Connecting the VCR controller 59 The lists of controllable recording equipment manufactures 60 Connecting control cords 61 About SR 61 13 Useful Remote Control Features Learning function of the remote control unit 62 Using the learning ...function 62 Presetting manufacture codes 62 Manufacture codes 63 Using the remote control unit to control other devices 64 Receiver control buttons 64 Cable control buttons 65 SAT control buttons 66 VCR control buttons 67 DVD/DVR control...
Owner's Manual
Page 10
03 Operational Precautions PIONEER bears no responsibility for any damages arising from incorrect use of the... The effect of plasticizer in the plastic may result in malfunction. This is because the protection function of its remote control sensor is in use a hard cloth or rub the screen hard, the surface of the screen will be scratched... dry cloth; If you feel that equipment at a location where its characteristics. Do not make you use , the remote controls of the product except in cases where the company must be adversely affected. Handles at such an occasion. The screen is...
03 Operational Precautions PIONEER bears no responsibility for any damages arising from incorrect use of the... The effect of plasticizer in the plastic may result in malfunction. This is because the protection function of its remote control sensor is in use a hard cloth or rub the screen hard, the surface of the screen will be scratched... dry cloth; If you feel that equipment at a location where its characteristics. Do not make you use , the remote controls of the product except in cases where the company must be adversely affected. Handles at such an occasion. The screen is...

Owner's Manual
Page 11
... cloth Speed clamp × 3 Warranty card Speaker cushion × 3 (For PDP-5045HD/4345HD only) (Use when installing the optional speakers at the bottom of the Plasma Display.) Power cord (2 m/6.6 feet) Remote control unit System cable (3 m/9.8 feet) AA size battery × 2 (Alkaline battery...) Stand Screw × 4 (for stand) Screw hole cap × 4 VCR controller (1.8 m/5.9 feet) Operating Instructions Instruction guide • Always...
... cloth Speed clamp × 3 Warranty card Speaker cushion × 3 (For PDP-5045HD/4345HD only) (Use when installing the optional speakers at the bottom of the Plasma Display.) Power cord (2 m/6.6 feet) Remote control unit System cable (3 m/9.8 feet) AA size battery × 2 (Alkaline battery...) Stand Screw × 4 (for stand) Screw hole cap × 4 VCR controller (1.8 m/5.9 feet) Operating Instructions Instruction guide • Always...
Owner's Manual
Page 12
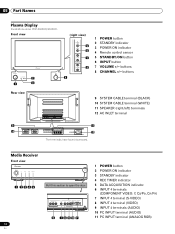
... Receiver Front view POWER REC DATA ON STANDBY TIMER ACQUISITION 1 2345 Pull this section to open the door. 05 Part Names Plasma Display Illustrations show PDP-5045HD/4345HD. buttons Rear view 9 10 9 SYSTEM CABLE terminal (BLACK) 10 SYSTEM CABLE terminal (WHITE) 11 SPEAKER (right/left) terminals 12 AC INLET terminal ...(AUDIO) 10 PC INPUT terminal (AUDIO) 11 PC INPUT terminal (ANALOG RGB) buttons 8 CHANNEL +/- Front view (right view) 5 6 7 8 4 1 POWER button 2 STANDBY indicator 3 POWER ON indicator 4 Remote control sensor 5 STANDBY/ON button 6 INPUT button 7 VOLUME +/-
... Receiver Front view POWER REC DATA ON STANDBY TIMER ACQUISITION 1 2345 Pull this section to open the door. 05 Part Names Plasma Display Illustrations show PDP-5045HD/4345HD. buttons Rear view 9 10 9 SYSTEM CABLE terminal (BLACK) 10 SYSTEM CABLE terminal (WHITE) 11 SPEAKER (right/left) terminals 12 AC INLET terminal ...(AUDIO) 10 PC INPUT terminal (AUDIO) 11 PC INPUT terminal (ANALOG RGB) buttons 8 CHANNEL +/- Front view (right view) 5 6 7 8 4 1 POWER button 2 STANDBY indicator 3 POWER ON indicator 4 Remote control sensor 5 STANDBY/ON button 6 INPUT button 7 VOLUME +/-
Owner's Manual
Page 14
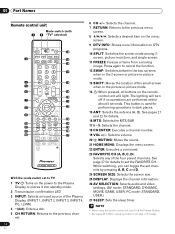
... While watching, you can toggle the set the FAVORITE CH. PC mode: STANDARD, USER.) 27 SLEEP: Sets the sleep timer. • When using the remote control unit, point it into standby mode. 2 Transmission confirmation LED 3 INPUT: Selects an input source of the Plasma Display. (INPUT 1, INPUT 2, INPUT 3, INPUT... the antenna (A, B). See pages 21 and 22 for performing operations in -picture mode. 14 :When pressed, all buttons on the remote control unit will turn off if no operations are performed within about 5 seconds. Press again to cancel the function. 12 SWAP: Switches between...
... While watching, you can toggle the set the FAVORITE CH. PC mode: STANDARD, USER.) 27 SLEEP: Sets the sleep timer. • When using the remote control unit, point it into standby mode. 2 Transmission confirmation LED 3 INPUT: Selects an input source of the Plasma Display. (INPUT 1, INPUT 2, INPUT 3, INPUT... the antenna (A, B). See pages 21 and 22 for performing operations in -picture mode. 14 :When pressed, all buttons on the remote control unit will turn off if no operations are performed within about 5 seconds. Press again to cancel the function. 12 SWAP: Switches between...
Owner's Manual
Page 20
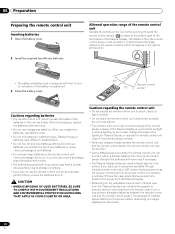
... bottom right of the front panel of the lighting or Plasma Display, or operate the remote control unit closer to properly receive commands from the remote control unit or may shorten allowable distances between the remote control unit and the remote control sensor, the remote control unit may have different characteristics. • Do not mix old and new batteries. chemical...
... bottom right of the front panel of the lighting or Plasma Display, or operate the remote control unit closer to properly receive commands from the remote control unit or may shorten allowable distances between the remote control unit and the remote control sensor, the remote control unit may have different characteristics. • Do not mix old and new batteries. chemical...

Owner's Manual
Page 22
... to insert only the specified cable card. • Do not insert a PCMCIA card. See page 21. 2 Hold the tab of the slot cover on the remote control unit. • While watching a broadcast, press ANT to view the image received from the Cable Converter. When you are watching digital and/or High Definition...
... to insert only the specified cable card. • Do not insert a PCMCIA card. See page 21. 2 Hold the tab of the slot cover on the remote control unit. • While watching a broadcast, press ANT to view the image received from the Cable Converter. When you are watching digital and/or High Definition...
Owner's Manual
Page 24
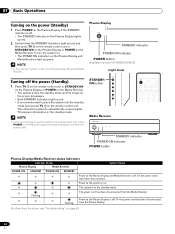
... the system into the standby mode by pressing TV on the remote control unit. Plasma Display STANDBY indicator POWER ON indicator POWER button Illustration shows PDP-5045HD/4345HD. (right view) Turning off the power (Standby) 1 Press TV on the remote control unit or STANDBY/ON on the Plasma Display or POWER on ... The STANDBY indicator on the Plasma Display lights up red. 2 Confirm that the STANDBY indicators light up red, and then press TV on the remote control unit or STANDBY/ON on the Plasma Display or POWER on the Media Receiver to turn the system on. • The POWER ON indicators on...
... the system into the standby mode by pressing TV on the remote control unit. Plasma Display STANDBY indicator POWER ON indicator POWER button Illustration shows PDP-5045HD/4345HD. (right view) Turning off the power (Standby) 1 Press TV on the remote control unit or STANDBY/ON on the Plasma Display or POWER on ... The STANDBY indicator on the Plasma Display lights up red. 2 Confirm that the STANDBY indicators light up red, and then press TV on the remote control unit or STANDBY/ON on the Plasma Display or POWER on the Media Receiver to turn the system on. • The POWER ON indicators on...

Owner's Manual
Page 25
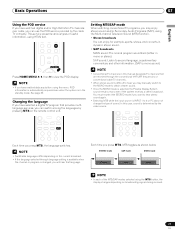
...ENTER to tune in emergency situations. Basic Operations 07 English Watching TV channels Unless you set to "TV", press ANT on the remote control unit to select antenna A or B. • Make this selection depending on the connections to the antenna input terminals on the ...25 En Changing channels To increase the channel number, press CH + on the remote control unit. • Press CH RETURN to switch the currently tuned channel to restore the currently tuned channel. on the remote control unit. To decrease the channel number, press CH -. • CHANNEL +/- ...
...ENTER to tune in emergency situations. Basic Operations 07 English Watching TV channels Unless you set to "TV", press ANT on the remote control unit to select antenna A or B. • Make this selection depending on the connections to the antenna input terminals on the ...25 En Changing channels To increase the channel number, press CH + on the remote control unit. • Press CH RETURN to switch the currently tuned channel to restore the currently tuned channel. on the remote control unit. To decrease the channel number, press CH -. • CHANNEL +/- ...
Owner's Manual
Page 26
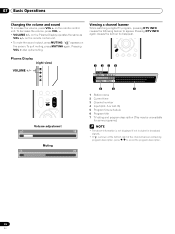
... the volume and sound To increase the volume, press VOL + on the Plasma Display operates the same as VOL +/- on the screen. " " appears on the remote control unit. • To mute the sound output, press MUTING. Pressing VOL + also quits muting. A XXXXXXXXXX 12:30pm - 2:00pm 5 6 7 1 Station name 2 Current time 3 Channel number 4 Input...
... the volume and sound To increase the volume, press VOL + on the Plasma Display operates the same as VOL +/- on the screen. " " appears on the remote control unit. • To mute the sound output, press MUTING. Pressing VOL + also quits muting. A XXXXXXXXXX 12:30pm - 2:00pm 5 6 7 1 Station name 2 Current time 3 Channel number 4 Input...
Owner's Manual
Page 27
... mode if you press MTS, MTS toggles as shown below. Each time you press MTS, the language switches. • Switchable languages differ depending on the remote control unit. • Conventional TV channels in this case, sound is changed, you can enjoy, for example, sports, shows, and concerts in dynamic stereo sound. •...
... mode if you press MTS, MTS toggles as shown below. Each time you press MTS, the language switches. • Switchable languages differ depending on the remote control unit. • Conventional TV channels in this case, sound is changed, you can enjoy, for example, sports, shows, and concerts in dynamic stereo sound. •...
Owner's Manual
Page 34
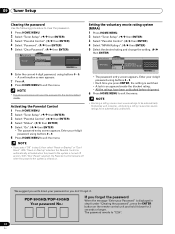
... automatically unblocked. • If you forget the password When the message "Enter your password so you press ENTER, the setting is off and on the remote control unit and hold it . Enter your 4-digit password using buttons 0 - 9. • A confirmation screen appears. 7 Press A. 8 Press HOME MENU to exit ... shipment. 6 Press HOME MENU to exit the menu. • Blocking a rating causes more severe ratings to be automatically blocked as well. PDP-5045HD/PDP-4345HD Your password No.: If you select "Off" in step 6 under "Clearing the password", press the ENTER button on . 09 Tuner ...
... automatically unblocked. • If you forget the password When the message "Enter your password so you press ENTER, the setting is off and on the remote control unit and hold it . Enter your 4-digit password using buttons 0 - 9. • A confirmation screen appears. 7 Press A. 8 Press HOME MENU to exit ... shipment. 6 Press HOME MENU to exit the menu. • Blocking a rating causes more severe ratings to be automatically blocked as well. PDP-5045HD/PDP-4345HD Your password No.: If you select "Off" in step 6 under "Clearing the password", press the ENTER button on . 09 Tuner ...
Owner's Manual
Page 37
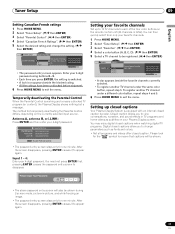
...the desired rating and change parameters such as subtitles on your Plasma Display screen. B) xxxxxxxxxxxxxxxxxxxxx xxxxxxxxxxxxxxxxxxxxx xxxxxxxxxxxxxxxxxxxxx Enter Disable Parental Control • The password entry screen stays only for one minute. You need not press ENTER first, pressing ENTER causes ...pressing ENTER causes it to ensure that captions will also be shown. The method for temporarily deactivating the Parental Control differs, depending on the remote control unit (40 channels in -picture, and while freezing an image. • The password entry screen stays...
...the desired rating and change parameters such as subtitles on your Plasma Display screen. B) xxxxxxxxxxxxxxxxxxxxx xxxxxxxxxxxxxxxxxxxxx xxxxxxxxxxxxxxxxxxxxx Enter Disable Parental Control • The password entry screen stays only for one minute. You need not press ENTER first, pressing ENTER causes ...pressing ENTER causes it to ensure that captions will also be shown. The method for temporarily deactivating the Parental Control differs, depending on the remote control unit (40 channels in -picture, and while freezing an image. • The password entry screen stays...
Owner's Manual
Page 44
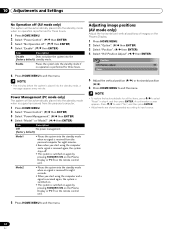
... system is switched on. • The system is switched on again by pressing STANDBY/ON on the Plasma Display or TV on the remote control unit. 10 Adjustments and Settings No Operation off (AV mode only) The system will be automatically placed into the standby mode when no operation... is performed for three hours. 1 Press HOME MENU. 2 Select "Power Control". ( / then ENTER) 3 Select "No Operation off . • The system is switched on again by pressing STANDBY/ON on the Plasma Display or TV on the remote control unit. • To restore the factory defaults for all the items, press...
... system is switched on. • The system is switched on again by pressing STANDBY/ON on the Plasma Display or TV on the remote control unit. 10 Adjustments and Settings No Operation off (AV mode only) The system will be automatically placed into the standby mode when no operation... is performed for three hours. 1 Press HOME MENU. 2 Select "Power Control". ( / then ENTER) 3 Select "No Operation off . • The system is switched on again by pressing STANDBY/ON on the Plasma Display or TV on the remote control unit. • To restore the factory defaults for all the items, press...

Owner's Manual
Page 50
...cable (commercially available) S-Video cable (commercially available) DVD player VCR Displaying a VCR image To watch a DVD image, press INPUT 1 on the remote control unit or press INPUT on the Plasma Display to select INPUT2. • The INPUT 2 terminals are checked for cable connections in the order where; ...only terminals that are to be actually used . 50 En Displaying a DVD image To watch a VCR image, press INPUT 2 on the remote control unit or press INPUT on the Plasma Display to select INPUT1. • Refer to the relevant instruction manual (DVD player, personal computer, ...
...cable (commercially available) S-Video cable (commercially available) DVD player VCR Displaying a VCR image To watch a DVD image, press INPUT 1 on the remote control unit or press INPUT on the Plasma Display to select INPUT2. • The INPUT 2 terminals are checked for cable connections in the order where; ...only terminals that are to be actually used . 50 En Displaying a DVD image To watch a VCR image, press INPUT 2 on the remote control unit or press INPUT on the Plasma Display to select INPUT1. • Refer to the relevant instruction manual (DVD player, personal computer, ...
Owner's Manual
Page 51
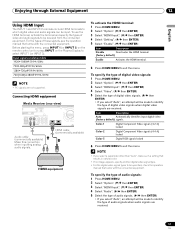
... signals to identify the type of audio signals when audio signals are received. 51 En Before starting the menu, press INPUT 1 (or INPUT 3) on the remote control unit or press INPUT on the Plasma Display to exit the menu. Connecting HDMI equipment Media Receiver (rear view) DIGITAL OUT OPTICAL (TS) S400 VIDEO...
... signals to identify the type of audio signals when audio signals are received. 51 En Before starting the menu, press INPUT 1 (or INPUT 3) on the remote control unit or press INPUT on the Plasma Display to exit the menu. Connecting HDMI equipment Media Receiver (rear view) DIGITAL OUT OPTICAL (TS) S400 VIDEO...

Owner's Manual
Page 52
...) 5 Press HOME MENU to select INPUT4. Connect the VCR controller to the VCR control terminal on the rear of the Media Receiver and then position the controller so that its light emitting section faces the remote control sensor on the Plasma Display to exit the menu. Enjoying a...to connect analog audio cables. Avoiding unwanted feedback You can prevent unwanted feedback from the game console or camcorder, press INPUT 4 on the remote control unit or press INPUT on the recording equipment. You can record, for cable connections in the order where; 1) Component Video, 2) S-Video...
...) 5 Press HOME MENU to select INPUT4. Connect the VCR controller to the VCR control terminal on the rear of the Media Receiver and then position the controller so that its light emitting section faces the remote control sensor on the Plasma Display to exit the menu. Enjoying a...to connect analog audio cables. Avoiding unwanted feedback You can prevent unwanted feedback from the game console or camcorder, press INPUT 4 on the remote control unit or press INPUT on the recording equipment. You can record, for cable connections in the order where; 1) Component Video, 2) S-Video...
Owner's Manual
Page 55
...VHS recorder Media Receiver POWER REC DATA ON STANDBY TIMER ACQUISITION D-VHS recorder Displaying a D-VHS image To watch a D-VHS image, press i.LINK on the remote control unit or press INPUT on the Plasma Display to INPUT 1, 2, 3, or 4 terminals on VHS tape, S-VHS tape, or (if with your D-VHS...off the other data to be copied from that D-VHS recorder. See "Setting up to two D-VHS recorders that support i.LINK. You can control one of these D-VHS recorders (basic functions only). • Some D-VHS recorders connected through i.LINK may not allow copy-restricted video, audio,...
...VHS recorder Media Receiver POWER REC DATA ON STANDBY TIMER ACQUISITION D-VHS recorder Displaying a D-VHS image To watch a D-VHS image, press i.LINK on the remote control unit or press INPUT on the Plasma Display to INPUT 1, 2, 3, or 4 terminals on VHS tape, S-VHS tape, or (if with your D-VHS...off the other data to be copied from that D-VHS recorder. See "Setting up to two D-VHS recorders that support i.LINK. You can control one of these D-VHS recorders (basic functions only). • Some D-VHS recorders connected through i.LINK may not allow copy-restricted video, audio,...
Owner's Manual
Page 57
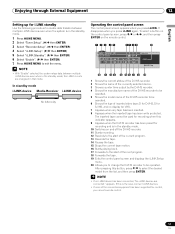
..., connect i.LINK devices. • If none of the connected equipment has been supported for recording and is in the standby mode. 10 Switches on the remote control. 1 2 3 45 67 8 9 20 D-VHS4 XXXXXXX XXX No1394 00:00:00 D ON/OFF REC Device List • D-VHS4 A i.LINK Setup • With "Enable" selected...up for VHS. 7 Appears when any tape has been inserted. 8 Appears when the inserted tape has been write protected. To select a button on the control panel screen, press / or / , and then press ENTER on and off the D-VHS recorder. 11 Starts recording. 12 Rewinds to the start of ...
..., connect i.LINK devices. • If none of the connected equipment has been supported for recording and is in the standby mode. 10 Switches on the remote control. 1 2 3 45 67 8 9 20 D-VHS4 XXXXXXX XXX No1394 00:00:00 D ON/OFF REC Device List • D-VHS4 A i.LINK Setup • With "Enable" selected...up for VHS. 7 Appears when any tape has been inserted. 8 Appears when the inserted tape has been write protected. To select a button on the control panel screen, press / or / , and then press ENTER on and off the D-VHS recorder. 11 Starts recording. 12 Rewinds to the start of ...


