

Installation Manual
Page 1
... viewing of front seat video should ever occur while the vehicle is properly connected to work properly. Ensure that can detect the operation of car's body (Another electronic device in the car) Important • When this unit or any other equipment. If you to the power terminal of images on , control signals are color-coded. Cover any cables. - MEDIA CENTER RECEIVER AUTORADIO MULTIMEDIA RECEPTOR Y CENTRO DE COMUNICACIONES MVH-P8200BT MVH...
... viewing of front seat video should ever occur while the vehicle is properly connected to work properly. Ensure that can detect the operation of car's body (Another electronic device in the car) Important • When this unit or any other equipment. If you to the power terminal of images on , control signals are color-coded. Cover any cables. - MEDIA CENTER RECEIVER AUTORADIO MULTIMEDIA RECEPTOR Y CENTRO DE COMUNICACIONES MVH-P8200BT MVH...

Installation Manual
Page 3
...). Red Connect to Green and Green/black leads. Clamp firmly with RCA cables (sold separately) English Connection method 1. System remote control Left Right � Subwoofer � � Subwoofer � � Front speaker � � Rear speaker Perform these connections when � using a subwoofer of this unit is monaural. The subwoofer output of the parking brake switch depends on the vehicle model. Pioneer IP-BUS accessories (sold separately) Blue/white Connect to system control terminal of the power amp or auto-antenna relay control...
...). Red Connect to Green and Green/black leads. Clamp firmly with RCA cables (sold separately) English Connection method 1. System remote control Left Right � Subwoofer � � Subwoofer � � Front speaker � � Rear speaker Perform these connections when � using a subwoofer of this unit is monaural. The subwoofer output of the parking brake switch depends on the vehicle model. Pioneer IP-BUS accessories (sold separately) Blue/white Connect to system control terminal of the power amp or auto-antenna relay control...
Owner's Manual
Page 2
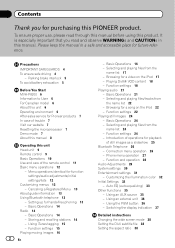
... and observe WARNINGs and CAUTIONs in a safe and accessible place for a video on the iPod 22 - Parking brake interlock 5 To avoid battery exhaustion 5 Before You Start MVH-P8200 6 Information to User 6 For Canadian model 6 About this unit 6 Operating environment 6 After-sales service for purchasing this PIONEER product. Connection menu operation 26 - Using an AUX source 35 - Switching the display indication 37 Detailed instructions Changing the wide screen mode 38 Setting the DivX subtitle file 38 Setting the aspect ratio...
... and observe WARNINGs and CAUTIONs in a safe and accessible place for a video on the iPod 22 - Parking brake interlock 5 To avoid battery exhaustion 5 Before You Start MVH-P8200 6 Information to User 6 For Canadian model 6 About this unit 6 Operating environment 6 After-sales service for purchasing this PIONEER product. Connection menu operation 26 - Using an AUX source 35 - Switching the display indication 37 Detailed instructions Changing the wide screen mode 38 Setting the DivX subtitle file 38 Setting the aspect ratio...

Owner's Manual
Page 6
... ID: AJDK029 MODEL NO.: MVH-P8200BT IC: 775E-K029 This equipment complies with FCC/IC radiation exposure limits set forth for uncontrolled equipment and meets the FCC/IC radio frequency (RF) Exposure Guidelines in Supplement C to hear outside sounds. ! Information to User Alteration or modifications carried out without maximum permissive exposure evaluation (MPE). CAUTION ! If the battery is desirable...
... ID: AJDK029 MODEL NO.: MVH-P8200BT IC: 775E-K029 This equipment complies with FCC/IC radiation exposure limits set forth for uncontrolled equipment and meets the FCC/IC radio frequency (RF) Exposure Guidelines in Supplement C to hear outside sounds. ! Information to User Alteration or modifications carried out without maximum permissive exposure evaluation (MPE). CAUTION ! If the battery is desirable...

Owner's Manual
Page 7
... operations may lead to battery drain. CUSTOMER SUPPORT DIVISION P.O. Before You Start Section 02 English After-sales service for Pioneer products Please contact the dealer or distributor from where you refer to this unit for the first time after -sales service (including warranty conditions) or any other pointed instrument. If the unit fails to connect the red lead (ACC) of Canada, Inc. RESET button 1 Remove...
... operations may lead to battery drain. CUSTOMER SUPPORT DIVISION P.O. Before You Start Section 02 English After-sales service for Pioneer products Please contact the dealer or distributor from where you refer to this unit for the first time after -sales service (including warranty conditions) or any other pointed instrument. If the unit fails to connect the red lead (ACC) of Canada, Inc. RESET button 1 Remove...

Owner's Manual
Page 10
... image screen for the audio source. Press to display the folder list, file list or preset channel list depending on the source. ject an incoming call or re- If the background setting on page 36.) Basic Operations Important ! When playing external storage de- CAPE Music (compressed audio)- Move to select different displays for the video source. Also used . i Thumb pad Functions are used for volume control. While operating the phone n ON HOOK source, press to preset the desired station...
... image screen for the audio source. Press to display the folder list, file list or preset channel list depending on the source. ject an incoming call or re- If the background setting on page 36.) Basic Operations Important ! When playing external storage de- CAPE Music (compressed audio)- Move to select different displays for the video source. Also used . i Thumb pad Functions are used for volume control. While operating the phone n ON HOOK source, press to preset the desired station...

Owner's Manual
Page 11
... the remote con- CAUTION ! If the battery leaks, wipe the remote control completely clean and install a new battery. trol. 2 Insert the battery with metallic objects. ! If you can't attach the front panel to the head unit. to cycle between: XM (XM tuner)-SIRIUS (SIRIUS tuner)-Digital Radio (HD Radio tuner)/Radio (tuner)-USB (USB storage device)/iPod (iPod connected using for the first time, pull out the film protruding from theft 1 Press the detach button to operate. Replace only...
... the remote con- CAUTION ! If the battery leaks, wipe the remote control completely clean and install a new battery. trol. 2 Insert the battery with metallic objects. ! If you can't attach the front panel to the head unit. to cycle between: XM (XM tuner)-SIRIUS (SIRIUS tuner)-Digital Radio (HD Radio tuner)/Radio (tuner)-USB (USB storage device)/iPod (iPod connected using for the first time, pull out the film protruding from theft 1 Press the detach button to operate. Replace only...

Owner's Manual
Page 14
... 1 When a call is received, press M.C. ! up . Turning private mode on page 26. 2 Function settings Operate the Bluetooth telephone function menu. The estimated call is selected on page 48. 2 Text information area ! left or right. Answering an incoming call 1 When a call time appears in the display (this unit 1 Connection Operate the Bluetooth telephone connection menu. down . Program service name ! Band/Preset number/Frequency indica- left or right, you release M.C. Adjusting the other party's listening...
... 1 When a call is received, press M.C. ! up . Turning private mode on page 26. 2 Function settings Operate the Bluetooth telephone function menu. The estimated call is selected on page 48. 2 Text information area ! left or right. Answering an incoming call 1 When a call time appears in the display (this unit 1 Connection Operate the Bluetooth telephone connection menu. down . Program service name ! Band/Preset number/Frequency indica- left or right, you release M.C. Adjusting the other party's listening...

Owner's Manual
Page 15
... iPod models are used. to select the function. Using iTunes tagging This function can be stored on this unit, the tag information will show up to your iPod firmware. ! iPod nano 3rd generation - iPod touch 2nd generation - to confirm the selection. Operating this unit 1 Tune in to the broadcast station. 2 Press and hold to display the setting mode. 2 Turn M.C. iPod nano 4th generation - iPod classic 120GB - if appears in to only those radio stations...
... iPod models are used. to select the function. Using iTunes tagging This function can be stored on this unit, the tag information will show up to your iPod firmware. ! iPod nano 3rd generation - iPod touch 2nd generation - to confirm the selection. Operating this unit 1 Tune in to the broadcast station. 2 Press and hold to display the setting mode. 2 Turn M.C. iPod nano 4th generation - iPod classic 120GB - if appears in to only those radio stations...

Owner's Manual
Page 17
... USB will turn off unless the control mode is set to Basic menu operations on a USB storage device 1 Open the USB connector cover. 2 Plug in and the ignition switch is set to a USB cable and AUX input using a USB cable. Playing 1 When a file is selected, press M.C. up or down . Browsing for a video on an iPod 1 Open the USB connector cover. 2 With an interface cable (e.g., CD-IU50V), connect the iPod to iPod. ! Selecting a folder 1 Push M.C. Incompatible text stored with the contact surface facing down . Changing...
... USB will turn off unless the control mode is set to Basic menu operations on a USB storage device 1 Open the USB connector cover. 2 Plug in and the ignition switch is set to a USB cable and AUX input using a USB cable. Playing 1 When a file is selected, press M.C. up or down . Browsing for a video on an iPod 1 Open the USB connector cover. 2 With an interface cable (e.g., CD-IU50V), connect the iPod to iPod. ! Selecting a folder 1 Push M.C. Incompatible text stored with the contact surface facing down . Changing...

Owner's Manual
Page 19
.... 1 Press M.C. One - Operating this unit. to display the setting mode. 2 Use M.C. Custom (DivX external subtitles) For details about the settings, refer to Changing the wide screen mode on page 38. 3 Press M.C. to display the setting mode. 2 Turn M.C. Deactivation Code - to display the desired code. Songs - iPod 5th generation This unit's iPod function allows you to Displaying the DivXâ VOD registration code on page 38. 3 Press M.C. Audio - En 19 to display the setting mode. 2 Turn M.C. A/V Format (switching media file types) 1 Press M.C. Original...
.... 1 Press M.C. One - Operating this unit. to display the setting mode. 2 Use M.C. Custom (DivX external subtitles) For details about the settings, refer to Changing the wide screen mode on page 38. 3 Press M.C. to display the setting mode. 2 Turn M.C. Deactivation Code - to display the desired code. Songs - iPod 5th generation This unit's iPod function allows you to Displaying the DivXâ VOD registration code on page 38. 3 Press M.C. Audio - En 19 to display the setting mode. 2 Turn M.C. A/V Format (switching media file types) 1 Press M.C. Original...

Owner's Manual
Page 20
... the control mode is set to iPod. - Refer to Wide Mode (switching the wide mode) on the previous page. Display (display setting) ! Display (display setting) - Refer to Searching the list by turning M.C. Switching the control mode to Time Search (time search) on page 18. 1 Press M.C. Section 03 Operating this setting is on, you can select the following functions are still accessible from this unit. ! Pausing ! Refer to iPod pauses song playback. DivX® Subtitle (DivX subtitle file settings...
... the control mode is set to iPod. - Refer to Wide Mode (switching the wide mode) on the previous page. Display (display setting) ! Display (display setting) - Refer to Searching the list by turning M.C. Switching the control mode to Time Search (time search) on page 18. 1 Press M.C. Section 03 Operating this setting is on, you can select the following functions are still accessible from this unit. ! Pausing ! Refer to iPod pauses song playback. DivX® Subtitle (DivX subtitle file settings...
Owner's Manual
Page 26
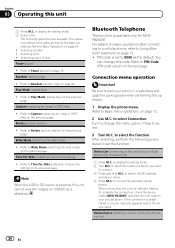
.... PIN code is available only for the basic operations. Section 03 Operating this unit cannot view still images on USB/SD as the default. Refer to Using Bluetooth telephone on the previous page. Random (random play ) ! Connection menu operation Important Be sure to select Connection. to park your cellular phone. Turn to display the setting mode. 2 Turn M.C. Refer to Basic menu operations on the previous page. Refer to Pause (pause) on page 24. ! to change...
.... PIN code is available only for the basic operations. Section 03 Operating this unit cannot view still images on USB/SD as the default. Refer to Using Bluetooth telephone on the previous page. Random (random play ) ! Connection menu operation Important Be sure to select Connection. to park your cellular phone. Turn to display the setting mode. 2 Turn M.C. Refer to Basic menu operations on the previous page. Refer to Pause (pause) on page 24. ! to change...

Owner's Manual
Page 27
... name of this unit can change the menu option. While this operation. To complete the connection, check the device name (MVH-P8200BT) and enter the link code on . 1 Press M.C. lity of this operation. 1 Display the phone menu. in the same display, the PIN code you can be turned on your cellular phone. to verify the connection. PIN Code (PIN code input) To connect your Bluetooth device is not displayed, select Search Again. ! to display the setting mode. 2 Turn M.C. to turn automatic connection on or...
... name of this unit can change the menu option. While this operation. To complete the connection, check the device name (MVH-P8200BT) and enter the link code on . 1 Press M.C. lity of this operation. 1 Display the phone menu. in the same display, the PIN code you can be turned on your cellular phone. to verify the connection. PIN Code (PIN code input) To connect your Bluetooth device is not displayed, select Search Again. ! to display the setting mode. 2 Turn M.C. to turn automatic connection on or...

Owner's Manual
Page 32
... to Appearance (screen/illumination color) on the next page). to customize the color. You can turn the demo display on or off. to turn the auto-equalizer on or off. If you select USB, SD as the source, you can be used for full-range speaker (Full) or subwoofer (Subwoofer) connection. to display the initial setting menu. 3 Turn M.C. Turn for rear full-range speaker connection (Full). 1 Press M.C. to change this unit Notes ! to display the setting mode. 2 Turn M.C. to select Color Setting in the audio menu...
... to Appearance (screen/illumination color) on the next page). to customize the color. You can turn the demo display on or off. to turn the auto-equalizer on or off. If you select USB, SD as the source, you can be used for full-range speaker (Full) or subwoofer (Subwoofer) connection. to display the initial setting menu. 3 Turn M.C. Turn for rear full-range speaker connection (Full). 1 Press M.C. to change this unit Notes ! to display the setting mode. 2 Turn M.C. to select Color Setting in the audio menu...
Owner's Manual
Page 33
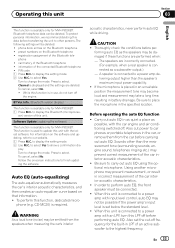
.... ! CAUTION ! forming auto EQ as a subwoofer output.) - Carry out auto EQ in battery drainage. When this LPF off frequency for MVH-P8200BT. Also set below the standard level. ! Operating this unit. Bluetooth telephone data can be deleted. ! to select Yes. to display the setting mode. 2 Use M.C. Press to display the setting mode. 2 Use M.C. Cleared is required. BT Ver. sor) version of the car interior acoustic characteristics. ! Software Update (updating the software) This function is available only for MVH-P8200BT...
.... ! CAUTION ! forming auto EQ as a subwoofer output.) - Carry out auto EQ in battery drainage. When this LPF off frequency for MVH-P8200BT. Also set below the standard level. ! Operating this unit. Bluetooth telephone data can be deleted. ! to select Yes. to display the setting mode. 2 Use M.C. Press to display the setting mode. 2 Use M.C. Cleared is required. BT Ver. sor) version of the car interior acoustic characteristics. ! Software Update (updating the software) This function is available only for MVH-P8200BT...

Owner's Manual
Page 34
... select. 6 Plug the microphone into the microphone input jack on , turn the source on active subwoofers or external amps delay the lower sounds. ! If the engine is turned off, press SRC to Initial Settings on where you place the microphone. Performing auto EQ 1 Stop the car in the air conditioner or heater may prevent correct auto EQ. # If this unit ! Section 03 Operating this unit is left...
... select. 6 Plug the microphone into the microphone input jack on , turn the source on active subwoofers or external amps delay the lower sounds. ! If the engine is turned off, press SRC to Initial Settings on where you place the microphone. Performing auto EQ 1 Stop the car in the air conditioner or heater may prevent correct auto EQ. # If this unit ! Section 03 Operating this unit is left...

Owner's Manual
Page 35
... audio/video player can enjoy the video contents of the connected iPod. ! For more details, refer to select the function. to Head unit on this unit. Refer to display the function menu. 2 Turn M.C. En 35 However, depending on page 19. to Display (display setting) on the cable, a reverse connection between the red (right side audio) cable and yellow (video) cable may cause distortion, color change or malfunction. If the microphone is automatically set the function. Other Functions Using an AUX source When connecting auxiliary device using...
... audio/video player can enjoy the video contents of the connected iPod. ! For more details, refer to select the function. to Head unit on this unit. Refer to display the function menu. 2 Turn M.C. En 35 However, depending on page 19. to Display (display setting) on the cable, a reverse connection between the red (right side audio) cable and yellow (video) cable may cause distortion, color change or malfunction. If the microphone is automatically set the function. Other Functions Using an AUX source When connecting auxiliary device using...

Owner's Manual
Page 45
... appropriate remote control buttons are correct. Load a new battery. Cables are incor- The data could no sound. The attenuator is Turn the attenuator on . Sub-folders cannot be operated. range again. Problems during file repeat play has been se- The iPod version Update the iPod is incorrect for the display. Confirm once more nectors are not connected correctly. that all connecrectly connected. The aspect ratio setting is old. The parking brake is...
... appropriate remote control buttons are correct. Load a new battery. Cables are incor- The data could no sound. The attenuator is Turn the attenuator on . Sub-folders cannot be operated. range again. Problems during file repeat play has been se- The iPod version Update the iPod is incorrect for the display. Confirm once more nectors are not connected correctly. that all connecrectly connected. The aspect ratio setting is old. The parking brake is...

Owner's Manual
Page 46
... Error This unit's DivX registration code has not been authorized by this unit. Not compatible SD storage device Remove your device and replace it . Message Cause Action Check USB The USB connec- File Not Playable-High Definition The connected ! Connect a USB Mass Storage Class compliant device. The external storage device in some- Check that cannot be played can play DivX HD files. The connected USB portable audio player/ USB memory consumes more than maximum allowable current. is not supported by the DivX...
... Error This unit's DivX registration code has not been authorized by this unit. Not compatible SD storage device Remove your device and replace it . Message Cause Action Check USB The USB connec- File Not Playable-High Definition The connected ! Connect a USB Mass Storage Class compliant device. The external storage device in some- Check that cannot be played can play DivX HD files. The connected USB portable audio player/ USB memory consumes more than maximum allowable current. is not supported by the DivX...


