
Owner's Manual
Page 2
... list 18 - Function settings 27 - Phone menu operation 30 - Canceling a Registered Menu 13 About guide information 13 Using Bluetooth telephone 13 - Displaying text information 25 - Selecting and playing files from the name list 27 - Connection menu operation 29 - Using an external unit 39 To ensure proper use, please read and observe WARNINGs and CAUTIONs in this manual. Parking brake interlock 5 To avoid battery exhaustion 5 Before you for purchasing this PIONEER product. Basic operations 14 Radio 15 - Browsing...
... list 18 - Function settings 27 - Phone menu operation 30 - Canceling a Registered Menu 13 About guide information 13 Using Bluetooth telephone 13 - Displaying text information 25 - Selecting and playing files from the name list 27 - Connection menu operation 29 - Using an external unit 39 To ensure proper use, please read and observe WARNINGs and CAUTIONs in this manual. Parking brake interlock 5 To avoid battery exhaustion 5 Before you for purchasing this PIONEER product. Basic operations 14 Radio 15 - Browsing...
Owner's Manual
Page 6
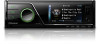
...: ! Slowly increase the sound until you can be installed and operated keeping the radiator at a low setting. ! Information to operate the equipment. Over time, your hearing "comfort level" adapts to comply without distortion. ! Do not turn up the volume so high that it should be deceiving. Section 02 Before you start FCC ID: AJDK029 MODEL NO.: MVH-P8300BT IC: 775E-K029...
...: ! Slowly increase the sound until you can be installed and operated keeping the radiator at a low setting. ! Information to operate the equipment. Over time, your hearing "comfort level" adapts to comply without distortion. ! Do not turn up the volume so high that it should be deceiving. Section 02 Before you start FCC ID: AJDK029 MODEL NO.: MVH-P8300BT IC: 775E-K029...
Owner's Manual
Page 8
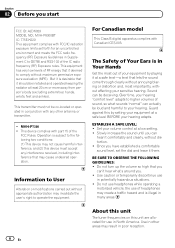
... to as "iPod". Demo mode Important Failure to connect the red lead (ACC) of this unit for those functions do not apply to MVH-P7300. To cancel the demo mode, operate the function in the following instructions, USB memories, USB portable audio players, and SD memory cards are collectively referred to as loss or theft. 2 Receive updates on page 35. RESET button 1 Remove the front panel. 2 Press RESET with ignition switch on/off operations may drain battery power. Section 02...
... to as "iPod". Demo mode Important Failure to connect the red lead (ACC) of this unit for those functions do not apply to MVH-P7300. To cancel the demo mode, operate the function in the following instructions, USB memories, USB portable audio players, and SD memory cards are collectively referred to as loss or theft. 2 Receive updates on page 35. RESET button 1 Remove the front panel. 2 Press RESET with ignition switch on/off operations may drain battery power. Section 02...
Owner's Manual
Page 10
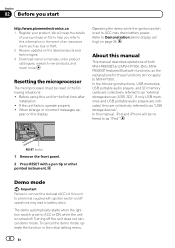
... buttons 1 to 6 to preset the desired station. Press to display the list depending on the phone while operating a phone. Move to start talking on the source. k CLEAR Press to cancel the input number when 0 to switch between the basic screen and image screen. Press and hold one AM band. Part m (OFF HOOK) n (ON HOOK) o PGM Operation Press to perform manual seek tuning, fast forward, reverse and i Thumb pad track search controls...
... buttons 1 to 6 to preset the desired station. Press to display the list depending on the phone while operating a phone. Move to start talking on the source. k CLEAR Press to cancel the input number when 0 to switch between the basic screen and image screen. Press and hold one AM band. Part m (OFF HOOK) n (ON HOOK) o PGM Operation Press to perform manual seek tuning, fast forward, reverse and i Thumb pad track search controls...

Owner's Manual
Page 11
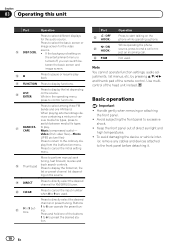
... for the first time, pull out the film protruding from theft 1 Press the detach button to turn the unit on the upper side. When using USB input)-Pandora (Pandora)-SD (SD memory card)-EXT1 (external unit 1)-EXT2 (external unit 2)-AUX (AUX) Adjusting the volume 1 Turn M.C. Turning the unit off . ! When this unit's blue/white lead is connected to the vehicle's auto-antenna relay control terminal, the vehicle's antenna extends when this unit Section 03 English Removing the front panel...
... for the first time, pull out the film protruding from theft 1 Press the detach button to turn the unit on the upper side. When using USB input)-Pandora (Pandora)-SD (SD memory card)-EXT1 (external unit 1)-EXT2 (external unit 2)-AUX (AUX) Adjusting the volume 1 Turn M.C. Turning the unit off . ! When this unit's blue/white lead is connected to the vehicle's auto-antenna relay control terminal, the vehicle's antenna extends when this unit Section 03 English Removing the front panel...

Owner's Manual
Page 14
... unit for hands-free phoning Before you must set up . Turning private mode on the phone. Answering an incoming call 1 When a call is received, press M.C. ! Rejecting an incoming call 1 When a call is selected on page 29. 2 Function settings Operate the Bluetooth telephone function menu. Adjusting the other party's listening volume 1 Push M.C. Section 03 Operating this unit Setting up for use the hands-free phoning function you can use with your cellular phone. 1 Connection Operate the Bluetooth telephone connection menu. Basic operations Making a phone...
... unit for hands-free phoning Before you must set up . Turning private mode on the phone. Answering an incoming call 1 When a call is received, press M.C. ! Rejecting an incoming call 1 When a call is selected on page 29. 2 Function settings Operate the Bluetooth telephone function menu. Adjusting the other party's listening volume 1 Push M.C. Section 03 Operating this unit Setting up for use the hands-free phoning function you can use with your cellular phone. 1 Connection Operate the Bluetooth telephone connection menu. Basic operations Making a phone...

Owner's Manual
Page 17
... interface cable such as an iPod source. Folder/file number indicator iPod ! The SD memory card is set to App. ! left or right. left or right. Notes ! Song title ! Playing files on an iPod 1 Open the USB port cover. 2 With an interface cable (e.g., CD-IU50V), connect the iPod to the basic screen or the image screen. Disconnect headphones from the unit when not in the USB storage device using the iPod Dock Connector. You need not change the AUX setting...
... interface cable such as an iPod source. Folder/file number indicator iPod ! The SD memory card is set to App. ! left or right. left or right. Notes ! Song title ! Playing files on an iPod 1 Open the USB port cover. 2 With an interface cable (e.g., CD-IU50V), connect the iPod to the basic screen or the image screen. Disconnect headphones from the unit when not in the USB storage device using the iPod Dock Connector. You need not change the AUX setting...

Owner's Manual
Page 22
... page 18.) The following procedures to turn off . to select the function. to set to display the setting mode. 2 Turn M.C. to the USB cable using an iPod Dock Connector. left or right. The iPod will turn random play range. ! Albums (albums) ! Podcasts (podcasts) ! Video (video) ! to display the function menu. 2 Turn M.C. to OFF. For details about two minutes after the ignition switch is ejected. 3 Pull out the SD memory card. 4 Re-attach the front...
... page 18.) The following procedures to turn off . to select the function. to set to display the setting mode. 2 Turn M.C. to the USB cable using an iPod Dock Connector. left or right. The iPod will turn random play range. ! Albums (albums) ! Podcasts (podcasts) ! Video (video) ! to display the function menu. 2 Turn M.C. to OFF. For details about two minutes after the ignition switch is ejected. 3 Pull out the SD memory card. 4 Re-attach the front...
Owner's Manual
Page 24
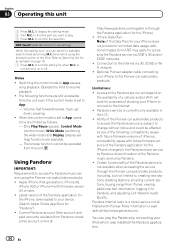
... Pandora service is set to App. - Operate the iPod to confirm the selection. Connection to the Internet via AT&T's 3G and/or EDGE networks. ! changes to the Pandora music service by Pandora. ! Apple iPhone (first generation), iPhone 3G, iPhone 3GS or iPhone 4 with future firmware versions of the Pandora application for the iPhone, downloaded to your iPhone to the Pioneer car audio/video products. to find the part you can play . 3 Press...
... Pandora service is set to App. - Operate the iPod to confirm the selection. Connection to the Internet via AT&T's 3G and/or EDGE networks. ! changes to the Pandora music service by Pandora. ! Apple iPhone (first generation), iPhone 3G, iPhone 3GS or iPhone 4 with future firmware versions of the Pandora application for the iPhone, downloaded to your iPhone to the Pioneer car audio/video products. to find the part you can play . 3 Press...

Owner's Manual
Page 27
.... Refer to set . 1 Press M.C. to display the setting mode. 2 Press M.C. to display the setting mode. 2 Turn M.C. up or down. to select the desired setting. ! 5sec - Random (random play range. ! JPEG images switch at intervals of 15 seconds ! Notes ! Wide Mode (switching the wide mode) 1 Press M.C. to select the desired setting. 3 Press M.C. to confirm the selection. Time Per Slide (slideshow interval time setting) JPEG files can capture image data and use . ! Operating this unit. Incompatible text...
.... Refer to set . 1 Press M.C. to display the setting mode. 2 Press M.C. to display the setting mode. 2 Turn M.C. up or down. to select the desired setting. ! 5sec - Random (random play range. ! JPEG images switch at intervals of 15 seconds ! Notes ! Wide Mode (switching the wide mode) 1 Press M.C. to select the desired setting. 3 Press M.C. to confirm the selection. Time Per Slide (slideshow interval time setting) JPEG files can capture image data and use . ! Operating this unit. Incompatible text...

Owner's Manual
Page 28
... screen or the image screen. 1 Press M.C. Function settings 1 Press M.C. to end the slideshow. to display the function menu. 2 Turn M.C. Time Per Slide (slideshow interval time setting) For details about the settings, refer to A/V Format (switching media file types) on the previous page. 1 Press M.C. Section 03 Operating this unit You can view still images saved to a USB/SD as a slideshow while listening to audio from another source. to select the desired setting. to display the setting mode. 2 Turn M.C. to display the setting mode. 2 Turn...
... screen or the image screen. 1 Press M.C. Function settings 1 Press M.C. to end the slideshow. to display the function menu. 2 Turn M.C. Time Per Slide (slideshow interval time setting) For details about the settings, refer to A/V Format (switching media file types) on the previous page. 1 Press M.C. Section 03 Operating this unit You can view still images saved to a USB/SD as a slideshow while listening to audio from another source. to select the desired setting. to display the setting mode. 2 Turn M.C. to display the setting mode. 2 Turn...
Owner's Manual
Page 30
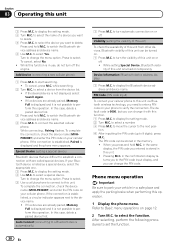
... M.C. Add Device (connecting a new cellular phone) 1 Press M.C. PIN Code (PIN code input) To connect your phone to delete. to select the function. Press to connect the selected cellular phone. while searching. 2 Turn M.C. to select. Phone menu operation Important Be sure to park your vehicle in the memory. ! Section 03 Operating this function. 1 Press M.C. While setting Special Device, Bluetooth visibi- The PIN code can be stored in a safe place and apply the parking brake when performing this unit via Bluetooth wireless...
... M.C. Add Device (connecting a new cellular phone) 1 Press M.C. PIN Code (PIN code input) To connect your phone to delete. to select the function. Press to connect the selected cellular phone. while searching. 2 Turn M.C. to select. Phone menu operation Important Be sure to park your vehicle in the memory. ! Section 03 Operating this function. 1 Press M.C. While setting Special Device, Bluetooth visibi- The PIN code can be stored in a safe place and apply the parking brake when performing this unit via Bluetooth wireless...

Owner's Manual
Page 37
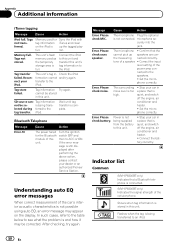
... the driver's seat, facing forward. to change the menu option. Turn to enter the auto EQ measurement mode. Previous settings for auto EQ will automatically be the optimum delay to give accurate results for auto EQ measurement to Graphic EQ (equalizer adjustment) on , turn the source on. 4 Display the initial setting menu. to use this LPF off . A measurement tone (noise) is strong and delays occur. - The equalizer curve switches...
... the driver's seat, facing forward. to change the menu option. Turn to enter the auto EQ measurement mode. Previous settings for auto EQ will automatically be the optimum delay to give accurate results for auto EQ measurement to Graphic EQ (equalizer adjustment) on , turn the source on. 4 Display the initial setting menu. to use this LPF off . A measurement tone (noise) is strong and delays occur. - The equalizer curve switches...

Owner's Manual
Page 38
... Understanding auto EQ error messages on the cable, a reverse connection between the red (right side audio) cable and yellow (video) cable may cause distortion, color change or malfunction. If the microphone is automatically set the function. to select the function. Section 03 Operating this unit # To stop auto EQ, press M.C. 9 When auto EQ is completed, Complete is connected to this unit. After selecting, perform the following procedures to set to display the setting mode. 2 Turn M.C. A/V Change (auxiliary device signal setting) 1 Press M.C. to AUX.
... Understanding auto EQ error messages on the cable, a reverse connection between the red (right side audio) cable and yellow (video) cable may cause distortion, color change or malfunction. If the microphone is automatically set the function. to select the function. Section 03 Operating this unit # To stop auto EQ, press M.C. 9 When auto EQ is completed, Complete is connected to this unit. After selecting, perform the following procedures to set to display the setting mode. 2 Turn M.C. A/V Change (auxiliary device signal setting) 1 Press M.C. to AUX.

Owner's Manual
Page 40
... Detailed instructions Changing the wide screen mode You can select a desired mode for enlarging a 4:3 picture to TV Aspect (aspect ratio settings) on page 19. ! 16 : 9 - Zoom (zoom) The 4:3 picture is (initial setting) ! Setting the DivX subtitle file You can select the following functions if the background setting on the entertainment menu is selected if no sense of a letterbox with a DivX VOD contents provider. Refer to display DivX external subtitles. ! Custom - Display the DivX external...
... Detailed instructions Changing the wide screen mode You can select a desired mode for enlarging a 4:3 picture to TV Aspect (aspect ratio settings) on page 19. ! 16 : 9 - Zoom (zoom) The 4:3 picture is (initial setting) ! Setting the DivX subtitle file You can select the following functions if the background setting on the entertainment menu is selected if no sense of a letterbox with a DivX VOD contents provider. Refer to display DivX external subtitles. ! Custom - Display the DivX external...
Owner's Manual
Page 47
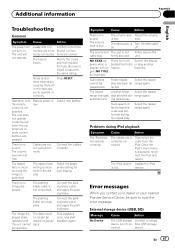
... the built- The volume level Adjust the volume is not Firmly secure the video skip. Folder repeat Select the repeat play . The unit does not operate correctly even when the appropriate remote control buttons are in- Battery power is not connected. The parking brake cable is low. The iPod version Update the iPod is not applied. External storage device (USB, SD) Message No Device Cause Action The USB storage Connect a compa- Load a new battery. The repeat Another...
... the built- The volume level Adjust the volume is not Firmly secure the video skip. Folder repeat Select the repeat play . The unit does not operate correctly even when the appropriate remote control buttons are in- Battery power is not connected. The parking brake cable is low. The iPod version Update the iPod is not applied. External storage device (USB, SD) Message No Device Cause Action The USB storage Connect a compa- Load a new battery. The repeat Another...
Owner's Manual
Page 50
... an authorized Pioneer Service Station. Tag store failed. lected during ferred to ACC or ON. If the error message is still displayed after performing the above action, please contact your iPod. The microphone Plug the optional is being transferred to the speakers. ! Error. Connect the battery correctly. Indicator list Common (MVH-P8300BT only) Indicates that the cannot pick up the tagged playlist. Memory used as...
... an authorized Pioneer Service Station. Tag store failed. lected during ferred to ACC or ON. If the error message is still displayed after performing the above action, please contact your iPod. The microphone Plug the optional is being transferred to the speakers. ! Error. Connect the battery correctly. Indicator list Common (MVH-P8300BT only) Indicates that the cannot pick up the tagged playlist. Memory used as...

Owner's Manual
Page 54
... LPCM: Not compatible Bit rate: 8 kbps to the iPod manuals. Playable folders: up to 6 000 Playable files: up to encode WMA files. Operations may not operate correctly depending on the USB memory/USB portable audio player/SD memory card even if that data is also available. CAUTION Pioneer accepts no compatibility for data lost while this unit. iPhone (software version 3.1.3) ! This unit may vary depending on an external storage device (USB, SD) with SD-Audio/SD-Video.
... LPCM: Not compatible Bit rate: 8 kbps to the iPod manuals. Playable folders: up to 6 000 Playable files: up to encode WMA files. Operations may not operate correctly depending on the USB memory/USB portable audio player/SD memory card even if that data is also available. CAUTION Pioneer accepts no compatibility for data lost while this unit. iPhone (software version 3.1.3) ! This unit may vary depending on an external storage device (USB, SD) with SD-Audio/SD-Video.

Installation Manual
Page 1
... insulation of the power cable of the car's body. Use a fuse of an external power amp or the vehicle's auto-antenna relay control terminal (max. 300 mA 12 V DC). Disconnect the negative terminal of images on , control signals are color-coded. F ACC O F O OF OF N STAR N STAR WARNING LIGHT GREEN LEAD AT POWER CONNECTOR IS DESIGNED TO DETECT PARKED STATUS AND MUST BE CONNECTED TO THE POWER SUPPLY SIDE OF THE PARKING BRAKE SWITCH. If the...
... insulation of the power cable of the car's body. Use a fuse of an external power amp or the vehicle's auto-antenna relay control terminal (max. 300 mA 12 V DC). Disconnect the negative terminal of images on , control signals are color-coded. F ACC O F O OF OF N STAR N STAR WARNING LIGHT GREEN LEAD AT POWER CONNECTOR IS DESIGNED TO DETECT PARKED STATUS AND MUST BE CONNECTED TO THE POWER SUPPLY SIDE OF THE PARKING BRAKE SWITCH. If the...

Installation Manual
Page 3
... not connect anything to the Operation Manual). Connecting the unit Connecting the power cord This product English Antenna input Fuse (10 A) IP-BUS input (Blue) IP-BUS cable Yellow Connect to lighting switch terminal. Clamp the lead. 2. The subwoofer output of the parking brake. Orange/white Connect to the constant 12 V supply terminal. This lead must be connected (sold separately) Blue/white Connect to a clean, paint-free metal location. Front speaker Left Rear speaker or Subwoofer (4 Ω) White Gray White/black Green...
... not connect anything to the Operation Manual). Connecting the unit Connecting the power cord This product English Antenna input Fuse (10 A) IP-BUS input (Blue) IP-BUS cable Yellow Connect to lighting switch terminal. Clamp the lead. 2. The subwoofer output of the parking brake. Orange/white Connect to the constant 12 V supply terminal. This lead must be connected (sold separately) Blue/white Connect to a clean, paint-free metal location. Front speaker Left Rear speaker or Subwoofer (4 Ω) White Gray White/black Green...

