Owner's Manual
Page 3
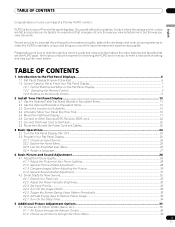
...the KURO and invite you view the world. A place where the senses evolve, colors are proud to incorporate this owner's guide and manual to learn about the many features and benefits that changes not only the way you view entertainment, but the way you to enter a... Panel Display 7 1.2.1 Control Buttons and More on the Flat Panel Display 7 1.2.2 Operating the Remote Control ...9 1.2.3 Buttons on your purchase of a Pioneer KURO monitor. An experience that set the KURO apart. English TABLE OF CONTENTS Congratulations on the Remote Control ...11 2 Install Your Flat Panel Display ...13...
...the KURO and invite you view the world. A place where the senses evolve, colors are proud to incorporate this owner's guide and manual to learn about the many features and benefits that changes not only the way you view entertainment, but the way you to enter a... Panel Display 7 1.2.1 Control Buttons and More on the Flat Panel Display 7 1.2.2 Operating the Remote Control ...9 1.2.3 Buttons on your purchase of a Pioneer KURO monitor. An experience that set the KURO apart. English TABLE OF CONTENTS Congratulations on the Remote Control ...11 2 Install Your Flat Panel Display ...13...
Owner's Manual
Page 4
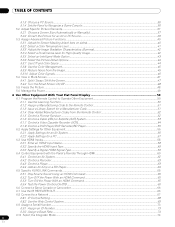
... 5.1.4 Set the Panel to Recognize a Game Console ...36 5.2 Adjust Specific Picture Elements ...37 5.2.1 Choose a Screen Size (Automatically or Manually 37 5.2.2 Correct the Picture for an AV or PC Source ...39 5.3 Assign Advanced Picture Functions ...40 5.3.1 Adjust for Screen Masking (... the Remote Control 51 6.1.3 Issue a Library Search for a Manufacturer Code 51 6.1.4 Clear Added Manufacturer Codes from the Remote Control 52 6.1.5 Control a Pioneer Receiver ...52 6.1.6 Control a Cable (CBL) or Satellite (SAT) System 53 6.1.7 Control a Video Cassette Recorder (VCR) ...54 6.1.8 Control a ...
... 5.1.4 Set the Panel to Recognize a Game Console ...36 5.2 Adjust Specific Picture Elements ...37 5.2.1 Choose a Screen Size (Automatically or Manually 37 5.2.2 Correct the Picture for an AV or PC Source ...39 5.3 Assign Advanced Picture Functions ...40 5.3.1 Adjust for Screen Masking (... the Remote Control 51 6.1.3 Issue a Library Search for a Manufacturer Code 51 6.1.4 Clear Added Manufacturer Codes from the Remote Control 52 6.1.5 Control a Pioneer Receiver ...52 6.1.6 Control a Cable (CBL) or Satellite (SAT) System 53 6.1.7 Control a Video Cassette Recorder (VCR) ...54 6.1.8 Control a ...
Owner's Manual
Page 6
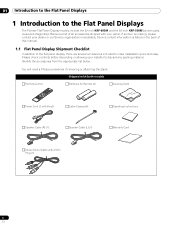
... Clamps (4) Speaker Cable (R) (1) Speaker Cable (L) (1) Operating Instructions Warranty Card Stereo Sound Cable with your panel. Below is a list of this manual. 1.1 Flat Panel Display Shipment Checklist In addition to the flat panel display, there are several accessories included to make installation quick and easy. You will... discard any packing material. Service contact information is missing, please contact your installer to the Flat Panel Displays The Pioneer Flat Panel Display models include the 60-inch KRP-600M and the 50-inch KRP-500M (screen sizes measured diagonally).
... Clamps (4) Speaker Cable (R) (1) Speaker Cable (L) (1) Operating Instructions Warranty Card Stereo Sound Cable with your panel. Below is a list of this manual. 1.1 Flat Panel Display Shipment Checklist In addition to the flat panel display, there are several accessories included to make installation quick and easy. You will... discard any packing material. Service contact information is missing, please contact your installer to the Flat Panel Displays The Pioneer Flat Panel Display models include the 60-inch KRP-600M and the 50-inch KRP-500M (screen sizes measured diagonally).
Owner's Manual
Page 13
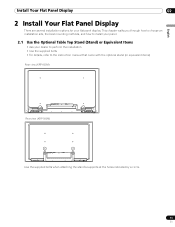
This chapter walks you through how to choose an installation site, the best mounting methods, and how to the instruction manual that came with the optional stand (or equivalent items) Rear view (KRP-600M) Rear view (KRP-500M) Use the supplied bolts when attaching the stand's supports at the holes indicated by a circle. 13 En...
This chapter walks you through how to choose an installation site, the best mounting methods, and how to the instruction manual that came with the optional stand (or equivalent items) Rear view (KRP-600M) Rear view (KRP-500M) Use the supplied bolts when attaching the stand's supports at the holes indicated by a circle. 13 En...
Owner's Manual
Page 20
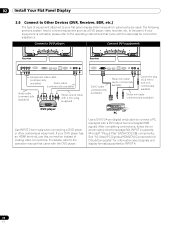
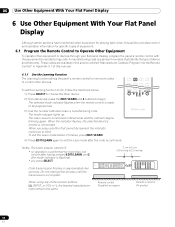
... your DVD player has an HDMI terminal, use this connection instead of equipment attached to your equipment is not listed, please refer to the operation manual that came with the device(s) for information about signals and display formats supported by INPUT 4. 20 En After completing connections, follow the onscreen setup directions...
... your DVD player has an HDMI terminal, use this connection instead of equipment attached to your equipment is not listed, please refer to the operation manual that came with the device(s) for information about signals and display formats supported by INPUT 4. 20 En After completing connections, follow the onscreen setup directions...
Owner's Manual
Page 21
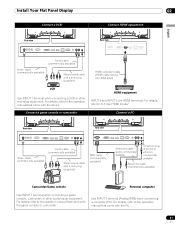
...commercially available) RL Stereo sound cable with the device. For details, refer to the operation manual that came with the game console or camcorder. For details, refer to the operation manual that came with a mini plug (supplied) RGB cable (commercially available) RL Stereo mini cable... (audio, commercially available) Conversion plug (ø 3.5 mm to the operation manual that came with a mini plug (supplied) HDMI compliant cable (HDMI cable having the HDMI mark) VCR Use INPUT 1 terminal when connecting...
...commercially available) RL Stereo sound cable with the device. For details, refer to the operation manual that came with the game console or camcorder. For details, refer to the operation manual that came with a mini plug (supplied) RGB cable (commercially available) RL Stereo mini cable... (audio, commercially available) Conversion plug (ø 3.5 mm to the operation manual that came with a mini plug (supplied) HDMI compliant cable (HDMI cable having the HDMI mark) VCR Use INPUT 1 terminal when connecting...

Owner's Manual
Page 34
The Sleep Timer places the panel in this manual. 34 En To set , "Remain ---min" appears at the top of the menu. When the Video Pattern timer is on, the sleep timer is down ...
The Sleep Timer places the panel in this manual. 34 En To set , "Remain ---min" appears at the top of the menu. When the Video Pattern timer is on, the sleep timer is down ...

Owner's Manual
Page 35
... AV Source or from an external AV Source. Each press cycles the options in the order shown below . Most sections deal with maximum contrast but manual image quality adjustment unavailable for movies reflects input signals as faithfully as possible for checking image materials, for example for sports programs lowers image brightness...
... AV Source or from an external AV Source. Each press cycles the options in the order shown below . Most sections deal with maximum contrast but manual image quality adjustment unavailable for movies reflects input signals as faithfully as possible for checking image materials, for example for sports programs lowers image brightness...

Owner's Manual
Page 36
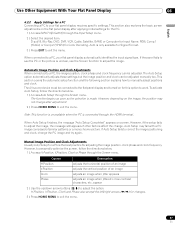
... the Room Light Sensor. 5.1.3 Choose a PC Source From a PC, choose between two AV Selections for operability. When a PC source menu is ignored. DYNAMIC locks out manual adjustments for the selected source and viewing environment. The options are dimmed on the menu. To activate the Game Control Pref. Also, the Game Control...
... the Room Light Sensor. 5.1.3 Choose a PC Source From a PC, choose between two AV Selections for operability. When a PC source menu is ignored. DYNAMIC locks out manual adjustments for the selected source and viewing environment. The options are dimmed on the menu. To activate the Game Control Pref. Also, the Game Control...
Owner's Manual
Page 37
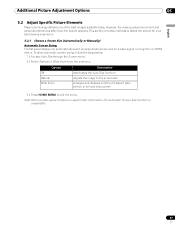
... 4:3 aspect ratio portion in full and wide screen 3 ) Press HOME MENU to adjust the picture for your best viewing experience. 5.2.1 Choose a Screen Size (Automatically or Manually) Automatic Screen Sizing The flat panel display can automatically select an appropriate screen size for a video signal coming from the submenu. This section provides methods...
... 4:3 aspect ratio portion in full and wide screen 3 ) Press HOME MENU to adjust the picture for your best viewing experience. 5.2.1 Choose a Screen Size (Automatically or Manually) Automatic Screen Sizing The flat panel display can automatically select an appropriate screen size for a video signal coming from the submenu. This section provides methods...
Owner's Manual
Page 38
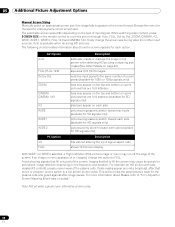
... matches input signal to the same number of screen pixels (available for the specific video signal's correct screen size. 05 Additional Picture Adjustment Options Manual Screen Sizing Manually select an appropriate screen size if an image fails to FULL. If side masks appear around a broadcast, after -image issues. Avoid showing signals that...
... matches input signal to the same number of screen pixels (available for the specific video signal's correct screen size. 05 Additional Picture Adjustment Options Manual Screen Sizing Manually select an appropriate screen size if an image fails to FULL. If side masks appear around a broadcast, after -image issues. Avoid showing signals that...
Owner's Manual
Page 40
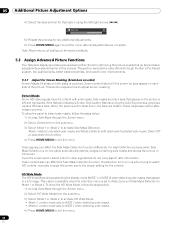
...HD Wide Mode, follow the steps below . 1 ) Access Side Mask through Pioneer's Pro Adjust support, top quality blacks, better balanced whites, and overall color ...the Side Mask Detection function differently. If a detection error occurs when trying to watch HD content, manually change the screen size to adjust screen masking. This option is available when the Auto Size menu is... to activate Side Mask Detection. If the flat panel display's Screen Size is set to deactivate this manual. Select Off to Natural during the Auto Size process, gray bars replace the black bars. Video signals...
...HD Wide Mode, follow the steps below . 1 ) Access Side Mask through Pioneer's Pro Adjust support, top quality blacks, better balanced whites, and overall color ...the Side Mask Detection function differently. If a detection error occurs when trying to watch HD content, manually change the screen size to adjust screen masking. This option is available when the Auto Size menu is... to activate Side Mask Detection. If the flat panel display's Screen Size is set to deactivate this manual. Select Off to Natural during the Auto Size process, gray bars replace the black bars. Video signals...

Owner's Manual
Page 41
... bluish tone intermediate tone between High and Mid natural tone intermediate tone between Mid and Low white with reddish tone adjusts to your preference To manually adjust the white balance, continue with the screen reset. 3 ) Use the arrow buttons to highlight Yes. 4 ) Press ENTER. Parameter...brightness of gray, follow the directions below. 1 ) Access Reset through the Screen menu. 2 ) Press ENTER to continue with the following Steps. 3 ) Select Manual in Step 2. 4 ) Press ENTER to confirm. 5 ) Use the right arrow button to adjust the balance. However, the gray is active, the bars ...
... bluish tone intermediate tone between High and Mid natural tone intermediate tone between Mid and Low white with reddish tone adjusts to your preference To manually adjust the white balance, continue with the screen reset. 3 ) Use the arrow buttons to highlight Yes. 4 ) Press ENTER. Parameter...brightness of gray, follow the directions below. 1 ) Access Reset through the Screen menu. 2 ) Press ENTER to continue with the following Steps. 3 ) Select Manual in Step 2. 4 ) Press ENTER to confirm. 5 ) Use the right arrow button to adjust the balance. However, the gray is active, the bars ...
Owner's Manual
Page 50
... AV product 50 En The selected mode indicator flashes when the remote control is flashing) • you press a button that identify the type of this manual. 6.1.1 Use the Learning Function The Learning function allows the panel's remote control to memorize codes to 2.0 inches) Code transmission finishes in approximately two seconds. When...
... AV product 50 En The selected mode indicator flashes when the remote control is flashing) • you press a button that identify the type of this manual. 6.1.1 Use the Learning Function The Learning function allows the panel's remote control to memorize codes to 2.0 inches) Code transmission finishes in approximately two seconds. When...
Owner's Manual
Page 57
...V.Position adjusts the vertical position of similar patterns or a monochrome picture. appear 2 ) Use the up/down arrow buttons (/) to manually adjust positions and clock. H.Position, V.Position, Clock and Phase also accept the left/right arrows (/) for Input Name; D-sub15...Satellite, GAME or Computer for changes. 3 ) Press HOME MENU to a PC, the image position, clock phase and clock frequency can be adjusted manually too. To activate Auto Setup, follow the directions below . 1 ) Access Auto Setup through the Input Setup menu. 2 ) Select the desired ...
...V.Position adjusts the vertical position of similar patterns or a monochrome picture. appear 2 ) Use the up/down arrow buttons (/) to manually adjust positions and clock. H.Position, V.Position, Clock and Phase also accept the left/right arrows (/) for Input Name; D-sub15...Satellite, GAME or Computer for changes. 3 ) Press HOME MENU to a PC, the image position, clock phase and clock frequency can be adjusted manually too. To activate Auto Setup, follow the directions below . 1 ) Access Auto Setup through the Input Setup menu. 2 ) Select the desired ...
Owner's Manual
Page 58
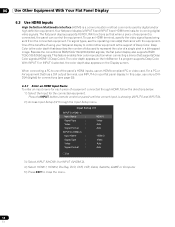
... the support of equipment connected through the Input Setup menu. Your flat panel display's INPUT 5 and INPUT 6 are HDMI terminals for connections (see the operating manual(s) that supports Deep Color signals (HDMI1.3 Deep Color). When connecting a PC to close the menu. 58 En One of the benefits of using your flat...
... the support of equipment connected through the Input Setup menu. Your flat panel display's INPUT 5 and INPUT 6 are HDMI terminals for connections (see the operating manual(s) that supports Deep Color signals (HDMI1.3 Deep Color). When connecting a PC to close the menu. 58 En One of the benefits of using your flat...

Owner's Manual
Page 59
... connected (default) when a PC is over -scan) PC (under-scan) 6.3.3 Specify a Digital HDMI Signal Type For the correct digital video signal type, check the operating manual that came with the other than Auto need to exit the menu. In PC mode, the image displays in full size for optimum image quality...
... connected (default) when a PC is over -scan) PC (under-scan) 6.3.3 Specify a Digital HDMI Signal Type For the correct digital video signal type, check the operating manual that came with the other than Auto need to exit the menu. In PC mode, the image displays in full size for optimum image quality...
Owner's Manual
Page 60
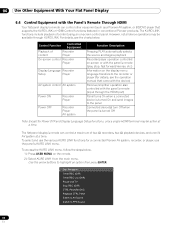
... on the display menu language transfers to the panel Connected device(s) turn Off when the panel is turned Off Note: Except for a connected Pioneer AV system, recorder, or player, use the various KURO LINK functions for Power OFF and Display Language Setup functions, only a single HDMI ...terminal may be active at a time. For details, see the operation manual that supports the KURO LINK or HDMI Control functions featured in conventional Pioneer products. To access the KURO LINK menu, follow the steps below . To select and use the panel's...
... on the display menu language transfers to the panel Connected device(s) turn Off when the panel is turned Off Note: Except for a connected Pioneer AV system, recorder, or player, use the various KURO LINK functions for Power OFF and Display Language Setup functions, only a single HDMI ...terminal may be active at a time. For details, see the operation manual that supports the KURO LINK or HDMI Control functions featured in conventional Pioneer products. To access the KURO LINK menu, follow the steps below . To select and use the panel's...

Owner's Manual
Page 67
...the communication and/or service provider. Connect the panel through your PC. • After connection to a network, enter correct settings. • Pioneer is unavailable through a Firewall, leaving only necessary ports open. • Do not connect a modular telephone cable to the LAN (10BASE-T/100BASE...-TX) terminal. Also refer to the instruction manual that came with some service providers, or different modem and broadband router brands may require additional settings on an ADSL modem, consult ...
...the communication and/or service provider. Connect the panel through your PC. • After connection to a network, enter correct settings. • Pioneer is unavailable through a Firewall, leaving only necessary ports open. • Do not connect a modular telephone cable to the LAN (10BASE-T/100BASE...-TX) terminal. Also refer to the instruction manual that came with some service providers, or different modem and broadband router brands may require additional settings on an ADSL modem, consult ...

Owner's Manual
Page 70
... system STANDBY 3 4 STANDARD MOVIE 5 6 DYNAMIC isf-DAY PURE isf-NIGHT SPORT isf-AUTO GAME Detail Adjust Picture Contrast Brightness Color : 40 Set 0 Set 0 Color Temp. : Manual R.High White Balance : 0 Set G.High Set 0 B.High Set 0 R.Low 0 G.Low Set 0 B.Low Set 0 Gamma : 3 Blue only mode : Off Screen size : Cinema 14:9 Set Set Set...
... system STANDBY 3 4 STANDARD MOVIE 5 6 DYNAMIC isf-DAY PURE isf-NIGHT SPORT isf-AUTO GAME Detail Adjust Picture Contrast Brightness Color : 40 Set 0 Set 0 Color Temp. : Manual R.High White Balance : 0 Set G.High Set 0 B.High Set 0 R.Low 0 G.Low Set 0 B.Low Set 0 Gamma : 3 Blue only mode : Off Screen size : Cinema 14:9 Set Set Set...


