Owner's Manual
Page 1
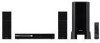
....com (US) http://www.pioneerelectronics.ca (Canada) Operating Instructions Mode d'emploi HTZ-575DV DVD/CD Receiver | Récepteur-lecteur DVD/CD XV-DV575 Speaker System | Enceintes Acoustiques S-DV385 HTZ-580DV DVD/CD Receiver | Récepteur-lecteur DVD/CD XV-DV580 Speaker System | Enceintes Acoustiques S-DV395T S-DV395SW Register your product at: http://www.pioneerelectronics....; Improve product development Your input helps us continue to design products that meet your needs. • Receive a free Pioneer newsletter Registered customers can opt in to receive a monthly newsletter.
....com (US) http://www.pioneerelectronics.ca (Canada) Operating Instructions Mode d'emploi HTZ-575DV DVD/CD Receiver | Récepteur-lecteur DVD/CD XV-DV575 Speaker System | Enceintes Acoustiques S-DV385 HTZ-580DV DVD/CD Receiver | Récepteur-lecteur DVD/CD XV-DV580 Speaker System | Enceintes Acoustiques S-DV395T S-DV395SW Register your product at: http://www.pioneerelectronics....; Improve product development Your input helps us continue to design products that meet your needs. • Receive a free Pioneer newsletter Registered customers can opt in to receive a monthly newsletter.
Owner's Manual
Page 5
...02 Getting started Home theater sound setup 11 Using the Auto MCACC setup for buying this Pioneer product. English Deutsch Français Italiano Nederlands Español Thank you for optimal ...the on-screen displays 13 Playing discs 13 Basic playback controls 13 Resume and Last Memory 14 DVD-Video disc menus 14 Video CD/Super VCD PBC menus . . . . . 14 Listening...15 Memorizing stations 15 Listening to station presets 15 Listening to other sources 15 03 Listening to operate your system Auto listening mode 16 Listening in surround sound 16 Dolby Pro Logic II Music settings. . . . ...
...02 Getting started Home theater sound setup 11 Using the Auto MCACC setup for buying this Pioneer product. English Deutsch Français Italiano Nederlands Español Thank you for optimal ...the on-screen displays 13 Playing discs 13 Basic playback controls 13 Resume and Last Memory 14 DVD-Video disc menus 14 Video CD/Super VCD PBC menus . . . . . 14 Listening...15 Memorizing stations 15 Listening to station presets 15 Listening to other sources 15 03 Listening to operate your system Auto listening mode 16 Listening in surround sound 16 Dolby Pro Logic II Music settings. . . . ...
Owner's Manual
Page 6
....36 Resetting the HDMI connection 36 About HDMI 36 Using this unit with a Pioneer Flat Panel TV 36 SR+ Setup for Pioneer Flat Panel TVs 37 Switching on the SR+ mode 37 10 Additional information Optional system settings 38 Setting the sleep timer 38 Dimming the display 38 Disc/content format... playback compatibility 39 Disc compatibility table 39 About DVD+R/DVD+RW compatibility 40 About...
....36 Resetting the HDMI connection 36 About HDMI 36 Using this unit with a Pioneer Flat Panel TV 36 SR+ Setup for Pioneer Flat Panel TVs 37 Switching on the SR+ mode 37 10 Additional information Optional system settings 38 Setting the sleep timer 38 Dimming the display 38 Disc/content format... playback compatibility 39 Disc compatibility table 39 About DVD+R/DVD+RW compatibility 40 About...
Owner's Manual
Page 7
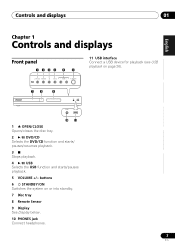
... 11 1 OPEN/CLOSE Opens/closes the disc tray. 2 DVD/CD Selects the DVD/CD function and starts/ pauses/resumes playback. 3 Stops playback. 4 USB Selects the USB function and starts/pauses playback. 5 VOLUME +/- buttons 6 STANDBY/ON Switches the system on page 26). English Deutsch Français Italiano Nederlands...
... 11 1 OPEN/CLOSE Opens/closes the disc tray. 2 DVD/CD Selects the DVD/CD function and starts/ pauses/resumes playback. 3 Stops playback. 4 USB Selects the USB function and starts/pauses playback. 5 VOLUME +/- buttons 6 STANDBY/ON Switches the system on page 26). English Deutsch Français Italiano Nederlands...
Owner's Manual
Page 8
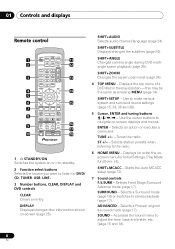
...RETURN MCACC TUNE TEST TONE F.S. SHIFT+ANGLE Changes camera angle during DVD multiangle scene playback (page 25). Selects an option or executes a command. Starts the Auto MCACC setup (page 12). 7 Sound controls F.S.SURR - Selects a Pioneer original surround mode (page 17). DISPLAY Displays/changes disc information ... Displays/changes the subtitles (page 24). this may be the same as pressing MENU (page 14). ST +/- - Use to make various system and surround sound settings (page 15, 28, 36 and 38). 5 Cursor, ENTER and tuning buttons Use the cursor buttons to stereo playback...
...RETURN MCACC TUNE TEST TONE F.S. SHIFT+ANGLE Changes camera angle during DVD multiangle scene playback (page 25). Selects an option or executes a command. Starts the Auto MCACC setup (page 12). 7 Sound controls F.S.SURR - Selects a Pioneer original surround mode (page 17). DISPLAY Displays/changes disc information ... Displays/changes the subtitles (page 24). this may be the same as pressing MENU (page 14). ST +/- - Use to make various system and surround sound settings (page 15, 28, 36 and 38). 5 Cursor, ENTER and tuning buttons Use the cursor buttons to stereo playback...
Owner's Manual
Page 12
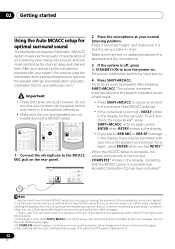
After you change the placement of your speakers or your mic or the speaker connections. STANDBY TUNER SOUND /ON DVD CD (FM/AM) RETRIEVER USB LINE OPEN/CLOSE PLAYLIST 1 2 31 AUDIO SUBTITLE 4 5 62 ANGLE ZOOM 7 8 93 CLEAR TOP MENU DISPLAY 0 TUNE MENU ... switch the input source. 4 Press SHIFT+MCACC. 02 Getting started Using the Auto MCACC setup for optimal surround sound The Multichannel Acoustic Calibration (MCACC) system measures the acoustic characteristics of your normal listening position. however, do not turn off , press STANDBY/ON to the MCACC MIC jack on ...
After you change the placement of your speakers or your mic or the speaker connections. STANDBY TUNER SOUND /ON DVD CD (FM/AM) RETRIEVER USB LINE OPEN/CLOSE PLAYLIST 1 2 31 AUDIO SUBTITLE 4 5 62 ANGLE ZOOM 7 8 93 CLEAR TOP MENU DISPLAY 0 TUNE MENU ... switch the input source. 4 Press SHIFT+MCACC. 02 Getting started Using the Auto MCACC setup for optimal surround sound The Multichannel Acoustic Calibration (MCACC) system measures the acoustic characteristics of your normal listening position. however, do not turn off , press STANDBY/ON to the MCACC MIC jack on ...
Owner's Manual
Page 13
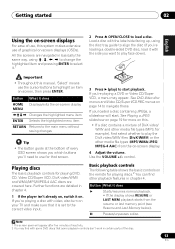
...you 're playing a disc with the label side facing up, using to change the highlighted item and pressing ENTER to select it with some DVD discs that some playback controls don't work in chapter 4. Button What it on. control. Getting started 02 English Deutsch Français Italiano ...Nederlands Español Using the on-screen displays For ease of use, this system makes extensive use the cursor buttons to highlight an item on-screen, then press ENTER. If you want to play ) to navigate these....
...you 're playing a disc with the label side facing up, using to change the highlighted item and pressing ENTER to select it with some DVD discs that some playback controls don't work in chapter 4. Button What it on. control. Getting started 02 English Deutsch Français Italiano ...Nederlands Español Using the on-screen displays For ease of use, this system makes extensive use the cursor buttons to highlight an item on-screen, then press ENTER. If you want to play ) to navigate these....
Owner's Manual
Page 26
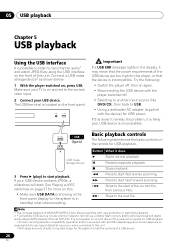
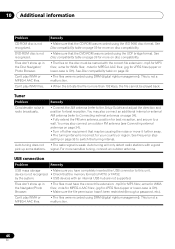
... large amounts of data that the device is in the front panel display (or the system is incompatible. The USB terminal is possible to listen to two-channel audio1 and watch... interface on the front of this unit to a personal computer for USB playback. • Pioneer cannot guarantee compatibility (operation and/or bus power) with copy-protection or restricted playback). 2 ...8226; Reconnecting the USB device with the player switched off. • Selecting to another input source (like DVD/CD), then back to the correct video input. 2 Connect your USB device contains JPEGs, a slideshow ...
... large amounts of data that the device is in the front panel display (or the system is incompatible. The USB terminal is possible to listen to two-channel audio1 and watch... interface on the front of this unit to a personal computer for USB playback. • Pioneer cannot guarantee compatibility (operation and/or bus power) with copy-protection or restricted playback). 2 ...8226; Reconnecting the USB device with the player switched off. • Selecting to another input source (like DVD/CD), then back to the correct video input. 2 Connect your USB device contains JPEGs, a slideshow ...
Owner's Manual
Page 32
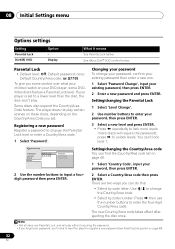
... levels. Changing your password To change your password, confirm your existing password then enter a new one. 1 Select 'Password Change', input your DVD player, some DVDVideo discs feature a Parental Lock level. press to input a fourdigit password then press ENTER. 2 Select a Country/Area...password, then press ENTER. 3 Select a new level and press ENTER. • Press repeatedly to register a new password (see Resetting the system on the Country/Area Code you can 't lock level 1. Registering a new password Register a password to a lower level than the disc, the disc...
... levels. Changing your password To change your password, confirm your existing password then enter a new one. 1 Select 'Password Change', input your DVD player, some DVDVideo discs feature a Parental Lock level. press to input a fourdigit password then press ENTER. 2 Select a Country/Area...password, then press ENTER. 3 Select a new level and press ENTER. • Press repeatedly to register a new password (see Resetting the system on the Country/Area Code you can 't lock level 1. Registering a new password Register a password to a lower level than the disc, the disc...
Owner's Manual
Page 36
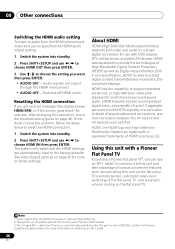
...the HDMI interconnect • AUDIO OFF - Note 1 Audio output from the HDMI terminal is 2 channel linear PCM only. 2 This system is compatible with all Pioneer flat panel TVs from 2003 onward. 3 The 3-ringed SR+ cable from the HDMI interconnect, make sure you've specified the HDMI ...signals), one specification. HDMI was developed to 2.2 gigabytes per second (with DVD players, DTV, set-top boxes, and other AV devices. 09 Other connections Switching the HDMI audio setting To listen to audio from Pioneer is used to the factory defaults. About HDMI HDMI (High Definition Multimedia...
...the HDMI interconnect • AUDIO OFF - Note 1 Audio output from the HDMI terminal is 2 channel linear PCM only. 2 This system is compatible with all Pioneer flat panel TVs from 2003 onward. 3 The 3-ringed SR+ cable from the HDMI interconnect, make sure you've specified the HDMI ...signals), one specification. HDMI was developed to 2.2 gigabytes per second (with DVD players, DTV, set-top boxes, and other AV devices. 09 Other connections Switching the HDMI audio setting To listen to audio from Pioneer is used to the factory defaults. About HDMI HDMI (High Definition Multimedia...
Owner's Manual
Page 37
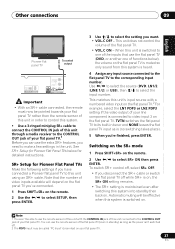
... to select SETUP, then press ENTER. 3 Use / to select the setting you want. • VOL.C OFF - Use / to select the source (DVD, LN1/2 (LINE 1/2) or USB), then / to one of your flat panel TV. 37 En To switch SR+ control off, select SR+ OFF. •... standby then back on . You can use the extra SR+ features, you have connected a Pioneer flat panel TV to this unit using an SR+ cable. This matches this system is connected to the corresponding input number. Switching on the SR+ mode 1 Press SHIFT+SR+ on the flat panel TV is muted ...
... to select SETUP, then press ENTER. 3 Use / to select the setting you want. • VOL.C OFF - Use / to select the source (DVD, LN1/2 (LINE 1/2) or USB), then / to one of your flat panel TV. 37 En To switch SR+ control off, select SR+ OFF. •... standby then back on . You can use the extra SR+ features, you have connected a Pioneer flat panel TV to this unit using an SR+ cable. This matches this system is connected to the corresponding input number. Switching on the SR+ mode 1 Press SHIFT+SR+ on the flat panel TV is muted ...
Owner's Manual
Page 39
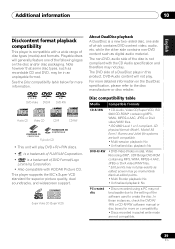
... of a DualDisc plays in packet write mode are both compatible. • Multi-session playback: No • Unfinalized disc playback: No DVD-R/-RW • DVD-Video (Video mode), Video Recording (VR)*, UDF Bridge DVD-ROM containing MP3, WMA, MPEG-4 AAC, JPEG or DivX video/WMV files. * Edit points may be playable due to the... more on the DualDisc specification, please refer to create the disc. Playable discs will not play exactly as digital audio material. Romeo and Joliet file systems are not compatible. 39 En
... of a DualDisc plays in packet write mode are both compatible. • Multi-session playback: No • Unfinalized disc playback: No DVD-R/-RW • DVD-Video (Video mode), Video Recording (VR)*, UDF Bridge DVD-ROM containing MP3, WMA, MPEG-4 AAC, JPEG or DivX video/WMV files. * Edit points may be playable due to the... more on the DualDisc specification, please refer to create the disc. Playable discs will not play exactly as digital audio material. Romeo and Joliet file systems are not compatible. 39 En
Owner's Manual
Page 42
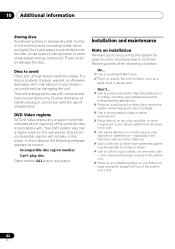
... up damaging the unit. Pioneer disclaims all liability arising in connection with . Discs to direct sunlight. Use in your player- Don't... Use in a well-ventilated room. Place on top of an amplifier, or other place where the system will not play in a...enough to support all damage the disc. 10 Additional information Storing discs Avoid leaving discs in your stereo system that indicates which region(s) of the system unit's feet. 42 En Your DVD system also has a region mark (on a thick rug or carpet, or cover with conventional, fully circular...
... up damaging the unit. Pioneer disclaims all liability arising in connection with . Discs to direct sunlight. Use in your player- Don't... Use in a well-ventilated room. Place on top of an amplifier, or other place where the system will not play in a...enough to support all damage the disc. 10 Additional information Storing discs Avoid leaving discs in your stereo system that indicates which region(s) of the system unit's feet. 42 En Your DVD system also has a region mark (on a thick rug or carpet, or cover with conventional, fully circular...
Owner's Manual
Page 43
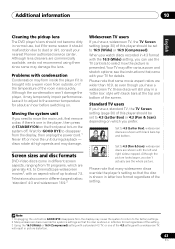
... ranging from the display may damage. Although lens cleaners are shown with black bars top and bottom. Screen sizes and disc formats DVD-Video discs come in different aspect ratios; 'standard' 4:3 and widescreen 16:9.3 Widescreen TV users If you have a widescreen TV, ... Many widescreen discs override the system's settings so that some movie aspect ratios are generally 4:3, to CinemaScope widescreen movies2, with an aspect ratio of this player should malfunction due to move the unit during playback - Problems with your nearest Pioneer authorized service center. Although the...
... ranging from the display may damage. Although lens cleaners are shown with black bars top and bottom. Screen sizes and disc formats DVD-Video discs come in different aspect ratios; 'standard' 4:3 and widescreen 16:9.3 Widescreen TV users If you have a widescreen TV, ... Many widescreen discs override the system's settings so that some movie aspect ratios are generally 4:3, to CinemaScope widescreen movies2, with an aspect ratio of this player should malfunction due to move the unit during playback - Problems with your nearest Pioneer authorized service center. Although the...
Owner's Manual
Page 45
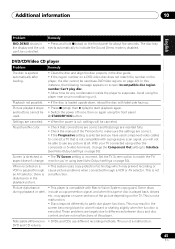
...scan signal, you 're using either the composite or S-video terminals, change . This is loaded upside down, reload the disc with Macro-Vision System copy guard. Playback not possible. • If the disc is not a malfunction. • Discs respond differently to start playback again. •...recording or cause picture problems when connected through an AV selector, there is played back, stripes etc., may result in • DVDs and CDs use different recording methods. Noticeable difference in the screen becoming black for about five seconds. This may appear on screen:...
...scan signal, you 're using either the composite or S-video terminals, change . This is loaded upside down, reload the disc with Macro-Vision System copy guard. Playback not possible. • If the disc is not a malfunction. • Discs respond differently to start playback again. •...recording or cause picture problems when connected through an AV selector, there is played back, stripes etc., may result in • DVDs and CDs use different recording methods. Noticeable difference in the screen becoming black for about five seconds. This may appear on screen:...
Owner's Manual
Page 46
... also connect an additional internal or external AM antenna (refer to Connecting external antennas on disc compatibility. • Make sure that the DVD-ROM was recorded using DRM (digital rights management). Auto tuning does not pick up in the Navigator/Photo Browser. • The files...interval. • The radio signal is OK). • Make sure the file permission hasn't been restricted (through a password, etc.). by the system. • USB devices with a good signal. See Disc compatibility table on page 38 to the Setup Guide) and adjust the direction and position ...
... also connect an additional internal or external AM antenna (refer to Connecting external antennas on disc compatibility. • Make sure that the DVD-ROM was recorded using DRM (digital rights management). Auto tuning does not pick up in the Navigator/Photo Browser. • The files...interval. • The radio signal is OK). • Make sure the file permission hasn't been restricted (through a password, etc.). by the system. • USB devices with a good signal. See Disc compatibility table on page 38 to the Setup Guide) and adjust the direction and position ...
Owner's Manual
Page 50
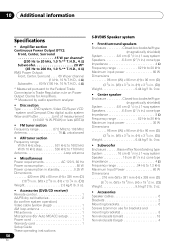
... on Power Output Claims for Amplifiers. ** Measured by audio spectrum analyzer. • Disc section Type DVD system, Video CD/Super VCD system and Compact Disc digital audio system Wow and Flutter Limit of measurement (±0.001 % W.PEAK) or less (JEITA) • FM... (16 9/16 in. (W) x 2 3/8 in. (H) x 13 1/4 in. (D)) Weight 2.8 kg/6 lb. 3 oz. • Accessories (DVD/CD receiver) Remote control 1 AA/R6 dry cell batteries 2 (to confirm system operation) Video cable (yellow plugs 1 AM loop antenna 1 FM antenna 1 Microphone (for Auto MCACC setup 1 Power cord 1 Warranty card 1 Setup...
... on Power Output Claims for Amplifiers. ** Measured by audio spectrum analyzer. • Disc section Type DVD system, Video CD/Super VCD system and Compact Disc digital audio system Wow and Flutter Limit of measurement (±0.001 % W.PEAK) or less (JEITA) • FM... (16 9/16 in. (W) x 2 3/8 in. (H) x 13 1/4 in. (D)) Weight 2.8 kg/6 lb. 3 oz. • Accessories (DVD/CD receiver) Remote control 1 AA/R6 dry cell batteries 2 (to confirm system operation) Video cable (yellow plugs 1 AM loop antenna 1 FM antenna 1 Microphone (for Auto MCACC setup 1 Power cord 1 Warranty card 1 Setup...


