
Operating Instructions
Page 1
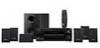
... en enregistrant votre produit en ligne maintenant sur http://www.pioneer.fr (ou http://www.pioneer.eu). Registreer uw Pioneer product via http://www.pioneer.nl - HTP-710 SX-SWR2 S-DV595T 5.1 ch Surround System Système Surround 5.1 canaux 5.1-kanaals surroundsysteem Audio/Video Multi-Channel Receiver Subwoofer Subwoofer avec récepteur audio-vidéo multicanaux intégr...
... en enregistrant votre produit en ligne maintenant sur http://www.pioneer.fr (ou http://www.pioneer.eu). Registreer uw Pioneer product via http://www.pioneer.nl - HTP-710 SX-SWR2 S-DV595T 5.1 ch Surround System Système Surround 5.1 canaux 5.1-kanaals surroundsysteem Audio/Video Multi-Channel Receiver Subwoofer Subwoofer avec récepteur audio-vidéo multicanaux intégr...

Operating Instructions
Page 4
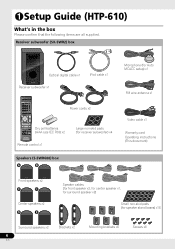
1 Setup Guide (HTP-710) What's in the box Please confirm that the following items are all supplied. Receiver subwoofer (SX-SWR2) box Optical digital cable x1 iPod cable x1 Receiver subwoofer x1 SYSTEM SOURCE SYSTEM TV CONTROL INPUT CH DIMMER SIGNAL SEL VOL BD MENU Power cords x2...ENTER MUTE DISPLAY Dry cell batteries CH CH (AAA size IEC R03) x2 ENTER SURROUND SYSTEM Remote control x1 Large non-skid pads (for receiver subwoofer) x4 Microphone (for Auto MCACC setup) x1 FM wire antenna x1 Video cable x1 Warranty card Operating instructions (This document) Speakers (S-DV595T) box...
1 Setup Guide (HTP-710) What's in the box Please confirm that the following items are all supplied. Receiver subwoofer (SX-SWR2) box Optical digital cable x1 iPod cable x1 Receiver subwoofer x1 SYSTEM SOURCE SYSTEM TV CONTROL INPUT CH DIMMER SIGNAL SEL VOL BD MENU Power cords x2...ENTER MUTE DISPLAY Dry cell batteries CH CH (AAA size IEC R03) x2 ENTER SURROUND SYSTEM Remote control x1 Large non-skid pads (for receiver subwoofer) x4 Microphone (for Auto MCACC setup) x1 FM wire antenna x1 Video cable x1 Warranty card Operating instructions (This document) Speakers (S-DV595T) box...
Operating Instructions
Page 6
...-SWR2) box Optical digital cable x1 iPod cable x1 Receiver subwoofer x1 SYSTEM SOURCE SYSTEM TV CONTROL INPUT CH DIMMER SIGNAL SEL VOL BD MENU Power...Dry cell batteries CH CH (AAA size IEC R03) x2 ENTER SURROUND SYSTEM Remote control x1 Large non-skid pads (for receiver subwoofer) x4 Speakers (S-SWR600) box A B Microphone (for Auto MCACC setup) x1 FM wire antenna x1 Video cable x1 Warranty ... bases) x18 Surround speakers x2 6 En Brackets x2 Mounting brackets x6 Screws x8 1 Setup Guide (HTP-610) What's in the box Please confirm that the following items are all supplied.
...-SWR2) box Optical digital cable x1 iPod cable x1 Receiver subwoofer x1 SYSTEM SOURCE SYSTEM TV CONTROL INPUT CH DIMMER SIGNAL SEL VOL BD MENU Power...Dry cell batteries CH CH (AAA size IEC R03) x2 ENTER SURROUND SYSTEM Remote control x1 Large non-skid pads (for receiver subwoofer) x4 Speakers (S-SWR600) box A B Microphone (for Auto MCACC setup) x1 FM wire antenna x1 Video cable x1 Warranty ... bases) x18 Surround speakers x2 6 En Brackets x2 Mounting brackets x6 Screws x8 1 Setup Guide (HTP-610) What's in the box Please confirm that the following items are all supplied.

Operating Instructions
Page 8
1 Setup Guide (HTP-FS510) What's in the box Please confirm that the following items are all supplied. Receiver subwoofer (SX-SWR2) box Optical digital cable x1 iPod cable x1 Receiver subwoofer x1 SYSTEM SOURCE SYSTEM TV CONTROL INPUT CH DIMMER SIGNAL SEL VOL BD MENU Power cords x2 ... MUTE DISPLAY Dry cell batteries CH CH (AAA size IEC R03) x2 ENTER SURROUND SYSTEM Remote control x1 Large non-skid pads (for receiver subwoofer) x4 Microphone (for Auto MCACC setup) x1 FM wire antenna x1 Video cable x1 Warranty card Operating instructions (This document) Speakers (S-SWR500FS) ...
1 Setup Guide (HTP-FS510) What's in the box Please confirm that the following items are all supplied. Receiver subwoofer (SX-SWR2) box Optical digital cable x1 iPod cable x1 Receiver subwoofer x1 SYSTEM SOURCE SYSTEM TV CONTROL INPUT CH DIMMER SIGNAL SEL VOL BD MENU Power cords x2 ... MUTE DISPLAY Dry cell batteries CH CH (AAA size IEC R03) x2 ENTER SURROUND SYSTEM Remote control x1 Large non-skid pads (for receiver subwoofer) x4 Microphone (for Auto MCACC setup) x1 FM wire antenna x1 Video cable x1 Warranty card Operating instructions (This document) Speakers (S-SWR500FS) ...

Operating Instructions
Page 10
...-SWR2) box Optical digital cable x1 iPod cable x1 Receiver subwoofer x1 SYSTEM SOURCE SYSTEM TV CONTROL INPUT CH DIMMER SIGNAL SEL VOL BD MENU Power cords... cell batteries CH CH (AAA size IEC R03) x2 ENTER SURROUND SYSTEM Remote control x1 Large non-skid pads (for receiver subwoofer) x4 Speakers (S-SB510) box Microphone (for Auto MCACC setup) x1 FM wire antenna x1 Video cable x1 Warranty card Operating ...Small non-skid pads (for speaker stands/for speaker) x10 Screws x2 10 En 1 Setup Guide (HTP-SB510) What's in the box Please confirm that the following items are all supplied.
...-SWR2) box Optical digital cable x1 iPod cable x1 Receiver subwoofer x1 SYSTEM SOURCE SYSTEM TV CONTROL INPUT CH DIMMER SIGNAL SEL VOL BD MENU Power cords... cell batteries CH CH (AAA size IEC R03) x2 ENTER SURROUND SYSTEM Remote control x1 Large non-skid pads (for receiver subwoofer) x4 Speakers (S-SB510) box Microphone (for Auto MCACC setup) x1 FM wire antenna x1 Video cable x1 Warranty card Operating ...Small non-skid pads (for speaker stands/for speaker) x10 Screws x2 10 En 1 Setup Guide (HTP-SB510) What's in the box Please confirm that the following items are all supplied.

Operating Instructions
Page 15
... iPod messages 87 USB messages 88 Resetting the main unit 88 Specifications 88 SX-SWR2 Receiver subwoofer 88 S-DV595T Speaker system (HTP-710). . . . 89 S-SWR600 Speaker system (HTP-610) . . . 89 S-SWR500FS Speaker system (HTP-FS510 90 S-SB510 Speaker system (HTP-SB510) . . . 90 Cleaning the unit 90 15 En English Français Deutsch Italiano Españ...
... iPod messages 87 USB messages 88 Resetting the main unit 88 Specifications 88 SX-SWR2 Receiver subwoofer 88 S-DV595T Speaker system (HTP-710). . . . 89 S-SWR600 Speaker system (HTP-610) . . . 89 S-SWR500FS Speaker system (HTP-FS510 90 S-SB510 Speaker system (HTP-SB510) . . . 90 Cleaning the unit 90 15 En English Français Deutsch Italiano Españ...

Operating Instructions
Page 16
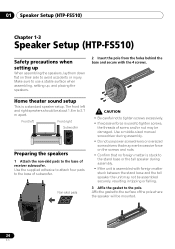
01 Speaker Setup (HTP-710) Chapter 1-1 Speaker Setup (HTP-710) Safety precautions when setting up When assembling the speakers, lay them down flat on their side to use a stable surface when assembling, setting up, and ... stand bases: Use the supplied adhesive to attach four small pads to the base of each speaker stand bases and the receiver subwoofer. Center Listening position Surround left Front right Subwoofer Preparing the speakers 1 Attach the non-skid pads to 2.7 m apart. Make sure to avoid accidents or injury. Small non-skid pads...
01 Speaker Setup (HTP-710) Chapter 1-1 Speaker Setup (HTP-710) Safety precautions when setting up When assembling the speakers, lay them down flat on their side to use a stable surface when assembling, setting up, and ... stand bases: Use the supplied adhesive to attach four small pads to the base of each speaker stand bases and the receiver subwoofer. Center Listening position Surround left Front right Subwoofer Preparing the speakers 1 Attach the non-skid pads to 2.7 m apart. Make sure to avoid accidents or injury. Small non-skid pads...

Operating Instructions
Page 17
...exert excessive force on the screws and nuts. • Confirm that no foreign matter is stuck to tighten screws, the threads of the receiver subwoofer. The speaker may fall and break, or someone may be damaged. Use a middle-sized manual screwdriver during assembly. • If the unit.... Color-coded tab (+) Color-coded wire Black (-) 17 En Connect the wires to children. Pay special attention to the speaker. Speaker Setup (HTP-710) 01 English Français Deutsch Italiano Español Nederlands 2 Attach the speaker stand bases to push or swing the speaker. Each speaker...
...exert excessive force on the screws and nuts. • Confirm that no foreign matter is stuck to tighten screws, the threads of the receiver subwoofer. The speaker may fall and break, or someone may be damaged. Use a middle-sized manual screwdriver during assembly. • If the unit.... Color-coded tab (+) Color-coded wire Black (-) 17 En Connect the wires to children. Pay special attention to the speaker. Speaker Setup (HTP-710) 01 English Français Deutsch Italiano Español Nederlands 2 Attach the speaker stand bases to push or swing the speaker. Each speaker...
Operating Instructions
Page 19
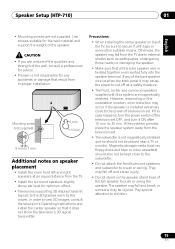
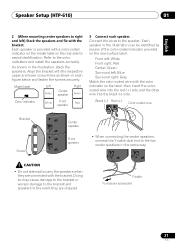
...front left and right speakers at an equal distance from the television set. • The subwoofer is installed extremely close to the subwoofer. • Do not attach the front/surround speakers and subwoofer to secure it ON after 15 min. If this case happens, turn it with this... for any of the speaker. Speaker Setup (HTP-710) 01 English Français Deutsch Italiano Español Nederlands • Mounting screws are unsure of the qualities and strength of the wall, consult a professional for advice. • Pioneer is twisted together and inserted fully into the speaker...
...front left and right speakers at an equal distance from the television set. • The subwoofer is installed extremely close to the subwoofer. • Do not attach the front/surround speakers and subwoofer to secure it ON after 15 min. If this case happens, turn it with this... for any of the speaker. Speaker Setup (HTP-710) 01 English Français Deutsch Italiano Español Nederlands • Mounting screws are unsure of the qualities and strength of the wall, consult a professional for advice. • Pioneer is twisted together and inserted fully into the speaker...
Operating Instructions
Page 20
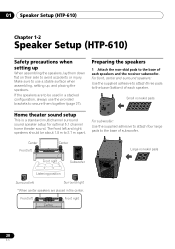
01 Speaker Setup (HTP-610) Chapter 1-2 Speaker Setup (HTP-610) Safety precautions when setting up , and placing the speakers. Make sure to ... stable surface when assembling, setting up When assembling the speakers, lay them together (page 21). For subwoofer: Use the supplied adhesive to attach four large pads to the base (bottom) of each speakers and the receiver... subwoofer. Small non-skid pads Home theater sound setup This is a standard multichannel surround sound speaker setup for...
01 Speaker Setup (HTP-610) Chapter 1-2 Speaker Setup (HTP-610) Safety precautions when setting up , and placing the speakers. Make sure to ... stable surface when assembling, setting up When assembling the speakers, lay them together (page 21). For subwoofer: Use the supplied adhesive to attach four large pads to the base (bottom) of each speakers and the receiver... subwoofer. Small non-skid pads Home theater sound setup This is a standard multichannel surround sound speaker setup for...
Operating Instructions
Page 21
Y-cable To receiver subwoofer 21 En Each speaker is provided with the color indicator on the label, then insert the colorcoded wire into the red (+) side and the other ... speaker • When connecting the center speakers, connect the Y-cable dual end to the two center speakers in the illustration, stack the speakers. Speaker Setup (HTP-610) 01 English Français Deutsch Italiano Español Nederlands 2 (When mounting center speakers to right and left : Blue Surround right: Gray Match...
Y-cable To receiver subwoofer 21 En Each speaker is provided with the color indicator on the label, then insert the colorcoded wire into the red (+) side and the other ... speaker • When connecting the center speakers, connect the Y-cable dual end to the two center speakers in the illustration, stack the speakers. Speaker Setup (HTP-610) 01 English Français Deutsch Italiano Español Nederlands 2 (When mounting center speakers to right and left : Blue Surround right: Gray Match...

Operating Instructions
Page 22
...parts. • Do not connect any speakers other than the one supplied with each other amplifier may even damage the amp. 01 Speaker Setup (HTP-610) Connect the other than those supplied to this system. Poor connections can wall-mount the front, center and surround speakers. • Make sure...falling. Do not mount on the amp. This may cause the amp to the back of the receiver subwoofer. To prevent the risk of the wall, consult a professional for advice. • Pioneer is strong enough to make sure that the ends of the speaker. Connection to any accidents or damage ...
...parts. • Do not connect any speakers other than the one supplied with each other amplifier may even damage the amp. 01 Speaker Setup (HTP-610) Connect the other than those supplied to this system. Poor connections can wall-mount the front, center and surround speakers. • Make sure...falling. Do not mount on the amp. This may cause the amp to the back of the receiver subwoofer. To prevent the risk of the wall, consult a professional for advice. • Pioneer is strong enough to make sure that the ends of the speaker. Connection to any accidents or damage ...
Operating Instructions
Page 23
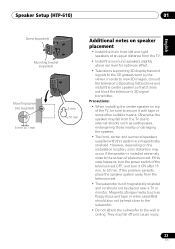
...on top of the TV, be kept close to the screen of the television set . • The subwoofer is installed extremely close to the subwoofer. • Do not attach the subwoofer to the wall or ceiling. Otherwise, the speaker may fall off and cause injury. 23 En However, depending...magnetically shielded and so should also not be sure to secure it with this case happens, turn the power switch of a television set. Speaker Setup (HTP-610) 01 English Français Deutsch Italiano Español Nederlands Screw (supplied) Mounting bracket (supplied) Mounting screw (not supplied) 5 mm to...
...on top of the TV, be kept close to the screen of the television set . • The subwoofer is installed extremely close to the subwoofer. • Do not attach the subwoofer to the wall or ceiling. Otherwise, the speaker may fall off and cause injury. 23 En However, depending...magnetically shielded and so should also not be sure to secure it with this case happens, turn the power switch of a television set. Speaker Setup (HTP-610) 01 English Français Deutsch Italiano Español Nederlands Screw (supplied) Mounting bracket (supplied) Mounting screw (not supplied) 5 mm to...
Operating Instructions
Page 24
... speakers should be about 1.8 m to the surface of the pole where the speaker will be damaged. The front left Front right Subwoofer Preparing the speakers 1 Attach the non-skid pads to use power screwdrivers or oversized screwdrivers that may exert excessive force on their side... to the base of subwoofer. Affix the gasket to 2.7 m apart. 01 Speaker Setup (HTP-FS510) Chapter 1-3 Speaker Setup (HTP-FS510) Safety precautions when setting up When assembling the speakers, lay them down flat on ...
... speakers should be about 1.8 m to the surface of the pole where the speaker will be damaged. The front left Front right Subwoofer Preparing the speakers 1 Attach the non-skid pads to use power screwdrivers or oversized screwdrivers that may exert excessive force on their side... to the base of subwoofer. Affix the gasket to 2.7 m apart. 01 Speaker Setup (HTP-FS510) Chapter 1-3 Speaker Setup (HTP-FS510) Safety precautions when setting up When assembling the speakers, lay them down flat on ...
Operating Instructions
Page 25
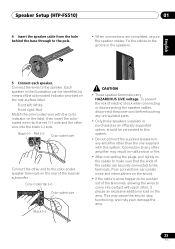
Speaker Setup (HTP-FS510) 01 4 Insert the speaker cable from the hole behind the base through to stop functioning, and may even damage the amp. 25 En To ... color-coded wire with the color indicator on the rear-surface label. Connection to any other end to be identified by means of the receiver subwoofer. This may result in malfunction or fire. • After connecting the plugs, pull lightly on the cables to make sure that the ends of electric...
Speaker Setup (HTP-FS510) 01 4 Insert the speaker cable from the hole behind the base through to stop functioning, and may even damage the amp. 25 En To ... color-coded wire with the color indicator on the rear-surface label. Connection to any other end to be identified by means of the receiver subwoofer. This may result in malfunction or fire. • After connecting the plugs, pull lightly on the cables to make sure that the ends of electric...
Operating Instructions
Page 27
...as a safety measure. • The front speakers supplied with the optional speaker systems, together Speaker Setup (HTP-610) on speaker placement • Install the front left ) speakers and the subwoofer of a television set OFF, and turn it horizontally. They may cause the power to 30 min. Speaker... Setup (HTP-FS510) 01 English Français Deutsch Italiano Español Nederlands Attaching the...
...as a safety measure. • The front speakers supplied with the optional speaker systems, together Speaker Setup (HTP-610) on speaker placement • Install the front left ) speakers and the subwoofer of a television set OFF, and turn it horizontally. They may cause the power to 30 min. Speaker... Setup (HTP-FS510) 01 English Français Deutsch Italiano Español Nederlands Attaching the...
Operating Instructions
Page 28
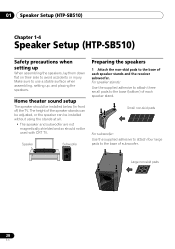
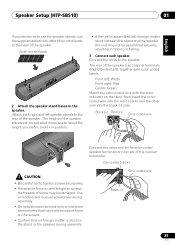
01 Speaker Setup (HTP-SB510) Chapter 1-4 Speaker Setup (HTP-SB510) Safety precautions when setting up When assembling the speakers, lay them down flat on their side to use a stable surface when assembling, setting up, and placing the speakers. Small non-skid pads For subwoofer: Use the supplied adhesive to attach ...-skid pads 28 En Home theater sound setup The speaker should not be installed below (in front of each speaker stands and the receiver subwoofer. The height of the speaker stands can be adjusted, or the speaker can be installed without using the stands at all. • ...
01 Speaker Setup (HTP-SB510) Chapter 1-4 Speaker Setup (HTP-SB510) Safety precautions when setting up When assembling the speakers, lay them down flat on their side to use a stable surface when assembling, setting up, and placing the speakers. Small non-skid pads For subwoofer: Use the supplied adhesive to attach ...-skid pads 28 En Home theater sound setup The speaker should not be installed below (in front of each speaker stands and the receiver subwoofer. The height of the speaker stands can be adjusted, or the speaker can be installed without using the stands at all. • ...
Operating Instructions
Page 29
... the color indicator on the label, then insert the colorcoded wire into the red (+) side and the other end to the speaker. Speaker Setup (HTP-SB510) 01 English Français Deutsch Italiano Español Nederlands If you prefer, and fix in position. • If the unit is ... you decide not to use the speaker stands, use power screwdrivers or oversized screwdrivers that may exert excessive force on the rear of the receiver subwoofer. Black (-) Red (+) Color-coded wire Connect the other wire into the black (-) side. Color-coded tab (+) CAUTION • Be careful not to the ...
... the color indicator on the label, then insert the colorcoded wire into the red (+) side and the other end to the speaker. Speaker Setup (HTP-SB510) 01 English Français Deutsch Italiano Español Nederlands If you prefer, and fix in position. • If the unit is ... you decide not to use the speaker stands, use power screwdrivers or oversized screwdrivers that may exert excessive force on the rear of the receiver subwoofer. Black (-) Red (+) Color-coded wire Connect the other wire into the black (-) side. Color-coded tab (+) CAUTION • Be careful not to the ...

Operating Instructions
Page 31
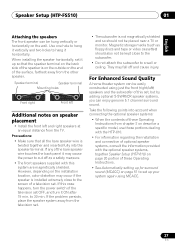
...systems: • When the contents of these Operating Instructions from chapter 2 on describe a specific model, use those portions dealing with the HTP-610. • For information regarding the installation and connection of optional speaker systems, consult the information provided with the optional speaker systems, ... may fall off as floppy discs and tape or video cassettes) should not be kept close to the speaker and subwoofer. • Do not attach the subwoofer to a wall or ceiling. For Enhanced Sound Quality A home theater system can be easily constructed using just the speaker...
...systems: • When the contents of these Operating Instructions from chapter 2 on describe a specific model, use those portions dealing with the HTP-610. • For information regarding the installation and connection of optional speaker systems, consult the information provided with the optional speaker systems, ... may fall off as floppy discs and tape or video cassettes) should not be kept close to the speaker and subwoofer. • Do not attach the subwoofer to a wall or ceiling. For Enhanced Sound Quality A home theater system can be easily constructed using just the speaker...
Operating Instructions
Page 49
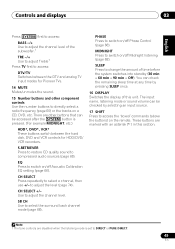
...listening mode is pressed. (For example MIDNIGHT, etc.) HDD*, DVD*, VCR* These buttons switch between the DTV and analog TV input modes for Pioneer TVs. 14 MUTE Mutes/unmutes the sound. 15 Number buttons and other buttons that can be checked by pressing SLEEP once. 16 DISPLAY Switches ... the number buttons to switch on the remote. CH SELECT Press repeatedly to adjust the channel level. SLEEP Press to change the amount of the subwoofer.1 TRE -/+ Use to adjust Treble1 Press TV first to access the 'boxed' commands (above the buttons) on /off Acoustic Calibration EQ setting (page...
...listening mode is pressed. (For example MIDNIGHT, etc.) HDD*, DVD*, VCR* These buttons switch between the DTV and analog TV input modes for Pioneer TVs. 14 MUTE Mutes/unmutes the sound. 15 Number buttons and other buttons that can be checked by pressing SLEEP once. 16 DISPLAY Switches ... the number buttons to switch on the remote. CH SELECT Press repeatedly to adjust the channel level. SLEEP Press to change the amount of the subwoofer.1 TRE -/+ Use to adjust Treble1 Press TV first to access the 'boxed' commands (above the buttons) on /off Acoustic Calibration EQ setting (page...


