
Operating Instructions
Page 2
... operating and maintenance (servicing) instructions in the literature accompanying the appliance. NO USER-SERVICEABLE PARTS INSIDE. THE SERIAL NUMBER FOR THIS EQUIPMENT IS LOCATED IN THE REAR. ATTENTION - These limits are designed to provide reasonable protection against harmful interference in a particular installation. Consult the dealer or an experienced radio/TV technician for a Class B digital device, pursuant to Part 15 of electricity when power is switched...
... operating and maintenance (servicing) instructions in the literature accompanying the appliance. NO USER-SERVICEABLE PARTS INSIDE. THE SERIAL NUMBER FOR THIS EQUIPMENT IS LOCATED IN THE REAR. ATTENTION - These limits are designed to provide reasonable protection against harmful interference in a particular installation. Consult the dealer or an experienced radio/TV technician for a Class B digital device, pursuant to Part 15 of electricity when power is switched...
Operating Instructions
Page 3
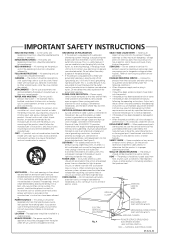
... the wall outlet and refer servicing to qualified service personnel under the following the operating instructions. OUTDOOR ANTENNA GROUNDING - Never spill liquid of the product should follow the manufacturer's instructions, and should be adhered to replace your product dealer or local power company. WALL OR CEILING MOUNTING - The product should use this indicates a need for long periods of the grounding type plug. Never...
... the wall outlet and refer servicing to qualified service personnel under the following the operating instructions. OUTDOOR ANTENNA GROUNDING - Never spill liquid of the product should follow the manufacturer's instructions, and should be adhered to replace your product dealer or local power company. WALL OR CEILING MOUNTING - The product should use this indicates a need for long periods of the grounding type plug. Never...
Operating Instructions
Page 5
... Setup 31 Setting up Connecting the speakers and wireless speaker system 11 Placing the speakers 13 Placing the wireless speaker system . . . . . 14 Wall-mounting the center and surround speaker system 15 Connecting to your TV 16 Connecting using the S-video output . . . . 16 Connecting using the component video output 17 Listening to TV audio through these operating instructions so that you start Features 8 What's in the box 8 Putting the batteries in the remote control 9 Using the remote control 9 Disc / content format playback compatibility 9 CD-R/RW compatibility 10 DVD...
... Setup 31 Setting up Connecting the speakers and wireless speaker system 11 Placing the speakers 13 Placing the wireless speaker system . . . . . 14 Wall-mounting the center and surround speaker system 15 Connecting to your TV 16 Connecting using the S-video output . . . . 16 Connecting using the component video output 17 Listening to TV audio through these operating instructions so that you start Features 8 What's in the box 8 Putting the batteries in the remote control 9 Using the remote control 9 Disc / content format playback compatibility 9 CD-R/RW compatibility 10 DVD...

Operating Instructions
Page 6
... for Pioneer plasma displays 65 Setting the channel levels 66 10 Video Adjust menu Video Adjust 68 Creating your own presets 68 11 Initial Settings menu Using the Initial Settings menu 69 Video Output settings 69 Language settings 70 Display settings 70 Options 71 Parental Lock 72 Bonus Group 73 12 Additional information Optional system settings 74 System Setup menu options in standby . .74 Resetting the system 75 Using and taking care of discs 75 Titles, chapters and tracks 75 DVD Video regions...
... for Pioneer plasma displays 65 Setting the channel levels 66 10 Video Adjust menu Video Adjust 68 Creating your own presets 68 11 Initial Settings menu Using the Initial Settings menu 69 Video Output settings 69 Language settings 70 Display settings 70 Options 71 Parental Lock 72 Bonus Group 73 12 Additional information Optional system settings 74 System Setup menu options in standby . .74 Resetting the system 75 Using and taking care of discs 75 Titles, chapters and tracks 75 DVD Video regions...
Operating Instructions
Page 8
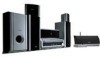
... you open it . • Speaker cables (HTD-645DV - The on -screen displays Setting up and using your main setup, or as a second stereo speaker system. • Energy saving design This system is designed to a progressive scancompatible TV or monitor using the component video outputs, you can be used for multichannel sound with the wireless speaker system: • AC adapter • RCA stereo cord • Operating Instructions (HTD-641DV only) • Warranty card • Power cord...
... you open it . • Speaker cables (HTD-645DV - The on -screen displays Setting up and using your main setup, or as a second stereo speaker system. • Energy saving design This system is designed to a progressive scancompatible TV or monitor using the component video outputs, you can be used for multichannel sound with the wireless speaker system: • AC adapter • RCA stereo cord • Operating Instructions (HTD-641DV only) • Warranty card • Power cord...
Operating Instructions
Page 14
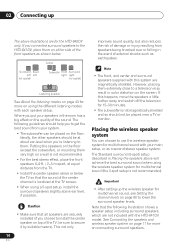
... each speaker setup. The Standard surround (5-spot) setup described in Placing the speakers above or below . If you connected surround speakers to the HTD-641DV, place them very high on a wall is not recommended. • For the best stereo effect, place the front speakers 6-9 ft. / 2-3 m apart, at equal distance from the TV. • Install the center speaker above will achieve the best surround sound when using the different listening modes...
... each speaker setup. The Standard surround (5-spot) setup described in Placing the speakers above or below . If you connected surround speakers to the HTD-641DV, place them very high on a wall is not recommended. • For the best stereo effect, place the front speakers 6-9 ft. / 2-3 m apart, at equal distance from the TV. • Install the center speaker above will achieve the best surround sound when using the different listening modes...

Operating Instructions
Page 18
... can use an SR+ cable (see note below) to connect it to reduce the input signal level. Pioneer plasma display CONTROL Media receiver OUT AUDIO OUTPUT TV PR COMPONENT VIDEO OUT PB VIDEO OUT S-VIDEO Y OUT VIDEO IN CONTROL SPEAKERS 18 En AUDIO OUT IN COAXIAL IN L LINE 2 R LINE 1 ANTENNA IN L R TV AM LOOP ANTENNA FM UNBAL 75 This system is compatible with this model, please contact our customer service center. See Optional system settings on this...
... can use an SR+ cable (see note below) to connect it to reduce the input signal level. Pioneer plasma display CONTROL Media receiver OUT AUDIO OUTPUT TV PR COMPONENT VIDEO OUT PB VIDEO OUT S-VIDEO Y OUT VIDEO IN CONTROL SPEAKERS 18 En AUDIO OUT IN COAXIAL IN L LINE 2 R LINE 1 ANTENNA IN L R TV AM LOOP ANTENNA FM UNBAL 75 This system is compatible with this model, please contact our customer service center. See Optional system settings on this...
Operating Instructions
Page 19
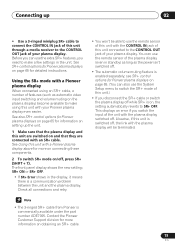
...+ cable from Pioneer is commercially available under the part number ADE7095. You can use the remote sensor of this unit with the CONTROL IN jack of this unit connected to the CONTROL OUT jack of the plasma display (even in standby) as long as automatic video input switching and volume muting on , the setting automatically reverts to SR+ OFF. See SR+ control options for more on connecting these components. 2 To switch SR+ mode...
...+ cable from Pioneer is commercially available under the part number ADE7095. You can use the remote sensor of this unit with the CONTROL IN jack of this unit connected to the CONTROL OUT jack of the plasma display (even in standby) as long as automatic video input switching and volume muting on , the setting automatically reverts to SR+ OFF. See SR+ control options for more on connecting these components. 2 To switch SR+ mode...

Operating Instructions
Page 24
...) Lights during Dolby Pro Logic II decoding. 14 2 DIGITAL (page 44) Lights during playback of a Dolby Digital source. 15 Speaker indicators These show some example displays. 5.1 channel surround sound Stereo (2.1 channel) sound 3.1 channel sound with Dialogue enhancement on the center channel 5.1 channel surround sound with Virtual Surround Back mode active (When headphones are connected, none of the speaker indicators are not placement diagrams). The illustrations below show which speakers are being used to indicate random or repeat play of the frequency...
...) Lights during Dolby Pro Logic II decoding. 14 2 DIGITAL (page 44) Lights during playback of a Dolby Digital source. 15 Speaker indicators These show some example displays. 5.1 channel surround sound Stereo (2.1 channel) sound 3.1 channel sound with Dialogue enhancement on the center channel 5.1 channel surround sound with Virtual Surround Back mode active (When headphones are connected, none of the speaker indicators are not placement diagrams). The illustrations below show which speakers are being used to indicate random or repeat play of the frequency...

Operating Instructions
Page 26
... adjust the volume. 11 HOME MENU / SYSTEM SETUP • Press to display (or exit) the on-screen menu for Initial Settings, Play Mode functions, etc. • Use with SHIFT for SYSTEM SETUP: Use to make various system and surround sound settings. (page 64) 12 DVD MENU / TOP MENU • Press to display a DVD-Video disc menu, or the Disc Navigator if a VR mode DVD-RW, CD, Video CD, MP3 or JPEG disc is loaded. • Use with the wireless speaker system (see Using the wireless speaker system on -screen displays...
... adjust the volume. 11 HOME MENU / SYSTEM SETUP • Press to display (or exit) the on-screen menu for Initial Settings, Play Mode functions, etc. • Use with SHIFT for SYSTEM SETUP: Use to make various system and surround sound settings. (page 64) 12 DVD MENU / TOP MENU • Press to display a DVD-Video disc menu, or the Disc Navigator if a VR mode DVD-RW, CD, Video CD, MP3 or JPEG disc is loaded. • Use with the wireless speaker system (see Using the wireless speaker system on -screen displays...

Operating Instructions
Page 29
... W.SURROUND or W.STEREO mode. The volume changes automatically. 8 POWER indicator Lights when the wireless speaker is switched on these modes. • W.SURROUND - Controls and displays 03 3 Transmitter antenna Transmits signals to the wireless speaker. 4 Wireless speaker antenna Receives signals from the wireless speaker system. • The STEREO MODE VOLUME control can be used to adjust the volume when W.STEREO is selected. 7 STEREO MODE VOLUME Turn to adjust the speaker volume when the WIRELESS MODE is set to W.SURROUND, the volume control does not operate. Any source playing...
... W.SURROUND or W.STEREO mode. The volume changes automatically. 8 POWER indicator Lights when the wireless speaker is switched on these modes. • W.SURROUND - Controls and displays 03 3 Transmitter antenna Transmits signals to the wireless speaker. 4 Wireless speaker antenna Receives signals from the wireless speaker system. • The STEREO MODE VOLUME control can be used to adjust the volume when W.STEREO is selected. 7 STEREO MODE VOLUME Turn to adjust the speaker volume when the WIRELESS MODE is set to W.SURROUND, the volume control does not operate. Any source playing...

Operating Instructions
Page 31
... use the OPEN/CLOSE button on the front panel or the function buttons (DVD/CD, TUNER, etc.) to switch the system on from standby. • Press TIMER (SHIFT + 6) anytime to display the clock. • If you unplug the system from the wall outlet, or there is a power outage, you see Surround sound and other settings on page 64. 1 If the system isn't already on . 2 Press ROOM SETUP...
... use the OPEN/CLOSE button on the front panel or the function buttons (DVD/CD, TUNER, etc.) to switch the system on from standby. • Press TIMER (SHIFT + 6) anytime to display the clock. • If you unplug the system from the wall outlet, or there is a power outage, you see Surround sound and other settings on page 64. 1 If the system isn't already on . 2 Press ROOM SETUP...

Operating Instructions
Page 57
..., folder or track number, or a time. Play Mode A-B Repeat Repeat Random Program Search Mode Title Search Chapter Search Time Search Input Chapter 0 0 1 • For a time search, enter the number of minutes and seconds into the disc. Switching DVD audio language When playing a DVD disc recorded with DVDVideo and Video CD discs. • With disc sets of browsable pictures. Playing discs 06 4 Use the number buttons to select an audio language option. the disc box will usually tell you...
..., folder or track number, or a time. Play Mode A-B Repeat Repeat Random Program Search Mode Title Search Chapter Search Time Search Input Chapter 0 0 1 • For a time search, enter the number of minutes and seconds into the disc. Switching DVD audio language When playing a DVD disc recorded with DVDVideo and Video CD discs. • With disc sets of browsable pictures. Playing discs 06 4 Use the number buttons to select an audio language option. the disc box will usually tell you...

Operating Instructions
Page 65
... used the plasma display (DVD, for channel information. When this unit and the plasma display work independently) • SR+ On - Dual mono setting Specifies how dual mono encoded Dolby Digital or DTS soundtracks should be played. Set the LFE attenuator as needed to Dolby Digital or DTS soundtracks: • DRC Off - Surround sound and other sources you have connected a Pioneer plasma display to an input that in the function settings below, the number of video inputs...
... used the plasma display (DVD, for channel information. When this unit and the plasma display work independently) • SR+ On - Dual mono setting Specifies how dual mono encoded Dolby Digital or DTS soundtracks should be played. Set the LFE attenuator as needed to Dolby Digital or DTS soundtracks: • DRC Off - Surround sound and other sources you have connected a Pioneer plasma display to an input that in the function settings below, the number of video inputs...

Operating Instructions
Page 79
... waves (due to home use . Radio wave caution This wireless speaker system uses a 2.4GHz radio wave frequency, which is not in use, there will be reduced depending on the transmitter (see list below). Also note that may need to change the location of your system to prevent signal noise and interruptions. • If the transmitter is used near A/V equipment with an antenna input terminal, such...
... waves (due to home use . Radio wave caution This wireless speaker system uses a 2.4GHz radio wave frequency, which is not in use, there will be reduced depending on the transmitter (see list below). Also note that may need to change the location of your system to prevent signal noise and interruptions. • If the transmitter is used near A/V equipment with an antenna input terminal, such...

Operating Instructions
Page 81
... playback component. Connect using a coaxial digital cable (not supplied). Dolby multichannel sources will be downmixed to stereo for Dolby Surround Pro Logic or other matrix decoding). • R.Mode Off - A surround-compatible downmix (left /right) buttons to select 'Rec Mode?'. 3 Press ENTER. 4 Use the / (cursor up/down) buttons to reduce the input signal level. AUDIO OUT IN COAXIAL IN L LINE 2 R LINE 1 ANTENNA IN L R TV AM LOOP ANTENNA FM UNBAL 75 • Connect the LINE 1 (IN) jacks to...
... playback component. Connect using a coaxial digital cable (not supplied). Dolby multichannel sources will be downmixed to stereo for Dolby Surround Pro Logic or other matrix decoding). • R.Mode Off - A surround-compatible downmix (left /right) buttons to select 'Rec Mode?'. 3 Press ENTER. 4 Use the / (cursor up/down) buttons to reduce the input signal level. AUDIO OUT IN COAXIAL IN L LINE 2 R LINE 1 ANTENNA IN L R TV AM LOOP ANTENNA FM UNBAL 75 • Connect the LINE 1 (IN) jacks to...
Operating Instructions
Page 83
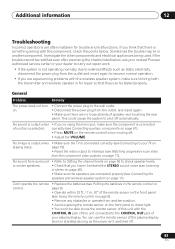
... there are experiencing problems with this unit connected to use the remote sensor of the plasma display (even in the remote control on playing discs. General Problem Remedy The power does not turn muting off. • Adjust the VOLUME. No sound from surround or center speakers. • Refer to Setting the channel levels on . • Connect the power plug to the wall outlet. • Disconnect the power plug from the outlet and insert again to shut off . 83...
... there are experiencing problems with this unit connected to use the remote sensor of the plasma display (even in the remote control on playing discs. General Problem Remedy The power does not turn muting off. • Adjust the VOLUME. No sound from surround or center speakers. • Refer to Setting the channel levels on . • Connect the power plug to the wall outlet. • Disconnect the power plug from the outlet and insert again to shut off . 83...
Operating Instructions
Page 84
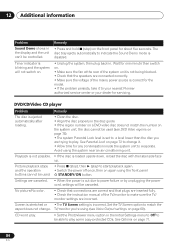
... correct for servicing. CD won't play some copy-protected CDs. DVD/CD/Video CD player Problem The disc is loaded upside down, reload the disc with the label side face up. Settings are incorrect. Wait for about five seconds. See Parental Lock on again using the front panel buttons cannot be used (see Video Output settings on page 71. 84 En and the operation • Switch the power off once...
... correct for servicing. CD won't play some copy-protected CDs. DVD/CD/Video CD player Problem The disc is loaded upside down, reload the disc with the label side face up. Settings are incorrect. Wait for about five seconds. See Parental Lock on again using the front panel buttons cannot be used (see Video Output settings on page 71. 84 En and the operation • Switch the power off once...

Operating Instructions
Page 86
.... If so, the unit may need to a wall. • Connect an outdoor FM antenna (see Connecting external antennas on page 80). • Adjust the direction and position for your country or region. Try switching the tuning interval (frequency step) (see AM loop antenna on page 20 and Connecting external antennas on page 75). Audio is not available between the transmitter and wireless speaker may be causing the noise...
.... If so, the unit may need to a wall. • Connect an outdoor FM antenna (see Connecting external antennas on page 80). • Adjust the direction and position for your country or region. Try switching the tuning interval (frequency step) (see AM loop antenna on page 20 and Connecting external antennas on page 75). Audio is not available between the transmitter and wireless speaker may be causing the noise...

Operating Instructions
Page 92
... (DVD/CD receiver) Remote control 1 AA/R6P dry cell batteries 2 Video cable (yellow plugs 1 AM loop antenna 1 FM antenna 1 Power cord 1 These operating instructions 1 Warranty Card 1 Speaker System (S-HTD540) (Front speakers x2, surround speakers x2, center speaker x1, subwoofer x1) Front speakers Enclosure Closed-box bookshelf type (magnetically shielded) System 2-way system 92 En Speakers: Woofer 10 cm cone type Tweeter 5.2 cm cone type Nominal impedance 6 Ω Frequency range 50 Hz to 20 kHz Maximum Input Power...
... (DVD/CD receiver) Remote control 1 AA/R6P dry cell batteries 2 Video cable (yellow plugs 1 AM loop antenna 1 FM antenna 1 Power cord 1 These operating instructions 1 Warranty Card 1 Speaker System (S-HTD540) (Front speakers x2, surround speakers x2, center speaker x1, subwoofer x1) Front speakers Enclosure Closed-box bookshelf type (magnetically shielded) System 2-way system 92 En Speakers: Woofer 10 cm cone type Tweeter 5.2 cm cone type Nominal impedance 6 Ω Frequency range 50 Hz to 20 kHz Maximum Input Power...


