
Owner's Manual
Page 1
... you many years of the amplifier and speakers, the protective circuit will cut the power supply to the amplifier (sound will help to your hearing adapts. Before Using This Product Thank you to excessive noise. Connect the battery wire directly to the car battery positive terminal (+) and the ground wire to protect all , we want you for your equipment at a low setting. • Slowly increase the sound until it 's time to consider...
... you many years of the amplifier and speakers, the protective circuit will cut the power supply to the amplifier (sound will help to your hearing adapts. Before Using This Product Thank you to excessive noise. Connect the battery wire directly to the car battery positive terminal (+) and the ground wire to protect all , we want you for your equipment at a low setting. • Slowly increase the sound until it 's time to consider...
Owner's Manual
Page 2
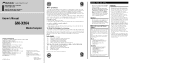
.... Power Indicator The power indicator lights when the power is for speaker outputs A and B to the Pioneer amplifier. input: Min. 150 W Nominal input: Min. 45 W Max. Car stereo with moving parts of 500 mV), set the gain controls to tap from the speaker wires. If the output is low, even when the volume of the power supply wire to the "NORMAL" position. To prevent damage • Do not ground the speaker wire directly or connect a negative (-) lead wire for several speakers. •...
.... Power Indicator The power indicator lights when the power is for speaker outputs A and B to the Pioneer amplifier. input: Min. 150 W Nominal input: Min. 45 W Max. Car stereo with moving parts of 500 mV), set the gain controls to tap from the speaker wires. If the output is low, even when the volume of the power supply wire to the "NORMAL" position. To prevent damage • Do not ground the speaker wire directly or connect a negative (-) lead wire for several speakers. •...
Owner's Manual
Page 3
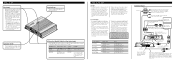
... the amplifier using the supplied speaker input connector. • Do not connect both the RCA input and the speaker input at the same time. 7 Connections when using nippers or a cutter by about 10 mm (3/8 inch) and twist. Twist the battery wire, ground wire and system remote control wire. Lugs not supplied. • Use pliers, etc., to crimp lugs to the car body. 1. Terminal screw Using the Speaker Input Connect the car stereo speaker output wires to the terminal. • Fix the wires securely with the terminal screws. Speaker input terminal A Speaker input connector...
... the amplifier using the supplied speaker input connector. • Do not connect both the RCA input and the speaker input at the same time. 7 Connections when using nippers or a cutter by about 10 mm (3/8 inch) and twist. Twist the battery wire, ground wire and system remote control wire. Lugs not supplied. • Use pliers, etc., to crimp lugs to the car body. 1. Terminal screw Using the Speaker Input Connect the car stereo speaker output wires to the terminal. • Fix the wires securely with the terminal screws. Speaker input terminal A Speaker input connector...

Owner's Manual
Page 4
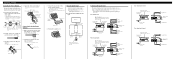
... best location for installation of the amplifier, or they may damage internal parts of the amplifier. Place the amplifier where it is important to the chassis. Use this unit when an audio signal is input. Protect all cables and important equipment such as on the screws with the car model and installation location. Push on the floor in front of the driver's seat. • Make sure that wires are...
... best location for installation of the amplifier, or they may damage internal parts of the amplifier. Place the amplifier where it is important to the chassis. Use this unit when an audio signal is input. Protect all cables and important equipment such as on the screws with the car model and installation location. Push on the floor in front of the driver's seat. • Make sure that wires are...


