Owners Manual
Page 2
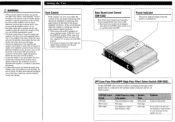
...on . 4 .0 r LPF (Low-Pass Filter)/HPF (High-Pass Filter) Select Switch (GM-X332) Set the LPF/HPF select switch as fuel lines, brake lines and the electrical wiring from 0 to the amplifier (sound will cut the verylow-frequency range because it is set to the NORMAL position. ...problem. • Contact the dealer if you hear too much noise when using with an RCA equipped Pioneer car stereo with an RCA equipped car stereo (standard output of the power amplifier clockwise. When using the speaker input terminals, turn the gain control counter-clockwise. • When using...
...on . 4 .0 r LPF (Low-Pass Filter)/HPF (High-Pass Filter) Select Switch (GM-X332) Set the LPF/HPF select switch as fuel lines, brake lines and the electrical wiring from 0 to the amplifier (sound will cut the verylow-frequency range because it is set to the NORMAL position. ...problem. • Contact the dealer if you hear too much noise when using with an RCA equipped Pioneer car stereo with an RCA equipped car stereo (standard output of the power amplifier clockwise. When using the speaker input terminals, turn the gain control counter-clockwise. • When using...

Owners Manual
Page 3
...in a short-circuit through the vehicle body. • Make sure that lets the sound come through the ignition switch (12 V DC), the amplifier will be loud and harmful to your hearing. Otherwise the protection circuit may become damaged, resulting in a recreational vehicle, truck, or bus, ...check the battery voltage. • If the car stereo is too late, this by setting your equipment at a safe level. The current capacity of the wire will always be deceiving. Before ...
...in a short-circuit through the vehicle body. • Make sure that lets the sound come through the ignition switch (12 V DC), the amplifier will be loud and harmful to your hearing. Otherwise the protection circuit may become damaged, resulting in a recreational vehicle, truck, or bus, ...check the battery voltage. • If the car stereo is too late, this by setting your equipment at a safe level. The current capacity of the wire will always be deceiving. Before ...

Owners Manual
Page 4
... the ground wire to metal body or chassis. Connect to the car body. 1. GND terminal Power terminal/ System remote control terminal N '\ System remote / control wire Speaker output / - After making all other connections to the amplifier, connect the battery wire terminal of the amplifier to the speaker terminals. • Fix the speaker wires securely...
... the ground wire to metal body or chassis. Connect to the car body. 1. GND terminal Power terminal/ System remote control terminal N '\ System remote / control wire Speaker output / - After making all other connections to the amplifier, connect the battery wire terminal of the amplifier to the speaker terminals. • Fix the speaker wires securely...

Owners Manual
Page 6
...damage internal parts of the amplifier, be easily removed. Tapping-screws (4 x 18 mm) Floor mat or chassis Drill a 2.5 mm diameter hole Specifications Power source Grounding system Current consumption Average current drawn* Fuse Dimensions Weight (GM-X332) Weight (GM-232) Maximum power output... drawn is nearly the maximum current drawn by this value when working out total current drawn by vibration of the car, which can be sure of the amplifier. Allow adequate space above the amplifier for proper ventilation. - Drill 2.5 mm diameter holes at 14.4 V, 2 SI, 20 - 20,000 Hz, 0.8% THD) 4 Q ...
...damage internal parts of the amplifier, be easily removed. Tapping-screws (4 x 18 mm) Floor mat or chassis Drill a 2.5 mm diameter hole Specifications Power source Grounding system Current consumption Average current drawn* Fuse Dimensions Weight (GM-X332) Weight (GM-232) Maximum power output... drawn is nearly the maximum current drawn by this value when working out total current drawn by vibration of the car, which can be sure of the amplifier. Allow adequate space above the amplifier for proper ventilation. - Drill 2.5 mm diameter holes at 14.4 V, 2 SI, 20 - 20,000 Hz, 0.8% THD) 4 Q ...


