Owner's Manual
Page 3
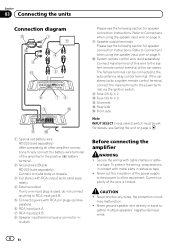
... to this unit, smoke, and overheating could result from contact with a 12 V battery and negative grounding. If this occurs, switch the system power off to prevent equipment malfunction. If you start Section 01 English Before connecting/ installing the amplifier WARNING ! If a DC voltage is short-circuited... Always keep the volume low enough to cause cancer and birth defect or other reproductive harm. gine is cut off and check the power supply and speaker connections. For your dealer. ! The use a fuse of the rating prescribed. Electrical shock could result in recreational vehicles...
... to this unit, smoke, and overheating could result from contact with a 12 V battery and negative grounding. If this occurs, switch the system power off to prevent equipment malfunction. If you start Section 01 English Before connecting/ installing the amplifier WARNING ! If a DC voltage is short-circuited... Always keep the volume low enough to cause cancer and birth defect or other reproductive harm. gine is cut off and check the power supply and speaker connections. For your dealer. ! The use a fuse of the rating prescribed. Electrical shock could result in recreational vehicles...
Owner's Manual
Page 4
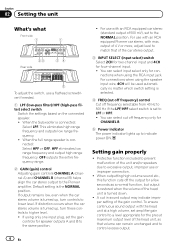
...input. ! output of 4 V or more, adjust level to match that volume can select cut off frequency only for CHANNEL B. 5 Power indicator The power indicator lights up , turn these controls to lower level. You can remain unchanged and to excessive output, improper use with max. Protective function...controls for the preout maximum output level of 500 mV), set amplifier gain control to a level appropriate for speaker outputs A and B to the Pioneer amplifier. When the full range speaker is connected: Select LPF. For use a flathead screwdriver if needed. 1 LPF (low-pass filter)/HPF (...
...input. ! output of 4 V or more, adjust level to match that volume can select cut off frequency only for CHANNEL B. 5 Power indicator The power indicator lights up , turn these controls to lower level. You can remain unchanged and to excessive output, improper use with max. Protective function...controls for the preout maximum output level of 500 mV), set amplifier gain control to a level appropriate for speaker outputs A and B to the Pioneer amplifier. When the full range speaker is connected: Select LPF. For use a flathead screwdriver if needed. 1 LPF (low-pass filter)/HPF (...
Owner's Manual
Page 5
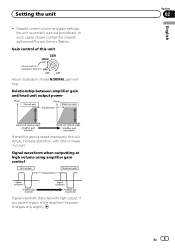
...nearest authorized Pioneer Service Station. Section 02 En 5 English Despite correct volume and gain settings, the unit sound still cuts out periodically. Gain control of this will simply increase distortion, with high output, if you raise the gain of the amplifier the power changes ... waveform when outputting at high volume using amplifier gain control Signal waveform distorted with little increase in power. Setting the unit ! Relationship between amplifier gain and head unit output power If amplifier gain is raised improperly, this unit Preout level: 2 V (Standard: 500 mV)...
...nearest authorized Pioneer Service Station. Section 02 En 5 English Despite correct volume and gain settings, the unit sound still cuts out periodically. Gain control of this will simply increase distortion, with high output, if you raise the gain of the amplifier the power changes ... waveform when outputting at high volume using amplifier gain control Signal waveform distorted with little increase in power. Setting the unit ! Relationship between amplifier gain and head unit output power If amplifier gain is raised improperly, this unit Preout level: 2 V (Standard: 500 mV)...
Owner's Manual
Page 6
... wire is used, do not connect anything to the auto-antenna relay control terminal. CAUTION ! Never cut the insulation of the power supply to feed power to other amplifier connections, finally connect the battery wire terminal of the amplifier to the positive (+) battery terminal. 2 Ground wire ... be connected to RCA input jack B. 5 Connecting wire with cable clamps or adhe- Never ground speaker wire directly or band to the power terminal via the ignition switch. If the car stereo lacks a system remote control terminal, connect the male terminal to - For details, ...
... wire is used, do not connect anything to the auto-antenna relay control terminal. CAUTION ! Never cut the insulation of the power supply to feed power to other amplifier connections, finally connect the battery wire terminal of the amplifier to the positive (+) battery terminal. 2 Ground wire ... be connected to RCA input jack B. 5 Connecting wire with cable clamps or adhe- Never ground speaker wire directly or band to the power terminal via the ignition switch. If the car stereo lacks a system remote control terminal, connect the male terminal to - For details, ...
Owner's Manual
Page 7
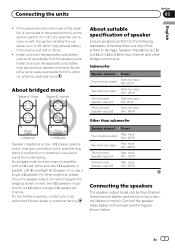
For any further enquiries, contact your local authorized Pioneer dealer or customer service. input: Min. 360 W Three-channel Speaker output A Max. input: Min. 120 W Three-channel Speaker output B Max. About bridged mode About suitable ... and mono) or two-channel (stereo or mono). Connect the speaker leads based on rear: two 8 W speakers in malfunction or personal injury due to the power terminal via the ignition switch (12 V DC), the amplifier will remain on or off, which may result in parallel for a two-channel amplifier, with the...
For any further enquiries, contact your local authorized Pioneer dealer or customer service. input: Min. 360 W Three-channel Speaker output A Max. input: Min. 120 W Three-channel Speaker output B Max. About bridged mode About suitable ... and mono) or two-channel (stereo or mono). Connect the speaker leads based on rear: two 8 W speakers in malfunction or personal injury due to the power terminal via the ignition switch (12 V DC), the amplifier will remain on or off, which may result in parallel for a two-channel amplifier, with the...
Owner's Manual
Page 9
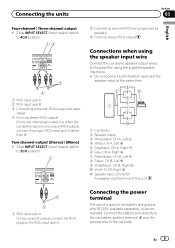
... + and the ground wire to the amplifier using the speaker input wire Connect the car stereo speaker output wires to the car body. Connecting the power terminal The use of this unit. 2 3 1 RCA input jack A For two-channel output, connect the RCA plugs to RCA input jack A rather than B. rately) 4 From...
... + and the ground wire to the amplifier using the speaker input wire Connect the car stereo speaker output wires to the car body. Connecting the power terminal The use of this unit. 2 3 1 RCA input jack A For two-channel output, connect the RCA plugs to RCA input jack A rather than B. rately) 4 From...
Owner's Manual
Page 10
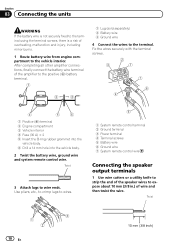
Use pliers, etc., to crimp lugs to wires. 1 System remote control terminal 2 Ground terminal 3 Power terminal 4 Terminal screws 5 Battery wire 6 Ground wire 7 System remote control wire Connecting the speaker output terminals 1 Use wire cutters or a utility knife to strip the ...
Use pliers, etc., to crimp lugs to wires. 1 System remote control terminal 2 Ground terminal 3 Power terminal 4 Terminal screws 5 Battery wire 6 Ground wire 7 System remote control wire Connecting the speaker output terminals 1 Use wire cutters or a utility knife to strip the ...
Owner's Manual
Page 13
Specifications and the design are subject to 26 V Maximum input level / impedance: RCA 6.5 V / 22 kW Speaker 26 V / 22 kW CEA2006 Specifications Power output 60 W RMS × 4 Channels (at 14.4 V, 2 W, 1 kHz, ≦ 1 % THD+N) Load impedance 4 W (2 W to 8 W allowable) Frequency ... × 62 mm × 349 mm (11-3/8 in. ×2-1/2 in. × 1 ft. 2 in.) Weight 3.3 kg (7.3 lbs) (Leads for wiring not included) Maximum power output ....... 760 W (190 W × 4) Continuous power output ... 60 W × 4 (at 14.4 V, 4 W, 20 Hz to 20 kHz ≦ 1 % THD +N) 180 W × 2 (at 14.4 V, 4 W...
Specifications and the design are subject to 26 V Maximum input level / impedance: RCA 6.5 V / 22 kW Speaker 26 V / 22 kW CEA2006 Specifications Power output 60 W RMS × 4 Channels (at 14.4 V, 2 W, 1 kHz, ≦ 1 % THD+N) Load impedance 4 W (2 W to 8 W allowable) Frequency ... × 62 mm × 349 mm (11-3/8 in. ×2-1/2 in. × 1 ft. 2 in.) Weight 3.3 kg (7.3 lbs) (Leads for wiring not included) Maximum power output ....... 760 W (190 W × 4) Continuous power output ... 60 W × 4 (at 14.4 V, 4 W, 20 Hz to 20 kHz ≦ 1 % THD +N) 180 W × 2 (at 14.4 V, 4 W...

