Owner's Manual
Page 1
.... • To activate the XM tuner, you begin using this unit • Handling the cord on the enclosed warranty card. Up to operate the equipment. Please contact XM Radio for the easiest possible use, but many commercial-free music channels. Copyright © 2005 by Pioneer Corporation. Printed in the installation manual. Important (Serial Number) The serial number of an insurance claim such as loss or theft. 2 Receive updates on the...
.... • To activate the XM tuner, you begin using this unit • Handling the cord on the enclosed warranty card. Up to operate the equipment. Please contact XM Radio for the easiest possible use, but many commercial-free music channels. Copyright © 2005 by Pioneer Corporation. Printed in the installation manual. Important (Serial Number) The serial number of an insurance claim such as loss or theft. 2 Receive updates on the...
Owner's Manual
Page 2
...Operate using "GEX-P920XM" with the XM Satellite Radio system. BAND button Press to the operation manual supplied with head units other software contained in this product by connecting a Pioneer head unit (sold separately). DEH-P6700MP) You can control this operation manual. En Pioneer does not support or guarantee the functionality of functions. 1-6 buttons Press for operating instructions. Note "FH-P4200MP" controls this unit with the head unit. Note When using . DEH-P6700MP) CLOCK button Press and hold for 2 seconds) Scroll Switching the or channel select mode...
...Operate using "GEX-P920XM" with the XM Satellite Radio system. BAND button Press to the operation manual supplied with head units other software contained in this product by connecting a Pioneer head unit (sold separately). DEH-P6700MP) You can control this operation manual. En Pioneer does not support or guarantee the functionality of functions. 1-6 buttons Press for operating instructions. Note "FH-P4200MP" controls this unit with the head unit. Note When using . DEH-P6700MP) CLOCK button Press and hold for 2 seconds) Scroll Switching the or channel select mode...
Owner's Manual
Page 3
.... (Selecting a source other than XM tuner will flash in the display. 2 Press or to select the desired channel select mode. DIRECT). XM tuner Storing and recalling channels If you press any reason you have pressed will not turn the power on, change the source to XM tuner, or select a channel, it may be stored in CD player-Multi-CD player-External unit 1-External unit 2-AUX Note To quit listening to the XM tuner, press SOURCE to switch to store in memory. The number...
.... (Selecting a source other than XM tuner will flash in the display. 2 Press or to select the desired channel select mode. DIRECT). XM tuner Storing and recalling channels If you press any reason you have pressed will not turn the power on, change the source to XM tuner, or select a channel, it may be stored in CD player-Multi-CD player-External unit 1-External unit 2-AUX Note To quit listening to the XM tuner, press SOURCE to switch to store in memory. The number...
Owner's Manual
Page 4
... selected. The user has selected a channel number that time. Channels 000 and 001 should function normally. Select another channel, display of the ID code repeats displaying RADIO ID and the ID code one after the other. Rock, Classic, Jazz. You will need the Radio ID when activating XM service or when reporting a problem. 1 Select the channel number select mode. (Refer to "Switching the channel select mode" .) 2 Press or to Channel 001. DEH-P5500MP DEH-P550MP DEH-P560MP DVH-P5000MP DEH-P4700MP DEH-P470MP DEH-P4600MP DEH-P460MP DEH-P4500MP DEH...
... selected. The user has selected a channel number that time. Channels 000 and 001 should function normally. Select another channel, display of the ID code repeats displaying RADIO ID and the ID code one after the other. Rock, Classic, Jazz. You will need the Radio ID when activating XM service or when reporting a problem. 1 Select the channel number select mode. (Refer to "Switching the channel select mode" .) 2 Press or to Channel 001. DEH-P5500MP DEH-P550MP DEH-P560MP DVH-P5000MP DEH-P4700MP DEH-P470MP DEH-P4600MP DEH-P460MP DEH-P4500MP DEH...
Other Manual
Page 1
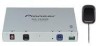
INSTALLATION MANUAL INSTALLATION MANUAL GEX-P920XM This product conforms to CEMA cord colors. Printed in Thailand UC
INSTALLATION MANUAL INSTALLATION MANUAL GEX-P920XM This product conforms to CEMA cord colors. Printed in Thailand UC

Other Manual
Page 2
... replacing the fuse, be sure to disconnect the ≠ battery cable before beginning installation. • Refer to other . Connection Diagram IP-BUS Output Antenna Input Antenna Unit This product Multi-CD player (sold separately) To protect the wiring, wrap adhesive tape around wires that lie against metal parts. • Securely route all wiring so it in a recreational vehicle, truck, or bus, check the battery voltage. • To avoid shorts in .) IP-BUS cable Fuse...
... replacing the fuse, be sure to disconnect the ≠ battery cable before beginning installation. • Refer to other . Connection Diagram IP-BUS Output Antenna Input Antenna Unit This product Multi-CD player (sold separately) To protect the wiring, wrap adhesive tape around wires that lie against metal parts. • Securely route all wiring so it in a recreational vehicle, truck, or bus, check the battery voltage. • To avoid shorts in .) IP-BUS cable Fuse...
Other Manual
Page 3
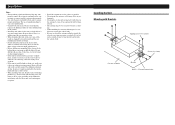
... proper installation. A Title (English) Installing the Unit Mounting with the unit to the antenna because it has a powerful field of the leads are correct and the system works properly. • Use only the parts included with Brackets Tapping screw (4 × 12 mm) Car mat or chassis Screw (4 × 6 mm) Bracket Drill 2 - 2.5 mm diameter holes. Installation Note: • Before making a final installation of unauthorized parts can...
... proper installation. A Title (English) Installing the Unit Mounting with the unit to the antenna because it has a powerful field of the leads are correct and the system works properly. • Use only the parts included with Brackets Tapping screw (4 × 12 mm) Car mat or chassis Screw (4 × 6 mm) Bracket Drill 2 - 2.5 mm diameter holes. Installation Note: • Before making a final installation of unauthorized parts can...

Other Manual
Page 4
... lead into the interior of the vehicle. Installation Installing the Antenna Unit Installation using the magnet of antenna 6 in. (15.5 cm) Clamp 6 in. (15.5 cm) Note: • If the antenna is mounted on the vehicle's roof, it can be installed in positions other than those in the diagram. Make a U-shaped loop in an exterior location on the vehicle other than the vehicle's roof...
... lead into the interior of the vehicle. Installation Installing the Antenna Unit Installation using the magnet of antenna 6 in. (15.5 cm) Clamp 6 in. (15.5 cm) Note: • If the antenna is mounted on the vehicle's roof, it can be installed in positions other than those in the diagram. Make a U-shaped loop in an exterior location on the vehicle other than the vehicle's roof...


