
Owners Manual
Page 2
Mounting Location Installing the Antenna unit 16 Specifications 17 1 Contents Dear Customer 2 Before Using This Product 3 About This Product 3 About This Manual 4 Important 4 Precaution 5 - After-sales Service for Pioneer Products Basic Operation 6 Basic Operation of TV Tuner 6 Preset Tuning 8 BSSM (Best Station Sequential Memory) ........ 8 Confirming Current Channel and Other Settings 9 Manual Preset Channel Setting 9 Connecting the Units 11 The Booster Switch 11 Installation 13 Installing the unit 13 Setting the Antenna unit 14 -
Mounting Location Installing the Antenna unit 16 Specifications 17 1 Contents Dear Customer 2 Before Using This Product 3 About This Product 3 About This Manual 4 Important 4 Precaution 5 - After-sales Service for Pioneer Products Basic Operation 6 Basic Operation of TV Tuner 6 Preset Tuning 8 BSSM (Best Station Sequential Memory) ........ 8 Confirming Current Channel and Other Settings 9 Manual Preset Channel Setting 9 Connecting the Units 11 The Booster Switch 11 Installation 13 Installing the unit 13 Setting the Antenna unit 14 -

Owners Manual
Page 3
... loss in front of speakers, thunderclap 140 Gunshot blast, jet plane 180 Rocket launching pad Information courtesy of sound levels is included for a lifetime. We Want You Listening For A Lifetime Used wisely, your protection. Sound can be loud and harmful to get the most importantly, without affecting your volume control at a safe level. To establish a safe level: • Start your...
... loss in front of speakers, thunderclap 140 Gunshot blast, jet plane 180 Rocket launching pad Information courtesy of sound levels is included for a lifetime. We Want You Listening For A Lifetime Used wisely, your protection. Sound can be loud and harmful to get the most importantly, without affecting your volume control at a safe level. To establish a safe level: • Start your...

Owners Manual
Page 4
... Head display AVR-W6100 lets you enjoy TV entertainment. The tuner frequencies on this product, which should not operate this product are allocated for reception of your vehicle's airbags. • The driver should be installed in a location where the driver cannot see it. 3 bility or affect the operation of TV broadcasts. Before Using This Product Information to operate the equipment. [For Canadian model...
... Head display AVR-W6100 lets you enjoy TV entertainment. The tuner frequencies on this product, which should not operate this product are allocated for reception of your vehicle's airbags. • The driver should be installed in a location where the driver cannot see it. 3 bility or affect the operation of TV broadcasts. Before Using This Product Information to operate the equipment. [For Canadian model...

Owners Manual
Page 5
... convenience, be sure to record this manual, the remote control is intended to help you read the Over Head display's Owner's Manual. It is located on next page and in other sections. This product features a number of this device is especially important that you begin using this product. Important The serial number of sophisticated functions ensuring superior reception and operation. All are designed for the...
... convenience, be sure to record this manual, the remote control is intended to help you read the Over Head display's Owner's Manual. It is located on next page and in other sections. This product features a number of this device is especially important that you begin using this product. Important The serial number of sophisticated functions ensuring superior reception and operation. All are designed for the...

Owners Manual
Page 6
... the battery is not available, please contact the companies listed below for repair without advance contact. 7 U.S.A. 7 CANADA Pioneer Electronics (U.S.A.), Inc. In case the necessary information is disconnected, the preset memory will be erased and must be audible. • Protect this manual handy as a reference for operating procedures and precautions. • Always keep the volume low enough for outside sounds to...
... the battery is not available, please contact the companies listed below for repair without advance contact. 7 U.S.A. 7 CANADA Pioneer Electronics (U.S.A.), Inc. In case the necessary information is disconnected, the preset memory will be erased and must be audible. • Protect this manual handy as a reference for operating procedures and precautions. • Always keep the volume low enough for outside sounds to...

Owners Manual
Page 7
Select the TV source on the Over Head Display. Select the desired band. ENGLISH ESPAÑOL Basic Operation When using with a Pioneer Over Head Display AVR-W6100, please read the Over Head display's Owner's Manual. Basic Operation of TV Tuner 1. For details, refer to the connected unit's manual. Source Channel 4 TV1 2 3 4 5 8 12 21 30 38 45 56 69 TV1 = TV2 DEUTSCH FRANÇAIS ITALIANO NEDERLANDS 6 TV 4ch Each press changes the Source ... 2.
Select the TV source on the Over Head Display. Select the desired band. ENGLISH ESPAÑOL Basic Operation When using with a Pioneer Over Head Display AVR-W6100, please read the Over Head display's Owner's Manual. Basic Operation of TV Tuner 1. For details, refer to the connected unit's manual. Source Channel 4 TV1 2 3 4 5 8 12 21 30 38 45 56 69 TV1 = TV2 DEUTSCH FRANÇAIS ITALIANO NEDERLANDS 6 TV 4ch Each press changes the Source ... 2.

Owners Manual
Page 8
..., you stop pressing the button. • To select channels with a CH button. 4. Next, switch channels with the AVR-W6100's main unit, first switch the selection mode to MANUAL/SEEK. Turn off the system. 7 Each time you press the button. Basic Operation 3. Manual Tuning (step by changing the length of the time you simultaneously press the 2/3 CH button, the mode switches between MANUAL/SEEK and PRESET. Seek Tuning starts as soon as you can skip broadcasting stations.
..., you stop pressing the button. • To select channels with a CH button. 4. Next, switch channels with the AVR-W6100's main unit, first switch the selection mode to MANUAL/SEEK. Turn off the system. 7 Each time you press the button. Basic Operation 3. Manual Tuning (step by changing the length of the time you simultaneously press the 2/3 CH button, the mode switches between MANUAL/SEEK and PRESET. Seek Tuning starts as soon as you can skip broadcasting stations.

Owners Manual
Page 9
... memorized stations may remain in memory. • Select the desired preset channel. 4 TV1 P12 PRESET Band Preset Number Selection mode Note: • To select channels with a CH button. BSSM (Best Station Sequential Memory) The BSSM function automatically memorizes strongly transmitted broadcast stations in 1 Band. In regions where reception of no more than 12 station is complete. ENGLISH ESPAÑOL DEUTSCH Preset Tuning Up to MANUAL/SEEK. Each press changes the Mode ... •...
... memorized stations may remain in memory. • Select the desired preset channel. 4 TV1 P12 PRESET Band Preset Number Selection mode Note: • To select channels with a CH button. BSSM (Best Station Sequential Memory) The BSSM function automatically memorizes strongly transmitted broadcast stations in 1 Band. In regions where reception of no more than 12 station is complete. ENGLISH ESPAÑOL DEUTSCH Preset Tuning Up to MANUAL/SEEK. Each press changes the Mode ... •...

Owners Manual
Page 10
... display to the connected unit's manual.) 2. COUNTRY SETTING PRESET NO . 1 [ 2ch] 9 Basic Operation Confirming Current Channel and Other Settings If the current audio source is TV, reception information such as the channel and band is displayed. Choose [PRESET NO.]. Channel Recall = Preset channel list = Indication OFF (Preset channel list) 4 TV1 2 3 4 5 8 12 21 30 38 45 56 69 Channels memorized (preset) in the following order: (CH CALL) 4 TV1 Each press changes the Mode ... Display a menu screen and select [PRESET CHANNEL SETTING] menu...
... display to the connected unit's manual.) 2. COUNTRY SETTING PRESET NO . 1 [ 2ch] 9 Basic Operation Confirming Current Channel and Other Settings If the current audio source is TV, reception information such as the channel and band is displayed. Choose [PRESET NO.]. Channel Recall = Preset channel list = Indication OFF (Preset channel list) 4 TV1 2 3 4 5 8 12 21 30 38 45 56 69 Channels memorized (preset) in the following order: (CH CALL) 4 TV1 Each press changes the Mode ... Display a menu screen and select [PRESET CHANNEL SETTING] menu...

Owners Manual
Page 11
Select [OK]. COUNTRY SETTING FRANÇAIS ITANLEIDAENROLANDS 10 Select the channel you want to preset. COUNTRY SETTING 7. Press the 2/3 button to preset. Select the Preset Number you want to use for presetting. COUNTRY SETTING 6. Select [CHANNEL NO.]. COUNTRY SETTING 5. ENGLISH ESPAÑOL DEUTSCH 3. COUNTRY SETTING PRESET NO . 3 [ 4ch] 4.
Select [OK]. COUNTRY SETTING FRANÇAIS ITANLEIDAENROLANDS 10 Select the channel you want to preset. COUNTRY SETTING 7. Press the 2/3 button to preset. Select the Preset Number you want to use for presetting. COUNTRY SETTING 6. Select [CHANNEL NO.]. COUNTRY SETTING 5. ENGLISH ESPAÑOL DEUTSCH 3. COUNTRY SETTING PRESET NO . 3 [ 4ch] 4.

Owners Manual
Page 12
... switch's ON/OFF setting using the tip of the wiring short-circuiting to the owner's manual for vehicles with cable clamps or adhesive tape. Before installing it cannot touch any moving parts, such as possible. To protect the wiring, wrap adhesive tape around them where they lie against metal parts. • Route and secure all wiring so it in a recreational vehicle, truck, or bus...
... switch's ON/OFF setting using the tip of the wiring short-circuiting to the owner's manual for vehicles with cable clamps or adhesive tape. Before installing it cannot touch any moving parts, such as possible. To protect the wiring, wrap adhesive tape around them where they lie against metal parts. • Route and secure all wiring so it in a recreational vehicle, truck, or bus...

Owners Manual
Page 13
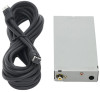
... terminal controlled by the ignition switch (12 V DC) ON/OFF. Do not connect this terminal, do not remove the cap. Fuse resistor [1 A] Cap When not using this lead to power source terminals to such terminals, the battery may be drained. If the lead is connected to which power is continuously supplied. ENGLISH AVR-W6100 ESPAÑOL 6 m [236 in.] TV tuner connection cable This...
... terminal controlled by the ignition switch (12 V DC) ON/OFF. Do not connect this terminal, do not remove the cap. Fuse resistor [1 A] Cap When not using this lead to power source terminals to such terminals, the battery may be drained. If the lead is connected to which power is continuously supplied. ENGLISH AVR-W6100 ESPAÑOL 6 m [236 in.] TV tuner connection cable This...

Owners Manual
Page 14
Installation Installing the unit Velcro tape Car mat or chassis 13
Installation Installing the unit Velcro tape Car mat or chassis 13

Owners Manual
Page 15
... children don't play with the unit to reach (Antenna cable length: 6 m [236 in.]). • If you want to mount the antenna on a rear (hatchback) windows pointing down , the tips of the vehicle. • Install the unit where it does not get caught or pinched in noise. ENGLISH ESPAÑOL Note: • Before finally installing the unit, connect the wiring temporarily, making sure it...
... children don't play with the unit to reach (Antenna cable length: 6 m [236 in.]). • If you want to mount the antenna on a rear (hatchback) windows pointing down , the tips of the vehicle. • Install the unit where it does not get caught or pinched in noise. ENGLISH ESPAÑOL Note: • Before finally installing the unit, connect the wiring temporarily, making sure it...

Owners Manual
Page 16
... 7 Example 2: Mounting on a rear side window (Fig. 3) 1 1. Note: • Install the antenna on the window on a hatchback window, use clamps where necessary to a temperature of the car. • Do not install with the antenna elements together as this reduces reception sensitivity. 1. Clamps When mounting on the driver's side of 20˚C or more. Installation Mounting Location 7 Example 1: Mounting on a rear window (Fig. 1) 1 7 Example 3: Mounting on a hatchback...
... 7 Example 2: Mounting on a rear side window (Fig. 3) 1 1. Note: • Install the antenna on the window on a hatchback window, use clamps where necessary to a temperature of the car. • Do not install with the antenna elements together as this reduces reception sensitivity. 1. Clamps When mounting on the driver's side of 20˚C or more. Installation Mounting Location 7 Example 1: Mounting on a rear window (Fig. 1) 1 7 Example 3: Mounting on a hatchback...

Owners Manual
Page 17
... sticking on the location for mounting before removing the protective paper. 2. Mounting the booster amp section. 1 2 20 mm [3/4 in.] 2 20 mm [3/4 in .] or more between the edge of 20 mm [3/4 in .] 1. Sticking antenna elements to a clean cloth and wipe, applying a little pressure. • Dry thoroughly with another clean cloth. 2 1. Decide on the booster amp section, make sure there is...
... sticking on the location for mounting before removing the protective paper. 2. Mounting the booster amp section. 1 2 20 mm [3/4 in.] 2 20 mm [3/4 in .] or more between the edge of 20 mm [3/4 in .] 1. Sticking antenna elements to a clean cloth and wipe, applying a little pressure. • Dry thoroughly with another clean cloth. 2 1. Decide on the booster amp section, make sure there is...

Owners Manual
Page 18
... ...0.35 kg [0.8 lbs] TV tuner Reception channel/TV system US/M: VHF 2 - 13 ch, UHF 14 - 69 ch Color system ...NTSC compatible Usable sensitivity ...14 dBµ (75 Ω, mono) Video S/N Over 37 dB (59 dBµ RF input, White Peak 100%) Video S/N 30 dB usable sensitivity ...46 dBµ Antenna input ...1 ch (φ 3.5 mm Mini plug type) Antenna cable ...6 m [236 in.] Note...
... ...0.35 kg [0.8 lbs] TV tuner Reception channel/TV system US/M: VHF 2 - 13 ch, UHF 14 - 69 ch Color system ...NTSC compatible Usable sensitivity ...14 dBµ (75 Ω, mono) Video S/N Over 37 dB (59 dBµ RF input, White Peak 100%) Video S/N 30 dB usable sensitivity ...46 dBµ Antenna input ...1 ch (φ 3.5 mm Mini plug type) Antenna cable ...6 m [236 in.] Note...


