

Owner's Manual
Page 2
Table of Contents Before You Start 3 Getting Started 4 Radio...7 CD/USB/iPod/AUX 8 Bluetooth 10 App Mode 12 Pandora 13 SiriusXM Satellite Radio 13 Settings 15 FUNCTION settings 15 AUDIO settings 16 SYSTEM settings 17 ILLUMINATION settings 17 MIXTRAX settings 18 Connections/Installation 19 Additional Information 22 2 En About this manual: • In the following instructions, a USB memory or USB audio player are referred to as "USB device". • In this manual, iPod and iPhone are referred to as "iPod".
Table of Contents Before You Start 3 Getting Started 4 Radio...7 CD/USB/iPod/AUX 8 Bluetooth 10 App Mode 12 Pandora 13 SiriusXM Satellite Radio 13 Settings 15 FUNCTION settings 15 AUDIO settings 16 SYSTEM settings 17 ILLUMINATION settings 17 MIXTRAX settings 18 Connections/Installation 19 Additional Information 22 2 En About this manual: • In the following instructions, a USB memory or USB audio player are referred to as "USB device". • In this manual, iPod and iPhone are referred to as "iPod".

Owner's Manual
Page 3
...dealer or an experienced radio/TV technician for help. FCC ID: AJDK071 MODEL NO.: FH-X820BS/X720BT/X721BT IC: 775E-K071 This device complies with Part 15 of electric shock, injury ...sure to pull off and on a circuit different from that interference will not occur in a particular installation. Electrical shock could result from person's body (excluding extremities: hands, wrists, feet and ankles). ... to operate the unit while driving. Before You Start Thank you for purchasing this PIONEER product To ensure proper use, please read and observe WARNINGs and CAUTIONs in this by...
...dealer or an experienced radio/TV technician for help. FCC ID: AJDK071 MODEL NO.: FH-X820BS/X720BT/X721BT IC: 775E-K071 This device complies with Part 15 of electric shock, injury ...sure to pull off and on a circuit different from that interference will not occur in a particular installation. Electrical shock could result from person's body (excluding extremities: hands, wrists, feet and ankles). ... to operate the unit while driving. Before You Start Thank you for purchasing this PIONEER product To ensure proper use, please read and observe WARNINGs and CAUTIONs in this by...

Owner's Manual
Page 6
... immediately. • Do not expose the battery or remote control to display the main menu. 2 Turn the M.C. The setup menu disappears after installation, [SET UP :YES] appears in the display. 1 Press the M.C. dial to excessive heat such as direct sunlight or fire. dial to select... indicator moves to confirm. 2 Turn the M.C. dial to select [NO], then press to the minute setting automatically. 3 Turn the M.C. Then install a new battery. • When disposing of no operation. dial to adjust the minute, then press to any time. special handling may become jammed...
... immediately. • Do not expose the battery or remote control to display the main menu. 2 Turn the M.C. The setup menu disappears after installation, [SET UP :YES] appears in the display. 1 Press the M.C. dial to excessive heat such as direct sunlight or fire. dial to select... indicator moves to confirm. 2 Turn the M.C. dial to select [NO], then press to the minute setting automatically. 3 Turn the M.C. Then install a new battery. • When disposing of no operation. dial to adjust the minute, then press to any time. special handling may become jammed...
Owner's Manual
Page 8
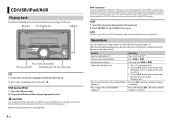
...OFF] in the FUNCTION settings (page 15). Play a song in the selected folder/ category*1 Press and hold or . CAUTION Use an optional Pioneer USB cable (CD-U50E) to connect the USB device as any device connected directly to the unit via MTP. Note that MTP connection is set... a source (page 17). dial to select the desired file, then press to confirm. To eject a disc, stop playback. 8 En MTP connection A device installed with Android OS 4.0 or later can make various adjustments in the SYSTEM settings, [AUX] cannot be played back via MTP, using an appropriate cable.
...OFF] in the FUNCTION settings (page 15). Play a song in the selected folder/ category*1 Press and hold or . CAUTION Use an optional Pioneer USB cable (CD-U50E) to connect the USB device as any device connected directly to the unit via MTP. Note that MTP connection is set... a source (page 17). dial to select the desired file, then press to confirm. To eject a disc, stop playback. 8 En MTP connection A device installed with Android OS 4.0 or later can make various adjustments in the SYSTEM settings, [AUX] cannot be played back via MTP, using an appropriate cable.

Owner's Manual
Page 12
...App Mode You can make various adjustments in the FUNCTION settings (page 15). NOTE PIONEER IS NOT LIABLE FOR ANY THIRD PARTY APPS OR CONTENT, INCLUDING WITHOUT LIMITATION THEIR ...on an iPhone/Android device via the unit The Bluetooth connection is compatible with iPhones and iPod touches installed with iOS 5.0 or later. dial to select [APP CONN.SET], then press to start up... PRACTICES. Press BAND/ . For iPhone users This function is available for all units except FH-X520UI. 1 Connect this unit, operation and information displayed may involve or require the provision ...
...App Mode You can make various adjustments in the FUNCTION settings (page 15). NOTE PIONEER IS NOT LIABLE FOR ANY THIRD PARTY APPS OR CONTENT, INCLUDING WITHOUT LIMITATION THEIR ...on an iPhone/Android device via the unit The Bluetooth connection is compatible with iPhones and iPod touches installed with iOS 5.0 or later. dial to select [APP CONN.SET], then press to start up... PRACTICES. Press BAND/ . For iPhone users This function is available for all units except FH-X520UI. 1 Connect this unit, operation and information displayed may involve or require the provision ...
Owner's Manual
Page 19
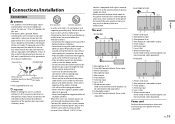
... not shorten any disconnected cable connectors with a 12-volt battery and negative grounding only. Use a fuse of the battery before installation. - Ensure that comes into contact with cable clamps or adhesive tape. If the vehicle is on the ignition switch, failure to... in a fire or malfunction. • To prevent a short-circuit, overheating or malfunction, be connected (sold separately). This unit FH-X820BS FH-X720BT/X721BT Power cord input Microphone input Microphone (4 m) Rear output or subwoofer output Front output Antenna input Fuse (10 A) Wired remote input...
... not shorten any disconnected cable connectors with a 12-volt battery and negative grounding only. Use a fuse of the battery before installation. - Ensure that comes into contact with cable clamps or adhesive tape. If the vehicle is on the ignition switch, failure to... in a fire or malfunction. • To prevent a short-circuit, overheating or malfunction, be connected (sold separately). This unit FH-X820BS FH-X720BT/X721BT Power cord input Microphone input Microphone (4 m) Rear output or subwoofer output Front output Antenna input Fuse (10 A) Wired remote input...
Owner's Manual
Page 20
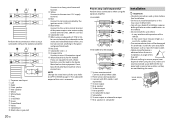
FH-X820BS FH-X720BT/X721BT/X520UI System remote control Connect to the green and green/black leads. Install this unit away from hot places such as near the heater outlet. • Optimum performance is obtained when the unit is monaural. Leave ample 5 cm... rear panel and wrap any connections. Power amp (sold separately) Connect with a Mute function, wire this may cause malfunctions. • Consult your dealer if installation requires drilling of a sudden stop. • The semiconductor laser will be sure to connect the subwoofer to the Audio Mute lead on that equipment. Perform...
FH-X820BS FH-X720BT/X721BT/X520UI System remote control Connect to the green and green/black leads. Install this unit away from hot places such as near the heater outlet. • Optimum performance is obtained when the unit is monaural. Leave ample 5 cm... rear panel and wrap any connections. Power amp (sold separately) Connect with a Mute function, wire this may cause malfunctions. • Consult your dealer if installation requires drilling of a sudden stop. • The semiconductor laser will be sure to connect the subwoofer to the Audio Mute lead on that equipment. Perform...

Owner's Manual
Page 21
... microphone in front of the steering column. 2 Tighten the screws on each side. 2 Install the microphone clip on the rear side of the driver at a suitable distance to become wound around the steering column or shift lever. Microphone Microphone ... the bracket screw holes. It is extremely dangerous to allow the microphone lead to pick up their voice clearly. Installing the microphone (Only for FH-X820BS/X720BT/X721BT) The microphone should be placed directly in such a way that it from the microphone clip. CAUTION It is recommended to use the clamps (sold ...
... microphone in front of the steering column. 2 Tighten the screws on each side. 2 Install the microphone clip on the rear side of the driver at a suitable distance to become wound around the steering column or shift lever. Microphone Microphone ... the bracket screw holes. It is extremely dangerous to allow the microphone lead to pick up their voice clearly. Installing the microphone (Only for FH-X820BS/X720BT/X721BT) The microphone should be placed directly in such a way that it from the microphone clip. CAUTION It is recommended to use the clamps (sold ...

Owner's Manual
Page 23
ERROR-16 → The iPod firmware version is not supported. - Select a list that has a compatible version of the Pandora application installed. Bluetooth device ERROR-10 → The power failed for FH-X820BS) CHECK ANTENNA → The antenna connection is incorrect. - INOPERABLE → The operation was disabled. - Wait until Pandora allows you to open...
ERROR-16 → The iPod firmware version is not supported. - Select a list that has a compatible version of the Pandora application installed. Bluetooth device ERROR-10 → The power failed for FH-X820BS) CHECK ANTENNA → The antenna connection is incorrect. - INOPERABLE → The operation was disabled. - Wait until Pandora allows you to open...


