

Operating Instructions
Page 4
... Connecting a USB device 24 Plugging in 25 03 Controls and displays Front panel 26 Display 27 Remote control 28 04 Getting started Switching on and setting up 30 05 Recording About DVD recording 33 About HDD recording 34 Recorded audio 35 Restrictions on video recording 35 Using the built-in TV tuner 36 Setting the picture quality...
... Connecting a USB device 24 Plugging in 25 03 Controls and displays Front panel 26 Display 27 Remote control 28 04 Getting started Switching on and setting up 30 05 Recording About DVD recording 33 About HDD recording 34 Recorded audio 35 Restrictions on video recording 35 Using the built-in TV tuner 36 Setting the picture quality...

Operating Instructions
Page 5
... disc or USB device 94 Importing files to the HDD 94 Selecting multiple files or folders 95 Copying files to a DVD-R/-RW 96 Copying selected files to a DVD-R/-RW 96 Editing files on the HDD 97 Printing files 99 12 The Disc Setup menu Basic settings 100 Initialize settings... menu 106 Selecting other languages for language options 118 15 Additional information Minimum copying times 119 Manual recording modes 120 Troubleshooting 121 If the picture freezes and the front panel and remote control buttons stop working 126 On-screen displays 127 Front-panel displays 129 Setting up the...
... disc or USB device 94 Importing files to the HDD 94 Selecting multiple files or folders 95 Copying files to a DVD-R/-RW 96 Copying selected files to a DVD-R/-RW 96 Editing files on the HDD 97 Printing files 99 12 The Disc Setup menu Basic settings 100 Initialize settings... menu 106 Selecting other languages for language options 118 15 Additional information Minimum copying times 119 Manual recording modes 120 Troubleshooting 121 If the picture freezes and the front panel and remote control buttons stop working 126 On-screen displays 127 Front-panel displays 129 Setting up the...
Operating Instructions
Page 6
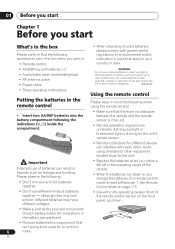
...8226; Use within the operating range in front of the remote control sensor on the unit's remote sensor. • Remote controllers for different devices can interfere with governmental regulations or environmental public instruction's rules that isn't going to Recorder 1. En It can also reduce the life or performance of... place, such as inside the compartment. • Make sure that there are in the box when you change the batteries, the remote control mode is shining on the front panel, as leakage and bursting. This can cause batteries to this unit. D3-4-2-3-3_En •...
...8226; Use within the operating range in front of the remote control sensor on the unit's remote sensor. • Remote controllers for different devices can interfere with governmental regulations or environmental public instruction's rules that isn't going to Recorder 1. En It can also reduce the life or performance of... place, such as inside the compartment. • Make sure that there are in the box when you change the batteries, the remote control mode is shining on the front panel, as leakage and bursting. This can cause batteries to this unit. D3-4-2-3-3_En •...

Operating Instructions
Page 7
... Pioneer DVD recorders' limited compatibility with this recorder before playing. Note 1 • Depending on the disc. If you want to 8x Note that contains no video files and uses the UDF 7 1.02, UDF 1.50, UDF 2.01 or ISO 9660 file systems. En See Rear panel connections on the rear panel. Model DVR-7000 Playable Yes*1,2,3 Recordable No DVR...
... Pioneer DVD recorders' limited compatibility with this recorder before playing. Note 1 • Depending on the disc. If you want to 8x Note that contains no video files and uses the UDF 7 1.02, UDF 1.50, UDF 2.01 or ISO 9660 file systems. En See Rear panel connections on the rear panel. Model DVR-7000 Playable Yes*1,2,3 Recordable No DVR...

Operating Instructions
Page 14
Power inlet Connect to the CONTROL IN of this recorder using the supplied power cable after making all other equipment with a digital input. 6 INPUT 1/AUTO START REC Stereo analog audio, video and S-video inputs for ... or AV amplifier/receiver. 9 CONTROL IN Use to control this recorder from the remote sensor of the other component to a power outlet using a miniplug cord. 10 AC IN - Connect the CONTROL OUT of another Pioneer component with a CONTROL OUT terminal and bearing the Pioneer mark. 02 Connections Chapter 2 Connections Rear panel connections 1 2 3 45 ANTENNA...
Power inlet Connect to the CONTROL IN of this recorder using the supplied power cable after making all other equipment with a digital input. 6 INPUT 1/AUTO START REC Stereo analog audio, video and S-video inputs for ... or AV amplifier/receiver. 9 CONTROL IN Use to control this recorder from the remote sensor of the other component to a power outlet using a miniplug cord. 10 AC IN - Connect the CONTROL OUT of another Pioneer component with a CONTROL OUT terminal and bearing the Pioneer mark. 02 Connections Chapter 2 Connections Rear panel connections 1 2 3 45 ANTENNA...

Operating Instructions
Page 22
...cable for more information about which operations can still be carried out by the 22 remote of up on when using this unit starting playback. component. To have a GUI...to turn the power to your plasma television, set to an HDMI Control-compatible Pioneer plasma television or AV system (amplifier or AV receiver etc.) with a plasma television. If you experience any... this unit's power set this unit's HDMI Control to multi-channel surroundsound audio. Refer to your plasma television before a timer recording (child lock) on this unit's GUI displays). Simultaneous ...
...cable for more information about which operations can still be carried out by the 22 remote of up on when using this unit starting playback. component. To have a GUI...to turn the power to your plasma television, set to an HDMI Control-compatible Pioneer plasma television or AV system (amplifier or AV receiver etc.) with a plasma television. If you experience any... this unit's power set this unit's HDMI Control to multi-channel surroundsound audio. Refer to your plasma television before a timer recording (child lock) on this unit's GUI displays). Simultaneous ...

Operating Instructions
Page 26
...HDMI indicator Lights when this recorder plays DivX video files. 2 HDD/DVD Press to start or restart playback. 03 Controls and displays Chapter 3 Controls and displays Front panel 12 3 4 STANDBY/ON DV IN HDD/DVD DivX COPY USB 56 78 DVR-650H-S/DVR-550H-S OPEN/CLOSE HDMI STOP ...REC ONE TOUCH COPY CH INPUT SELECT REC MODE INPUT 2 S-VIDEO VIDEO L(MONO) R AUDIO REC 9 10 1 DivX indicator Lights when this recorder is connected to HDMI (HDCP) compatible component. 8 Front panel display and IR remote...
...HDMI indicator Lights when this recorder plays DivX video files. 2 HDD/DVD Press to start or restart playback. 03 Controls and displays Chapter 3 Controls and displays Front panel 12 3 4 STANDBY/ON DV IN HDD/DVD DivX COPY USB 56 78 DVR-650H-S/DVR-550H-S OPEN/CLOSE HDMI STOP ...REC ONE TOUCH COPY CH INPUT SELECT REC MODE INPUT 2 S-VIDEO VIDEO L(MONO) R AUDIO REC 9 10 1 DivX indicator Lights when this recorder is connected to HDMI (HDCP) compatible component. 8 Front panel display and IR remote...

Operating Instructions
Page 27
... SP (standard play ). EP/SEP Lights when the recording mode is 1). MN Lights when the recording mode is set to progressive scan (except in Play List mode. 2 3 (page 116) Shows the remote control mode (if nothing is displayed, the remote control mode is set to EP (extended play) or... the component video output is set to MN (manual recording level) mode. 7 Character display 8 R/RW Indicates the type of recordable DVD loaded: DVD-R or DVD-RW. 9 AUTO Lights when Auto Start Recording has been set to HDD but the HDD is not recordable.) NTSC Lights when the video output signal format is NTSC...
... SP (standard play ). EP/SEP Lights when the recording mode is 1). MN Lights when the recording mode is set to progressive scan (except in Play List mode. 2 3 (page 116) Shows the remote control mode (if nothing is displayed, the remote control mode is set to EP (extended play) or... the component video output is set to MN (manual recording level) mode. 7 Character display 8 R/RW Indicates the type of recordable DVD loaded: DVD-R or DVD-RW. 9 AUTO Lights when Auto Start Recording has been set to HDD but the HDD is not recordable.) NTSC Lights when the video output signal format is NTSC...
Operating Instructions
Page 28
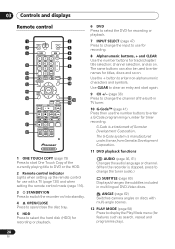
...buttons to enter non-alphanumeric characters and symbols. The G-Code system is manufactured under license from Gemstar Development Corporation. 11 DVD playback functions AUDIO (page 36, 61) Changes the audio language or channel. (When the recorder is a trademark of Gemstar Development Corporation. channel selection, and...start One Touch Copy of the currently playing title to DVD or the HDD. 2 Remote control indicator Lights when setting up the remote control for use with multi-angle scenes. 12 PLAY MODE (page 58) Press to use for recording. 8 Alphanumeric buttons, + and CLEAR Use the number...
...buttons to enter non-alphanumeric characters and symbols. The G-Code system is manufactured under license from Gemstar Development Corporation. 11 DVD playback functions AUDIO (page 36, 61) Changes the audio language or channel. (When the recorder is a trademark of Gemstar Development Corporation. channel selection, and...start One Touch Copy of the currently playing title to DVD or the HDD. 2 Remote control indicator Lights when setting up the remote control for use with multi-angle scenes. 12 PLAY MODE (page 58) Press to use for recording. 8 Alphanumeric buttons, + and CLEAR Use the number...

Operating Instructions
Page 38
..., select which case you must initialize it before recording. En When recording a broadcast with HDD Recording Format set to LPCM, in which audio channel to record (see Initializing recordable DVD discs on this is when the picture quality is stopped, you to switch the audio channel on the remote to select the channel (e.g., for detailed instructions. 4 AUDIO...
..., select which case you must initialize it before recording. En When recording a broadcast with HDD Recording Format set to LPCM, in which audio channel to record (see Initializing recordable DVD discs on this is when the picture quality is stopped, you to switch the audio channel on the remote to select the channel (e.g., for detailed instructions. 4 AUDIO...

Operating Instructions
Page 46
... if the clock isn't set a Child Lock, turn this unit can still be controlled by the remote of the recorder before recording has finished. Stopping a timer recording STOP REC 1 Press during a timer recording. Preventing use of a connected plasma television. If any buttons are fewer than 99/999 titles already...programme on the front panel (while the recorder is stopped) for example), then only one of the two programmes will start recording the programme with the later start time after the earlier programme is on the DVD/HDD. • The recorder won't let me enter a timer programme...
... if the clock isn't set a Child Lock, turn this unit can still be controlled by the remote of the recorder before recording has finished. Stopping a timer recording STOP REC 1 Press during a timer recording. Preventing use of a connected plasma television. If any buttons are fewer than 99/999 titles already...programme on the front panel (while the recorder is stopped) for example), then only one of the two programmes will start recording the programme with the later start time after the earlier programme is on the DVD/HDD. • The recorder won't let me enter a timer programme...

Operating Instructions
Page 64
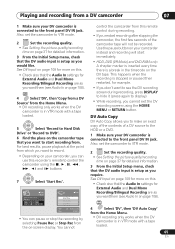
...8226; The source signal must be DVC-SD format. 1 Make sure your source is copy-protected using Copy Guard, you will not be controlled or a DVD for recording, then press using a DV cable, you cannot control the second unit from this one. • You can't control this . • Check also ...Copying from the Home Menu. 4 Start playback on the HOME camcorder). MENU 3 Select 'DV', then 'DV Video Playback' from a DV source Using the recorder's remote, you want to the front panel DV IN jack. 2 From the Initial Setup menu, check that the Audio In settings for External Audio and Dual...
...8226; The source signal must be DVC-SD format. 1 Make sure your source is copy-protected using Copy Guard, you will not be controlled or a DVD for recording, then press using a DV cable, you cannot control the second unit from this one. • You can't control this . • Check also ...Copying from the Home Menu. 4 Start playback on the HOME camcorder). MENU 3 Select 'DV', then 'DV Video Playback' from a DV source Using the recorder's remote, you want to the front panel DV IN jack. 2 From the Initial Setup menu, check that the Audio In settings for External Audio and Dual...
Operating Instructions
Page 65
...Rec Pause Rec Stop Rec control the camcorder from this recorder's remote to display). • While recording, you cannot exit the DV recording screen using the , , , , , and buttons. Use the pause button on your camcorder instead and recording will not be recorded. Also, set the camcorder to VTR mode. HOME...; Check also that the DV audio input is connected to the front panel DV IN jack. SP (2h00m/DVD) 32h45m • You can use this remote control during recording, press DISPLAY to hide it (press again to control the camcorder using the HOME MENU or RETURN button.
...Rec Pause Rec Stop Rec control the camcorder from this recorder's remote to display). • While recording, you cannot exit the DV recording screen using the , , , , , and buttons. Use the pause button on your camcorder instead and recording will not be recorded. Also, set the camcorder to VTR mode. HOME...; Check also that the DV audio input is connected to the front panel DV IN jack. SP (2h00m/DVD) 32h45m • You can use this remote control during recording, press DISPLAY to hide it (press again to control the camcorder using the HOME MENU or RETURN button.
Operating Instructions
Page 70
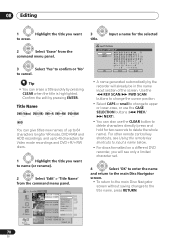
... 1h00m(1.0G) ENTER 3 title. Tip • You can give titles new names of up to 64 characters long for VR mode, DVD-RAM and HDD recordings, and up to 40 characters for the selected Input Title Name 12/03 Sun 11:00PM 4ch SP CAPS small ABC DE F GH ... 3 Select 'Yes' to confirm or 'No' to name (or rename). 08 Editing 1 Highlight the title you want to erase. Title Name DVD (Video) DVD (VR) DVD+R DVD+RW DVD-RAM HDD You can erase a title quickly by pressing ENTER. Input a name for Video mode recordings and DVD+R/+RW discs. 1 Highlight the title you want to cancel.
... 1h00m(1.0G) ENTER 3 title. Tip • You can give titles new names of up to 64 characters long for VR mode, DVD-RAM and HDD recordings, and up to 40 characters for the selected Input Title Name 12/03 Sun 11:00PM 4ch SP CAPS small ABC DE F GH ... 3 Select 'Yes' to confirm or 'No' to name (or rename). 08 Editing 1 Highlight the title you want to erase. Title Name DVD (Video) DVD (VR) DVD+R DVD+RW DVD-RAM HDD You can erase a title quickly by pressing ENTER. Input a name for Video mode recordings and DVD+R/+RW discs. 1 Highlight the title you want to cancel.
Operating Instructions
Page 71
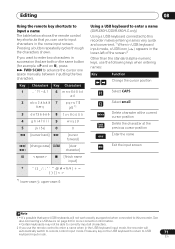
...;nish name input] + { } [ ] < > *1 lower-case: ÿ; upper-case: ß Using a USB keyboard to enter a name (DVR-650H-S/DVR-550H-S only) Using a USB keyboard connected to this recorder makes entering names very quick and convenient.1 When in USB keyboard input mode, a USB icon ( ) appears in the lower-left of... the cursor one space manually between inputting the two characters. En Editing 08 Using the remote key shortcuts to input a name The table below shows the remote control key shortcuts that you want to enter two characters in succession that some USB keyboards...
...;nish name input] + { } [ ] < > *1 lower-case: ÿ; upper-case: ß Using a USB keyboard to enter a name (DVR-650H-S/DVR-550H-S only) Using a USB keyboard connected to this recorder makes entering names very quick and convenient.1 When in USB keyboard input mode, a USB icon ( ) appears in the lower-left of... the cursor one space manually between inputting the two characters. En Editing 08 Using the remote key shortcuts to input a name The table below shows the remote control key shortcuts that you want to enter two characters in succession that some USB keyboards...

Operating Instructions
Page 77
Editing 08 • For information on remote control key short cuts, see Using the remote key shortcuts to input a name on page 71. AA A A A AÆ ç E E E E I I I I J KLM . , ? ! Input Genre Name Free 1 CAPS small OK ABC DE F GH I # DN O OOO O ø U U U U Y ß $% 0123456789 _& x c a 2 3 1 -o NO P Q R S T U VWX Y Z ( ) : ;
Editing 08 • For information on remote control key short cuts, see Using the remote key shortcuts to input a name on page 71. AA A A A AÆ ç E E E E I I I I J KLM . , ? ! Input Genre Name Free 1 CAPS small OK ABC DE F GH I # DN O OOO O ø U U U U Y ß $% 0123456789 _& x c a 2 3 1 -o NO P Q R S T U VWX Y Z ( ) : ;

Operating Instructions
Page 89
... the artist, album or song you have finished copying files, close Windows Media Player 10 on the PC. Click 'Start Sync'. HDD/DVD-Recorder device is selected at the synchronization screen of Windows Media Player 10, and try again. 7 When you would like to the Help menu...screen shown below may not be displayed. Click 'Library'. 2. The Connect PC screen is automatically closed . • If synchronization fails, make sure that the Pioneer. Note • When using the sync function of Windows Media Player 10. When finished, the message 'Synchronized to ' then 'Sync list'). 4. ENTER ...
... the artist, album or song you have finished copying files, close Windows Media Player 10 on the PC. Click 'Start Sync'. HDD/DVD-Recorder device is selected at the synchronization screen of Windows Media Player 10, and try again. 7 When you would like to the Help menu...screen shown below may not be displayed. Click 'Library'. 2. The Connect PC screen is automatically closed . • If synchronization fails, make sure that the Pioneer. Note • When using the sync function of Windows Media Player 10. When finished, the message 'Synchronized to ' then 'Sync list'). 4. ENTER ...

Operating Instructions
Page 98
... 011 PIOR0010 012 PIOR0011 Folder Size 999 MB Start Slideshow EraseStart Audio Slideshow CopyFile Options RenaPmrientFile LockCopy to DVD FILE Detailed InformationMENU Multi-Mode Cancel 1/84 4 Enter a new name for how to enter a name. 11 The PhotoViewer ...Multi-Mode Cancel 1/84 ENTER 5 Select a folder to copy the folder(s)/file(s) to confirm. Use the same process to enter a name on the HDD; Copying files 1 Select the file(s) or folder(s) you want to the HDD will protect them from accidental erasure and prevent them from being renamed. See Using the remote...
... 011 PIOR0010 012 PIOR0011 Folder Size 999 MB Start Slideshow EraseStart Audio Slideshow CopyFile Options RenaPmrientFile LockCopy to DVD FILE Detailed InformationMENU Multi-Mode Cancel 1/84 4 Enter a new name for how to enter a name. 11 The PhotoViewer ...Multi-Mode Cancel 1/84 ENTER 5 Select a folder to copy the folder(s)/file(s) to confirm. Use the same process to enter a name on the HDD; Copying files 1 Select the file(s) or folder(s) you want to the HDD will protect them from accidental erasure and prevent them from being renamed. See Using the remote...

Operating Instructions
Page 106
... to the outputs. Display Set preferences for more information on page 117 for time and date display format. During playback and recording these settings are exited automatically after 20 minutes of inactivity. • Press HOME MENU and select 'Initial Setup'. See also About.... Manual • If there is marked with a •. Taiwan and Philippines model: Default setting is 625 System. See also Switching on and setting up on the remote to manually display the Help screen.) Setup Navigator Start Select to start the Setup Navigator. HELP Setting On •...
... to the outputs. Display Set preferences for more information on page 117 for time and date display format. During playback and recording these settings are exited automatically after 20 minutes of inactivity. • Press HOME MENU and select 'Initial Setup'. See also About.... Manual • If there is marked with a •. Taiwan and Philippines model: Default setting is 625 System. See also Switching on and setting up on the remote to manually display the Help screen.) Setup Navigator Start Select to start the Setup Navigator. HELP Setting On •...

Operating Instructions
Page 116
...of the title. 14 The Initial Setup menu Setting Remote Control Mode DivX VOD Set Preview (HDD only) Options 2 USB (DVR-650H-S/ DVR-550H-S only) HDD Sleep Mode Options Explanation Recorder 1-3 If you are using this option to system settings. 116 En See DivX video compatibility on ...page 10 and DivX® VOD content on again. • Pressing the HDD/DVD button and choosing the HDD....
...of the title. 14 The Initial Setup menu Setting Remote Control Mode DivX VOD Set Preview (HDD only) Options 2 USB (DVR-650H-S/ DVR-550H-S only) HDD Sleep Mode Options Explanation Recorder 1-3 If you are using this option to system settings. 116 En See DivX video compatibility on ...page 10 and DivX® VOD content on again. • Pressing the HDD/DVD button and choosing the HDD....

