
Owner's Manual
Page 2
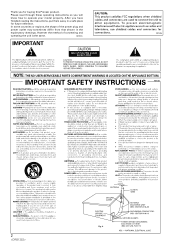
After you have finished reading the instructions, put them away in the explanatory drawings. K015 En NOTE: THE NO USER-SERVICEABLE PARTS COMPARTMENT WARNING IS LOCATED ON THE APPLIANCE BOTTOM. 2 In some countries or regions, the shape of connecting and operating the unit is the same. Thank you for future reference. Please read through these operating instructions so you will know how to operate your model properly. However the method of the power plug and power outlet may sometimes differ from that shown in a safe place for buying this Pioneer product.
After you have finished reading the instructions, put them away in the explanatory drawings. K015 En NOTE: THE NO USER-SERVICEABLE PARTS COMPARTMENT WARNING IS LOCATED ON THE APPLIANCE BOTTOM. 2 In some countries or regions, the shape of connecting and operating the unit is the same. Thank you for future reference. Please read through these operating instructions so you will know how to operate your model properly. However the method of the power plug and power outlet may sometimes differ from that shown in a safe place for buying this Pioneer product.
Owner's Manual
Page 4
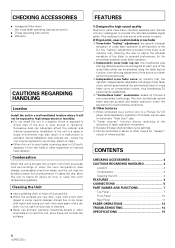
... fader assures durable and stable operation under the severest of DJ performance conditions. 3) Other features 1 When connected via a control cord to a Pioneer DJ CD player (sold separately), operation of the unit in a damp or dusty environment may also result in a malfunction or accident. (Avoid...wipe with a soft cloth dipped in some neutral cleanser diluted five or six times with water and wrung out well, then wipe again with power to spare. 2) Ergonomic, user-customizable cross fader 1 Cross-fader "feeling" adjustment: the specific physical sensation of cross fader operation is brought...
... fader assures durable and stable operation under the severest of DJ performance conditions. 3) Other features 1 When connected via a control cord to a Pioneer DJ CD player (sold separately), operation of the unit in a damp or dusty environment may also result in a malfunction or accident. (Avoid...wipe with a soft cloth dipped in some neutral cleanser diluted five or six times with water and wrung out well, then wipe again with power to spare. 2) Ergonomic, user-customizable cross fader 1 Cross-fader "feeling" adjustment: the specific physical sensation of cross fader operation is brought...
Owner's Manual
Page 5
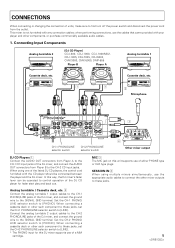
... ground wire to the SIGNAL GND terminal. CONNECTIONS When connecting or changing the connection of units, make sure to first turn off the power switch and disconnect the power cord from Player B to the CH-2 CD input jacks. Cassette deck, etc. 2 1 1 2 Microphone RL RL RL CH-2 R LR SEND RETURN CH-1 MIC LR...
... ground wire to the SIGNAL GND terminal. CONNECTIONS When connecting or changing the connection of units, make sure to first turn off the power switch and disconnect the power cord from Player B to the CH-2 CD input jacks. Cassette deck, etc. 2 1 1 2 Microphone RL RL RL CH-2 R LR SEND RETURN CH-1 MIC LR...

Owner's Manual
Page 6
...output only. When using an effector with a monaural input, connect it to the auxiliary power outlet of L and R signals. CONNECTIONS 2. CH-2 ON ON ON OFF OFF OFF CH-1 PROFESSIONAL 2CHANNEL MIXER DJM-707 FADER CURVE CROSS FADER 1 CROSS FADER 2 FADER CUT LAG MIN MAX FADER START ...C.F. 1 CH-1 C.F. 2 CH-2 PHONES CH-2 POWER 5 Headphones 5 Use to connect headphones with another mixer, connect these jacks to...
...output only. When using an effector with a monaural input, connect it to the auxiliary power outlet of L and R signals. CONNECTIONS 2. CH-2 ON ON ON OFF OFF OFF CH-1 PROFESSIONAL 2CHANNEL MIXER DJM-707 FADER CURVE CROSS FADER 1 CROSS FADER 2 FADER CUT LAG MIN MAX FADER START ...C.F. 1 CH-1 C.F. 2 CH-2 PHONES CH-2 POWER 5 Headphones 5 Use to connect headphones with another mixer, connect these jacks to...
Owner's Manual
Page 7
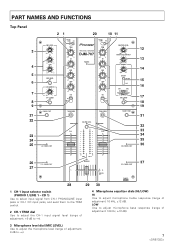
... START 23 24 25 CH-1 FADER START 26 27 C.F.1 FADER START PHONO 1 /LINE 1 CD 1 PHONO 2 /LINE 2 CD 2 TRIM - +9 HI PROFESSIONAL 2CHANNEL MIXER DJM-707 POWER TRIM - +9 HI -26 +6 MID -26 +6 MID -26 +6 LOW -26 +6 LOW -26 +6 EQ OFF ON -26 +6 EQ OFF ON MASTER LEVEL - 0... 5 3 1 0 -1 -3 -6 -9 - 15 - 22 dB CH-1 R 14 9 5 3 1 0 -1 -3 -6 -9 - 15 - 22 dB CH-2 REVERSE CH-2 10 9 8 7 6 5 4 3 2 1 0 1 2 FEELING ADJ. 28 29 30 CH-2 FADER START C.F.2 FADER START PHONES POWER 12 13 14 15 16 17 18 19 31 32 33 34 35 36 37 1 CH-1 input selector switch (PHONO 1/LINE 1 -
... START 23 24 25 CH-1 FADER START 26 27 C.F.1 FADER START PHONO 1 /LINE 1 CD 1 PHONO 2 /LINE 2 CD 2 TRIM - +9 HI PROFESSIONAL 2CHANNEL MIXER DJM-707 POWER TRIM - +9 HI -26 +6 MID -26 +6 MID -26 +6 LOW -26 +6 LOW -26 +6 EQ OFF ON -26 +6 EQ OFF ON MASTER LEVEL - 0... 5 3 1 0 -1 -3 -6 -9 - 15 - 22 dB CH-1 R 14 9 5 3 1 0 -1 -3 -6 -9 - 15 - 22 dB CH-2 REVERSE CH-2 10 9 8 7 6 5 4 3 2 1 0 1 2 FEELING ADJ. 28 29 30 CH-2 FADER START C.F.2 FADER START PHONES POWER 12 13 14 15 16 17 18 19 31 32 33 34 35 36 37 1 CH-1 input selector switch (PHONO 1/LINE 1 -

Owner's Manual
Page 8
...enabled. the selection is determined by the position of the CH-1 fader lever, or by the cross fader lever is indicated by an authorized Pioneer service technician). 23 CH-1 REVERSE indicator When lighted, indicates that the front panel's FADER REVERSE switch has been set to [OFF], the indicator... goes out and the equalizer circuit is bypassed. 20 POWER indicator Lights when power is turned On. 21 CH-1 FADER START button When this button is bypassed. 10 CH-2 input selector switch (PHONO 2/LINE 2 - ...
...enabled. the selection is determined by the position of the CH-1 fader lever, or by the cross fader lever is indicated by an authorized Pioneer service technician). 23 CH-1 REVERSE indicator When lighted, indicates that the front panel's FADER REVERSE switch has been set to [OFF], the indicator... goes out and the equalizer circuit is bypassed. 20 POWER indicator Lights when power is turned On. 21 CH-1 FADER START button When this button is bypassed. 10 CH-2 input selector switch (PHONO 2/LINE 2 - ...
Owner's Manual
Page 10
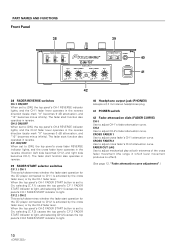
...[CH-2] causes the top panel's CH-2 FADER START indicator to light. 40 Headphone output jack (PHONES) Accepts a 6.3 mm stereo headphones plug. 41 POWER switch 42 Fader attenuation dials (FADER CURVE) CH-1 Use to [ON], the top panel's cross fader REVERSE indicator lights, and the cross fader lever ... CH-2 attenuation curve. CH-2 ON ON ON OFF OFF OFF CH-1 PROFESSIONAL 2CHANNEL MIXER DJM-707 FADER CURVE CROSS FADER 1 CROSS FADER 2 FADER CUT LAG MIN MAX FADER START C.F. 1 CH-1 C.F. 2 CH-2 PHONES CH-2 POWER 40 41 42 38 FADER REVERSE switches CH-1 ON/OFF When set to CH-2 is ...
...[CH-2] causes the top panel's CH-2 FADER START indicator to light. 40 Headphone output jack (PHONES) Accepts a 6.3 mm stereo headphones plug. 41 POWER switch 42 Fader attenuation dials (FADER CURVE) CH-1 Use to [ON], the top panel's cross fader REVERSE indicator lights, and the cross fader lever ... CH-2 attenuation curve. CH-2 ON ON ON OFF OFF OFF CH-1 PROFESSIONAL 2CHANNEL MIXER DJM-707 FADER CURVE CROSS FADER 1 CROSS FADER 2 FADER CUT LAG MIN MAX FADER START C.F. 1 CH-1 C.F. 2 CH-2 PHONES CH-2 POWER 40 41 42 38 FADER REVERSE switches CH-1 ON/OFF When set to CH-2 is ...

Owner's Manual
Page 11
...PHONO] position supports an MM type cartridge. * When no analog turntable is not meant as a safety ground. 51 CH-1 PLAYER CONTROL jack When a Pioneer DJ CD player is connected to the CH-2 CD jacks, a special control cord used to connect this unit in tandem with a monaural input, connect ...player's control jack, thus enabling the fader start function. 52 MASTER 1 jacks XLR type balanced output. Connect to the power amplifier's balanced input jacks. 53 CH-2 PLAYER CONTROL jack When a Pioneer DJ CD player is connected to the CH-1 CD jacks, a special control cord can be input to both L ...
...PHONO] position supports an MM type cartridge. * When no analog turntable is not meant as a safety ground. 51 CH-1 PLAYER CONTROL jack When a Pioneer DJ CD player is connected to the CH-2 CD jacks, a special control cord used to connect this unit in tandem with a monaural input, connect ...player's control jack, thus enabling the fader start function. 52 MASTER 1 jacks XLR type balanced output. Connect to the power amplifier's balanced input jacks. 53 CH-2 PLAYER CONTROL jack When a Pioneer DJ CD player is connected to the CH-1 CD jacks, a special control cord can be input to both L ...
Owner's Manual
Page 12
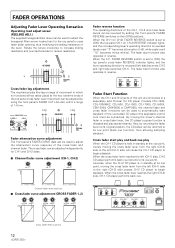
... mm. CH-2 ON ON ON OFF OFF OFF Fader Start Function When the CH-1 and CH-2 jacks of this unit are connected to a separately sold Pioneer DJ CD player (models CDJ-1000, CDJ-1000MK2, CDJ-800, CDJ-100S, CDJ-700S, CDJ-500II, CMX-3000, CMX-5000 or DMP-555), the... player to begin playback. CH-2 ON ON ON OFF OFF OFF CH-1 PROFESSIONAL 2CHANNEL MIXER DJM-707 FADER CURVE CROSS FADER 1 CROSS FADER 2 FADER CUT LAG MIN MAX FADER START C.F. 1 CH-1 C.F. 2 CH-2 PHONES CH-2 POWER 12 Cross fader lever positions Cross fader lag adjustment The mechanical play When the CH-1 CD ...
... mm. CH-2 ON ON ON OFF OFF OFF Fader Start Function When the CH-1 and CH-2 jacks of this unit are connected to a separately sold Pioneer DJ CD player (models CDJ-1000, CDJ-1000MK2, CDJ-800, CDJ-100S, CDJ-700S, CDJ-500II, CMX-3000, CMX-5000 or DMP-555), the... player to begin playback. CH-2 ON ON ON OFF OFF OFF CH-1 PROFESSIONAL 2CHANNEL MIXER DJM-707 FADER CURVE CROSS FADER 1 CROSS FADER 2 FADER CUT LAG MIN MAX FADER START C.F. 1 CH-1 C.F. 2 CH-2 PHONES CH-2 POWER 12 Cross fader lever positions Cross fader lag adjustment The mechanical play When the CH-1 CD ...
Owner's Manual
Page 14
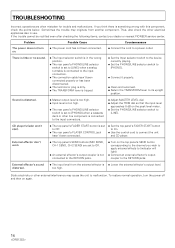
... Set the PHONO/LINE selector switch to [PHONO]. ÷ Connect it properly. ÷ Clean and reconnect. ÷ Return the TRANSFORM lever to a power outlet. External effector don't work. ÷ The top panel's SEND buttons (MIC SEND, CH-1 SEND, CH-2 SEND) are often mistaken for trouble and... malfunctions. If the trouble cannot be rectified even after checking the following items, contact your dealer or nearest PIONEER service center. Sometimes the trouble may cause the unit to Off. ÷ An external effector's output coupler is in use. Problem ...
... Set the PHONO/LINE selector switch to [PHONO]. ÷ Connect it properly. ÷ Clean and reconnect. ÷ Return the TRANSFORM lever to a power outlet. External effector don't work. ÷ The top panel's SEND buttons (MIC SEND, CH-1 SEND, CH-2 SEND) are often mistaken for trouble and... malfunctions. If the trouble cannot be rectified even after checking the following items, contact your dealer or nearest PIONEER service center. Sometimes the trouble may cause the unit to Off. ÷ An external effector's output coupler is in use. Problem ...
Owner's Manual
Page 15
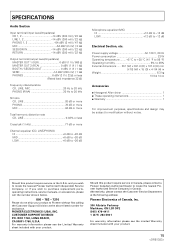
... driver 1 ÷ These operating instructions 1 ÷ Warranty 1 For improvement purposes, specifications and design may be subject to Pioneer without notice. BOX 1760, LONG BEACH, CA 90801-1760, U.S.A. CUSTOMER SUPPORT DIVISION P.O. For warranty information please see the Limited...instructions, service manuals, or accessories, please call the number shown below. 800 - 782 - 7210 Please do not ship your product. Power supply voltage AC 120 V, 60 Hz Power consumption 23 W Operating temperature ........ +5 °C to +35 °C (41 °F to 95 °F) Operating humidity 5% ...
... driver 1 ÷ These operating instructions 1 ÷ Warranty 1 For improvement purposes, specifications and design may be subject to Pioneer without notice. BOX 1760, LONG BEACH, CA 90801-1760, U.S.A. CUSTOMER SUPPORT DIVISION P.O. For warranty information please see the Limited...instructions, service manuals, or accessories, please call the number shown below. 800 - 782 - 7210 Please do not ship your product. Power supply voltage AC 120 V, 60 Hz Power consumption 23 W Operating temperature ........ +5 °C to +35 °C (41 °F to 95 °F) Operating humidity 5% ...


