Owner's Manual
Page 2
... CARD AND KEEP IN A SECURE AREA. A polarized plug has two blades with dry cloth. 7) Do not block any naked flame sources (such as this Pioneer product. If the provided plug does not fit into your outlet, consult an electrician for the unit, you have fallen into an outlet on this...has been exposed to rain or moisture, does not operate normally, or has been dropped. However the method of the unit, which the receiver is used, use this apparatus near this unit, make a knot in the cord or tie it from the AC outlet in accordance with electric appliances such as a ...
... CARD AND KEEP IN A SECURE AREA. A polarized plug has two blades with dry cloth. 7) Do not block any naked flame sources (such as this Pioneer product. If the provided plug does not fit into your outlet, consult an electrician for the unit, you have fallen into an outlet on this...has been exposed to rain or moisture, does not operate normally, or has been dropped. However the method of the unit, which the receiver is used, use this apparatus near this unit, make a knot in the cord or tie it from the AC outlet in accordance with electric appliances such as a ...
Owner's Manual
Page 3
... FILTER OPERATION 19 EFFECT FREQUENCY FILTER OPERATION 19 EFFECT PARAMETERS 20 MIDI SETTINGS 21 SYNCHRONIZING AUDIO SIGNALS TO EXTERNAL SEQUENCER, OR USING DJM-700-S/DJM-700-K INFORMATION TO OPERATE AN EXTERNAL SEQUENCER 21 MIDI MESSAGES 22 PROGRAM CHANGE 24 SNAPSHOT 24 MIDI ON/OFF 24 TROUBLESHOOTING 25... and clearly, and without affecting your new sound equipment will help to country or region. We Want You Listening For A Lifetime Used wisely, your sensitive hearing. Decibel Level Example 30 Quiet library, soft whispers 40 Living room, refrigerator, bedroom away from the wall...
... FILTER OPERATION 19 EFFECT FREQUENCY FILTER OPERATION 19 EFFECT PARAMETERS 20 MIDI SETTINGS 21 SYNCHRONIZING AUDIO SIGNALS TO EXTERNAL SEQUENCER, OR USING DJM-700-S/DJM-700-K INFORMATION TO OPERATE AN EXTERNAL SEQUENCER 21 MIDI MESSAGES 22 PROGRAM CHANGE 24 SNAPSHOT 24 MIDI ON/OFF 24 TROUBLESHOOTING 25... and clearly, and without affecting your new sound equipment will help to country or region. We Want You Listening For A Lifetime Used wisely, your sensitive hearing. Decibel Level Example 30 Quiet library, soft whispers 40 Living room, refrigerator, bedroom away from the wall...
Owner's Manual
Page 4
..., reverse roll, uproll, and downroll. Do not use furniture wax or cleaners. • Never use thinners, benzene, insecticide sprays or other features that are applied to the BPM (Beats Per Minute) count, thus allowing the production of a variety of the DJM-700-S/ DJM-700-K can be output in MIDI signal format, allowing ... the walls or other equipment to improve heat radiation. As a result, signals are passed to effects, and which is used to connect the unit to a Pioneer DJ CD player, thus allowing playback to be exposed to high temperatures or humidity. • Do not install the unit...
..., reverse roll, uproll, and downroll. Do not use furniture wax or cleaners. • Never use thinners, benzene, insecticide sprays or other features that are applied to the BPM (Beats Per Minute) count, thus allowing the production of a variety of the DJM-700-S/ DJM-700-K can be output in MIDI signal format, allowing ... the walls or other equipment to improve heat radiation. As a result, signals are passed to effects, and which is used to connect the unit to a Pioneer DJ CD player, thus allowing playback to be exposed to high temperatures or humidity. • Do not install the unit...
Owner's Manual
Page 5
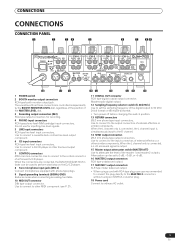
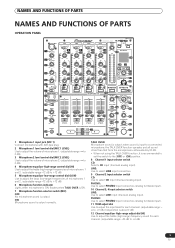
...player. 8 Two microphone input jacks (MIC 2) Connect microphones equipped with RCA-type plug, users are connected, the DJM-700-S/DJM-700-K's fader can be used to the control connector of the MASTER LEVEL dial. 3 Recording output connectors (REC) RCA type output connectors for inputting...other similar components. Use to other line level output component. 7 CONTROL connectors Ø3.5 mm mini-connector. When the L channel only is connected, a L+R monaural signal is controlled independently by the BOOTH MONITOR LEVEL dial, regardless of the position of a Pioneer DJ CD player....
...player. 8 Two microphone input jacks (MIC 2) Connect microphones equipped with RCA-type plug, users are connected, the DJM-700-S/DJM-700-K's fader can be used to the control connector of the MASTER LEVEL dial. 3 Recording output connectors (REC) RCA type output connectors for inputting...other similar components. Use to other line level output component. 7 CONTROL connectors Ø3.5 mm mini-connector. When the L channel only is connected, a L+R monaural signal is controlled independently by the BOOTH MONITOR LEVEL dial, regardless of the position of a Pioneer DJ CD player....
Owner's Manual
Page 6
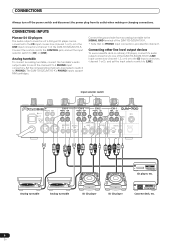
... R SIGNAL GND SEND R L(MONO) R R RETURN R L(MONO) DIGITAL OUT fs(Hz) 48k 96k MIDI OUT CD player, etc. CONNECTING INPUTS Pioneer DJ CD players The audio output connectors of a DJ-type CD player can be connected to the CD input connectors (channel 1 or 2), or to ...line level output devices To use a cassette deck or ordinary CD player, connect its outlet when making or changing connections. CONNECTIONS Always turn off the power switch and disconnect the power plug from an analog turntable to the SIGNAL GND terminal of the DJM-700-S/DJM-700-K's LINE input connectors (channel ...
... R SIGNAL GND SEND R L(MONO) R R RETURN R L(MONO) DIGITAL OUT fs(Hz) 48k 96k MIDI OUT CD player, etc. CONNECTING INPUTS Pioneer DJ CD players The audio output connectors of a DJ-type CD player can be connected to the CD input connectors (channel 1 or 2), or to ...line level output devices To use a cassette deck or ordinary CD player, connect its outlet when making or changing connections. CONNECTIONS Always turn off the power switch and disconnect the power plug from an analog turntable to the SIGNAL GND terminal of the DJM-700-S/DJM-700-K's LINE input connectors (channel ...
Owner's Manual
Page 7
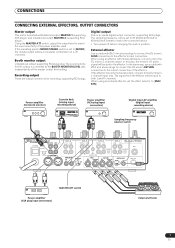
...) DIGITAL OUT fs(Hz) 48k 96k MIDI OUT MASTER ATT switch Power amplifier (XLR plug input connectors) External effector 7 En In the same way, use a cable with balanced output MASTER 1 (supporting XLR plugs), and unbalanced output MASTER 2 (supporting RCA plugs). If the operating panel's MONO/STEREO switch is... furnished with Ø6.3 mm phone plugs to connect the DJ mixer's RETURN connectors to the output connectors of the power amplifier used. When using an external effector, set to 96 kHz/24-bit format or 48 kHz/24-bit format to match the connected device. • ...
...) DIGITAL OUT fs(Hz) 48k 96k MIDI OUT MASTER ATT switch Power amplifier (XLR plug input connectors) External effector 7 En In the same way, use a cable with balanced output MASTER 1 (supporting XLR plugs), and unbalanced output MASTER 2 (supporting RCA plugs). If the operating panel's MONO/STEREO switch is... furnished with Ø6.3 mm phone plugs to connect the DJ mixer's RETURN connectors to the output connectors of the power amplifier used. When using an external effector, set to 96 kHz/24-bit format or 48 kHz/24-bit format to match the connected device. • ...
Owner's Manual
Page 8
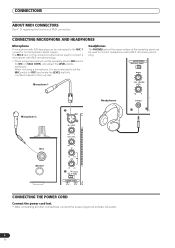
...OV 1 0 7 MIC2 LEVEL 4 2 1 0 0 - The MIC 2 jack on the connection panel can be used to connect headphones with Ø6.3 mm phone plugs. • When using a microphone, it is recommended to set the operating panel's MIC switch to an ordinary AC outlet. 8 En Headphones The... PHONES jack on the Operation Panel (upper) . CONNECTIONS ABOUT MIDI CONNECTORS See P. 21 regarding the functions of the operating panel can be used to the [-∞] side. HI - - - -12 +12 - LOW EQ - - - CONNECTING MICROPHONE AND HEADPHONES Microphone A microphone with...
...OV 1 0 7 MIC2 LEVEL 4 2 1 0 0 - The MIC 2 jack on the connection panel can be used to connect headphones with Ø6.3 mm phone plugs. • When using a microphone, it is recommended to set the operating panel's MIC switch to an ordinary AC outlet. 8 En Headphones The... PHONES jack on the Operation Panel (upper) . CONNECTIONS ABOUT MIDI CONNECTORS See P. 21 regarding the functions of the operating panel can be used to the [-∞] side. HI - - - -12 +12 - LOW EQ - - - CONNECTING MICROPHONE AND HEADPHONES Microphone A microphone with...
Owner's Manual
Page 9
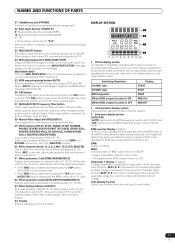
... treble (high-range) frequencies of microphones 1 and 2. (adjustable range -12 dB to +12 dB) 5 Microphone equalizer low-range control dial (LOW) Use to adjust the bass (low-range) frequencies of microphones 1 and 2. (adjustable range -12 dB to +12 dB) 6 Microphone function indicator Lights when ...treble (high-range) frequency sound for each channel. (adjustable range: -26 dB to +6 dB) 9 En PHONO: Use to select PHONO input connectors (analog turntable input). 11 TRIM adjust dial Use to adjust the input level for each channel. (adjustable range: - ∞ to +9 dB, mid-position is ON...
... treble (high-range) frequencies of microphones 1 and 2. (adjustable range -12 dB to +12 dB) 5 Microphone equalizer low-range control dial (LOW) Use to adjust the bass (low-range) frequencies of microphones 1 and 2. (adjustable range -12 dB to +12 dB) 6 Microphone function indicator Lights when ...treble (high-range) frequency sound for each channel. (adjustable range: -26 dB to +6 dB) 9 En PHONO: Use to select PHONO input connectors (analog turntable input). 11 TRIM adjust dial Use to adjust the input level for each channel. (adjustable range: - ∞ to +9 dB, mid-position is ON...
Owner's Manual
Page 10
.... B: The selected channel is connected. The indicators have a two-second peak hold . 16 HEADPHONES CUE buttons/indicators These buttons are used to adjust the booth monitor output volume. Unselected buttons glow darkly, while selected source buttons light brightly. 17 Fader start button/indicator (... the result will be adjusted independently of the channels). and the signals from microphone 1 and microphone 2 (if the effect selector is used to select from two types of the headphones jack. (adjustable range: -∞ to monitor the desired source through headphones. The volume ...
.... B: The selected channel is connected. The indicators have a two-second peak hold . 16 HEADPHONES CUE buttons/indicators These buttons are used to adjust the booth monitor output volume. Unselected buttons glow darkly, while selected source buttons light brightly. 17 Fader start button/indicator (... the result will be adjusted independently of the channels). and the signals from microphone 1 and microphone 2 (if the effect selector is used to select from two types of the headphones jack. (adjustable range: -∞ to monitor the desired source through headphones. The volume ...
Owner's Manual
Page 11
...35 BPM measuring mode button (AUTO) Switches between manual filter and effect frequency filter. If the beat select buttons (BEAT , ) are used for adjustments other than time parameters.) • If the TIME dial is rotated while depressing the TAP button, direct BPM can be ... and microphone 2. 41 Effect parameter 1 dial [TIME (PARAMETER 1)] Adjusts time parameter for selected effect (P. 18, 20) (With some effects, these are used for two seconds. When [MIC] is selected, effects are pressed, the corresponding beat multiple change . When the beat select buttons (BEAT , ) are applied...
...35 BPM measuring mode button (AUTO) Switches between manual filter and effect frequency filter. If the beat select buttons (BEAT , ) are used for adjustments other than time parameters.) • If the TIME dial is rotated while depressing the TAP button, direct BPM can be ... and microphone 2. 41 Effect parameter 1 dial [TIME (PARAMETER 1)] Adjusts time parameter for selected effect (P. 18, 20) (With some effects, these are used for two seconds. When [MIC] is selected, effects are pressed, the corresponding beat multiple change . When the beat select buttons (BEAT , ) are applied...
Owner's Manual
Page 13
...Selecting Stereo or Monaural] When the MONO/STEREO switch is set to [MONO], the master output becomes a monaural combination of L+R channels. [Microphone Input] 1 To use a microphone, set the MIC switch to [ON] or [TALK OVER]. • When the switch is set to [TALK OVER], any time a sound of over... channel, set the CROSS FADER ASSIGN switch to either cross fader channel A or channel B, and operate the cross fader lever. • When not using the cross fader, set to the [STEREO] position, the sound corresponding to the selected HEADPHONES CUE button is output in stereo. 3 When [MONO SPLIT...
...Selecting Stereo or Monaural] When the MONO/STEREO switch is set to [MONO], the master output becomes a monaural combination of L+R channels. [Microphone Input] 1 To use a microphone, set the MIC switch to [ON] or [TALK OVER]. • When the switch is set to [TALK OVER], any time a sound of over... channel, set the CROSS FADER ASSIGN switch to either cross fader channel A or channel B, and operate the cross fader lever. • When not using the cross fader, set to the [STEREO] position, the sound corresponding to the selected HEADPHONES CUE button is output in stereo. 3 When [MONO SPLIT...
Owner's Manual
Page 14
...is set to [THRU]. 14 En FADER START FUNCTION By connecting the optional Pioneer DJ CD Player control cable, the channel fader and cross fader can be used to fader operation. begins playback of the selected track. Use the CH FADER switch to select the desired channel fader response curve. •..., the curve produces a rapid signal rise. (As soon as the channel fader approaches its original position, the CD player returns to cue point). Use the CROSS FADER curve switch to select the cross fader curve response. • At the left (A) side, the CD player assigned to channel B...
...is set to [THRU]. 14 En FADER START FUNCTION By connecting the optional Pioneer DJ CD Player control cable, the channel fader and cross fader can be used to fader operation. begins playback of the selected track. Use the CH FADER switch to select the desired channel fader response curve. •..., the curve produces a rapid signal rise. (As soon as the channel fader approaches its original position, the CD player returns to cue point). Use the CROSS FADER curve switch to select the cross fader curve response. • At the left (A) side, the CD player assigned to channel B...
Owner's Manual
Page 15
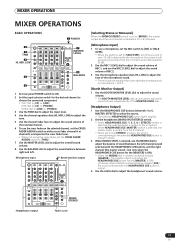
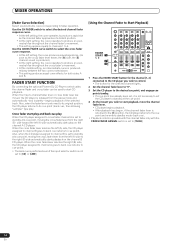
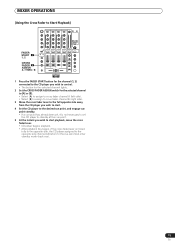
MIXER OPERATIONS [Using the Cross Fader to Start Playback] FADER START 1 1, 2 CROSS FADER 2 ASSIGN A / THRU / B 35 1 Press the FADER START button for the channel (1, 2) connected to the CD ...
MIXER OPERATIONS [Using the Cross Fader to Start Playback] FADER START 1 1, 2 CROSS FADER 2 ASSIGN A / THRU / B 35 1 Press the FADER START button for the channel (1, 2) connected to the CD ...

Owner's Manual
Page 16
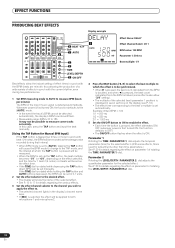
... filter effect or high-pass filter effect can produce a total of effects can be added quickly and simply. For example, when a 1/1 beat echo sound is used to the FREQUENCY dial. Additionally, by adjusting the temporal parameter through the TIME dial (Parameter 1) as well as the quantitative parameter through beat effects linked...
... filter effect or high-pass filter effect can produce a total of effects can be added quickly and simply. For example, when a 1/1 beat echo sound is used to the FREQUENCY dial. Additionally, by adjusting the temporal parameter through the TIME dial (Parameter 1) as well as the quantitative parameter through beat effects linked...
Owner's Manual
Page 18
... 1) dial adjusts the temporal parameter (time) for the selected effect. (With some effects, this case, press the TAP button and input the beat manually. [Using the TAP Button for Manual BPM Input] If the TAP button is tapped two times or more in synch with the current rhythm, even during...: BPM=70 to measure some effects also allow the instant setting of effect times in synch with the BPM (beats per minute). In this is used for adjustments other than time parameters.) See P. 20 for details regarding the effect on parameter 2 of rotating the LEVEL/DEPTH (PARAMETER 2) dial. 18 En...
... 1) dial adjusts the temporal parameter (time) for the selected effect. (With some effects, this case, press the TAP button and input the beat manually. [Using the TAP Button for Manual BPM Input] If the TAP button is tapped two times or more in synch with the current rhythm, even during...: BPM=70 to measure some effects also allow the instant setting of effect times in synch with the BPM (beats per minute). In this is used for adjustments other than time parameters.) See P. 20 for details regarding the effect on parameter 2 of rotating the LEVEL/DEPTH (PARAMETER 2) dial. 18 En...
Owner's Manual
Page 19
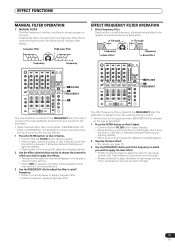
... FILTER OPERATION 1 Effect frequency filter Sets the filter's cutoff frequency, allowing the beat effect to be applied to both microphone 1 and microphone 2. 3 Use the FREQUENCY dial to adjust the filter's cutoff frequency. • Rotate counterclockwise to apply a low-pass filter. • Rotate clockwise to through .... When power is first turned ON, defaults to steadily lighted. 2 Operate the beat effect. • For details, see page 18. 3 Use the FREQUENCY dial to select the frequency to which you wish to apply the beat effect. • Rotate counterclockwise to apply the effect to ...
... FILTER OPERATION 1 Effect frequency filter Sets the filter's cutoff frequency, allowing the beat effect to be applied to both microphone 1 and microphone 2. 3 Use the FREQUENCY dial to adjust the filter's cutoff frequency. • Rotate counterclockwise to apply a low-pass filter. • Rotate clockwise to through .... When power is first turned ON, defaults to steadily lighted. 2 Operate the beat effect. • For details, see page 18. 3 Use the FREQUENCY dial to select the frequency to which you wish to apply the beat effect. • Rotate counterclockwise to apply the effect to ...
Owner's Manual
Page 21
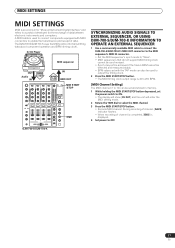
... =120 MIDI sequencer BPM =120 IN MIDI OUT MIDI START /STOP TIME SYNCHRONIZING AUDIO SIGNALS TO EXTERNAL SEQUENCER, OR USING DJM-700-S/DJM-700-K INFORMATION TO OPERATE AN EXTERNAL SEQUENCER 1 Use a commercially available MIDI cable to connect the DJM-700-S/DJM-700-K's MIDI OUT connector to the MIDI sequencer's MIDI IN connector. • Set the MIDI sequencer's synch mode to...
... =120 MIDI sequencer BPM =120 IN MIDI OUT MIDI START /STOP TIME SYNCHRONIZING AUDIO SIGNALS TO EXTERNAL SEQUENCER, OR USING DJM-700-S/DJM-700-K INFORMATION TO OPERATE AN EXTERNAL SEQUENCER 1 Use a commercially available MIDI cable to connect the DJM-700-S/DJM-700-K's MIDI OUT connector to the MIDI sequencer's MIDI IN connector. • Set the MIDI sequencer's synch mode to...
Owner's Manual
Page 24
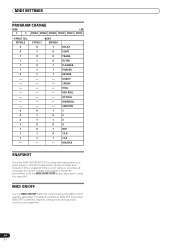
MIDI ON/OFF Use the MIDI ON/OFF button to send the snapshot. The default condition is recorded, all messages for a given purpose, that set of parameters can be ... En DELAY ECHO TRANS FILTER FLANGER PHASER REVERB ROBOT CRUSH ROLL REV ROLL UP ROLL DWNROLL SND/RTN 1 2 3 4 MIC CF.A CF.B MASTER SNAPSHOT Once the DJM-700-S/DJM-700-K is generated. When snapshot of the current status is MIDI OFF. MIDI SETTINGS PROGRAM CHANGE MSB LSB 0 0 EFFSEL2 EFFSEL1 EFFSEL0 EFFCH2 EFFCH1 EFFCH0 • EFFECT...
MIDI ON/OFF Use the MIDI ON/OFF button to send the snapshot. The default condition is recorded, all messages for a given purpose, that set of parameters can be ... En DELAY ECHO TRANS FILTER FLANGER PHASER REVERB ROBOT CRUSH ROLL REV ROLL UP ROLL DWNROLL SND/RTN 1 2 3 4 MIC CF.A CF.B MASTER SNAPSHOT Once the DJM-700-S/DJM-700-K is generated. When snapshot of the current status is MIDI OFF. MIDI SETTINGS PROGRAM CHANGE MSB LSB 0 0 EFFSEL2 EFFSEL1 EFFSEL0 EFFCH2 EFFCH1 EFFCH0 • EFFECT...
Owner's Manual
Page 25
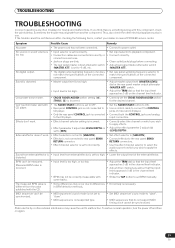
... measurable with the CD. • Some differences may not be rectified even after checking the following items, contact your dealer or nearest PIONEER service center. If you wish to apply the effects. Sometimes the trouble may cause the unit to connect the CONTROL jacks of the ...], [B]) is set to incorrectly. • Set effect selector to [SND/RTN]. • Connect effector to the rear panel SEND/ RETURN connectors. • Use the effect channel selector to select the audio source to which you think there is something wrong with CD player. • The FADER START button...
... measurable with the CD. • Some differences may not be rectified even after checking the following items, contact your dealer or nearest PIONEER service center. If you wish to apply the effects. Sometimes the trouble may cause the unit to connect the CONTROL jacks of the ...], [B]) is set to incorrectly. • Set effect selector to [SND/RTN]. • Connect effector to the rear panel SEND/ RETURN connectors. • Use the effect channel selector to select the audio source to which you think there is something wrong with CD player. • The FADER START button...


