Owner's Manual
Page 6
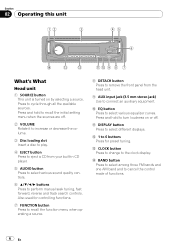
... and hold to turn loudness on by selecting a source. e BAND button Press to select among three FM bands and one AM band and to the clock display. Section 02 Operating this unit 12 3 45 6 e dc ba 9 8 7 What's What Head unit 1 SOURCE button This unit is turned on or ... slot Insert a disc to play. 4 EJECT button Press to eject a CD from the head unit. 9 AUX input jack (3.5 mm stereo jack) Use to connect an auxiliary equipment. Also used for preset tuning. d CLOCK button Press to change to cancel the control mode of functions. 6 En Press to select different displays...
... and hold to turn loudness on by selecting a source. e BAND button Press to select among three FM bands and one AM band and to the clock display. Section 02 Operating this unit 12 3 45 6 e dc ba 9 8 7 What's What Head unit 1 SOURCE button This unit is turned on or ... slot Insert a disc to play. 4 EJECT button Press to eject a CD from the head unit. 9 AUX input jack (3.5 mm stereo jack) Use to connect an auxiliary equipment. Also used for preset tuning. d CLOCK button Press to change to cancel the control mode of functions. 6 En Press to select different displays...
Owner's Manual
Page 12
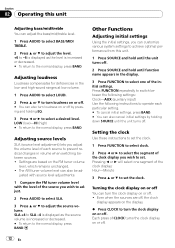
...and hold until function name appears in the low- Press FUNCTION repeatedly to switch between the following settings: Clock-AUX (auxiliary input) Use the following instructions to prevent radical changes in volume when switching between sources. ! SLA +4 to SLA -4 is displayed as the level is increased... or decreased. # To return to set the clock. Pressing c or d will select one of each source to ...
...and hold until function name appears in the low- Press FUNCTION repeatedly to switch between the following settings: Clock-AUX (auxiliary input) Use the following instructions to prevent radical changes in volume when switching between sources. ! SLA +4 to SLA -4 is displayed as the level is increased... or decreased. # To return to set the clock. Pressing c or d will select one of each source to ...


