Owner's Manual
Page 2
... Using balance adjustment 11 - Before You Start Information to User 3 For Canadian model 3 About this unit 3 After-sales service for buying this Pioneer product. Installing the battery 5 - Adjusting initial settings 12 - Setting the clock 12 - Playing tracks in strong signals 8 - Scanning tracks or folders 10 ...- Remote control 7 - Tuning in random order 10 - Turning the unit off 8 Tuner 8 - After you will know how to the radio 8 - Switching the auxiliary setting 13 Additional Information Error messages 14 Handling guideline of discs and player 14 Dual Discs 14 WMA, MP3 and ...
... Using balance adjustment 11 - Before You Start Information to User 3 For Canadian model 3 About this unit 3 After-sales service for buying this Pioneer product. Installing the battery 5 - Adjusting initial settings 12 - Setting the clock 12 - Playing tracks in strong signals 8 - Scanning tracks or folders 10 ...- Remote control 7 - Tuning in random order 10 - Turning the unit off 8 Tuner 8 - After you will know how to the radio 8 - Switching the auxiliary setting 13 Additional Information Error messages 14 Handling guideline of discs and player 14 Dual Discs 14 WMA, MP3 and ...
Owner's Manual
Page 5
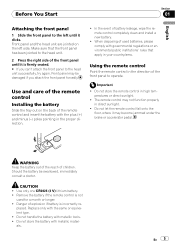
In the event of children. Important ! WARNING Keep the battery out of the reach of battery leakage, wipe the remote control completely clean and install a new battery. ! Danger of explosion if battery is firmly seated. # If you attach the front panel forcedly. placed. Make sure that ... in the direction of the remote control and insert the battery with the same or equivalent type. ! Use and care of the remote control Installing the battery Slide the tray out on the left until it is incorrectly re- En 5 The remote control may be swallowed, immediately consult ...
In the event of children. Important ! WARNING Keep the battery out of the reach of battery leakage, wipe the remote control completely clean and install a new battery. ! Danger of explosion if battery is firmly seated. # If you attach the front panel forcedly. placed. Make sure that ... in the direction of the remote control and insert the battery with the same or equivalent type. ! Use and care of the remote control Installing the battery Slide the tray out on the left until it is incorrectly re- En 5 The remote control may be swallowed, immediately consult ...
Other Manual
Page 2
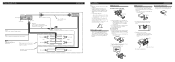
...Extend top and bottom of the vehicle. - Connecting the Units ENGLISH This Product Rear output Antenna jack Yellow Connect to the following installation methods. Connect with RCA cables (sold separately) Power amp (sold separately) System remote control Red Connect to terminal controlled by using...in a shallow space, use factory supplied mounting sleeve. 2. ENGLISH DIN Rear-mount 1. Screw Dashboard or Console Factory radio mounting bracket Fuse (10 A) Blue/white Connect to a clean, paint-free metal location. If there is installed at the sides of the dashboard.
...Extend top and bottom of the vehicle. - Connecting the Units ENGLISH This Product Rear output Antenna jack Yellow Connect to the following installation methods. Connect with RCA cables (sold separately) Power amp (sold separately) System remote control Red Connect to terminal controlled by using...in a shallow space, use factory supplied mounting sleeve. 2. ENGLISH DIN Rear-mount 1. Screw Dashboard or Console Factory radio mounting bracket Fuse (10 A) Blue/white Connect to a clean, paint-free metal location. If there is installed at the sides of the dashboard.


