Owner's Manual
Page 1
COMPACT DISC PLAYER CDJ-1000 Operating Instructions
COMPACT DISC PLAYER CDJ-1000 Operating Instructions
Owner's Manual
Page 2
NOTE: THE NO USER-SERVICEABLE PARTS COMPARTMENT WARNING IS LOCATED ON THE APPLIANCE BOTTOM. 2 En
NOTE: THE NO USER-SERVICEABLE PARTS COMPARTMENT WARNING IS LOCATED ON THE APPLIANCE BOTTOM. 2 En
Owner's Manual
Page 3
Please write this equipment is for this serial number on your security. 3 En model] IMPORTANT NOTICE H006AEn The serial number for your enclosed warranty card and keep it in the rear panel. This is located in a secure area. [For U.S.
Please write this equipment is for this serial number on your security. 3 En model] IMPORTANT NOTICE H006AEn The serial number for your enclosed warranty card and keep it in the rear panel. This is located in a secure area. [For U.S.
Owner's Manual
Page 4
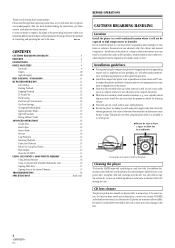
... to Brake 14 Hot Cue ...14 Loop Playback 14 Reversing Playback 15 Fader Start Playback 15 Relay Play Using Two Players 15 Wave Display 15 About the CD TEXT 15 USING CUE POINTS / LOOP POINTS MEMORY 16 Using Internal Memory 16 Using a Commercially Available Multimedia Card 16 Copying MMC Data 17 Copying Data in the Internal Memory 17 TROUBLESHOOTING 18 SPECIFICATIONS Back cover BEFORE OPERATIONS CAUTIONS REGARDING HANDLING Location Install the player in the explanatory drawings...
... to Brake 14 Hot Cue ...14 Loop Playback 14 Reversing Playback 15 Fader Start Playback 15 Relay Play Using Two Players 15 Wave Display 15 About the CD TEXT 15 USING CUE POINTS / LOOP POINTS MEMORY 16 Using Internal Memory 16 Using a Commercially Available Multimedia Card 16 Copying MMC Data 17 Copying Data in the Internal Memory 17 TROUBLESHOOTING 18 SPECIFICATIONS Back cover BEFORE OPERATIONS CAUTIONS REGARDING HANDLING Location Install the player in the explanatory drawings...
Owner's Manual
Page 5
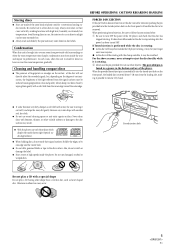
... extremely low temperatures. BEFORE OPERATIONS: CAUTIONS REGARDING HANDLING FORCED DISC EJECTION If the eject button does not function or the disc cannot be reduced causing degradation of sound quality. If forced ejection is performed while the disc is rotating. 2 Always use the pin provided (Do not use record cleaning sprays or anti-static agents on the front panel will...
... extremely low temperatures. BEFORE OPERATIONS: CAUTIONS REGARDING HANDLING FORCED DISC EJECTION If the eject button does not function or the disc cannot be reduced causing degradation of sound quality. If forced ejection is performed while the disc is rotating. 2 Always use the pin provided (Do not use record cleaning sprays or anti-static agents on the front panel will...
Owner's Manual
Page 6
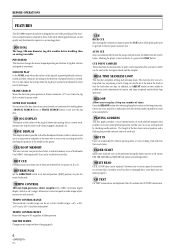
... PLAY button. RELOOP Allows you can on a Multimedia Card (MMC) (sold separately). PITCH BEND This function changes the music tempo depending on an analog record by checking needle position. CUE/LOOP MEMORY This unit can be used as you to replay a loop any number of speed to Loop-in combination with a 0.02% increment digital display (within a ±6% range) allows exact control of times. REAL TIME SEAMLESS LOOP This function...
... PLAY button. RELOOP Allows you can on a Multimedia Card (MMC) (sold separately). PITCH BEND This function changes the music tempo depending on an analog record by checking needle position. CUE/LOOP MEMORY This unit can be used as you to replay a loop any number of speed to Loop-in combination with a 0.02% increment digital display (within a ±6% range) allows exact control of times. REAL TIME SEAMLESS LOOP This function...
Owner's Manual
Page 7
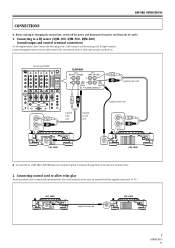
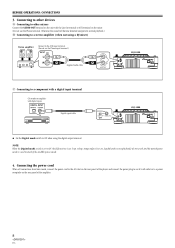
...) terminal. P.15 CDJ-1000 Supplied control cord CDJ-1000 7 En Connect the white plug to the L (left) terminal and the red plug to a DJ mixer (DJM-300, DJM-500, DJM-600) (sound output and control terminal connection) Use the supplied audio cables. BEFORE OPERATIONS CONNECTIONS ÷ Before making or changing the connections, switch off the power and disconnect the power cord from the mixer to allow relay play and back cue. Connect the supplied control cord to enable control of two units are connected to allow fader start play Alternate playback can...
...) terminal. P.15 CDJ-1000 Supplied control cord CDJ-1000 7 En Connect the white plug to the L (left) terminal and the red plug to a DJ mixer (DJM-300, DJM-500, DJM-600) (sound output and control terminal connection) Use the supplied audio cables. BEFORE OPERATIONS CONNECTIONS ÷ Before making or changing the connections, switch off the power and disconnect the power cord from the mixer to allow relay play and back cue. Connect the supplied control cord to enable control of two units are connected to allow fader start play Alternate playback can...
Owner's Manual
Page 8
... player and connect the power plug to an AC wall outlet or to a power receptacle on the mixer. (Do not use the Phono input terminal.) Supplied audio cable C Connecting to a component with a digital input terminal CD recorder or amplifier with digital inputs Digital signal cable CDJ-1000 CDJ-1000 ÷ Set the Digital mode switch to other mixers Connect the AUDIO OUT terminal on the unit with the Line In terminal or AUX terminal on the rear panel of the audible pause mode. 4. And the muted pause mode is set...
... player and connect the power plug to an AC wall outlet or to a power receptacle on the mixer. (Do not use the Phono input terminal.) Supplied audio cable C Connecting to a component with a digital input terminal CD recorder or amplifier with digital inputs Digital signal cable CDJ-1000 CDJ-1000 ÷ Set the Digital mode switch to other mixers Connect the AUDIO OUT terminal on the unit with the Line In terminal or AUX terminal on the rear panel of the audible pause mode. 4. And the muted pause mode is set...
Owner's Manual
Page 9
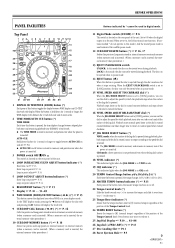
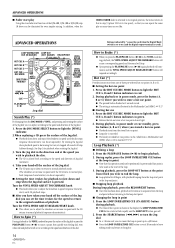
... of the Tempo Control knob. 24 TEMPO RESET button (*) Resets the tempo to toggle between the 1 track full-scale and 2x zoom scale. 2 TIME MODE/AUTO CUE button (*) TIME MODE: Each time this mode, the disc cannot be ejected during playback. Playback starts normal speed faster as the dial is turned clockwise. 16 VINYL SPEED ADJUST RELEASE/START dial (*) When the JOG MODE SELECT button is inserted, the external memory takes precedence.) 13 EJECT UNLOCK/LOCK switch UNLOCK: In...
... of the Tempo Control knob. 24 TEMPO RESET button (*) Resets the tempo to toggle between the 1 track full-scale and 2x zoom scale. 2 TIME MODE/AUTO CUE button (*) TIME MODE: Each time this mode, the disc cannot be ejected during playback. Playback starts normal speed faster as the dial is turned clockwise. 16 VINYL SPEED ADJUST RELEASE/START dial (*) When the JOG MODE SELECT button is inserted, the external memory takes precedence.) 13 EJECT UNLOCK/LOCK switch UNLOCK: In...
Owner's Manual
Page 10
... switch is set to reverse. 38 DIRECTION FWD/REV switch (*) Plays tracks backwards when set to the [REV] position (forward position). 39 HOT CUE REC MODE button (*) P.14 Switches HOT CUE button function (REC/CALL). ¶ It is set in the audio memory display mode the light will be able to measure the BPM of a track. 68 EJECT LOCK indicator Lights when the EJECT UNLOCK/LOCK switch is set to the [LOCK] position. 69 Master Tempo indicator (MT) Lights when the master tempo function...
... switch is set to reverse. 38 DIRECTION FWD/REV switch (*) Plays tracks backwards when set to the [REV] position (forward position). 39 HOT CUE REC MODE button (*) P.14 Switches HOT CUE button function (REC/CALL). ¶ It is set in the audio memory display mode the light will be able to measure the BPM of a track. 68 EJECT LOCK indicator Lights when the EJECT UNLOCK/LOCK switch is set to the [LOCK] position. 69 Master Tempo indicator (MT) Lights when the master tempo function...
Owner's Manual
Page 11
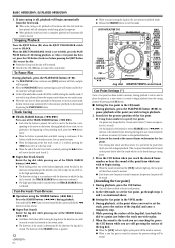
..., be lit up Insert straight 1. CUE] indicator will indicate [A.CUE-60dB] (in the player. Press the TIME MODE/AUTO CUE button for the beginning of the disc when the player begins to play when inserting a disc or when performing track searching. ¶ Turning auto cueing on the front panel of the track. When the EJECT UNLOCK/LOCK switch is set to LOCK, press the PLAY/PAUSE button (6) during playback, or when a Cue point has been...
..., be lit up Insert straight 1. CUE] indicator will indicate [A.CUE-60dB] (in the player. Press the TIME MODE/AUTO CUE button for the beginning of the disc when the player begins to play when inserting a disc or when performing track searching. ¶ Turning auto cueing on the front panel of the track. When the EJECT UNLOCK/LOCK switch is set to LOCK, press the PLAY/PAUSE button (6) during playback, or when a Cue point has been...
Owner's Manual
Page 12
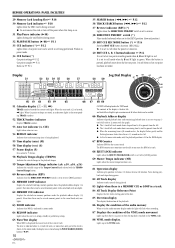
.../LOCK switch is released. Press and hold the 1 button to play. 3. The direction of the Jog dial, turn back the dial to advance or rewind 135 frames in memory, during playback it is stored in the CDJ mode 1. LOOP IN/REALTIME CUE TRACK SEARCH 4, ¢ SEARCH 1, ¡ CUE VINYL SPEED ADJUST TOUCH /BRAKE VINYL SPEED ADJUST RELEASE /START JOG MODE SELECT TEMPO ±6/±10/±16/±24 MASTER TEMPO TEMPO RESET PLAY...
.../LOCK switch is released. Press and hold the 1 button to play. 3. The direction of the Jog dial, turn back the dial to advance or rewind 135 frames in memory, during playback it is stored in the CDJ mode 1. LOOP IN/REALTIME CUE TRACK SEARCH 4, ¢ SEARCH 1, ¡ CUE VINYL SPEED ADJUST TOUCH /BRAKE VINYL SPEED ADJUST RELEASE /START JOG MODE SELECT TEMPO ±6/±10/±16/±24 MASTER TEMPO TEMPO RESET PLAY...
Owner's Manual
Page 13
... the BPM rates match, mixing of the TEMPO RESET button cancels the reset and speed setting made with the direction and mount of the Tempo Control knob changes as track A is heard from the speakers, press the PLAY/PAUSE button (6) on player CD2. ÷ Track B begins playing. 11.While checking the sound on the Jog dial or apply too much force. Move the TEMPO slider to CDJ. During playback, press the CUE button...
... the BPM rates match, mixing of the TEMPO RESET button cancels the reset and speed setting made with the direction and mount of the Tempo Control knob changes as track A is heard from the speakers, press the PLAY/PAUSE button (6) on player CD2. ÷ Track B begins playing. 11.While checking the sound on the Jog dial or apply too much force. Move the TEMPO slider to CDJ. During playback, press the CUE button...
Owner's Manual
Page 14
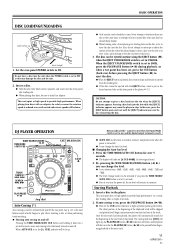
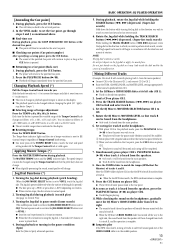
... be eliminated for even simpler mixing. ADVANCED OPERATIONS 7 Fader start play Using the cross fader start function of the DJM-600, DJM-500 or DJM-300, step 10 above can be set separately). How to Brake (*) ¶ When you wish to adjust the slowdown in step 9 (player CD2 at the speed you to store a hot cue point. ¶ The pressed button flashes for playback when rotating the Jog...
... be eliminated for even simpler mixing. ADVANCED OPERATIONS 7 Fader start play Using the cross fader start function of the DJM-600, DJM-500 or DJM-300, step 10 above can be set separately). How to Brake (*) ¶ When you wish to adjust the slowdown in step 9 (player CD2 at the speed you to store a hot cue point. ¶ The pressed button flashes for playback when rotating the Jog...
Owner's Manual
Page 15
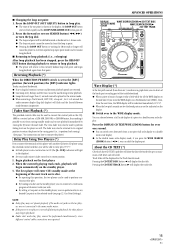
... the displays). ÷ Set your audio mixer's fader control to a double zoom scale display. You can choose between a full scale display of music changes it possible to exit from the next time, the WAVE display will be used to the WAVE display mode. Reversing Playback (*) When the DIRECTION FWD/REV switch is turned off . 2. Fader Start Playback (*) The provided control cable may not operate properly if the audio out jacks on the first player. 2. P. 7. ÷ Set both player's auto cue function...
... the displays). ÷ Set your audio mixer's fader control to a double zoom scale display. You can choose between a full scale display of music changes it possible to exit from the next time, the WAVE display will be used to the WAVE display mode. Reversing Playback (*) When the DIRECTION FWD/REV switch is turned off . 2. Fader Start Playback (*) The provided control cable may not operate properly if the audio out jacks on the first player. 2. P. 7. ÷ Set both player's auto cue function...
Owner's Manual
Page 16
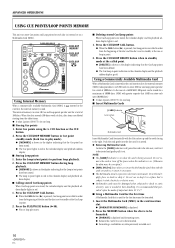
... of important data. Press the CUE/LOOP MEMORY button during loop playback. ¶ [MEMORY] is shown in the display indicating that is on a Multimedia Card (MMC). Press the PLAY/PAUSE button (6). ¶ Play or loop play mode). ¶ [MEMORY] is used . Using a Commercially Available Multimedia Card When a Multimedia Card is shown in the display indicating that periodical copies be formatted. ¶ Formatting a card deletes any data previously recorded on . (Otherwise the data may be ejected...
... of important data. Press the CUE/LOOP MEMORY button during loop playback. ¶ [MEMORY] is shown in the display indicating that is on a Multimedia Card (MMC). Press the PLAY/PAUSE button (6). ¶ Play or loop play mode). ¶ [MEMORY] is used . Using a Commercially Available Multimedia Card When a Multimedia Card is shown in the display indicating that periodical copies be formatted. ¶ Formatting a card deletes any data previously recorded on . (Otherwise the data may be ejected...
Owner's Manual
Page 17
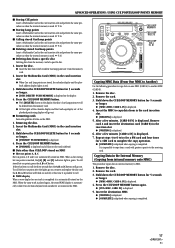
... complete the copy operation. ¶ [COMPLETE] is displayed when copying is completed. PUSH MEMORY] is automatically called. When the same track is played again, the stored WAVE display is displayed. 4. When a disc storing hot cue points is used. P.16 7 Deleting stored Cue/Loop points Insert a Multimedia Card in the card insertion slot and perform the same procedure as when the internal memory is inserted, the [A], [B] and [C] indicators light in red...
... complete the copy operation. ¶ [COMPLETE] is displayed when copying is completed. PUSH MEMORY] is automatically called. When the same track is played again, the stored WAVE display is displayed. 4. When a disc storing hot cue points is used. P.16 7 Deleting stored Cue/Loop points Insert a Multimedia Card in the card insertion slot and perform the same procedure as when the internal memory is inserted, the [A], [B] and [C] indicators light in red...
Owner's Manual
Page 18
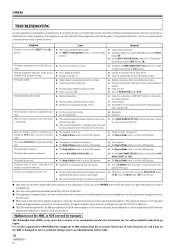
.... ÷ Turn off the A. Refer to installation instructions. ÷ Check the settings of the audio mixer switches and sound volume controls. ÷ Clean away dirt. ÷ Press the PLAY/PAUSE button (6). ÷ Connect to audio mixer's LINE INPUT terminals. (Do not connect to malfunction. This is set the desired JOG MODE [VINYL or CDJ]. ÷ The Digital Mode switch is NOT a malfunction. ¶ The BPM value measured by pressing the PLAY/PAUSE button (6). and if data on the...
.... ÷ Turn off the A. Refer to installation instructions. ÷ Check the settings of the audio mixer switches and sound volume controls. ÷ Clean away dirt. ÷ Press the PLAY/PAUSE button (6). ÷ Connect to audio mixer's LINE INPUT terminals. (Do not connect to malfunction. This is set the desired JOG MODE [VINYL or CDJ]. ÷ The Digital Mode switch is NOT a malfunction. ¶ The BPM value measured by pressing the PLAY/PAUSE button (6). and if data on the...
Owner's Manual
Page 19
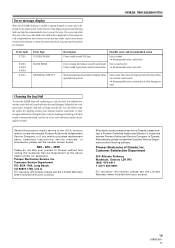
... purchase replacement parts, operating instructions, service manuals, or accessories, please call the number shown below is displayed or if the same error code is displayed even after corrective action has been taken, contact your nearest Pioneer Service Station or contact the store from which you purchased your product. 19 En Pioneer Electronics Service, Inc. Should this product require service in the U.S.A. OTHERS: TROUBLESHOOTING Error message display When the CDJ-1000 CD player...
... purchase replacement parts, operating instructions, service manuals, or accessories, please call the number shown below is displayed or if the same error code is displayed even after corrective action has been taken, contact your nearest Pioneer Service Station or contact the store from which you purchased your product. 19 En Pioneer Electronics Service, Inc. Should this product require service in the U.S.A. OTHERS: TROUBLESHOOTING Error message display When the CDJ-1000 CD player...
Owner's Manual
Page 20
... a low setting. • Slowly increase the sound until it at two feet. Guard against this now will provide a lifetime of your sensitive hearing. Decibel Level Example 30 Quiet library, soft whispers 40 Living room, refrigerator, bedroom away from loud noise is often undetectable until you listening for your musical enjoyment. Accessories ÷ Operating instructions 1 ÷ Power cord ...1 ÷ Audio cable ...1 ÷ Control cord ...1 ÷...
... a low setting. • Slowly increase the sound until it at two feet. Guard against this now will provide a lifetime of your sensitive hearing. Decibel Level Example 30 Quiet library, soft whispers 40 Living room, refrigerator, bedroom away from loud noise is often undetectable until you listening for your musical enjoyment. Accessories ÷ Operating instructions 1 ÷ Power cord ...1 ÷ Audio cable ...1 ÷ Control cord ...1 ÷...


