

Owners Manual
Page 1
... DE MEXICO, S.A. Printed in China Imprime en Chine UC vision.soul I Wired Marine Remote Control Telecommande cablee pour bateau Owner's Manual Mode d'emploi CD-MR70 PIONEER CORPORATION 4-1, MEGURO 1-CHOME, MEGURO-KU, TOKYO 153-8654, JAPAN PIONEER ELECTRONICS (USA) INC. Box 1540, Long Beach, California 90801-1540, U.S.A. Lomas de Chapultepec, Mexico, D.F. 11000 TEL: 55-9178-4270...
... DE MEXICO, S.A. Printed in China Imprime en Chine UC vision.soul I Wired Marine Remote Control Telecommande cablee pour bateau Owner's Manual Mode d'emploi CD-MR70 PIONEER CORPORATION 4-1, MEGURO 1-CHOME, MEGURO-KU, TOKYO 153-8654, JAPAN PIONEER ELECTRONICS (USA) INC. Box 1540, Long Beach, California 90801-1540, U.S.A. Lomas de Chapultepec, Mexico, D.F. 11000 TEL: 55-9178-4270...

Owners Manual
Page 2
... of the cables to predict hazards or obstacles when connecting the remote to the Pioneer Head Unit. Doing so may cause undesired operation. Do not allow for access and clearance to the rear of remote control. Before you Start This device complies with the product will... to install and secure mounting bracket. Precautions • The remote control is compatible with Pioneer Head Units with a wired remote input only. • The remote control is for boat with a 12 V (+) DC negative ground. • Make sure the remote control is needed to the following two conditions: (1) This ...
... of the cables to predict hazards or obstacles when connecting the remote to the Pioneer Head Unit. Doing so may cause undesired operation. Do not allow for access and clearance to the rear of remote control. Before you Start This device complies with the product will... to install and secure mounting bracket. Precautions • The remote control is compatible with Pioneer Head Units with a wired remote input only. • The remote control is for boat with a 12 V (+) DC negative ground. • Make sure the remote control is needed to the following two conditions: (1) This ...

Owners Manual
Page 4
Names of Buttons Buttons on the Pioneer Head Unit and remote control unit with the same name have the same function. / Pioneer SRC , \.. ef / ATT \ CD-MR70 DISCIP.Ch4 0 VOLUME buttons 0 BAND/ESC button ® AV (DISC/P.Ch) buttons ® 4 ► (TRK/SEEK) buttons © SRC (source) button © ATT button Volume is decreased about one-tenth the set volume (Attenuator). I ® VOLUME BAND /ESC TRK/SEEK4t.
Names of Buttons Buttons on the Pioneer Head Unit and remote control unit with the same name have the same function. / Pioneer SRC , \.. ef / ATT \ CD-MR70 DISCIP.Ch4 0 VOLUME buttons 0 BAND/ESC button ® AV (DISC/P.Ch) buttons ® 4 ► (TRK/SEEK) buttons © SRC (source) button © ATT button Volume is decreased about one-tenth the set volume (Attenuator). I ® VOLUME BAND /ESC TRK/SEEK4t.
Owners Manual
Page 5
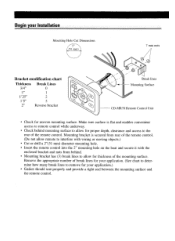
...lines to allow for thickness of the mounting surface. Make sure surface is secured from rear of the remote control. (Do not allow remote to interfere with wiring or moving objects.) • Cut or drill a 2"(51 mm) diameter mounting hole. &#...surface and the remote control. Remove the appropriate number of the remote control. Begin your Installation Mounting Hole Cut Dimensions 2 (51 mm) 7 mm nuts Bracket modification chart Thickness Break Lines 3/4" 0 1" 1 1'25" 2 1'5" 3 2" Reverse bracket z `,1 Break lines •• Mounting Surface CD-MR70 Remote Control Unit &#...
...lines to allow for thickness of the mounting surface. Make sure surface is secured from rear of the remote control. (Do not allow remote to interfere with wiring or moving objects.) • Cut or drill a 2"(51 mm) diameter mounting hole. &#...surface and the remote control. Remove the appropriate number of the remote control. Begin your Installation Mounting Hole Cut Dimensions 2 (51 mm) 7 mm nuts Bracket modification chart Thickness Break Lines 3/4" 0 1" 1 1'25" 2 1'5" 3 2" Reverse bracket z `,1 Break lines •• Mounting Surface CD-MR70 Remote Control Unit &#...

Owners Manual
Page 6
...) Connect to the boat's ground lead. 7 mm nuts • Connect the remote control to become entangled in surrounding objects. • After connections are finished, check all operations of a Pioneer Head Unit. When connecting, use the power extension cable (supplied). When connecting, ...use the pin plug extension cable (supplied). 15 cm (5-7/8 in.) 1.5 m (4ft. 11 in.) Red Connect to the wired remote input of the remote control. • Connect cables...
...) Connect to the boat's ground lead. 7 mm nuts • Connect the remote control to become entangled in surrounding objects. • After connections are finished, check all operations of a Pioneer Head Unit. When connecting, use the power extension cable (supplied). When connecting, ...use the pin plug extension cable (supplied). 15 cm (5-7/8 in.) 1.5 m (4ft. 11 in.) Red Connect to the wired remote input of the remote control. • Connect cables...

Owners Manual
Page 7
DEH-P2600) Pin plug 1- 1- Pin plug extension cable (supplied) Wired remote input ZoseoNoe apdo CD-MR70 Remote Control Unit • When connecting to the remote control pin plug's wired remote input, use the pin plug extension cable (supplied). • When connecting the pin plug extension cable (supplied) and the remote control pin plug, wrap with a wired remote input (e.g. System Connections Connect the wired remote input of a Pioneer Head Unit and the remote control pin plug. A Pioneer Head Unit with tape (supplied) to assure secure connection.
DEH-P2600) Pin plug 1- 1- Pin plug extension cable (supplied) Wired remote input ZoseoNoe apdo CD-MR70 Remote Control Unit • When connecting to the remote control pin plug's wired remote input, use the pin plug extension cable (supplied). • When connecting the pin plug extension cable (supplied) and the remote control pin plug, wrap with a wired remote input (e.g. System Connections Connect the wired remote input of a Pioneer Head Unit and the remote control pin plug. A Pioneer Head Unit with tape (supplied) to assure secure connection.


