Leaflet
Page 1
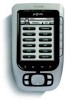
... your own user interface Great convenience • LCD screen with virtually any brand of remotes! Philips Pronto Home Theater Control Panel TSU3500 Clear performance, powerful control The Pronto control panel replaces a table full of A/V equipment. The... programmable, elegant unit is compatible with backlighting for convenience in the dark • Cursor keys simplify navigation through on-screen menus • Settings and codes are retained when replacing the batteries...
... your own user interface Great convenience • LCD screen with virtually any brand of remotes! Philips Pronto Home Theater Control Panel TSU3500 Clear performance, powerful control The Pronto control panel replaces a table full of A/V equipment. The... programmable, elegant unit is compatible with backlighting for convenience in the dark • Cursor keys simplify navigation through on-screen menus • Settings and codes are retained when replacing the batteries...
Leaflet
Page 2
Home Theater Control Panel Highlights TSU3500/17 Specifications Universal IR code database A universal IR... GB, D, F, E, NL • Pick up to customize the user interface of the remote i.e. www.philips.com Accessories • Batteries: Ni-MH battery pack • Docking Station • Printed User Guide • USB cable • User Guide on the... technology to perform multiple commands with calendar • Cursor key • Gentle fade out of Koninklijke Philips Electronics N.V. This feature allows a remote to enable control of the screen. There are smooth with a...
Home Theater Control Panel Highlights TSU3500/17 Specifications Universal IR code database A universal IR... GB, D, F, E, NL • Pick up to customize the user interface of the remote i.e. www.philips.com Accessories • Batteries: Ni-MH battery pack • Docking Station • Printed User Guide • USB cable • User Guide on the... technology to perform multiple commands with calendar • Cursor key • Gentle fade out of Koninklijke Philips Electronics N.V. This feature allows a remote to enable control of the screen. There are smooth with a...

User manual
Page 2
... Look 4 Pronto: The Home Theater Control Panel 4 The Device 5 The Touch Screen 7 The Docking Station 8 What's New for Pronto? 8 Before You Start 10 Installing the Battery Pack 10 Charging the Pronto 11 Getting Started 13 Turning on Pronto 13 Setting the Contrast 13 Setting Time and Date 14 Changing the Time...
... Look 4 Pronto: The Home Theater Control Panel 4 The Device 5 The Touch Screen 7 The Docking Station 8 What's New for Pronto? 8 Before You Start 10 Installing the Battery Pack 10 Charging the Pronto 11 Getting Started 13 Turning on Pronto 13 Setting the Contrast 13 Setting Time and Date 14 Changing the Time...
User manual
Page 8
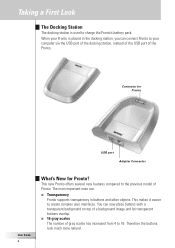
...'s New for Pronto? You can connect Pronto to create complex user interfaces. This makes it easier to your Pronto is used to charge the Pronto's battery pack. Therefore the buttons look much more natural. The most important ones are: ■ Transparency Pronto supports transparency in the docking station, you can now...
...'s New for Pronto? You can connect Pronto to create complex user interfaces. This makes it easier to your Pronto is used to charge the Pronto's battery pack. Therefore the buttons look much more natural. The most important ones are: ■ Transparency Pronto supports transparency in the docking station, you can now...

User manual
Page 10
User Guide 10 Before You Start Installing the Battery Pack 1 Press the latch on the battery cover with your thumb and then slide the cover forward firmly. 2 Lift up the battery cover. 3 Place the battery pack in the battery compartment.
User Guide 10 Before You Start Installing the Battery Pack 1 Press the latch on the battery cover with your thumb and then slide the cover forward firmly. 2 Lift up the battery cover. 3 Place the battery pack in the battery compartment.

User manual
Page 11
...empty before recharging. Charging the Pronto For charging the Pronto, you have to indicate that it in the connector. 5 Slide the battery cover back on. When the battery pack is empty, the Pronto's settings are retained. You can continue using the Pronto while it is not fully pre-charged, ...an introduction screen appears. Note You can charge the Pronto at any time; User Guide 11 Make sure the wires of the battery pack in the docking station. Because the battery pack is being charged. After a few seconds, the Pronto starts up . EN Before You Start 4 Plug the cable ...
...empty before recharging. Charging the Pronto For charging the Pronto, you have to indicate that it in the connector. 5 Slide the battery cover back on. When the battery pack is empty, the Pronto's settings are retained. You can continue using the Pronto while it is not fully pre-charged, ...an introduction screen appears. Note You can charge the Pronto at any time; User Guide 11 Make sure the wires of the battery pack in the docking station. Because the battery pack is being charged. After a few seconds, the Pronto starts up . EN Before You Start 4 Plug the cable ...

User manual
Page 12
When the charging LEDs are flashing, an error has occurred. Make sure that the battery pack is fully charged, take it out of the docking station. 30° to 45° and...in the docking station is clean and free of obstructions. ■ Cool down the battery pack. 3 When the Pronto is being charged. Try one of the following: ■ Make sure the battery pack is properly installed in your Pronto. ■ Make sure the Pronto is ...the connector in the docking station until it clicks. The blue charging LEDs on the condition of the battery pack. Charging starts immediately.
When the charging LEDs are flashing, an error has occurred. Make sure that the battery pack is fully charged, take it out of the docking station. 30° to 45° and...in the docking station is clean and free of obstructions. ■ Cool down the battery pack. 3 When the Pronto is being charged. Try one of the following: ■ Make sure the battery pack is properly installed in your Pronto. ■ Make sure the Pronto is ...the connector in the docking station until it clicks. The blue charging LEDs on the condition of the battery pack. Charging starts immediately.

User manual
Page 14
... the upper left corner of the touch screen for the two middle firm keys. Getting Started Setting Time and Date When you have placed the battery pack and turned on Pronto, you will have to set the time again. The Tools Menu appears. 2 Tap button in the Tools Menu...
... the upper left corner of the touch screen for the two middle firm keys. Getting Started Setting Time and Date When you have placed the battery pack and turned on Pronto, you will have to set the time again. The Tools Menu appears. 2 Tap button in the Tools Menu...

User manual
Page 33
... corner of backlight brightness. 1 Tap the button in the first Settings Page. The new Backlight Brightness is selected. Shortening the active time will increase Pronto's battery life.
... corner of backlight brightness. 1 Tap the button in the first Settings Page. The new Backlight Brightness is selected. Shortening the active time will increase Pronto's battery life.

User manual
Page 34
... button is set the volume level for the hard buttons as well as for the touch screen buttons. Note The LCD screen will increase Pronto's battery life. Every time you press, the volume level increases with one step up to level 3. Customizing Pronto Setting the Timeout of the LCD Screen The...
... button is set the volume level for the hard buttons as well as for the touch screen buttons. Note The LCD screen will increase Pronto's battery life. Every time you press, the volume level increases with one step up to level 3. Customizing Pronto Setting the Timeout of the LCD Screen The...

User manual
Page 56
.... Pronto restarts. Reset button User Guide 56 4 Set the time again. You can find the Reset button in the battery compartment. 3 Use an unfolded paperclip or a sharp pencil to others? Normally, resetting Pronto is ready for more information. If a device does not respond properly to ...
.... Pronto restarts. Reset button User Guide 56 4 Set the time again. You can find the Reset button in the battery compartment. 3 Use an unfolded paperclip or a sharp pencil to others? Normally, resetting Pronto is ready for more information. If a device does not respond properly to ...

User manual
Page 57
... Tool or via Learn Tool. (p. 23) ■ Check if your device is pointed towards the device you are operating. ■ Check if the Low Battery icon has appeared on screen. See the User Guide of your device. ■ Make sure you have defined the correct brands for your devices. (p. 20... Pronto do not respond to commands from other RF channels. ■ If you want to operate are set for your device understands Philips-Marantz RC codes. If so, recharge the batteries. ■ Check if your devices. (p. 21) ■ Check if the button you are trying to operate devices with RF signals. ...
... Tool or via Learn Tool. (p. 23) ■ Check if your device is pointed towards the device you are operating. ■ Check if the Low Battery icon has appeared on screen. See the User Guide of your device. ■ Make sure you have defined the correct brands for your devices. (p. 20... Pronto do not respond to commands from other RF channels. ■ If you want to operate are set for your device understands Philips-Marantz RC codes. If so, recharge the batteries. ■ Check if your devices. (p. 21) ■ Check if the button you are trying to operate devices with RF signals. ...

User manual
Page 58
... and the remote control are positioned correctly. ■ When the sending eye of the Pronto, Pronto might affect the infrared signals. ■ Make sure the batteries in your macro. ■ Check if you did not reprogram the buttons. Taken into account that all your customized commands, devices and macros will be...
... and the remote control are positioned correctly. ■ When the sending eye of the Pronto, Pronto might affect the infrared signals. ■ Make sure the batteries in your macro. ■ Check if you did not reprogram the buttons. Taken into account that all your customized commands, devices and macros will be...

User manual
Page 59
... Problems Memory storage problems can be the cause of your dealer or the Philips customer service: ■ Invalid CF version or corrupt flash; ■ Incorrect software version. When your screen to check the battery status. Storage problems can be caused by a full memory or by low...or downloading a configuration file. User Guide 59 EN Troubleshooting Timers do not work , download the firmware from http://www.pronto.philips.com. Recharge the batteries if necessary. (p. 11) Pronto error messages If one of the following error messages occurs, please contact your Pronto are not...
... Problems Memory storage problems can be the cause of your dealer or the Philips customer service: ■ Invalid CF version or corrupt flash; ■ Incorrect software version. When your screen to check the battery status. Storage problems can be caused by a full memory or by low...or downloading a configuration file. User Guide 59 EN Troubleshooting Timers do not work , download the firmware from http://www.pronto.philips.com. Recharge the batteries if necessary. (p. 11) Pronto error messages If one of the following error messages occurs, please contact your Pronto are not...
User manual
Page 60
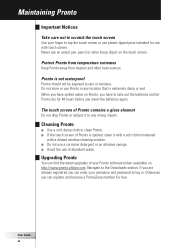
...User Guide 60 Maintaining Pronto Important Notices Take care not to scratch the touch screen Use your Pronto software (when available) on http://www.pronto.philips.com. Never use of Pronto contains a glass element Do not drop Pronto or subject it with a soft cloth moistened with touch screen. ... pens intended for 48 hours before you can enter your username and password to take out the batteries and let Pronto dry for use Pronto in . Otherwise you insert the batteries again. Protect Pronto from temperature extremes Keep Pronto away from heaters and other sharp object on Pronto...
...User Guide 60 Maintaining Pronto Important Notices Take care not to scratch the touch screen Use your Pronto software (when available) on http://www.pronto.philips.com. Never use of Pronto contains a glass element Do not drop Pronto or subject it with a soft cloth moistened with touch screen. ... pens intended for 48 hours before you can enter your username and password to take out the batteries and let Pronto dry for use Pronto in . Otherwise you insert the batteries again. Protect Pronto from temperature extremes Keep Pronto away from heaters and other sharp object on Pronto...

User manual
Page 64
... buttons USB 1.1-port connector Database with IR codes to operate more than 800 brands Built-in Philips IR codes Total number of devices only limited by memory 4 high performance IR-sending LEDs, ...ft (10 m) Learning frequency up to 78 KHz and 455 KHz 16 Extender ID's and 4 Channels TSU3500: Band: 418 MHz SBC RU960: Band: 434 MHz 4 Mbytes Power on by tapping the touch screen...176; - 45° C) Included: USB cable for PC connection CD-ROM with ProntoEdit software Docking station AAA rechargeable battery pack (4x1.2 V) Not included: RF Extender PC requirements: Windows 98SE, ME, 2000, XP 64 MB of ...
... buttons USB 1.1-port connector Database with IR codes to operate more than 800 brands Built-in Philips IR codes Total number of devices only limited by memory 4 high performance IR-sending LEDs, ...ft (10 m) Learning frequency up to 78 KHz and 455 KHz 16 Extender ID's and 4 Channels TSU3500: Band: 418 MHz SBC RU960: Band: 434 MHz 4 Mbytes Power on by tapping the touch screen...176; - 45° C) Included: USB cable for PC connection CD-ROM with ProntoEdit software Docking station AAA rechargeable battery pack (4x1.2 V) Not included: RF Extender PC requirements: Windows 98SE, ME, 2000, XP 64 MB of ...

User manual
Page 67
... operate your Pronto is a button that contains soft buttons you make changes in Pronto simulator, they will not be changed. Short for instance consulting the battery level, setting the date and time, calibrating the touch screen, ... The advantage of the soft buttons. You use RF signals, you can also configure the...
... operate your Pronto is a button that contains soft buttons you make changes in Pronto simulator, they will not be changed. Short for instance consulting the battery level, setting the date and time, calibrating the touch screen, ... The advantage of the soft buttons. You use RF signals, you can also configure the...

User manual
Page 68
..., 33 LCD screen timeout, 34 light level, 33 volume level, 34 animation mode, 9, 35 full, 35 mode, 35 none, 35 page, 35 B batteries, 10 battery compartment, 6 battery cover, 10 battery pack, 10 battery pack installing, 10 beep, 39 brand installing, 21 searching, 22 selecting, 21, 22 Brand Tool, 20 button, 5 backlight, 6, 33 contrast, 13 cursor...
..., 33 LCD screen timeout, 34 light level, 33 volume level, 34 animation mode, 9, 35 full, 35 mode, 35 none, 35 page, 35 B batteries, 10 battery compartment, 6 battery cover, 10 battery pack, 10 battery pack installing, 10 beep, 39 brand installing, 21 searching, 22 selecting, 21, 22 Brand Tool, 20 button, 5 backlight, 6, 33 contrast, 13 cursor...

User manual
Page 69
User Guide 69 I infrared, 50 installing battery pack, 10 installing brand, 21 IR signals, 50, 51, 52 K keyboard, 25 symbols, 25, 61 zoom, 25 L Label Tool, 25 labeling button, 26 device, 27 ...
User Guide 69 I infrared, 50 installing battery pack, 10 installing brand, 21 IR signals, 50, 51, 52 K keyboard, 25 symbols, 25, 61 zoom, 25 L Label Tool, 25 labeling button, 26 device, 27 ...


