Leaflet
Page 1
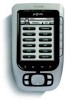
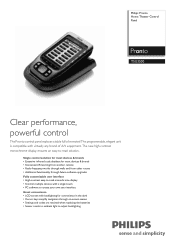
Philips Pronto Home Theater Control Panel TSU3500 Clear performance, powerful control The Pronto control panel replaces a table full of A/V equipment. The new high-contrast monochrome display ensures an easy-to-read monochrome display • Control multiple... frequency works through walls and from other rooms • Additional functionality through on-screen menus • Settings and codes are retained when replacing the batteries • Sensor reacts to ambient light to -read solution. Single control solution for most devices & brands • Extensive infrared code database for ...
Philips Pronto Home Theater Control Panel TSU3500 Clear performance, powerful control The Pronto control panel replaces a table full of A/V equipment. The new high-contrast monochrome display ensures an easy-to-read monochrome display • Control multiple... frequency works through walls and from other rooms • Additional functionality through on-screen menus • Settings and codes are retained when replacing the batteries • Sensor reacts to ambient light to -read solution. Single control solution for most devices & brands • Extensive infrared code database for ...

User manual
Page 2
... Home Theater Control Panel 4 The Device 5 The Touch Screen 7 The Docking Station 8 What's New for Pronto? 8 Before You Start 10 Installing the Battery Pack 10 Charging the Pronto 11 Getting Started 13 Turning on Pronto 13 Setting the Contrast 13 Setting Time and Date 14 Changing the Time Format 14 Changing the Time 14...
... Home Theater Control Panel 4 The Device 5 The Touch Screen 7 The Docking Station 8 What's New for Pronto? 8 Before You Start 10 Installing the Battery Pack 10 Charging the Pronto 11 Getting Started 13 Turning on Pronto 13 Setting the Contrast 13 Setting Time and Date 14 Changing the Time Format 14 Changing the Time 14...
User manual
Page 8
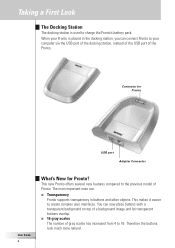
... on top of a background image and let transparent buttons overlap. ■ 16 gray scales The number of Pronto. This makes it easier to charge the Pronto's battery pack. This new Pronto offers several new features compared to the previous model of gray scales has increased from 4 to 16. You ...can connect Pronto to your Pronto is used to create complex user interfaces. When your computer via the USB ...
... on top of a background image and let transparent buttons overlap. ■ 16 gray scales The number of Pronto. This makes it easier to charge the Pronto's battery pack. This new Pronto offers several new features compared to the previous model of gray scales has increased from 4 to 16. You ...can connect Pronto to your Pronto is used to create complex user interfaces. When your computer via the USB ...

User manual
Page 11
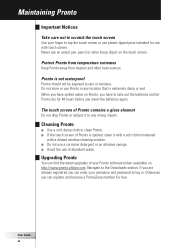
...not get stuck while sliding the cover on. Make sure the wires of the battery pack in the docking station. However, you need to be entirely empty before recharging. Charging the Pronto For charging the Pronto, you have to set the clock. You only need to place it as possible...starting up automatically and an introduction screen appears. the battery pack does not have to charge it in the connector. 5 Slide the battery cover back on the Pronto. Note You can charge the Pronto at any time; User Guide 11 When the battery pack is not fully pre-charged, you should recharge...
...not get stuck while sliding the cover on. Make sure the wires of the battery pack in the docking station. However, you need to be entirely empty before recharging. Charging the Pronto For charging the Pronto, you have to set the clock. You only need to place it as possible...starting up automatically and an introduction screen appears. the battery pack does not have to charge it in the connector. 5 Slide the battery cover back on the Pronto. Note You can charge the Pronto at any time; User Guide 11 When the battery pack is not fully pre-charged, you should recharge...

User manual
Page 12
... is 2 to 3 hours, depending on the front of the docking station indicate that you first tilt the Pronto to an angle of 30° to 45° User Guide 12 Make sure that the battery pack is being charged. Before You Start 1 Plug the power adapter into a wall outlet and connect it... to the docking station. 2 Slide the Pronto in the docking station is clean and free of obstructions. ■ Cool down the battery pack. 3 When the Pronto is fully charged, take it out of the docking station. 30° to 45° and then...
... is 2 to 3 hours, depending on the front of the docking station indicate that you first tilt the Pronto to an angle of 30° to 45° User Guide 12 Make sure that the battery pack is being charged. Before You Start 1 Plug the power adapter into a wall outlet and connect it... to the docking station. 2 Slide the Pronto in the docking station is clean and free of obstructions. ■ Cool down the battery pack. 3 When the Pronto is fully charged, take it out of the docking station. 30° to 45° and then...

User manual
Page 14
... Format button toggles between the three time formats: ■ 12 hour (AM/PM): This is selected. Changing the Time Format 1 Tap and hold the Pronto icon in the upper left corner of the touch screen for the two middle firm keys. The labels '+' and '-' appear for 3 seconds. The first... Settings Page appears. Getting Started Setting Time and Date When you have placed the battery pack and turned on Pronto, you will have to set the time again. The Tools Menu appears. 2 Tap button in the first Settings Page. User Guide 14 3 ...
... Format button toggles between the three time formats: ■ 12 hour (AM/PM): This is selected. Changing the Time Format 1 Tap and hold the Pronto icon in the upper left corner of the touch screen for the two middle firm keys. The labels '+' and '-' appear for 3 seconds. The first... Settings Page appears. Getting Started Setting Time and Date When you have placed the battery pack and turned on Pronto, you will have to set the time again. The Tools Menu appears. 2 Tap button in the first Settings Page. User Guide 14 3 ...

User manual
Page 33
... of the Button Backlight The timeout of the Button backlight determines how long the backlight of the LCD backlight. Shortening the active time will increase Pronto's battery life. To decrease the timeout, press (and hold ) the firm key labeled '-'. 3 Tap the button again. There are 4 levels of backlight brightness. 1 Tap the button...
... of the Button Backlight The timeout of the Button backlight determines how long the backlight of the LCD backlight. Shortening the active time will increase Pronto's battery life. To decrease the timeout, press (and hold ) the firm key labeled '-'. 3 Tap the button again. There are 4 levels of backlight brightness. 1 Tap the button...

User manual
Page 34
... 3. User Guide 34 The new LCD screen timeout is selected. You can either select 1 of the hard buttons, tap in the second Settings Page. Customizing Pronto Setting the Timeout of the LCD Screen The timeout of the 3 volume levels or choose to mute. The '+' and '-' labels appear on the two middle... active time will only time out when you tap, the volume level increases with one step up to mute. Note The LCD screen will increase Pronto's battery life. Setting the Volume Level of the Hard Buttons To adjust the volume of the 3 volume levels or choose to level 3.
... 3. User Guide 34 The new LCD screen timeout is selected. You can either select 1 of the hard buttons, tap in the second Settings Page. Customizing Pronto Setting the Timeout of the LCD Screen The timeout of the 3 volume levels or choose to mute. The '+' and '-' labels appear on the two middle... active time will only time out when you tap, the volume level increases with one step up to mute. Note The LCD screen will increase Pronto's battery life. Setting the Volume Level of the Hard Buttons To adjust the volume of the 3 volume levels or choose to level 3.

User manual
Page 56
... for use. See 'Changing the Time' on the battery cover with your thumb and then slide the cover forward firmly. 2 Lift off the battery cover. Reset button User Guide 56 4 Set the time again. Normally, resetting Pronto is ready for all personal changes like saved and programmed... are retained. You can find the Reset button in the battery compartment. 3 Use an unfolded paperclip or a sharp pencil to others? Pronto restarts. Note If you have to reconfigure Pronto to RF signals sent out by Pronto, you reset Pronto, all devices work properly with IR signals. FAQ How do...
... for use. See 'Changing the Time' on the battery cover with your thumb and then slide the cover forward firmly. 2 Lift off the battery cover. Reset button User Guide 56 4 Set the time again. Normally, resetting Pronto is ready for all personal changes like saved and programmed... are retained. You can find the Reset button in the battery compartment. 3 Use an unfolded paperclip or a sharp pencil to others? Pronto restarts. Note If you have to reconfigure Pronto to RF signals sent out by Pronto, you reset Pronto, all devices work properly with IR signals. FAQ How do...

User manual
Page 57
... not respond to commands from other RF channels. ■ If you want to operate are trying to save power. If so, recharge the batteries. ■ Check if your device is in the documentation of the RF Extender for your devices. (p. 21) ■ Check if the button you need ...more information. See 'Setting the Timeout of Pronto to use is assigned properly via Brand Tool or via Learn Tool. (p. 23) ■ Check if your device understands Philips-Marantz RC codes. Switch your device back to IR mode. (p. 52) ■ If you have defined...
... not respond to commands from other RF channels. ■ If you want to operate are trying to save power. If so, recharge the batteries. ■ Check if your device is in the documentation of the RF Extender for your devices. (p. 21) ■ Check if the button you need ...more information. See 'Setting the Timeout of Pronto to use is assigned properly via Brand Tool or via Learn Tool. (p. 23) ■ Check if your device understands Philips-Marantz RC codes. Switch your device back to IR mode. (p. 52) ■ If you have defined...

User manual
Page 58
... the key on the other remote control for more than one second. Therefore it might affect the infrared signals. ■ Make sure the batteries in your macro. ■ Check if you did not reprogram the buttons. Taken into account that all your customized commands, devices and macros...commands ■ Make sure you have defined the correct brands for your devices. (p. 20) ■ Make sure you have to reprogram your Pronto. The configuration file is corrupted When the configuration file is not pointed towards the learning eye of your existing remote control is corrupted, you ...
... the key on the other remote control for more than one second. Therefore it might affect the infrared signals. ■ Make sure the batteries in your macro. ■ Check if you did not reprogram the buttons. Taken into account that all your customized commands, devices and macros...commands ■ Make sure you have defined the correct brands for your devices. (p. 20) ■ Make sure you have to reprogram your Pronto. The configuration file is corrupted When the configuration file is not pointed towards the learning eye of your existing remote control is corrupted, you ...

User manual
Page 59
... to the PC ■ Make sure the batteries in the Pronto are set properly. (p. 14) Memory Storage Problems Memory storage problems can be the cause of the following error messages occurs, please contact your dealer or the Philips customer service: ■ Invalid CF version or... corrupt flash; ■ Incorrect software version. Recharge the batteries if necessary. (p. 11) Pronto error messages If one of Pronto not saving a macro. EN Troubleshooting Timers do not ...
... to the PC ■ Make sure the batteries in the Pronto are set properly. (p. 14) Memory Storage Problems Memory storage problems can be the cause of the following error messages occurs, please contact your dealer or the Philips customer service: ■ Invalid CF version or... corrupt flash; ■ Incorrect software version. Recharge the batteries if necessary. (p. 11) Pronto error messages If one of Pronto not saving a macro. EN Troubleshooting Timers do not ...
User manual
Page 60
If you are already registered you can enter your Pronto software (when available) on http://www.pronto.philips.com. Protect Pronto from temperature extremes Keep Pronto away from heaters and other sharp object on Pronto, you insert the batteries again. Otherwise you can find the latest upgrades of your username and password to log in any strong impact...
If you are already registered you can enter your Pronto software (when available) on http://www.pronto.philips.com. Protect Pronto from temperature extremes Keep Pronto away from heaters and other sharp object on Pronto, you insert the batteries again. Otherwise you can find the latest upgrades of your username and password to log in any strong impact...

User manual
Page 67
...an adjacent room. A timer allows you can set an alarm or program your VCR to consult and adjust several settings, for instance consulting the battery level, setting the date and time, calibrating the touch screen, ... The advantage of RF is a button that it to operate the remote... a converter box that contains soft buttons you to define actions to operate devices. The Settings Tool allow you can use to your Pronto. EN Glossary ProntoEdit RF RF code RF Extender Settings Tool Simulator Soft button Timer Touch screen USB ProntoEdit is a separate application in ProntoEdit...
...an adjacent room. A timer allows you can set an alarm or program your VCR to consult and adjust several settings, for instance consulting the battery level, setting the date and time, calibrating the touch screen, ... The advantage of RF is a button that it to operate the remote... a converter box that contains soft buttons you to define actions to operate devices. The Settings Tool allow you can use to your Pronto. EN Glossary ProntoEdit RF RF code RF Extender Settings Tool Simulator Soft button Timer Touch screen USB ProntoEdit is a separate application in ProntoEdit...

User manual
Page 68
..., 33 LCD screen timeout, 34 light level, 33 volume level, 34 animation mode, 9, 35 full, 35 mode, 35 none, 35 page, 35 B batteries, 10 battery compartment, 6 battery cover, 10 battery pack, 10 battery pack installing, 10 beep, 39 brand installing, 21 searching, 22 selecting, 21, 22 Brand Tool, 20 button, 5 backlight, 6, 33 contrast, 13 cursor... Button backlight timeout, 33 C calibrating the touch screen, 35 changing date, 15 language, 16 time, 14 time format, 14 channel channel down, 5 channel up, 5 charging Pronto, 11 clock settings.
..., 33 LCD screen timeout, 34 light level, 33 volume level, 34 animation mode, 9, 35 full, 35 mode, 35 none, 35 page, 35 B batteries, 10 battery compartment, 6 battery cover, 10 battery pack, 10 battery pack installing, 10 beep, 39 brand installing, 21 searching, 22 selecting, 21, 22 Brand Tool, 20 button, 5 backlight, 6, 33 contrast, 13 cursor... Button backlight timeout, 33 C calibrating the touch screen, 35 changing date, 15 language, 16 time, 14 time format, 14 channel channel down, 5 channel up, 5 charging Pronto, 11 clock settings.

User manual
Page 69
User Guide 69 I infrared, 50 installing battery pack, 10 installing brand, 21 IR signals, 50, 51, 52 K ...Device, 31 multi language support, 9 N navigation cursor, 9, 35, 48 touch screen, 35, 48 Index O operating the Pronto cursor navigation, 48 RF signals, 50 touch screen navigation, 48 troubleshooting, 57 Overview Device, 17 Page, 18 P page animation..., 35 page labeling, 27 Page Overview, 9, 18 Pronto, 4 adjusting the settings, 32 appliance, 5 charging, 11 customizing, 19 Device Overview, 17 IR signals, 52 maintaining, 60...
User Guide 69 I infrared, 50 installing battery pack, 10 installing brand, 21 IR signals, 50, 51, 52 K ...Device, 31 multi language support, 9 N navigation cursor, 9, 35, 48 touch screen, 35, 48 Index O operating the Pronto cursor navigation, 48 RF signals, 50 touch screen navigation, 48 troubleshooting, 57 Overview Device, 17 Page, 18 P page animation..., 35 page labeling, 27 Page Overview, 9, 18 Pronto, 4 adjusting the settings, 32 appliance, 5 charging, 11 customizing, 19 Device Overview, 17 IR signals, 52 maintaining, 60...

