
User manual
Page 2
... not installed and used in a particular installation. However, there is connected. • Consult the dealer or an experienced radio/TV technician for help. Canada English: This digital apparatus does not exceed the Class B limits for a Class B digital device, pursuant to Part 15 of Communications.This Class B digital apparatus complies with Canadian ICES-003. This device must accept any interference received...
... not installed and used in a particular installation. However, there is connected. • Consult the dealer or an experienced radio/TV technician for help. Canada English: This digital apparatus does not exceed the Class B limits for a Class B digital device, pursuant to Part 15 of Communications.This Class B digital apparatus complies with Canadian ICES-003. This device must accept any interference received...

User manual
Page 3
Contents 1 Important Important safety instructions Notice 2 Your portable DVD player Introduction What's in the box Overview of the main unit Overview of the second screen 3 Get started Preparation Connect the second screen Connect power 4 Use your player Turn on Select OSD language Play discs Play options 5 Adjust settings Set the main unit Set the second screen 6 Use more of your player Connect additional equipment Connect power from household source 7 Product information 8 Troubleshooting 6 6 8 10 10 10 11 13 14 14 15 16 17 17 17 17 18 19 19 20 21 21 22 23 24 EN 3 English
Contents 1 Important Important safety instructions Notice 2 Your portable DVD player Introduction What's in the box Overview of the main unit Overview of the second screen 3 Get started Preparation Connect the second screen Connect power 4 Use your player Turn on Select OSD language Play discs Play options 5 Adjust settings Set the main unit Set the second screen 6 Use more of your player Connect additional equipment Connect power from household source 7 Product information 8 Troubleshooting 6 6 8 10 10 10 11 13 14 14 15 16 17 17 17 17 18 19 19 20 21 21 22 23 24 EN 3 English

User manual
Page 6
... grounding-type plug. Caution:To prevent electric shock, match the wide blade of the obsolete outlet. l Use only with the apparatus. b Keep these instructions. h Do not install near water. k Only use attachments/accessories specified by the manufacturer or sold with the cart, stand, tripod, bracket, or table specified by the manufacturer. j Protect the power cord...
... grounding-type plug. Caution:To prevent electric shock, match the wide blade of the obsolete outlet. l Use only with the apparatus. b Keep these instructions. h Do not install near water. k Only use attachments/accessories specified by the manufacturer or sold with the cart, stand, tripod, bracket, or table specified by the manufacturer. j Protect the power cord...

User manual
Page 7
...easy access to the power cord, plug or adaptor to disconnect this , set your volume to environmental considerations. Disposal of these materials may contain lead and mercury. Hearing safety Listen at a moderate volume. • Using headphones at a high volume can produce sounds in any sources of danger on other ...to rain or moisture, does not operate normally, or has been dropped. o Apparatus shall not be regulated due to a safe level before your hearing adapts and leave it there. English n Refer all servicing to higher volumes of sound. For disposal or recycling information, ...
...easy access to the power cord, plug or adaptor to disconnect this , set your volume to environmental considerations. Disposal of these materials may contain lead and mercury. Hearing safety Listen at a moderate volume. • Using headphones at a high volume can produce sounds in any sources of danger on other ...to rain or moisture, does not operate normally, or has been dropped. o Apparatus shall not be regulated due to a safe level before your hearing adapts and leave it there. English n Refer all servicing to higher volumes of sound. For disposal or recycling information, ...
User manual
Page 8
To establish a safe volume level: • Set your volume control at reasonable volumes for reasonable periods of materials which can hear it may void the user's authority to adjust the volume as your headphones. • Listen at a low setting. • Slowly increase the sound until you . • You should use caution or temporarily discontinue use headphones while operating a motorized vehicle, cycling, skateboarding, etc.; it comfortably...
To establish a safe volume level: • Set your volume control at reasonable volumes for reasonable periods of materials which can hear it may void the user's authority to adjust the volume as your headphones. • Listen at a low setting. • Slowly increase the sound until you . • You should use caution or temporarily discontinue use headphones while operating a motorized vehicle, cycling, skateboarding, etc.; it comfortably...

User manual
Page 10
... package: • Main unit x 1 • Second screen x 1 • AC power adaptor x 1, DSA-9W-09 F (DVE) or AY4132 (Philips) • Car adaptor x 1 • AV cable x 2 • Fastening strap x 2 • User Manual x 1 • Quick Start Guide x 1 10 EN You can restrict the play the following discs on the DVD player (including CD-R, CD-RW, DVD±R and DVD±RW): • DVD-Video • Video CD • Audio CD • MP3...
... package: • Main unit x 1 • Second screen x 1 • AC power adaptor x 1, DSA-9W-09 F (DVE) or AY4132 (Philips) • Car adaptor x 1 • AV cable x 2 • Fastening strap x 2 • User Manual x 1 • Quick Start Guide x 1 10 EN You can restrict the play the following discs on the DVD player (including CD-R, CD-RW, DVD±R and DVD±RW): • DVD-Video • Video CD • Audio CD • MP3...
User manual
Page 11
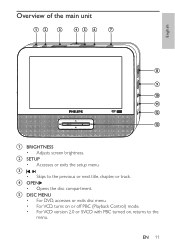
English Overview of the main unit a BRIGHTNESS • Adjusts screen brightness. EN 11 e DISC MENU • For DVD, accesses or exits disc menu. • For VCD, turns on or off PBC (Playback Control) mode. • For VCD version 2.0 or SVCD with PBC turned on, returns to the previous or next title, chapter, or track. b SETUP • Accesses or exits the setup menu. d OPEN • Opens the disc compartment. c, • Skips to the menu.
English Overview of the main unit a BRIGHTNESS • Adjusts screen brightness. EN 11 e DISC MENU • For DVD, accesses or exits disc menu. • For VCD, turns on or off PBC (Playback Control) mode. • For VCD version 2.0 or SVCD with PBC turned on, returns to the previous or next title, chapter, or track. b SETUP • Accesses or exits the setup menu. d OPEN • Opens the disc compartment. c, • Skips to the menu.
User manual
Page 12
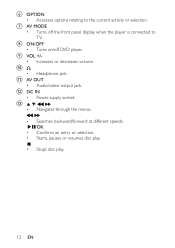
...; Headphone jack. m ,, , • Navigates through the menus. , • Searches backward/forward at different speeds. /OK • Confirms an entry or selection. • Starts, pauses or resumes disc play. • Stops disc play. 12 EN k AV OUT • Audio/video output jack. i VOL +/• Increases or decreases volume. f OPTION • Accesses options relating to TV. g AV MODE • Turns off DVD player.
...; Headphone jack. m ,, , • Navigates through the menus. , • Searches backward/forward at different speeds. /OK • Confirms an entry or selection. • Starts, pauses or resumes disc play. • Stops disc play. 12 EN k AV OUT • Audio/video output jack. i VOL +/• Increases or decreases volume. f OPTION • Accesses options relating to TV. g AV MODE • Turns off DVD player.

User manual
Page 13
EN 13 English Overview of the second screen a DC IN • Power supply socket. d VOL -/+ • Decreases or increases volume. f OFF/ON • Turns off/on the second screen. e BRIGHTNESS -/+ • Adjusts screen brightness. b AV IN • Audio/video input jack. c • Headphone jack.
EN 13 English Overview of the second screen a DC IN • Power supply socket. d VOL -/+ • Decreases or increases volume. f OFF/ON • Turns off/on the second screen. e BRIGHTNESS -/+ • Adjusts screen brightness. b AV IN • Audio/video input jack. c • Headphone jack.

User manual
Page 14
3 Get started Caution • Use the controls only as stated in this user manual. • Always follow the instructions in this chapter in a car, attach the main unit and the second screen to the back of the front seat headrests. 1 Pull the strap through the loops on the back of the main unit. 2 Hold... the main unit to the strap. 3 Position the main unit at the back of the apparatus.Write the numbers here: Model No Serial No Preparation To use the player in sequence. If you contact Philips, you , then attach the buckle to the headrest. • To attach the second screen, repeat the...
3 Get started Caution • Use the controls only as stated in this user manual. • Always follow the instructions in this chapter in a car, attach the main unit and the second screen to the back of the front seat headrests. 1 Pull the strap through the loops on the back of the main unit. 2 Hold... the main unit to the strap. 3 Position the main unit at the back of the apparatus.Write the numbers here: Model No Serial No Preparation To use the player in sequence. If you contact Philips, you , then attach the buckle to the headrest. • To attach the second screen, repeat the...

User manual
Page 15
B: second screen 1 Connect the supplied AV cable to: • the AV OUT jack on the main unit. • the AV IN jack on the second screen. EN 15 English Connect the second screen Caution • Turn off your player before you connect the second screen. A: main unit;
B: second screen 1 Connect the supplied AV cable to: • the AV OUT jack on the main unit. • the AV IN jack on the second screen. EN 15 English Connect the second screen Caution • Turn off your player before you connect the second screen. A: main unit;
User manual
Page 16
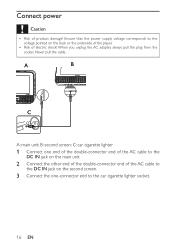
... voltage corresponds to the car cigarette lighter socket. 16 EN B: second screen; A: main unit; When you unplug the AC adapter, always pull the plug from the socket. Connect power Caution • Risk of electric shock! C: car cigarette lighter 1 Connect one end of the double-connector end of the AC cable to the DC IN jack on the main unit. 2 Connect the other end of...
... voltage corresponds to the car cigarette lighter socket. 16 EN B: second screen; A: main unit; When you unplug the AC adapter, always pull the plug from the socket. Connect power Caution • Risk of electric shock! C: car cigarette lighter 1 Connect one end of the double-connector end of the AC cable to the DC IN jack on the main unit. 2 Connect the other end of...
User manual
Page 18
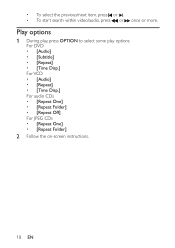
• To select the previous/next item, press or . • To start search within video/audio, press or once or more. Play options 1 During play, press OPTION to select some play options. For DVD • [Audio] • [Subtitle] • [Repeat] • [Time Disp.] For VCD • [Audio] • [Repeat] • [Time Disp.] For audio CDs • [Repeat One] • [Repeat Folder] • [Repeat Off] For JPEG CDs • [Repeat One] • [Repeat Folder] 2 Follow the on-screen instructions. 18 EN
• To select the previous/next item, press or . • To start search within video/audio, press or once or more. Play options 1 During play, press OPTION to select some play options. For DVD • [Audio] • [Subtitle] • [Repeat] • [Time Disp.] For VCD • [Audio] • [Repeat] • [Time Disp.] For audio CDs • [Repeat One] • [Repeat Folder] • [Repeat Off] For JPEG CDs • [Repeat One] • [Repeat Folder] 2 Follow the on-screen instructions. 18 EN
User manual
Page 19
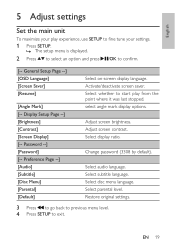
... Password --] [Password] [-- Preference Page --] [Audio] [Subtitle] [Disc Menu] [Parental] [Default] Select on-screen display language. Adjust screen brightness. Activate/deactivate screen saver. EN 19 Select disc menu language. Select audio language. English 5 Adjust settings Set the main unit To maximize your play from the point where it was last stopped. Display Setup Page --] [Brightness] [Contrast] [Screen Display] [-- Adjust screen contrast. Select whether to start play experience, use SETUP to fine tune your settings. 1 Press SETUP. » The setup...
... Password --] [Password] [-- Preference Page --] [Audio] [Subtitle] [Disc Menu] [Parental] [Default] Select on-screen display language. Adjust screen brightness. Activate/deactivate screen saver. EN 19 Select disc menu language. Select audio language. English 5 Adjust settings Set the main unit To maximize your play from the point where it was last stopped. Display Setup Page --] [Brightness] [Contrast] [Screen Display] [-- Adjust screen contrast. Select whether to start play experience, use SETUP to fine tune your settings. 1 Press SETUP. » The setup...

User manual
Page 20
Set the second screen You can also set the second screen. • To adjust volume level for the second screen, rotate VOL -/+ on the second screen. • To adjust the brightness of the second screen, rotate BRIGHTNESS -/+ on the second screen. 20 EN
Set the second screen You can also set the second screen. • To adjust volume level for the second screen, rotate VOL -/+ on the second screen. • To adjust the brightness of the second screen, rotate BRIGHTNESS -/+ on the second screen. 20 EN

User manual
Page 21
EN 21 Match the color of your player Connect additional equipment Caution • Turn off the front panel display. TV not supplied Tip • To conserve energy, press AV MODE to turn off your player before connecting to any additional equipment. You can connect the player to a TV or an amplifier to enjoy DVDs or Karaoke. English 6 Use more of the AV cables (the AV cable connected to TV is not supplied) with the jacks: the yellow cable is for the yellow video jack, the red/ white cable is for the red/white audio jacks.
EN 21 Match the color of your player Connect additional equipment Caution • Turn off the front panel display. TV not supplied Tip • To conserve energy, press AV MODE to turn off your player before connecting to any additional equipment. You can connect the player to a TV or an amplifier to enjoy DVDs or Karaoke. English 6 Use more of the AV cables (the AV cable connected to TV is not supplied) with the jacks: the yellow cable is for the yellow video jack, the red/ white cable is for the red/white audio jacks.

User manual
Page 24
... the problem remains unsolved, register your TV or program. • The LCD is power at www.philips.com/welcome. You may, however, see tiny black points and/or bright points(red, blue, green) that the AV cable is connected correctly. Never remove the casing of electric shock. No power • Ensure that both plugs of the mains cord are properly connected. • Ensure that the video output format of time...
... the problem remains unsolved, register your TV or program. • The LCD is power at www.philips.com/welcome. You may, however, see tiny black points and/or bright points(red, blue, green) that the AV cable is connected correctly. Never remove the casing of electric shock. No power • Ensure that both plugs of the mains cord are properly connected. • Ensure that the video output format of time...

Quick start guide
Page 1
... not have Audio and Video inputs, you can consult the owner's manual of screen to match lighting conditions. Press BRIGHTNESS on the main unit or rotate BRIGHTNESS -/+ on the second screen to adjust brightness of your TV. (If your dealer.) 1 Slide the ON/OFF switch to ON to switch on the main unit. 2 Slide OPEN 2 on the main unit. 3 Remove the protective card (if any) and load a disc with the...
... not have Audio and Video inputs, you can consult the owner's manual of screen to match lighting conditions. Press BRIGHTNESS on the main unit or rotate BRIGHTNESS -/+ on the second screen to adjust brightness of your TV. (If your dealer.) 1 Slide the ON/OFF switch to ON to switch on the main unit. 2 Slide OPEN 2 on the main unit. 3 Remove the protective card (if any) and load a disc with the...
Leaflet
Page 1
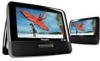
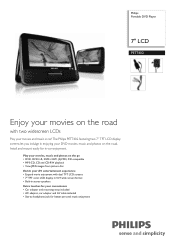
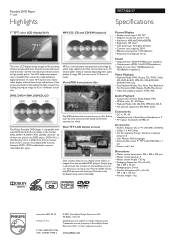
... images from picture disc Enrich your AV entertainment experience • Expand movie enjoyment with two widescreen LCDs Play your movies, music and photos on the road. Play your movies and music in -car enjoyment. Install and mount easily for better personal music enjoyment Philips Portable DVD Player 7" LCD PET7402 Enjoy your movies on the road with dual TFT LCD screens • 7" TFT color LCD display in 16:9 wide screen format • Built-in stereo speakers Extra touches...
... images from picture disc Enrich your AV entertainment experience • Expand movie enjoyment with two widescreen LCDs Play your movies, music and photos on the road. Play your movies and music in -car enjoyment. Install and mount easily for better personal music enjoyment Philips Portable DVD Player 7" LCD PET7402 Enjoy your movies on the road with dual TFT LCD screens • 7" TFT color LCD display in 16:9 wide screen format • Built-in stereo speakers Extra touches...
Leaflet
Page 2
.... DVD+/-R is standard for a DVD drive that are saved on the DVD player. Dual TFT LCD display screens Dual screens allow you can accept both common rewritable disc types. Now you to display same videos or images from the portable DVD players. Trademarks are subject to change without the quality loss than comes from picture disc Sound • Output Power: 250mW RMS(built-in speakers) • Output power (RMS): 10mW RMS(earphone) • Signal to...
.... DVD+/-R is standard for a DVD drive that are saved on the DVD player. Dual TFT LCD display screens Dual screens allow you can accept both common rewritable disc types. Now you to display same videos or images from the portable DVD players. Trademarks are subject to change without the quality loss than comes from picture disc Sound • Output Power: 250mW RMS(built-in speakers) • Output power (RMS): 10mW RMS(earphone) • Signal to...

