Leaflet
Page 1
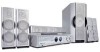
... quality • Clear Voice™ for dialogue enhancement in movies Enjoy perfect sound anywhere • Adjust the sound to your seating position via joy stick remote control View and share your pictures on TV • Media Slot for access to your TV Clear width & depth in sound • Cinema Center Speaker...
... quality • Clear Voice™ for dialogue enhancement in movies Enjoy perfect sound anywhere • Adjust the sound to your seating position via joy stick remote control View and share your pictures on TV • Media Slot for access to your TV Clear width & depth in sound • Cinema Center Speaker...

Leaflet
Page 2
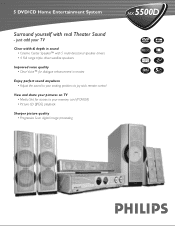
digital : 1 x optical • Audio output: - S-Video (Hosiden) - 5 DVD/CD Home Entertainment System standard product information MX 5500D dvd • 5 Disc Changer • Plays CD, CD-RW, MP3-CD*,VCD, DVD, DVD+R/RW, Picture CD (Kodak, JPEG) • Parental control • Play modes (repeat/program) • Progressive Scan * Plays MP3-CD (supports 32, 56, 64, 96, 128, 256 kbps and variable bit rate) tuner • FM/AM Digital tuning with 40 presets sound • Bass & Treble Control • Digital Sound Modes: rock, digital, jazz, classic, drama, action, sci-fi, concert &#...
digital : 1 x optical • Audio output: - S-Video (Hosiden) - 5 DVD/CD Home Entertainment System standard product information MX 5500D dvd • 5 Disc Changer • Plays CD, CD-RW, MP3-CD*,VCD, DVD, DVD+R/RW, Picture CD (Kodak, JPEG) • Parental control • Play modes (repeat/program) • Progressive Scan * Plays MP3-CD (supports 32, 56, 64, 96, 128, 256 kbps and variable bit rate) tuner • FM/AM Digital tuning with 40 presets sound • Bass & Treble Control • Digital Sound Modes: rock, digital, jazz, classic, drama, action, sci-fi, concert &#...
User manual
Page 1
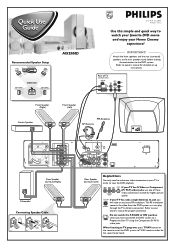
... the DVD system so it can play ANTENNA IN through the TV's Antenna connector. When listening to TV programs, press TV/AV button on the remote to set up instructions. Refer to your TV in order to be heard. Pr/Cr Pb/Cb Y S-VIDEO If your TV has S-Video or Component... video connection to your owner's manual for the sound to view the DVD playback. Refer to owner's manual for higher picture quality. Recommended Speaker Setup MX5500D 12nc: 3139 115 22081 Printed in China Use this simple and quick way to a Progressive Scan TV using the Component (Pr Pb Y) video jacks. IMPORTANT...
... the DVD system so it can play ANTENNA IN through the TV's Antenna connector. When listening to TV programs, press TV/AV button on the remote to set up instructions. Refer to your TV in order to be heard. Pr/Cr Pb/Cb Y S-VIDEO If your TV has S-Video or Component... video connection to your owner's manual for the sound to view the DVD playback. Refer to owner's manual for higher picture quality. Recommended Speaker Setup MX5500D 12nc: 3139 115 22081 Printed in China Use this simple and quick way to a Progressive Scan TV using the Component (Pr Pb Y) video jacks. IMPORTANT...

User manual
Page 2
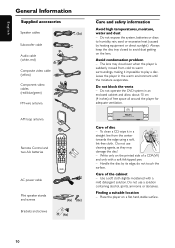
...OK STOP PLAY/PAUSE DISC SKIP REPEAT REPEAT PROGRAM A-B VOICE MUTE DIM SLEEP SUB TV VOL Make sure your TV remote control may require a playability enhancement or upgrade. If not, call Philips at 1-800-531-0039 for more details. 3 Press OPEN•CLOSE 0 on the front of disc formats provided... by various disc manufacturers, your TV manual for assistance. Do not use channel 3 or 4 on the TV unless you see the blue Philips DVD background screen on the remote to complete the basic hook-up . 4 Playback will be called FRONT, A/V IN, or VIDEO. For double-sided discs, load the ...
...OK STOP PLAY/PAUSE DISC SKIP REPEAT REPEAT PROGRAM A-B VOICE MUTE DIM SLEEP SUB TV VOL Make sure your TV remote control may require a playability enhancement or upgrade. If not, call Philips at 1-800-531-0039 for more details. 3 Press OPEN•CLOSE 0 on the front of disc formats provided... by various disc manufacturers, your TV manual for assistance. Do not use channel 3 or 4 on the TV unless you see the blue Philips DVD background screen on the remote to complete the basic hook-up . 4 Playback will be called FRONT, A/V IN, or VIDEO. For double-sided discs, load the ...

User manual
Page 10
... Listening to the playback 17 Recording (digital 17 Functional Overview Main unit and remote control 18-19 Control buttons available on the remote only 19 Getting Started Step 1: Inserting batteries into the remote control 20 Using the remote control to operate the system 20 Step 2: Setting the clock 20 Step 3:... Setting the TV 21 Changing the NTSC/PAL setting via the remote control 21 Selecting the color system that corresponds to your TV 21 Step 4: Selecting speaker layout 22 Changing seating control position 22 Setting...
... Listening to the playback 17 Recording (digital 17 Functional Overview Main unit and remote control 18-19 Control buttons available on the remote only 19 Getting Started Step 1: Inserting batteries into the remote control 20 Using the remote control to operate the system 20 Step 2: Setting the clock 20 Step 3:... Setting the TV 21 Changing the NTSC/PAL setting via the remote control 21 Selecting the color system that corresponds to your TV 21 Step 4: Selecting speaker layout 22 Changing seating control position 22 Setting...

User manual
Page 11
... Eco Power standby mode ...... 42 Switching to standby mode (view clock) ... 42 Dimming system's display screen 42 Recording to an external device 42 Using the remote to operate your television ... 42 Specifications 43 Troubleshooting 44-45 Glossary 46-47 Limited Warranty 48 Contents 9
... Eco Power standby mode ...... 42 Switching to standby mode (view clock) ... 42 Dimming system's display screen 42 Recording to an external device 42 Using the remote to operate your television ... 42 Specifications 43 Troubleshooting 44-45 Glossary 46-47 Limited Warranty 48 Contents 9
User manual
Page 12
...cabinet and allow about 10 cm (4 inches) of free space all around the player for adequate ventilation. 10 cm (4 inches) 10 cm (4 inches) PHILIPS DVD Home Cinema System 10 cm (4 inches) Care of the cabinet - Write only on a flat, hard, stable surface. 10 Do not expose the... Speaker cables (5x) Subwoofer cable Audio cable (white, red) Composite video cable (yellow) Component video cables (red/blue/green) FM wire antenna AM loop antenna Remote Control and two AA batteries DISC/ TV/AV MEDIA TUNER AUX/DI 1 2 3 4 5 6 7 8 9 SURR. 0 VOL SOUND SYSTEM MENU DISC MENU ...
...cabinet and allow about 10 cm (4 inches) of free space all around the player for adequate ventilation. 10 cm (4 inches) 10 cm (4 inches) PHILIPS DVD Home Cinema System 10 cm (4 inches) Care of the cabinet - Write only on a flat, hard, stable surface. 10 Do not expose the... Speaker cables (5x) Subwoofer cable Audio cable (white, red) Composite video cable (yellow) Component video cables (red/blue/green) FM wire antenna AM loop antenna Remote Control and two AA batteries DISC/ TV/AV MEDIA TUNER AUX/DI 1 2 3 4 5 6 7 8 9 SURR. 0 VOL SOUND SYSTEM MENU DISC MENU ...
User manual
Page 18
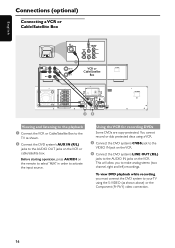
... cannot record or dub protected discs using the S-VIDEO (as shown. 2 Connect the DVD system's AUX IN (R/L) jacks to the AUDIO OUT jacks on the remote to select "AUX" in order to activate the input source. Using the VCR for recording DVDs Some DVDs are copy-protected. English Connections (optional) Connecting...
... cannot record or dub protected discs using the S-VIDEO (as shown. 2 Connect the DVD system's AUX IN (R/L) jacks to the AUDIO OUT jacks on the remote to select "AUX" in order to activate the input source. Using the VCR for recording DVDs Some DVDs are copy-protected. English Connections (optional) Connecting...

User manual
Page 19
... equipment for example) CD Recorder ~ AC MAINS Listening to the playback 1 Connect the DVD system's DIGITAL IN jack to the DIGITAL OUT jack on the remote to select "DI" in order to the audio connection. (See page 33 "Setting the digital output".) Notes: - You cannot record the disc through a VCR or...
... equipment for example) CD Recorder ~ AC MAINS Listening to the playback 1 Connect the DVD system's DIGITAL IN jack to the DIGITAL OUT jack on the remote to select "DI" in order to the audio connection. (See page 33 "Setting the digital output".) Notes: - You cannot record the disc through a VCR or...
User manual
Page 20
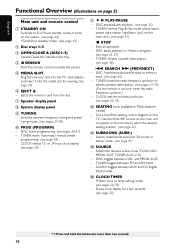
... towards this sensor. 5 MEDIA SLOT - Exits an operation. - Use the VOLUME control on the main unit or joystick on page 3) Main unit and remote control 1 STANDBY ON - Shows clock display for a few seconds. (see page 20) * = Press and hold the button for viewing. (see pages 37-38) 0 PROG (PROGRAM) - .... (see page 20) ! ÉÅ PLAY•PAUSE - Turns on/off the seating control diagram on the main unit.) (see pages 37-38) (On the remote, it into the PC card adaptor and insert it can only tunes the radio frequency up /down .) - or 24-hour clock display. (see pages 26...
... towards this sensor. 5 MEDIA SLOT - Exits an operation. - Use the VOLUME control on the main unit or joystick on page 3) Main unit and remote control 1 STANDBY ON - Shows clock display for a few seconds. (see page 20) * = Press and hold the button for viewing. (see pages 37-38) 0 PROG (PROGRAM) - .... (see page 20) ! ÉÅ PLAY•PAUSE - Turns on/off the seating control diagram on the main unit.) (see pages 37-38) (On the remote, it into the PC card adaptor and insert it can only tunes the radio frequency up /down .) - or 24-hour clock display. (see pages 26...
User manual
Page 21
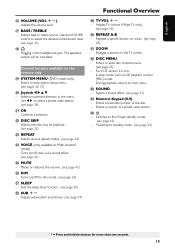
... page 25) £ REPEAT - Sets the sleep timer function. (see pages 30, 31) ) Joystick 1 2 3 4 - In stop mode, turns on the remote only ( SYSTEM MENU (DVD mode only) - Enters or exits system setup menu. (see page 40) • SUB +- For VCD version 2.0 only; Control buttons ...see page 41) *n - Adjusts the volume level. & BASS / TREBLE - Use the VOLUME control to main menu. ‹ SOUND - Adjusts TV volume (Philips TV only.) (see page 41) ª TV VOL +- Selects movement direction in the headphones jack. Repeats a specific section on /off playback control (PBC) ...
... page 25) £ REPEAT - Sets the sleep timer function. (see pages 30, 31) ) Joystick 1 2 3 4 - In stop mode, turns on the remote only ( SYSTEM MENU (DVD mode only) - Enters or exits system setup menu. (see page 40) • SUB +- For VCD version 2.0 only; Control buttons ...see page 41) *n - Adjusts the volume level. & BASS / TREBLE - Use the VOLUME control to main menu. ‹ SOUND - Adjusts TV volume (Philips TV only.) (see page 41) ª TV VOL +- Selects movement direction in the headphones jack. Repeats a specific section on /off playback control (PBC) ...
User manual
Page 22
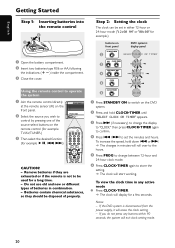
...197;, S, T.) OPEN•CLOSE DISC 1 DISC 2 DISC 3 DISC 4 DISC 5 DISC 1 DISC 2 DISC 3 STANDBY- Using the remote control to operate the system 1 Aim the remote control directly at the remote sensor (iR) on the remote control (for example TV/AV, TUNER.) 3 Then select the desired function (for a few seconds. To increase the speed...: - Do not use old and new or different types of properly. Batteries contain chemical substances, so they are exhausted or if the remote is disconnected from the power supply, it will erase the clock setting. - To view the clock time in combination. -
...197;, S, T.) OPEN•CLOSE DISC 1 DISC 2 DISC 3 DISC 4 DISC 5 DISC 1 DISC 2 DISC 3 STANDBY- Using the remote control to operate the system 1 Aim the remote control directly at the remote sensor (iR) on the remote control (for example TV/AV, TUNER.) 3 Then select the desired function (for a few seconds. To increase the speed...: - Do not use old and new or different types of properly. Batteries contain chemical substances, so they are exhausted or if the remote is disconnected from the power supply, it will erase the clock setting. - To view the clock time in combination. -

User manual
Page 23
... 1 on your TV, then press the Channel down button repeatedly until "DISC X" appears on the display panel (or press DISC/MEDIA on the remote.) 2 Turn on the remote to enter disc mode. ➜ Make sure no MP3 or picture (Kodak, JPEG) disc is compatible with both NTSC and PAL (multisystem.) The...1, 2 DISC/ TV/AV MEDIA TUNER AUX/DI 1 2 3 4 5 6 1 Press DISC/MEDIA on the TV and set the TV to channel 3 or 4 if you see the blue Philips DVD background screen on the TV. ➜ Usually this if the connected TV is compatible with both NTSC and PAL. PAL - Auto - Select this DVD...
... 1 on your TV, then press the Channel down button repeatedly until "DISC X" appears on the display panel (or press DISC/MEDIA on the remote.) 2 Turn on the remote to enter disc mode. ➜ Make sure no MP3 or picture (Kodak, JPEG) disc is compatible with both NTSC and PAL (multisystem.) The...1, 2 DISC/ TV/AV MEDIA TUNER AUX/DI 1 2 3 4 5 6 1 Press DISC/MEDIA on the TV and set the TV to channel 3 or 4 if you see the blue Philips DVD background screen on the TV. ➜ Usually this if the connected TV is compatible with both NTSC and PAL. PAL - Auto - Select this DVD...
User manual
Page 24
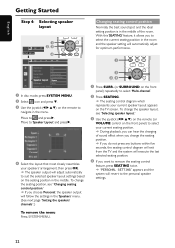
... in the middle of sound effect when you change the speaker layout, see "Selecting speaker layout." 3 Use the joystick (1 2 3 4) on the remote (or VOLUME control on the front panel) to suit the selected speaker layout settings based on the front panel) repeatedly to select 'Multi-channel.' 2...or SURROUND on the seating position in the menu. Personal 4 Select the layout that most closely resembles your current speaker layout appears on the remote to the personal speaker settings. To change the seating position. ➜ If you do not press any buttons within five seconds, the ...
... in the middle of sound effect when you change the speaker layout, see "Selecting speaker layout." 3 Use the joystick (1 2 3 4) on the remote (or VOLUME control on the front panel) to suit the selected speaker layout settings based on the front panel) repeatedly to select 'Multi-channel.' 2...or SURROUND on the seating position in the menu. Personal 4 Select the layout that most closely resembles your current speaker layout appears on the remote to the personal speaker settings. To change the seating position. ➜ If you do not press any buttons within five seconds, the ...

User manual
Page 25
...repeatedly to select 'Multi-channel.' 2 In disc mode, press SYSTEM MENU. 3 Select icon and press 4. 4 Use the joystick (1 2 3 4) on the remote to navigate in the menu. B Delay time settings - Move to 'Menu Language' and press 2. 4 Select a language and press OK. 5 Use the joystick (1 2 ...3 4) on the remote to navigate in the menu. These adjustments may include : A Turning on the remote to language setup page 1 In disc mode, stop playback and press SYSTEM MENU. 2 Select icon and press 4. 3 Use...
...repeatedly to select 'Multi-channel.' 2 In disc mode, press SYSTEM MENU. 3 Select icon and press 4. 4 Use the joystick (1 2 3 4) on the remote to navigate in the menu. B Delay time settings - Move to 'Menu Language' and press 2. 4 Select a language and press OK. 5 Use the joystick (1 2 ...3 4) on the remote to navigate in the menu. These adjustments may include : A Turning on the remote to language setup page 1 In disc mode, stop playback and press SYSTEM MENU. 2 Select icon and press 4. 3 Use...
User manual
Page 26
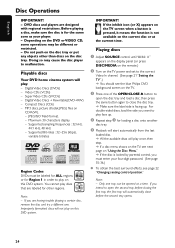
... up . 4 Repeat step 3 for the same zone as your four-digit password. (See page 35-36.) G To obtain the best surround effects, see the blue Philips DVD background screen on CD-R(W). - MP3 discs, picture (Kodak, JPEG) files on the TV. 3 Press one . Supported Bit-rates : 32~256 (kbps), variable ...the same button again to malfunction. Playing discs 1 Adjust SOURCE control until "DISC X" appears on the display panel (or press DISC/MEDIA on the remote.) 2 Turn on the TV power and set to open the second tray before closing the first tray, the first tray will play once, then ...
... up . 4 Repeat step 3 for the same zone as your four-digit password. (See page 35-36.) G To obtain the best surround effects, see the blue Philips DVD background screen on CD-R(W). - MP3 discs, picture (Kodak, JPEG) files on the TV. 3 Press one . Supported Bit-rates : 32~256 (kbps), variable ...the same button again to malfunction. Playing discs 1 Adjust SOURCE control until "DISC X" appears on the display panel (or press DISC/MEDIA on the remote.) 2 Turn on the TV power and set to open the second tray before closing the first tray, the first tray will play once, then ...

User manual
Page 27
Using the Disc Menu Depending on the disc, a menu may not be available on the remote. For VCD with Playback Control (PBC) feature (version 2.0 only) G In stop . Stopping playback G Press Ç. To cancel the resume mode G In stop mode and when ... a power-saving feature, the system will automatically switch to Eco standby mode if you can replace the discs on disc trays 2~5. 25 buttons on the remote, then press ÉÅ or OK to start automatically. ➜ If you load in a track/chapter number. For example, if currently disc tray 1 is playing...
Using the Disc Menu Depending on the disc, a menu may not be available on the remote. For VCD with Playback Control (PBC) feature (version 2.0 only) G In stop . Stopping playback G Press Ç. To cancel the resume mode G In stop mode and when ... a power-saving feature, the system will automatically switch to Eco standby mode if you can replace the discs on disc trays 2~5. 25 buttons on the remote, then press ÉÅ or OK to start automatically. ➜ If you load in a track/chapter number. For example, if currently disc tray 1 is playing...
User manual
Page 30
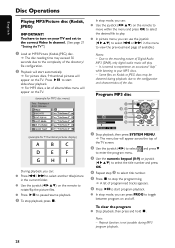
G Press S / T to play . - G Use the joystick (1 2 3 4) on the remote to move within the menu and press OK to select the desired file to select another title/picture in the menu to start automatically. ➜ ... joystick (1 2 3 4) on Kodak or JPEG discs may exceed 30 seconds due to enter the program menu. G In stop playback, press Ç. Some files on the remote to pause/resume playback. 3 To stop mode, you can use the joystick (1 2 3 4) to select S or T in the current folder. Repeat function is normal to experience...
G Press S / T to play . - G Use the joystick (1 2 3 4) on the remote to move within the menu and press OK to select the desired file to select another title/picture in the menu to start automatically. ➜ ... joystick (1 2 3 4) on Kodak or JPEG discs may exceed 30 seconds due to enter the program menu. G In stop playback, press Ç. Some files on the remote to pause/resume playback. 3 To stop mode, you can use the joystick (1 2 3 4) to select S or T in the current folder. Repeat function is normal to experience...

User manual
Page 31
... been modified using a USB connection, further operation is not guaranteed. - G Press S / T to rotate/flip the picture files. G Use the joystick (1 2 3 4) on the remote to select another picture. Do not attach any other material than the supplied label on handling the memory card - Do not bend, drop, disassemble or... (1 2 3 4) to make your player. 3 Adjust SOURCE control until "MEDIA SLOT" appears on the display panel (or press DISC/MEDIA twice on the remote.) 4 Turn on the TV power and set to the correct Video In channel. (See page 21 "Setting the TV".) ➜ If the memory card is...
... been modified using a USB connection, further operation is not guaranteed. - G Press S / T to rotate/flip the picture files. G Use the joystick (1 2 3 4) on the remote to select another picture. Do not attach any other material than the supplied label on handling the memory card - Do not bend, drop, disassemble or... (1 2 3 4) to make your player. 3 Adjust SOURCE control until "MEDIA SLOT" appears on the display panel (or press DISC/MEDIA twice on the remote.) 4 Turn on the TV power and set to the correct Video In channel. (See page 21 "Setting the TV".) ➜ If the memory card is...

User manual
Page 32
... will resume or begin . English DVD Menu Options Using the menu bar You can continue a number of the TV screen. 2 Use the joystick (1 2 3 4) on the remote to navigate in the menu. ➜ Press 1 2 to move within the enlarged picture on the TV. Refer to the jacket or case of the disc...
... will resume or begin . English DVD Menu Options Using the menu bar You can continue a number of the TV screen. 2 Use the joystick (1 2 3 4) on the remote to navigate in the menu. ➜ Press 1 2 to move within the enlarged picture on the TV. Refer to the jacket or case of the disc...


