Leaflet
Page 1
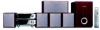
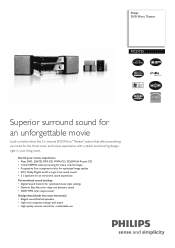
Philips DVD Micro Theater MCD735 Superior surround sound for an unforgettable movie Look no further than this 5.1-channel DVD Micro "Theater" system that offers everything you need for the finest ... experience with a stylish and stunning design right in your interior(s) • Elegant wood-finished speakers • High-end component design with stand • High quality remote control for deep and dramatic sound • 200W RMS total output power Design that blends into your living room. Enrich your movie experience • Plays...
Philips DVD Micro Theater MCD735 Superior surround sound for an unforgettable movie Look no further than this 5.1-channel DVD Micro "Theater" system that offers everything you need for the finest ... experience with a stylish and stunning design right in your interior(s) • Elegant wood-finished speakers • High-end component design with stand • High quality remote control for deep and dramatic sound • 200W RMS total output power Design that blends into your living room. Enrich your movie experience • Plays...
Leaflet
Page 2
... vertical resolution of colors, resulting in a noticeably sharper picture. Instead of Koninklijke Philips Electronics N.V. from low to change without notice. All Rights reserved. Trademarks are ...Control cable, AM/FM Antenna, Audio/Video cable, Quick Use Guide, Guarantee booklet • Remote control: 49-key with no line structure. Issue date 2009-02-12 Version: 1.0.5 12 NC:...when you are written at a low level. or their respective owners. DVD Micro Theater MCD735/37 Specifications Sound • Output Power: Total 200W • Sound Enhancement: Digital ...
... vertical resolution of colors, resulting in a noticeably sharper picture. Instead of Koninklijke Philips Electronics N.V. from low to change without notice. All Rights reserved. Trademarks are ...Control cable, AM/FM Antenna, Audio/Video cable, Quick Use Guide, Guarantee booklet • Remote control: 49-key with no line structure. Issue date 2009-02-12 Version: 1.0.5 12 NC:...when you are written at a low level. or their respective owners. DVD Micro Theater MCD735/37 Specifications Sound • Output Power: Total 200W • Sound Enhancement: Digital ...
User manual
Page 6
... the power cord 13 Optional: Connecting additional equipment 13 Functional Overview DVD player and power amplifier 14~15 Remote control 16~17 Getting Started Step 1: Inserting batteries into the Remote Control 18 Using the Remote Control to operate the Player Step 2: Setting up the TV 18~19 Setting up Progressive Scan feature To...
... the power cord 13 Optional: Connecting additional equipment 13 Functional Overview DVD player and power amplifier 14~15 Remote control 16~17 Getting Started Step 1: Inserting batteries into the Remote Control 18 Using the Remote Control to operate the Player Step 2: Setting up the TV 18~19 Setting up Progressive Scan feature To...

User manual
Page 8
... the system to separate into three materials: cardboard (box), polystyrene foam (buffer) and polyethylene (bags, protective foam sheet). Remote control with 5.1-channel full digital amplifier creates the same dynamic sound qualities that your retailer or Philips. Control cable - AM antenna - English General Information Features Your DVD Micro Theatre with two AAA batteries -
... the system to separate into three materials: cardboard (box), polystyrene foam (buffer) and polyethylene (bags, protective foam sheet). Remote control with 5.1-channel full digital amplifier creates the same dynamic sound qualities that your retailer or Philips. Control cable - AM antenna - English General Information Features Your DVD Micro Theatre with two AAA batteries -
User manual
Page 11
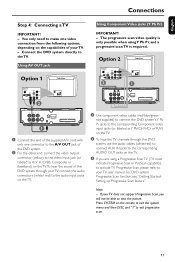
... the other end, connect the video output connector (yellow) to the video input jack (or labeled as Y Pb/Cb Pr/Cr or YUV) on the remote to exit the system menu and then DISC and "1" to the TV.
... the other end, connect the video output connector (yellow) to the video input jack (or labeled as Y Pb/Cb Pr/Cr or YUV) on the remote to exit the system menu and then DISC and "1" to the TV.
User manual
Page 13
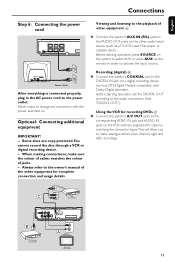
... on the other equipment for recording DVDs C ● Connect the system's A/V OUT jacks to the corresponding VIDEO IN jack and AUDIO IN jacks on the remote in the AC power cord to the power outlet. Optional: Connecting additional equipment IMPORTANT! - Viewing and listening to the playback of jacks. - C VIDEO IN AUDIO...
... on the other equipment for recording DVDs C ● Connect the system's A/V OUT jacks to the corresponding VIDEO IN jack and AUDIO IN jacks on the remote in the AC power cord to the power outlet. Optional: Connecting additional equipment IMPORTANT! - Viewing and listening to the playback of jacks. - C VIDEO IN AUDIO...
User manual
Page 14
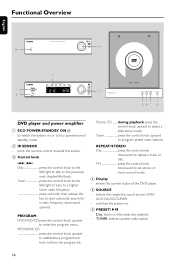
... the left /right to skip to the previous/ next chapter/title/track. Picture CD ........ selects the respective sound source: DVD/ AUX1/AUX2/TUNER. - point the remote control towards this sensor. 3 Control knob 4 / ¢ Disc press the control knob to the left /right to tune to a higher/ lower radio frequency press and...
... the left /right to skip to the previous/ next chapter/title/track. Picture CD ........ selects the respective sound source: DVD/ AUX1/AUX2/TUNER. - point the remote control towards this sensor. 3 Control knob 4 / ¢ Disc press the control knob to the left /right to tune to a higher/ lower radio frequency press and...
User manual
Page 16
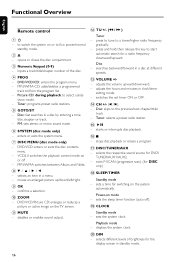
... disc playback. ^9 - sets a time for DISC only) * SLEEP/TIMER Standby mode - Disc: fast searches in a disc at different speeds. # VOLUME +/- - Playback mode - Functional Overview English Remote control 1B - adjusts the volume upward/downward. - DVD/VCD: enters or exits the disc contents menu. - selects different levels of the disc. 4 PROG - to Eco...
... disc playback. ^9 - sets a time for DISC only) * SLEEP/TIMER Standby mode - Disc: fast searches in a disc at different speeds. # VOLUME +/- - Playback mode - Functional Overview English Remote control 1B - adjusts the volume upward/downward. - DVD/VCD: enters or exits the disc contents menu. - selects different levels of the disc. 4 PROG - to Eco...
User manual
Page 17
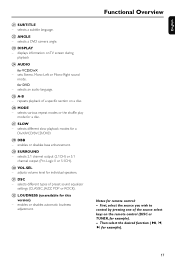
...). - sets Stereo, Mono-Left or Mono-Right sound mode. selects different types of the source select keys on the remote control (DISC or TUNER, for this version) - selects different slow playback modes for remote control: - Functional Overview Notes for a DivX/VCD/SVCD/DVD. • DBB - enables or disables bass enhancement. ª SURROUND...
...). - sets Stereo, Mono-Left or Mono-Right sound mode. selects different types of the source select keys on the remote control (DISC or TUNER, for this version) - selects different slow playback modes for remote control: - Functional Overview Notes for a DivX/VCD/SVCD/DVD. • DBB - enables or disables bass enhancement. ª SURROUND...
User manual
Page 18
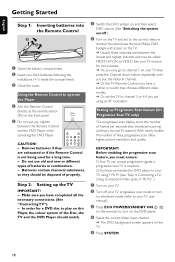
... video-in combination. - Do not use old and new or different types of the Disc, the TV and the DVD Player should see the blue Philips DVD background screen on the front panel. Step 2: Setting up Progressive Scan feature (for Progressive Scan TV only) The progressive scan display twice the number... TV. 2 Turn off "). 2 Turn on the TV and set the TV to turn on interlaced mode (refer to operate the Player 1 Aim the Remote Control directly at the remote sensor STANDBY-ON (IR) on the TV. ➜ Usually these channels are using Y Pb Pr (see the Video In channel. ➜ Or, the...
... video-in combination. - Do not use old and new or different types of the Disc, the TV and the DVD Player should see the blue Philips DVD background screen on the front panel. Step 2: Setting up Progressive Scan feature (for Progressive Scan TV only) The progressive scan display twice the number... TV. 2 Turn off "). 2 Turn on the TV and set the TV to turn on interlaced mode (refer to operate the Player 1 Aim the Remote Control directly at the remote sensor STANDBY-ON (IR) on the TV. ➜ Usually these channels are using Y Pb Pr (see the Video In channel. ➜ Or, the...
User manual
Page 19
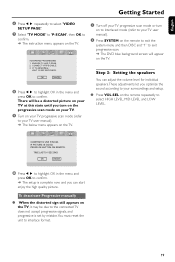
... TV at this state until you can start enjoy the high quality picture. CONFIRM TO USE P-SCAN, IF PICTURE IS GOOD, PRESS OK BUTTON ON REMOTE. To deactivate Progressive manually ● When the distorted sign still appears on the TV, it may be a distorted picture on your surroundings and setup. ●...; Press VOL.SEL on the remote repeatedly to confirm. ➜ The instruction menu appears on the remote to exit the system menu and then DISC and "1" to confirm.
... TV at this state until you can start enjoy the high quality picture. CONFIRM TO USE P-SCAN, IF PICTURE IS GOOD, PRESS OK BUTTON ON REMOTE. To deactivate Progressive manually ● When the distorted sign still appears on the TV, it may be a distorted picture on your surroundings and setup. ●...; Press VOL.SEL on the remote repeatedly to confirm. ➜ The instruction menu appears on the remote to exit the system menu and then DISC and "1" to confirm.

User manual
Page 20
... preference You can select your own preferred language settings.This DVD system will remain once selected. If the language selected is not available on the remote to confirm. 20 To exit from the menu ● Press SYSTEM again.
... preference You can select your own preferred language settings.This DVD system will remain once selected. If the language selected is not available on the remote to confirm. 20 To exit from the menu ● Press SYSTEM again.
User manual
Page 21
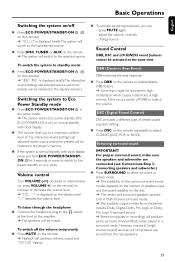
...is displayed on the display panel. change source. DBB (Dynamic Bass Boost) DBB enhances the bass response. ● Press DBB on the remote to the selected source. For proper surround sound, make sure the speakers and subwoofer are connected (see Connections-Step 3: Connecting speakers and subwoofer.)... "MUTING" flashes. ● To activate sound reproduction, you can: - To switch off the volume temporarily ● Press MUTE on the remote. ➜ Playback will not produce any sound from the rear speakers. 21 Basic Operations English Switching the system on/off DBB or reduce the...
...is displayed on the display panel. change source. DBB (Dynamic Bass Boost) DBB enhances the bass response. ● Press DBB on the remote to the selected source. For proper surround sound, make sure the speakers and subwoofer are connected (see Connections-Step 3: Connecting speakers and subwoofer.)... "MUTING" flashes. ● To activate sound reproduction, you can: - To switch off the volume temporarily ● Press MUTE on the remote. ➜ Playback will not produce any sound from the rear speakers. 21 Basic Operations English Switching the system on/off DBB or reduce the...

User manual
Page 23
... DVD system.You cannot play on the current disc or at the current time. ALL 1 Note: - Digital Video Discs (DVDs) - Do not push on the remote) to play : - title/album name -12 characters Max. Depending on the DVD or VIDEO CD, some operations may cause the disc player malfunction. - DivX(R) disc... on CDR(W) - Compact Discs (CDs) - MP3 track number is 999. • Supported sampling frequencies for other than disc on the TV, see the blue Philips DVD background screen on the TV. 4 Press OPEN•CLOSE to open the disc tray and load in order to stop playback. 23
... DVD system.You cannot play on the current disc or at the current time. ALL 1 Note: - Digital Video Discs (DVDs) - Do not push on the remote) to play : - title/album name -12 characters Max. Depending on the DVD or VIDEO CD, some operations may cause the disc player malfunction. - DivX(R) disc... on CDR(W) - Compact Discs (CDs) - MP3 track number is 999. • Supported sampling frequencies for other than disc on the TV, see the blue Philips DVD background screen on the TV. 4 Press OPEN•CLOSE to open the disc tray and load in order to stop playback. 23
User manual
Page 24
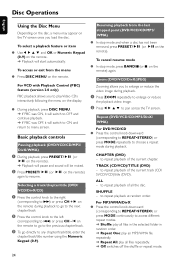
.... 24 Basic playback controls Pausing playback (DVD/VCD/CD/MP3/ DivX/WMA) 1 During playback, press PRESET/ÉÅ (or ÉÅ on the remote). ➜ Playback will pause and sound will switch to ON and return to resume. to repeat playback at random order. ALL - SHUFFLE - to repeat... current track (CD/ SVCD/VCD)/title (DVD). To select a playback feature or item ● Use 1 2 3 4 and OK or Numeric Keypad (0-9) on the remote. Selecting a track/chapter/title (DVD/ VCD/DivX/CD) 1 Press the control knob to the right (corresponding to T) or press CH + ™ on the...
.... 24 Basic playback controls Pausing playback (DVD/VCD/CD/MP3/ DivX/WMA) 1 During playback, press PRESET/ÉÅ (or ÉÅ on the remote). ➜ Playback will pause and sound will switch to ON and return to resume. to repeat playback at random order. ALL - SHUFFLE - to repeat... current track (CD/ SVCD/VCD)/title (DVD). To select a playback feature or item ● Use 1 2 3 4 and OK or Numeric Keypad (0-9) on the remote. Selecting a track/chapter/title (DVD/ VCD/DivX/CD) 1 Press the control knob to the right (corresponding to T) or press CH + ™ on the...
User manual
Page 25
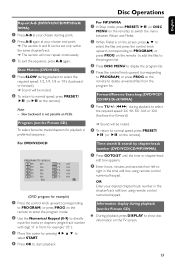
... WMA) 1 Press A-B at your chosen starting point. 2 Press A-B again at your desired chapter/track number in the chapter/track edit box using remote control numerical keypad. Slow backward is on the screen, press 3 4 to select the files and press the control knob upward (corresponding to PROGRAM) or... SLOW during playback to PROGRAM) or press PROG on VCDs. For DVD/VCD/CD (DVD program for playback in the time edit box using remote control numerical keypad. Program (not for Picture CD) To select favourite tracks/chapters for example) 1 Press the control knob upward (corresponding to ...
... WMA) 1 Press A-B at your chosen starting point. 2 Press A-B again at your desired chapter/track number in the chapter/track edit box using remote control numerical keypad. Slow backward is on the screen, press 3 4 to select the files and press the control knob upward (corresponding to PROGRAM) or... SLOW during playback to PROGRAM) or press PROG on VCDs. For DVD/VCD/CD (DVD program for playback in the time edit box using remote control numerical keypad. Program (not for Picture CD) To select favourite tracks/chapters for example) 1 Press the control knob upward (corresponding to ...

User manual
Page 27
Disc Operations English Playback selection During playback, you can : ● Press the control knob to the left /right (corresponding to S/T ) or press CH on the remote. ● Use 1 2 3 4 to view the zoomed picture. 27 Zoom picture (JPEG) ● During playback, press ZOOM repeatedly to display the picture with different.../ "Slide Show" and press OK to highlight one of the current folder or the whole disc. 1 Press BAND/9 (or 9 on the remote to switch between Album and Filelist. To display the other pictures on the previous/next page ● Press the control knob to the left /...
Disc Operations English Playback selection During playback, you can : ● Press the control knob to the left /right (corresponding to S/T ) or press CH on the remote. ● Use 1 2 3 4 to view the zoomed picture. 27 Zoom picture (JPEG) ● During playback, press ZOOM repeatedly to display the picture with different.../ "Slide Show" and press OK to highlight one of the current folder or the whole disc. 1 Press BAND/9 (or 9 on the remote to switch between Album and Filelist. To display the other pictures on the previous/next page ● Press the control knob to the left /...
User manual
Page 28
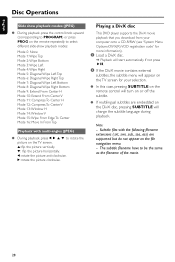
...disc This DVD player supports the DivX movie playback that you download from your selection. ● In this case, pressing SUBTITLE on the remote control will turn on or off the subtitle. ● If multilingual subtitles are supported but do not appear on the file navigation menu... English Disc Operations Slide show playback modes (JPEG) ● During playback, press the control knob upward (corresponding to PROGRAM) or press PROG on the remote repeatedly to select different slide-show playback modes: Mode 0: None Mode 1: Wipe Top Mode 2: Wipe Bottom Mode 3: Wipe Left Mode 4: Wipe Right...
...disc This DVD player supports the DivX movie playback that you download from your selection. ● In this case, pressing SUBTITLE on the remote control will turn on or off the subtitle. ● If multilingual subtitles are supported but do not appear on the file navigation menu... English Disc Operations Slide show playback modes (JPEG) ● During playback, press the control knob upward (corresponding to PROGRAM) or press PROG on the remote repeatedly to select different slide-show playback modes: Mode 0: None Mode 1: Wipe Top Mode 2: Wipe Bottom Mode 3: Wipe Left Mode 4: Wipe Right...

User manual
Page 36
... clock 1 In Standby mode, press and hold the control knob to the left/right (corresponding to S/T) or TU +/- à/ á on the remote until the frequency indication starts to change, then release. ➜ The system automatically tunes to the next strong radio station. ● To tune to a... weak station, press the control knob to the left/right (corresponding to confirm the clock setting. on the remote to set the minutes. 5 Press CLOCK again to S/ T) or TU +/- à/ á on the display screen. 2 Turn VOLUME -/+ clockwise or ...
... clock 1 In Standby mode, press and hold the control knob to the left/right (corresponding to S/T) or TU +/- à/ á on the remote until the frequency indication starts to change, then release. ➜ The system automatically tunes to the next strong radio station. ● To tune to a... weak station, press the control knob to the left/right (corresponding to confirm the clock setting. on the remote to set the minutes. 5 Press CLOCK again to S/ T) or TU +/- à/ á on the display screen. 2 Turn VOLUME -/+ clockwise or ...

User manual
Page 37
... to confirm the time setting. ➜ "OFF" flashes on the display screen. 6 Turn VOLUME -/+ clockwise or anticlockwise or press VOLUME -/+ on the remote to select "ON". ➜ icon appears on the display screen. Before setting the timer, ensure that the clock is set correctly. 1 Press and hold... is displayed briefly.Then, the hour digits flash on the display screen. 2 Turn VOLUME -/+ clockwise or anticlockwise or press VOLUME -/+ on the remote to set the hours. 3 Press SLEEP/TIMER to set time. English Other Functions Setting sleep/wake-up timer setting IMPORTANT! - To deactivate the ...
... to confirm the time setting. ➜ "OFF" flashes on the display screen. 6 Turn VOLUME -/+ clockwise or anticlockwise or press VOLUME -/+ on the remote to select "ON". ➜ icon appears on the display screen. Before setting the timer, ensure that the clock is set correctly. 1 Press and hold... is displayed briefly.Then, the hour digits flash on the display screen. 2 Turn VOLUME -/+ clockwise or anticlockwise or press VOLUME -/+ on the remote to set the hours. 3 Press SLEEP/TIMER to set time. English Other Functions Setting sleep/wake-up timer setting IMPORTANT! - To deactivate the ...


